Transcription
eForms TutorialWelcome to etrieve eForms, our platform for submission of electronic forms.Multiple departments at College of the Redwoods use this platform for thesubmission of forms. This tutorial was created by the Financial Aid Department and therefore the tutorial may have an emphasis on financial aid specific forms. Please contact the department requesting the submission of aneForm for more information or questions.Note: text displayed in blue are links.Table of ContentsGetting Started:How to Login into eFormsTroubleshooting Login IssuesAssistance with Login IssuesPage:123How To:Navigate eFormsKnow which eForms to submitSubmit a eFormSubmit a eForm with AttachmentsUse the Additional Documents eFormCheck the status of your submitted eFormAccess a returned eFormNavigate the Mobile MenuLogout of eForms46791214151718[0]
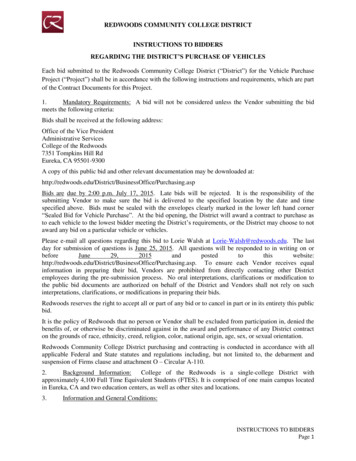
eForms TutorialAccess eForms at: https://eforms.redwoods.eduLogging in. Easy as 1.2.3.123This is the eForms login screenwhich can be accessed athttps://eforms.redwoods.edu,this is where students will sign into eForms by using theirmycr.redwoods.edu emailaccount.1. Students will need to click theGoogle icon below the buttonthat says “Sign In”.2. Students will input theirfull student email address,which is comprised of their firstinitial, their last name, the last 3digits of their student ID numberand @mycr.redwoods.edu.3. The student will then beprompted for their student emailpassword.[1]
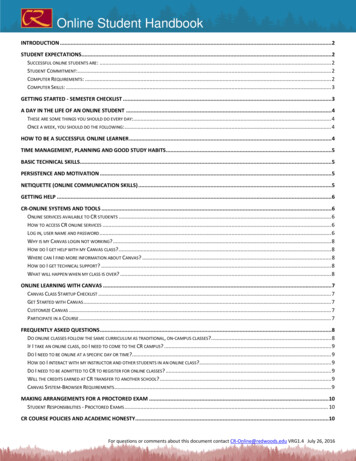
Login Issue?Error message when trying tolog in?This error occurs when a studenthas a single personal google account already logged into on theirweb browser. eForms is trying tologin automatically with that singlepersonal gmail account.Solution:1. Go to https://redwoods.edu2. Click on “Student Email” at theupper left hand corner.3. Log into your student email.4. Log into eForms using the linksprovided in the financial aidemails, myFinAid, orat: https://eforms.redwoods.eduThis process ensures that eFormsdoes not try to use a personalgoogle account.[2]
Login Issue AssistanceNeed Help?Visit our student services page anddrop into our welcome center athttps://www.redwoods.edu/servicesor contact the department you aretrying to submit an eForm for.Contact the Student Technology AssistantAlternatively you can contact our student technology assistant if you are not able to drop intoour welcome center or can’t resolve the eForm login issue on your own.Student Technology AssistantEmail: tech-helpline@redwoods.eduCall: 707-476-4225Department Contacts for Certain eForms:Admissions & RecordsFinancial AidVeteransEmail: ambassador@redwoods.eduEmail: finaid@redwoods.eduEmail: veterans@redwoods.eduPhone: 707-476-4200Phone: 707-476-4182Phone: 707-476-4110[3]
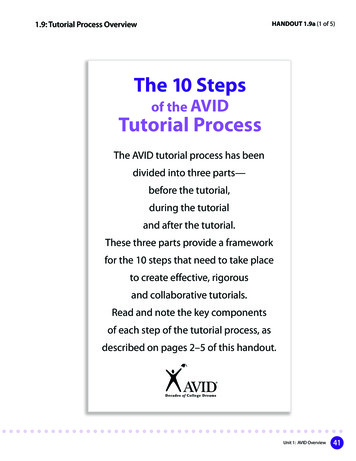
Navigating eFormsAfter logging into eForms, aloading screen will appear:“Loading Etrieve Central”Please be patient as the eFormmodule loads.Once the eForms module loads,the student will see a variety ofoptions, such as Inbox,Activity, Forms and Drafts.Inbox: Students can click on“Inbox” to access any returnedeForms that need correcting orresubmitting. See the “ReturnedeForms” section of the tutorialto learn more.Students should periodicallycheck their eForms inbox.[4]
Activity: Students can click on“Activity” to review the status ofsubmitted forms as they movethrough the process.Students should periodicallycheck the activity of their forms toknow if they have been receivedand reviewed.Forms: Students can click on“Forms” to access all required andoptional eForms.Financial Aid Students shouldcheck their myFinAid in WebAdvisor, their student email account orthe eForm checklist for information about which forms they needto submit to complete their financial aid file.Drafts: Students can click on“Drafts” to access their unfinishedforms.Students who start a form, but areunable to finish in one sitting, canresume their forms by clicking ondrafts and selecting the unfinishedform.[5]
Determining which eForms to SubmitCheck Student EmailMany departments will inform students via their student email regarding the submission of required eForms.Check WebAdvisorSome departments' requiredeForms will be posted onWebAdvisor.Check eFormsSome departments will have theirrequired eForms on a checklistfound in eForms at the very top.Contact the DepartmentIf you are unsure of which eForms you need to submit, please contact the department formore information. Submitting unnecessary eForms may delay processing.Visit: https://www.redwoods.edu or Call: 707-476-4100 to find contact information for thedepartment.[6]
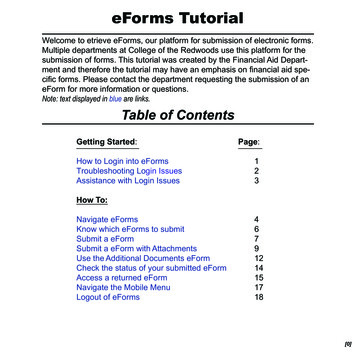
Submitting an eFormStep 1.Click on “Forms” to access optional and required forms.If applicable, a student’s eFormschecklist can also be found here.Step 2.Click on the form you need to fillout.The form will display the title, purpose, your CR ID and Name.Step 3.Click on the Academic Year boxand select the academic year forwhich you are filling out the form.[7]
Step 4.Fill out the form according to thedirections provided on the form.Some eForms have skip logic builtin, so as you answer questions,the form may adjust.Some eForms require attachments, see page 9Step 5.Once the form has been filled out,click on “Submit” to submit theform.Step 6.You will see a “Submitted Form”message displayed after clickingon submit.[8]
Submitting eForms with AttachmentsStep 1.Fill out the form according to thedirections.Note: Some forms have links tofillable PDFs that will need to befilled out and attached.Attention:Forms that require an attachmentwill not submit until the studentattaches the required document.The student will receive two errormessages: “You must attach documentation” and “Form is notsubmittable.”Step 2.Click on the “Attachments” buttonto open the attachments optionbox.Then click on “Upload File(s)” toopen the File Upload dialog box.[9]
Step 3.Use the File Upload dialog box tonavigate and select the file youwant to upload and attach to youreForm.Click “Open” to upload the file andattach.Warning:The only file types allowed are:.PDF, .Jpg, .Jpeg, .Tif, .Tiff, .xps,.bmp, & .gifWord Documents and PasswordProtected PDFs are Not AllowedStep 4.Options ButtonYou will see your document attached. If you need to delete yourattachment, use the optionsbutton directly to the right of theattachment name.Once attachment has been uploaded, click the “Submit” button.[10]
Step 5.A “Submitted Form” message toindicate that the form has beensuccessfully submitted.How to Convert a Paper Document to DigitalTo submit a document that is in paper format, students may use a scanner or a camera on asmart phone. Please check with the office in which you are submitting a paper document for, toensure that it may be submitted electronically. Some laws require certain forms to have a “wet”signature and paper submission may be the only option.Scanner Use:Students may access scanners on all campuses and sites of College of the Redwoods. Scanners are located in the libraries and student services offices. Please contact the campus or sitefor more information, including hours of operation and availability.Smart Phone Camera:Students may use the camera from a smart phone to take a clear photo of the paper documentthat needs to be submitted. Students may use the smart phone to access, take/upload photosof documents, and to submit eForms.[11]
Using the Additional Documents eFormPurpose:Need to upload and send us something?The “Additional Documents” eForm allows students who need to submit a document to theFinancial Aid Office that isn’t a form or cannot be submitted with any of our current forms.DO NOT SEND AN EMAIL WITH AN ATTACHMENT: please use the Additional Documents eForm to upload and send us documents.Step 1:Click on “Forms” to access allavailable forms.Then locate the:“Additional Documents”Step 2.Click on the “Additional Documents” to open the form.[12]
Step 3.Select the academic year you aresubmitting for.Not sure what year? Please contact the Office of the eForm.Step 4:Click on the “Additional Info” textarea and leave a brief statementabout the attachment you are submitting.Step 5.Use the “Attachments” button toselect and upload a file.Use the “Submit” button to submitattachment.[13]
Understanding Your eForm StatusAfter Submitting a FormOnce you have submitted a Form,students can click on “Activity”and view the current status of thatform.Financial Aid eForms: Pleaseallow 1-2 weeks after submissionfor forms to be fully accepted andtracked.Lets take a closer lookStatus: “In Progress”After clicking on “Activity” you willsee forms that are labeled “InProgress” this means you havesubmitted the form and the form iswaiting to be looked at by OfficeStaff.Status: “Ended”If the student’s form has a statusof “Ended” this means the formhas been accepted by Office Staff.Lets take a closer lookFinancial Aid eForms: The Formwill then be tracked into the student’s file and will show up as received in myFinAid.[14]
Returned eFormsPurpose:The eForm inbox allows Office Staff to return an eForm when there is something wrongwith the form.Students will receive an eForm back with a history comment letting the student know what’swrong with the form. The student can make corrections to the form and resubmit.The form will remain in the student’s inbox until corrected and resubmittedInboxWhen a student has a returnedeForm, the inbox will display anumber which indicates theamount of returned forms.Note: this notification number willnot change until the form hasbeen resubmitted.Viewing the Returned FormStudents can click on the eFormto view and make any correctionsthat are needed.Comments by the Staff can befound in “History.” A notificationsymbol will let the student knowthere is comment.[15]
HistoryA student can click “History,” toaccess the history of the form including any comments by Staff.A student can see when they submitted the form, the comment, andwhen the form was returned.Student Email MessageWhen a form is returned, the student will also receive a studentemail letting them know that aform was returned.The email will include a commentby Staff and a link to the returnedform.Email LinkWhen the student clicks the link intheir student email, they will bedirected to log into eForm.Once logged into eForms, the student will be redirected to the particular form in their inbox for reviewing and resubmission.[16]
Navigating Mobile MenuMain MenuForms PageStudents can click onany of the options toview them.Students can viewforms and select theform they need to fillout.To log off of eFormsstudents will need toclick on the menu expander and select “SignOut.”Students can use theback arrow to return tothe main menu.FormsSubmissionForms will display asnormal. Students willneed to make sure toscroll through and fillout the form fully.After selecting “Submit”a student will see asubmission messagethat says “SubmittedForm.”Students can use the“Submit” button tosubmit their form.[17]
Logging out of eFormsStep 1.Click on the menu expander in theupper right-hand corner.Step 2.The eForm menu will expand.Click on “Sign Out” to sign out ofeForms.Step 3.If the student signs out successfully they will see a message thatsays “You are now logged out.”Students can click on the “LogBack In” button to return to theeForms login screen.[End]
Visit: https://www.redwoods.edu or Call: 707-476-4100 to find contact information for the department. Check Student Email Many departments will inform stu-dents via their student email re-garding the submission of re-quired eForms. Check WebAdvisor Some departments' required eForms will be posted on WebAdvisor. Check eForms