Transcription
Valley-Wide Health Systems, Inc. NextGen EPMQuick Reference
NEXTGEN EPMValley-Wide Health Systems, Inc.Support Staff Quick ReferenceNew Patient Check-in—Adding Demographic Information from PIF . 3New Patient Check-in—Adding UDS Information from PIF . 4New Patient Check-in—Chart Details . 5Check-in—Create Encounter . 6Table of ContentsTable of ContentsCheck-in AutoFlow—Verifying Demographic Information . 7Check-in AutoFlow—Privacy Notice Information . 8Check-in AutoFlow—Client Defined Information . 9Check-in AutoFlow—UDS Information. 10Check-in AutoFlow—Add Insurance when Patient Is Subscriber . 11Check-in AutoFlow—Add Insurance - Other Person is Subscriber . 13Check-in AutoFlow—Add Insurance - Multiple Insurance . 15Check-in AutoFlow—Attach Insurance Not in System. 17Check-in AutoFlow—Adolescent Health—Guarantor & Insurance . 19Check-in AutoFlow—Insurance Card Scanning . 21Check-in AutoFlow—Patient with No Insurance . 23Check-in AutoFlow—Chart Details & Printing Labels . 24Look Up Patient’s Appointments . 25Generate List of Tomorrow’s Appointments for Confirmations . 25Adding Blood Draw Ordered During Provider Visit . 26Scheduling—New Patient Appointment . 27Scheduling—Established Patient Appointment . 29Creating an Encounter for Patient without Appointment . 31View Patient’s Chart . 32Only enter data into boxes indicated above—do not add data where NOT specifiedNGSupportPicRefs0011
Quick ReferenceValley-Wide Health Systems, Inc.NEXTGEN EPMNew Patient Check-in 2009 Valley-Wide Health Systems. All Rights Reserved.Confidential and Proprietary information. This document may not be disclosed or copied without prior written permission.Products, brand names, trademarks, and service-marks are the property of their respective owners.Only enter data into boxes indicated above—do not add data where NOT specified2NGSupportPicRefs001
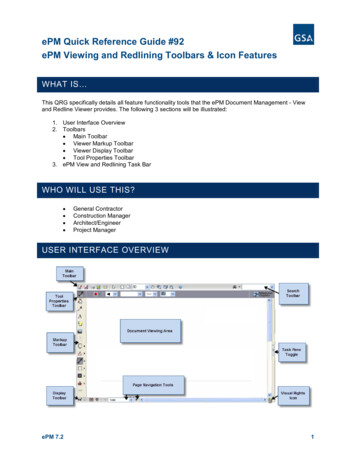
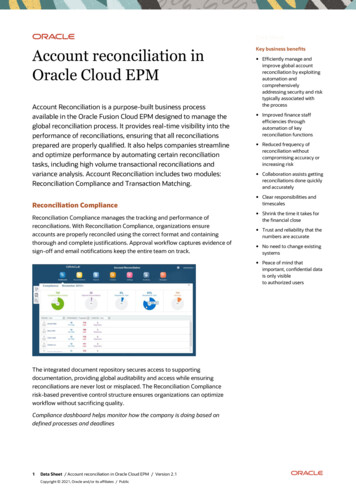
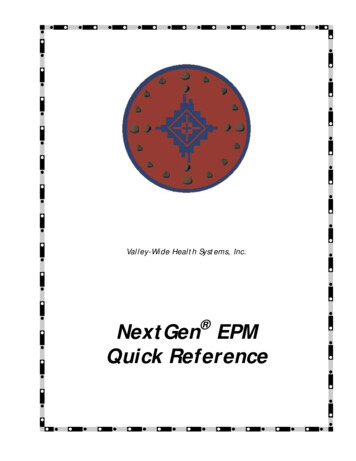
NEXTGEN EPMValley-Wide Health Systems, Inc.Support Staff Quick ReferenceNew Patient Check-in—Adding Demographic Information from PIFNames and addresses:DO NOT USE SYMBOLS orPUNCTUATION (exceptperiod) in address.Use a space instead.Mailing Address Billing Address if different than PhysicalAddress; then physical addresswould be Secondary Address.If only one address listed, putthat as Billing Address.New Patient Check-in—Adding Demographic Information from PIFIf a patient does nothave or does not disclose their SSN, useall 9s:999-999-9999After typing Street, pressTAB key twice and type ZIPcode to auto-fill the City,State, and County.Use Alternate Phone forEmergency Contact information. Put Contact nameand relation in CommentClick Chart button to create a chart for the newpatient after all requiredinformation is filled infrom PIFDon’t forget UDS page!Only enter data into boxes indicated above—do not add data where NOT specifiedNGSupportPicRefs0013
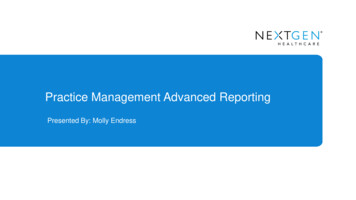
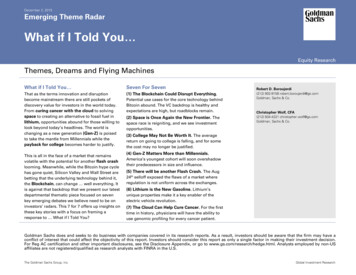
Quick ReferenceValley-Wide Health Systems, Inc.NEXTGEN EPMNew Patient Check-in—Adding UDS Information from PIFNew Patient Check-in—Adding UDS Information from PIFBasic Patient Information atthe top of the page remainsfor Demographics, UDS, Client Defined and Privacypages.The UDS page records data we report to the Federal Government for funding. Primary MedicalCoverage is for reporting and DOES NOT attachinsurance for the current Encounter. (SelectNONE from list if patient is Self Pay). DO NOTCLICK Self Pay box.Click Chart button to create a chart for the newpatient after all requiredinformation is filled infrom PIF.Only enter data into boxes indicated above—do not add data where NOT specified4NGSupportPicRefs001
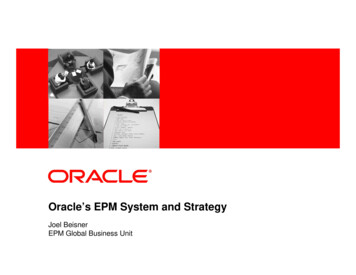
NEXTGEN EPMValley-Wide Health Systems, Inc.Support Staff Quick ReferenceNew Patient Check-in—Chart DetailsNew Patient Check-in—Chart DetailsOnly boxes to update arePIF Updated and PatientHandbook. Type in the current date using full dateformat: MM/DD/YYYY.Please use slashesClick OK to continuechecking patient in, tocreate Encounter.Only enter data into boxes indicated above—do not add data where NOT specifiedNGSupportPicRefs0015
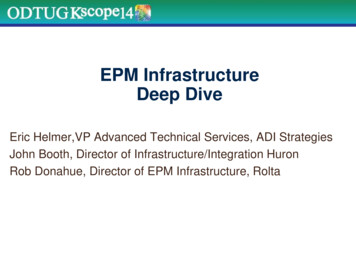
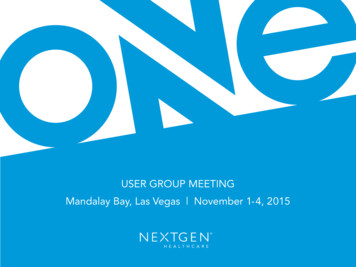
Quick ReferenceValley-Wide Health Systems, Inc.NEXTGEN EPMCheck-in—Create EncounterCheck-in—Create EncounterIf Rendering provider is amid-level, choose theirSupervisor from the list.Guarantor adult who willbe responsible for payingfor charges for THIS encounter (in case insurancedoes not pay). All Minors*must have an adult(Person) as GuarantorFor Nurse Visits and DentalHygienists, choose Rendering and put clinic nurse orhygienist in First Consulting box (i.e. CCFMC Nurse)- type first few letters ofclinic nurse/hygienist nameto locate in list. If Resident, they are First Consulting and hygienist is Second Consulting.Click OK to continuechecking patient in, tobegin AutoFlow*the only exception is for an Adolescent Care visit—minor will be Guarantor in that case ONLYOnly enter data into boxes indicated above—do not add data where NOT specified6NGSupportPicRefs001
NEXTGEN EPMValley-Wide Health Systems, Inc.Support Staff Quick ReferenceCheck-in AutoFlow—Verifying Demographic InformationCheck-in AutoFlow—Verifying Demographic InformationVerify Demographic information with patient or if enteredfor new patient, verify thatinformation was entered correctly from PIF.Click AutoFlow buttonafter verifying Demographic information, to goto next page:Privacy Notice.Only enter data into boxes indicated above—do not add data where NOT specifiedNGSupportPicRefs0017
Quick ReferenceValley-Wide Health Systems, Inc.NEXTGEN EPMCheck-in AutoFlow—Privacy Notice InformationCheck-in AutoFlow—Privacy Notice InformationIf patient has signed PrivacyNotice in chart, type dates fromform and choose Signed in Privacy Notice Reason list. Put intoday’s date and Privacy NoticeReason if new patient.Click AutoFlow buttonafter verifying PrivacyNotice information, to goto next page:Client-Defined.Only enter data into boxes indicated above—do not add data where NOT specified8NGSupportPicRefs001
NEXTGEN EPMValley-Wide Health Systems, Inc.Support Staff Quick ReferenceCheck-in AutoFlow—Client Defined InformationCheck-in AutoFlow—Client Defined InformationChoose Declined Disclosure ifpatient checked box to declineto disclose Family Size and Income on PIF.Choose Voter Registrationstatus.Choose Medical Home (MedicalProvider group).Click AutoFlow buttonafter verifying Client Defined information, to goto next page: UDS.Only enter data into boxes indicated above—do not add data where NOT specifiedNGSupportPicRefs0019
Quick ReferenceValley-Wide Health Systems, Inc.NEXTGEN EPMCheck-in AutoFlow—UDS InformationCheck-in AutoFlow—UDS InformationUDS page records data we report to the Federal Government for funding. Primary Medical Coverage is for reporting and DOES NOT attach insurance for the current Encounter. (Select NONE from list if patient is Self Pay). DONOT CLICK Self Pay box.Click AutoFlow buttonafter verifying UDS information, to go to nextpage:Insurance Selection.Only enter data into boxes indicated above—do not add data where NOT specified10NGSupportPicRefs001
NEXTGEN EPMValley-Wide Health Systems, Inc.Support Staff Quick ReferenceCheck-in AutoFlow—Add Insurance when Patient Is Subscriber (pg 1 of 2)Check-in AutoFlow—Add Insurance when Patient is SubscriberClick Patient in list; thenright-click and select NewInsurance.Type a few letters of theInsurance name in PayerName box and click Findto lookup insurance inNextGen. Then doubleclick Insurance in list.Only enter data into boxes indicated above—do not add data where NOT specifiedNGSupportPicRefs00111
Quick ReferenceValley-Wide Health Systems, Inc.NEXTGEN EPMCheck-in AutoFlow—Add Insurance when Patient is SubscriberCheck-in AutoFlow—Add Insurance when Patient Is Subscriber (pg 2 of 2)Click Ins Cards tab to scanthe insurance card for theinsurance. See InsuranceCard Scanning on page 21& 22.Type information fromInsurance card into fieldson Detail page—HIC/Policy Nbr is typically theSubscriber Number or ID.Click OK button wheninsurance information hasbeen added and insurancecard has been scanned.Insurance has been addedand is applied for thisencounter by selecting iton left and clicking rightarrow to add to right sideof screen.Click AutoFlow button tocontinue.Only enter data into boxes indicated above—do not add data where NOT specified12NGSupportPicRefs001
NEXTGEN EPMValley-Wide Health Systems, Inc.Support Staff Quick ReferenceCheck-in AutoFlow—Add Insurance - Other Person is Subscriber (pg 1 of 2)Check-in AutoFlow—Add Insurance - Other Person is SubscriberClick card-holder’s namein list; then right-click andselect New Insurance.If card-holder is not in list,right-click and add NewRelation, then add NewInsurance for card-holder.Type a few letters of theInsurance name in PayerName box and click Findto lookup insurance inNextGen. Then doubleclick Insurance in list.Only enter data into boxes indicated above—do not add data where NOT specifiedNGSupportPicRefs00113
Quick ReferenceValley-Wide Health Systems, Inc.NEXTGEN EPMCheck-in AutoFlow—Add Insurance - Other Person is SubscriberCheck-in AutoFlow—Add Insurance - Other Person is Subscriber (pg 2 of 2)Click Ins Cards tab to scanthe insurance card for theinsurance. See InsuranceCard Scanning on page 21& 22.Type information fromInsurance card into fieldson Detail page—HIC/Policy Nbr is typically theSubscriber Number or ID.Click OK button wheninsurance information hasbeen added and insurancecard has been scanned.Insurance has been addedand is applied for thisencounter by selecting iton left and clicking rightarrow to add to right sideof screen.Click AutoFlow button tocontinue.Only enter data into boxes indicated above—do not add data where NOT specified14NGSupportPicRefs001
NEXTGEN EPMValley-Wide Health Systems, Inc.Support Staff Quick ReferenceCheck-in AutoFlow—Add Insurance - Multiple Insurance (pg 1 of 2)Check-in AutoFlow—Add Insurance - Multiple InsuranceClick Patient in list; thenright-click and select NewInsurance.Type a few letters of theInsurance name in PayerName box and click Findto lookup insurance inNextGen. Then doubleclick Insurance in list.Only enter data into boxes indicated above—do not add data where NOT specifiedNGSupportPicRefs00115
Quick ReferenceValley-Wide Health Systems, Inc.NEXTGEN EPMCheck-in AutoFlow—Add Insurance - Multiple Insurance (pg 2 of 2)Check-in AutoFlow—Add Insurance - Multiple InsuranceClick Ins Cards tab to scanthe insurance card for theinsurance. See InsuranceCard Scanning on page 21& 22.Type information fromInsurance card into fieldson Detail page—HIC/Policy Nbr is typically theSubscriber Number or ID.Click OK button wheninsurance information hasbeen added and insurancecard has been scanned.Repeat the steps above to add insurance to the patient for the second insurance held bythe patient. If additional insurance is held by a relation, follow the instructions for Adding Insurance—Other Person is Subscriber on page 13 and 14.Selected Insurance for the Encounter shouldbe added in the order of billing: Primary in thelist first, followed by Secondary and Tertiary.Select the insurance name in the list on theleft and click the right arrow to add it for theencounter, on the right.Click AutoFlow button tocontinue.Only enter data into boxes indicated above—do not add data where NOT specified16NGSupportPicRefs001
NEXTGEN EPMValley-Wide Health Systems, Inc.Support Staff Quick ReferenceCheck-in AutoFlow—Attach Insurance Not in System (pg 1 of 2)Check-in AutoFlow—Attach Insurance Not in SystemUse the following method to add insurance for an encounter/patient ONLY if theinsurance is NOT in our list of Insurance Payers.Click Patient/Relation inlist; then right-click andselect New Insurance.Type a few letters of theInsurance name in PayerName box and click Find tolookup insurance inNextGen. If Insurance NOTFOUND Continue below.Type scan in PayerName box and click Findto lookup “Scanned Card”insurance in NextGen.Then double-clickScanned Card in list.Only enter data into boxes indicated above—do not add data where NOT specifiedNGSupportPicRefs00117
Quick ReferenceValley-Wide Health Systems, Inc.NEXTGEN EPMCheck-in AutoFlow—Attach Insurance Not in System (pg 2 of 2)Check-in AutoFlow—Attach Insurance Not in SystemClick Ins Cards tab to scanthe insurance card for theinsurance. See InsuranceCard Scanning on page 21& 22. Be sure scannedcard is clear!Type information fromInsurance card into fieldson Detail page—HIC/Policy Nbr is typically theSubscriber Number or ID.Click OK button wheninsurance information hasbeen added and insurancecard has been scanned.Scanned Card Insurance has been added andis applied for this encounter by selecting it onleft and clicking right arrow to add to rightside of screen. Billing Department will reviewinsurance card information.Click AutoFlow button tocontinue.Only enter data into boxes indicated above—do not add data where NOT specified18NGSupportPicRefs001
NEXTGEN EPMValley-Wide Health Systems, Inc.Support Staff Quick ReferenceCheck-in AutoFlow—Adolescent Health—Guarantor & Insurance (pg 1 of 2)Choose Self as Guarantoron Create Encounterscreen. Then click Yes toconfirm setting Guarantoras minor.On the UDS page, indicate thepatient’s Primary Medical Coverage as Adolescent HealthConfidential.Check-in AutoFlow—Adolescent Health—Guarantor & InsuranceIf an adolescent comes in and does not wish parents to be billed or know about an appointment, we set themas Guarantor for the encounter and set the Insurance selection so that their parents or insurance are not billed.Click Patient in list, thenright-click and select NewInsurance.Type a few letters of Adolescent Health in Payer Name boxand click Find to look up inNextGen. Then double-clickAdolescent Health in list.Only enter data into boxes indicated above—do not add data where NOT specifiedNGSupportPicRefs00119
Quick ReferenceValley-Wide Health Systems, Inc.NEXTGEN EPMCheck-in AutoFlow—Adolescent Health—Guarantor & InsuranceCheck-in AutoFlow—Adolescent Health—Guarantor & Insurance (pg 2 of 2)Click OK button withoutentering any data on Insurance Maintenance orIns Cards page.Remove parent’s insurance: Selectparent’s insurance on RIGHT sideand click LEFT arrow to remove insurance for this encounter.Add Adolescent Health as“insurance” for this encounter by selecting it on leftand clicking right arrow toadd to right side of screen.Click AutoFlow button tocontinue.Only enter data into boxes indicated above—do not add data where NOT specified20NGSupportPicRefs001
NEXTGEN EPMValley-Wide Health Systems, Inc.Support Staff Quick ReferenceCheck-in AutoFlow—Insurance Card Scanning (pg 1 of 2)Check-in AutoFlow—Insurance Card ScanningBe sure Visioneer RoadWarrior andShow Camera/Scanner Interfaceoptions are checked. Then clickAcquire.Only enter data into boxes indicated above—do not add data where NOT specifiedNGSupportPicRefs00121
Quick ReferenceValley-Wide Health Systems, Inc.NEXTGEN EPMCheck-in AutoFlow—Insurance Card Scanning (pg 2 of 2)Check-in AutoFlow—Insurance Card ScanningGrayscale and AutoCrop toOriginal must be chosenfor best image scanning.Insert card and click Scan.Don’t forget to scanthe Back of the card!Click OK button wheninsurance card has beenscanned. And click OK outof Insurance window.Be sure scanned card is clear! If you can’t read it, likely no one else can either. Rescan distorted or un-clear images of cards.Only enter data into boxes indicated above—do not add data where NOT specified22NGSupportPicRefs001
NEXTGEN EPMValley-Wide Health Systems, Inc.Support Staff Quick ReferenceCheck-in AutoFlow—Patient with No Insurance (Self Pay)Check-in AutoFlow—Patient with No InsuranceOn the UDS page, indicate thepatient’s Primary MedicalCoverage as NONE. DO NOTCLICK SELF PAY box.On the Encounter InsuranceSelection page, DO NOT ADDInsurance to the Patient anddo not select Insurance for theEncounter. There should be noInsurance on the right in Selected Insurance.Click AutoFlow button tocontinue.Only enter data into boxes indicated above—do not add data where NOT specifiedNGSupportPicRefs00123
Quick ReferenceValley-Wide Health Systems, Inc.NEXTGEN EPMCheck-in AutoFlow—Chart Details & Printing LabelsCheck-in AutoFlow—Chart DetailsVerify that patient has updatedPIF within the last year and alsothat they have been issued apatient handbook. If updatedduring this visit, type in today’sdate (use mm/dd/yyyy format)Check-in AutoFlow—Printing LabelsChoose Encounter Label fromTemplate list and click Print 3copies.Then choose Patient ID Labeland Print 5 copies.Click AutoFlow button tofinish the Check-in.Only enter data into boxes indicated above—do not add data where NOT specified24NGSupportPicRefs001
NEXTGEN EPMValley-Wide Health Systems, Inc.Support Staff Quick ReferenceLook Up Patient’s AppointmentsThen type in Date of Birth forpatient and choose Expectedfrom the Status list, then clickFind button to view all the patient’s future Expected appointments. Add first few letters ofLast name to limit search more.Leave Status blank (none) to viewall appointments for patient.Look Up Appointments: Patient’s Appointmentsand Lists for ConfirmationsClick Appt List icon in toolbar.Generate List of Tomorrow’s Appointments for ConfirmationsClick Appt List icon in toolbar.Choose: Expected in Status Tomorrow in Appt Date (optional) Provider namein Resourcethen click Find button toview appointments for tomorrow.Double-click appointment inlist to view patient phonenumber. Call, type results ofcall in Confirmation Resultsbox and click Confirmed box ifpatient is confirmed coming.Only enter data into boxes indicated above—do not add data where NOT specifiedNGSupportPicRefs00125
Quick ReferenceValley-Wide Health Systems, Inc.NEXTGEN EPMAdding Blood Draw Ordered During Provider VisitAdding Blood DrawOrdered During Provider VisitRight-click Appointment inScheduler Book and selectOpen from menu.Scroll the Resources list andclick to put the green checkmark beside the Nurse foryour clinic. Both the Nurseand the Provider should bechecked. Then click OK. Youmay need an Override if theNurse schedule is full.Patient’s appointment now displays in boththe Provider and the Nurse column and onlyone Encounter is in NextGen.Only enter data into boxes indicated above—do not add data where NOT specified26NGSupportPicRefs001
NEXTGEN EPMValley-Wide Health Systems, Inc.Support Staff Quick ReferenceScheduling—New Patient Appointment (pg 1 of 2)Schedule Book Buttons:Change DateGo To TodayNext DatePrevious DateAppointment SearchAheadRefresh ScheduleScheduling—New Patient AppointmentLocate appointment slot onschedule, right-click timeslotin Scheduler Book and selectNEW (for new appointment)from menu.Hide Patient NamesClick Menu button and clickLookup to find person inNextGen. For a new person, bediligent to ensure person is notalready in NextGen.Find person by Birth Datefirst. If not found, deleteBirth Date and use ONLY thefirst three or four letters ofLast and First name.BE SURE THE PERSON is NOTalready in NextGen! Clickthe New button to add a newperson to the system for anappointment.BE SURE THE PERSON isNOT already in NextGen!Fill in the basic Pt Info forAppointment: Last Name First Name MI DOB Home PhoneAnd click OK.Only enter data into boxes indicated above—do not add data where NOT specifiedNGSupportPicRefs00127
Quick ReferenceValley-Wide Health Systems, Inc.NEXTGEN EPMScheduling—New Patient AppointmentScheduling—New Patient Appointment (pg
NEXTGEN EPM Valley-Wide Health Systems, Inc. Support Staff Quick Reference NGSupportPicRefs001 3 Only enter data into boxes indicated above—do not add data where NOT specified New Patient Check-in—Adding Demographic Information from PIF Names and addresses: DO NOT USE SYMBOLS or PUN