Transcription
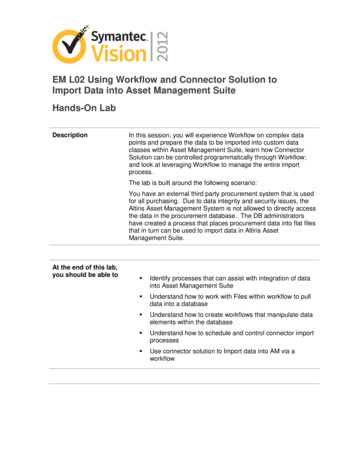
NUTRIKIDS District Data Import ToolVersion 5.XThis feature allows you to import .txt / .csv files from your Student Information System into the NUTRIKIDSDatabase.Step 1: Backup Login to your NUTRIKIDS POS Manager program Click on the “Tools” menu option located in the top tool bar and select “Backup”. Ifthere is a problem with your import this backup can be restored. You must have Directorrights in order to see these options Click the “Browse” button in order to choose a location for your NUTRIKIDS POSManager Backup. Browse to a safe location (preferably on the server) and record thelocation of this backup on the line below for future reference. Choose a location to save yourbackup and click the “Save” buttonLocation of Backup: Click the “Backup” button Your backup will begin immediately Click “Yes” when you are prompted to test your backup to be sure it is error-free Click “OK” Click “OK”www.NUTRIKIDS.comPage 1 of 101.800.724.9853
Step 2: Setup Click on the “Features” menu option located in the top toll bar and select “Import/SetupDistrict Data” You must have Director rights in order to see these options Under “Setup District Import” select “Student Setup” and click the “Next” button Thisoption will allow you to configure the .txt / .csv file for importing into the NUTRIKIDS Database Click the “Browse” button in order to set the path to the Student Information System’sText File. You must browse to where your .txt / .csv file is located. This .txt / .csv file is theexported file created by your SIS. Contact your Technology Department if you are not surewhere this .txt / .csv file is locatedwww.NUTRIKIDS.comPage 2 of 101.800.724.9853
Click the “Next” button to continue Now Select your Source Data Type and click the “Next” button. This step tells theNUTRIKIDS program what type of .txt / .csv file you’re importingIf you selected “Fixed Width” as your Source Data Type please skip to Step 4 (pg. 6), otherwisecontinue to Step 3 for “Delimited” data typesStep 3: Delimited Setup You have selected the Delimited Data Type. Check off which “Delimiter” you are using.The delimiter is a character that is used to separate each field in the .txt / .csv file from thenext field. Notice that you may use the “Other” field in case the .txt / .csv file has a uniquedelimiter. A Comma Delimited (.csv) file could look like NUTRIKIDS.comPage 3 of 101.800.724.9853
Now select the row at which you want the import to start. If the .txt / .csv file has aheader (a row that displays what each column represents) then you should start the import atRow 2, otherwise leave this option set to ‘1’ Choose a “Text Qualifier”. The Text Qualifier is used to identify text groupings in the .txt /.csv file. For example, if the .txt / .csv file contains the Student ID Numbers but they’reenclosed in quotations, it’s these quotations that represent the beginning and end of each textfield in the .txt / .csv file. ie: if last name “Jones Jr.” Click the “Next” button Now you must “Assign Import Field Names”. To assign each column to a particular FieldName simply click on the column (the column will highlight in yellow) and then select theappropriate Field Name in the drop-down box located near the top Click the “Next” button when you have assigned all the columns to their correspondingField Names. If you fail to identify each column, you will be prompted to select a field namefor each column. Click the “OK” button to go back and assign each column to a fieldNOTE: If you have the NUTRIKIDS Free & Reduced Module do NOT import F&R eligibilities. Ifyour import file contains an Eligibility field, you can select the Skip Column option to ignore thatfield during import.www.NUTRIKIDS.comPage 4 of 101.800.724.9853
Now fill in your Import Setup Codes. There are four sections on this screen: EligibilityCodes, Date of Birth Codes, Grade Codes, and Activation Codes. If your .txt / .csv filecontains these fields, be sure that the Import Tool knows what each field is represented by.For example, if you are importing Pre-School students and your District considers thesestudents to be in Grades ‘PS-AM’ and ‘PS-PM’, you will have to place the letters ‘PS-AM’ and‘PS-PM’ in two of the ten available fields labeled Pre-School Codes OR if the D.O.B. field isrepresented as Year/Day/Month (1999/31/12) you would have to enter yyyy/dd/mm in theD.O.B. Format fieldNOTE: If your .txt / .csv file contains ALL of the Active Students in your District, and NODeactivated Students you may check off the option labeled “Active Only Listed.” Please call us at1-800-724-9853 if you have any questions on Active Only Imports. Click the “Save” button to confirm your Import Settings. If you checked off the “ActiveOnly Listed” box you will be reminded that all students NOT listed in the .txt / .csv file will bemarked as inactive. Click the “Yes” button to continuePlease skip to Step 5 (pg. 8) to continue your NUTRIKIDS District Data Import directionswww.NUTRIKIDS.comPage 5 of 101.800.724.9853
Step 4: Fixed Width Setup According to Step 2 of this document, you have selected the “Fixed Width” Data Type.You will now have to tell the program the structure of your “Fixed Width” Text File. Todo this you will need to determine the start position and length of each field in the .txt file. Forexample, looking at Figure ‘A’ you can see there are 5 fields in the .txt file. The Student IDfield begins at position ‘1’ and has a length of ’10’. The First Name field begins at position ‘11’and has a length of ‘10’. The Last Name field begins at position ‘21’ and has a length of ‘10’.The Address field begins at position ‘31’ and has a length of ‘25’. The Grade field begins atposition ‘56’ and has a length of ‘2’Figure-ANOTE: Using Notepad can help you determine the Start Positions of each field in your .txt file.Be sure that Word Wrap is turned off (Go to the “Format” menu option at the top and uncheckWord Wrap) and also make sure the Status Bar is showing (Go to the “View” option at the topand check Status Bar). Check the box for each field that you are importing and enter the Start Position andLength. Each field will highlight in yellow after it has been selected. You must select the fieldfirst before you can fill in the Start Position and LengthNOTE: If you have the NUTRIKIDS Free & Reduced Module do NOT import F&R eligibilities Now select the row at which you want the import to start. If the .txt file has a header (arow that displays what each column represents) then you should start the import at Row 2,otherwise leave this option set to ‘1’ Click the “Print Grid” button in order to get a printed copy of the Start Positions andLengths for each field in your Text File. It is recommended that you keep this printed copyfor future reference in case you need to setup the District Data Import again Click the “Next” button to continuewww.NUTRIKIDS.comPage 6 of 101.800.724.9853
Now fill in your Import Setup Codes. There are four fields on this screen: Eligibility Codes,Date of Birth Codes, Grade Codes, and Activation Codes. If your .txt file contains these fields,be sure that the Import Tool knows what each field is represented by. For example, if you areimporting Pre-School students and your District considers these students to be in Grades ‘PSAM’ and ‘PS-PM’, you will have to place the letters ‘PS-AM’ and ‘PS-PM’ in two of the tenavailable fields labeled Pre-School Codes OR if the D.O.B. field is represented asYear/Day/Month (1999/31/12) you would have to enter yyyy/dd/mm in the D.O.B. Format fieldNOTE: If your .txt file contains ALL of the Active Students in your District, and NO DeactivatedStudents you may check off the option labeled “Active Only Listed.” Please call us at 1-800-724-9853if you have any questions on Active Only Imports. Click the “Save” button to confirm your Import Settings. If you checked off the “ActiveOnly Listed” box you will be reminded that all students NOT listed in the .txt / .csv file will bemarked as inactive. Click the “Yes” button to continueNOTE: At this point your file should be ready to import pending verification of data samplesexplained on the following page.www.NUTRIKIDS.comPage 7 of 101.800.724.9853
Step 5: Importing the DataImporting Data in order to update the NUTRIKIDS Database should ONLY be done after ALL servinglines have finished their End Day Routine and ALL lines have been imported under the S.L. Dataoption Under “Import District Data” choose “Student Import” and click the “Next” button. Thisoption will import the student data into the NUTRIKIDS Database Browse through the Student Import Samples. There are five students that are previewed inthis section. Look through each Student’s information and confirm that the data looks correct.Click the arrow [ ] keys located at the top to see the next student on the preview screen Click the “Import” button when you are done previewing the Import. If any of the importfields do NOT look correct, click the “Close” button and call NUTRIKIDS at 1-800-724-9853 sothat we may assist you in setting up the fields correctlywww.NUTRIKIDS.comPage 8 of 101.800.724.9853
Click “Yes” when you are prompted to update the Student File When the District Data Import is completed a report will be generated that includes anystudents/classrooms that have been added to the database. It is recommended that youprint this report off in case there are any questions about the import after it has beencompleted Click the “Close” button after you have printed off the report The last step shows you Pre-Import/Post-Import Information. Please take note of thisinformation for future reference. Note that this screen will show you the enrollment figuresfor Free, Reduced, and Full Paid students for your entire District. It will also show you thenumber of new students and deactivated students in the NUTRIKIDS Databasewww.NUTRIKIDS.comPage 9 of 101.800.724.9853
If for any reason the Import numbers do NOT look correct, click the “Restore Pre-ImportData!” button to restore the information you had before the District Data Import. If youdecide to restore the Pre-Import Data you will be prompted to confirm this action. Click the“Yes” button and your original database settings will be restored Click the “OK” buttonNOTE: If the Student Eligibility [Free & Reduced] Status is NOT included in the .txt / .csv fileall new students imported will be set to Full Paid StatusStep 6: Data Verification Click on the “Tools” menu option located at the top and choose “Preferences”. Youmust have Director rights in order to see these options Click on the “Data Verification” tab Select the “No Building Assigned” option and click the “Verify” button. This will makesure that every student in your NUTRIKIDS database is assigned to a building Now select the “No Grade Assigned” option and click the “Verify” button. This will makesure that every student in your NUTRIKIDS database is assigned to a gradeNOTE: If the Data Verification process finds any students that are NOT assigned to a Buildingand/or Grade, a report will be generated that will include all of these students. You can manuallyassign these students to the correct building or grade, or you can call NUTRIKIDS at 1-800-724-9853for assistance. Click the “Close” button at the top Congratulations! You have finished the District Data Import Process!www.NUTRIKIDS.comPage 10 of 101.800.724.9853
www.NUTRIKIDS.com Page 2 of 10 1.800.724.9853 Step 2: Setup Click on the "Features" menu option located in the top toll bar and select "Import/Setup District Data" You must have Director rights in order to see these options Under "Setup District Import" select "Student Setup" and click the "Next" button This option will allow you to configure the .txt / .csv file .