Transcription
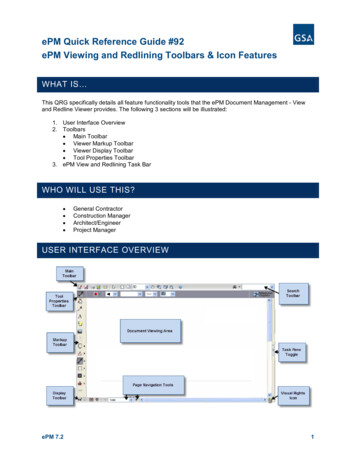
ePM Quick Reference Guide #92ePM Viewing and Redlining Toolbars & Icon FeaturesWHAT IS This QRG specifically details all feature functionality tools that the ePM Document Management - Viewand Redline Viewer provides. The following 3 sections will be illustrated:1. User Interface Overview2. Toolbars Main Toolbar Viewer Markup Toolbar Viewer Display Toolbar Tool Properties Toolbar3. ePM View and Redlining Task BarWHO WILL USE THIS? General ContractorConstruction ManagerArchitect/EngineerProject ManagerUSER INTERFACE OVERVIEWePM 7.21
ePM Quick Reference Guide #92ePM Viewing and Redlining Toolbars & Icon FeaturesTOOLBARS: MAIN TOOLBARMarkup Exists Indicator. When present, this icon lets you know that a markup existsfor the currently opened document.Markup. Access commands regarding markup files, such as creating a new markupfile, opening a markup file for edit or review, and saving a markup file.Markup Save – Saves document.Print. Opens the Print dialog box which contains standard print options, such aschoosing a printer, giving a range of pages to print, etc. You can also select print-toscale options, view Print Preview, and set ISO Banner and Watermark options. Anoption is available to print Changemarks information and/or redaction reasons as anappended page.If Print Region is selected from the Print menu, press the mouse on a starting point ofthe viewer and draw a rectangle on the area of the document that you would like toprint. The Print dialog appears when you release the mouse.Save and PublishSelect Save View as JPG from the submenu to save the current view displayed in theBrava! Enterprise window as a JPG file. This feature captures the image window as ascreen capture and will include all visible elements (e.g., markup entities, magnifierwindow, measurement indications, etc.).Select Publish to CSF from the submenu to publish the current file to secure CSFformat with encrypted Visual Rights. CSF is a neutral 2D format that is a replica of thesource file, including images, graphics, layout, and more. Secure CSF files publishedwith Brava! Enterprise can be opened in Brava! Desktop or the free Brava! Reader.Select Publish to PDF or TIFF from the submenu to publish the current file (with anyopen markups) to PDF or TIFF format. A variety of publishing options can be selectedfrom the dialog.When redacted entities are present in the open markup, publishing to CSF, PDF, orTIFF finalizes the redaction in the output file.Measure. Access commands for measurement and calibration. You can measure lines,polygons, circles, and rectangles, use the measure count feature, and access themeasurement settings dialog. See Measurement Tool PropertiesePM 7.22
ePM Quick Reference Guide #92ePM Viewing and Redlining Toolbars & Icon FeaturesSelect. Use the Select tool to select text in a document to copy (if allowed), select anintelligent object, and to activate Changemarks.Download. If allowed by your administrator, you can download the current document toyour local machine and open it in its native environment. Used in Net-It Centralinstallations.Fit All. Returns the zoom level to 100% so the full image displays in the Brava! window.Fit Width. Ideal for 8.5” X 11” office documents, Zoom Width changes the zoom level sothat the entire width of the image appears in the window. You can read rows of textwithout having to scroll right and left to see the entire line.Image based Zoom. You can select to view an image based on a percentage of theoriginal document's resolution and actual size. You can select from 25 to 800 percent ofits actual size or input a custom percentage.Pan/Zoom. When zoomed in on an image, use the Pan tool to maneuver around theimage.Zoom Window. Use the Zoom tool to zoom in, zoom out, (by holding down the rightmouse button and moving the mouse up and down) or zoom to an area by dragging a boxaround the desired display area.Zoom In/Out. Use the Zoom tool to zoom in and zoom out by holding down the leftmouse button.Magnifier. Use the Magnifier to summon a magnified view window on your image. Themagnification can be adjusted and a toggle tool is available to allow you to switch backand forth between eye glass and bird’s eye view.Brava! Enterprise Help. Launch the on-line Help file to access hyperlinked Help aboutBrava! features.Find. You can search the text on documents and images with the search tool. Wildcardsand macros accepted. You can search up, down, and match case.ePM 7.23
ePM Quick Reference Guide #92ePM Viewing and Redlining Toolbars & Icon FeaturesTOOLBARS: VIEWER MARKUP TOOLBAREdit Markups. Use to select and edit markup attributes, resize, reshape, rotate, copy,or move entity.Arrow. Use to add arrows to your images. The arrow head is set at the first selectionpoint.Text. Use the Text tool to insert text directly on the image (rather than in a note). Usethe Markup Properties tools to change the font name, size, etc.Changemarks. The Changemarks tool allows markup authors to type or copy/pastein detailed text in a scrolling window. Authors can also add hyperlinks to point the userto additional information. Reviewers simply need to double-click on the markup entitywhile in select mode to review the text, or automatically scroll through eachChangemark contained in the Changemarks list by clicking a Next button. See Also"Changemarks Panel" in the previous table.Insert Image. Use this markup tool to insert external raster images (JPG, BMP, orPNG) into your current markup layer. Once selected, images can be resized andpositioned where you want them.You can set multiple instances of this same image entity or use the Browse button inthe Markup Properties bar to choose another raster image to insert. The propertiesbar also contains a list of 10 most recently used images which can be individuallyePM 7.24
ePM Quick Reference Guide #92ePM Viewing and Redlining Toolbars & Icon Featuresselected and inserted.Add Markup Stamp. If Stamp Templates have been authored and saved, the markupstamp button is available on the Markup Toolbar. When clicked, a list of availablemarkup stamps is shown that can be added to the current markup layer.The stamp template is a group of markup entities that have been defined as a singleunit and all elements of the template are resized and moved as a single entity andcannot be edited otherwise. Color, content, and other elements are defined by theauthor when a stamp template is created and saved.When a stamp is inserted, if a dynamic text field exists (such as %Page, %Date,%dbstring(value), etc.), the field is resolved and results are populated in the stamp.Cloud and Polyclouds. Add cloud or polycloud shapes on your images.Sketch and PolySketch. Use this tool to draw freehand shapes and lines on yourimage. Polysketch can be filled or unfilled.Crossout, Arc, and Line Tools. Use any of these tools to add linear shapes on yourdocuments and images. The mouse cursor will change to reflect the tool selected.Line width and style can be selected in the markup properties toolbar, with additionalarrow end styles available for the Line Arrow tool.Rectangle, Rounded Rectangle, Ellipse, and Polygon shapes. Shapes can beused as highlights or hides, and can be filled or hollow as determined by yourselection in the Shape Properties drop-down list. Use the Hides shapes to cover or“hide” areas of the image. Hides shapes are automatically the same color as thebackground color. The mouse cursor will change to reflect the tool selected.Redact Area. This markup entity allows you to place a rectangular cover over an areaof a sensitive or confidential document to block only certain portions from beingviewed, searched, or copied.Allow Area Tool. This tool allows you to cut away areas of an unpublished redactedrectangle that you would like to reveal and make visible. The allow area rectangle,when drawn over a redaction area, cancels the redaction in that area only.ePM 7.25
ePM Quick Reference Guide #92ePM Viewing and Redlining Toolbars & Icon FeaturesFind & Redact. This tool lets you run a command that finds and redacts multipleinstances of a common word or phrase simultaneously.Find & Redact From/To. Similar to Find & Redact, this tool allows you to specify arange of text to redact by entering a start and end search pattern. You can choosewhether or not to include the end string in the redaction.Redact Privacy Information. Use the Redact Privacy Information tool to quickly findand redact sensitive information commonly found in documents and forms includingSocial Security numbers, Phone numbers, Email addresses, Date of birth, andNames. Exception lists can be specified.Redact Using Script(s)/List(s). This tool allows you to run a command to find andredact a predefined list of phrases or redaction scripts in one action. See the Brava!online help for the required scripts and lists format.You may use redaction wildcards and macros to search for and redact text strings andnumber combinations. See the online help for using the available tags and macrosthat can be used with the Find & Redact, and Redact Using Scripts tools.Redact Page. This tool allows you to redact an entire page or specified pages. Youcan select to redact all pages, only the currently displayed page, or a range of pages(type in the start and end page numbers). Essentially, this tool can be used inconjunction with the Allow Area tool as a reverse redaction tool, in other words,"redact everything on this page except specified areas."With all of the above tools, the redactions are not finalized until the document ispublished .Edit Text. You can highlight, strikeout, and underline selectable text contained in adrawing or document. Simply drag a box around the text area you want to include toselect and mark it.Hyperlink. Add a hyperlink to any markup entity or Changemark. Hyperlinks can belaunched by clicking on a markup entity containing a hyperlink with the Select tool, orby clicking the launch hyperlink button from the Changemarks list.ePM 7.26
ePM Quick Reference Guide #92ePM Viewing and Redlining Toolbars & Icon FeaturesREFERENCESReference the following ePM Quick Reference Guides (QRGs) for additional information. QRGs can beaccessed through the ePM Portal. ePM 7.2QRG 91 - ePM View and Redlining Document ManagementQRG 93 - ePM View and Redline Supported File Formats7
Enterprise can be opened in Brava! Desktop or the free Brava! Reader. Select . Publish to PDF . or . TIFF . . Download. If allowed by your administrator, you can download the current document to . See the Brava! online help for the required scripts and lists format.