Transcription
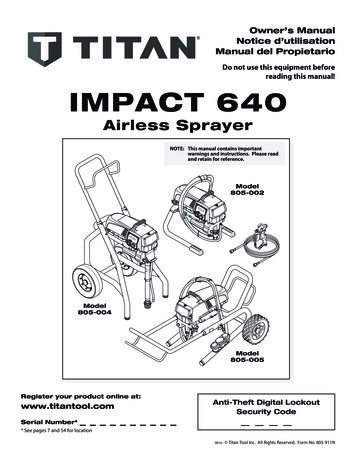
Owner’s ManualNotice d’utilisationManual del PropietarioDo not use this equipment beforereading this manual!IMPACT 640Airless SprayerNOTE: This manual contains importantwarnings and instructions. Please readand retain for ster your product online at:www.titantool.comSerial Number*Anti-Theft Digital LockoutSecurity Code* See pages 7 and 54 for location0816 Titan Tool Inc. All Rights Reserved. Form No. 805-911N
Important Safety InformationRead all safety information before operating theequipment. Save these instructions. Indicates a hazardous situation which, if not avoided,could result in death or serious injury.To reduce the risks of fire or explosion, electrical shockand the injury to persons, read and understand allinstructions included in this manual. Be familiar with thecontrols and proper usage of the equipment. Grounding InstructionsThis product must be grounded. In the event of an electrical short circuit,grounding reduces the risk of electric shock by providing an escape wirefor the electric current. This product is equipped with a cord having agrounding wire with an appropriate grounding plug. The plug mustbe plugged into an outlet that is properly installed and grounded inaccordance with all local codes and ordinances. warning - Improper installation of the grounding plugcan result in a risk of electric shock. If repair or replacement of the cord or plug is necessary, do not connectthe green grounding wire to either flat blade terminal. The wire withinsulation having a green outer surface with or without yellow stripes isthe grounding wire and must be connected to the grounding pin.Check with a qualified electrician or serviceman if the groundinginstructions are not completely understood, or if you are in doubt asto whether the product is properly grounded. Do not modify the plugprovided. If the plug will not fit the outlet, have the proper outletinstalled by a qualified electrician.This product is for use on a nominal 120 volt circuit and has a groundingplug that looks like the plug illustrated below. Make sure that the productis connected to an outlet having the same configuration as the plug. Noadapter should be used with this product. WARNING: Injection injuryA high pressure paint stream produced by this equipmentcan pierce the skin and underlying tissues, leading toserious injury and possible amputation. See a physicianimmediately.Grounded OutletGrounding PinCover for grounded outlet boxPREVENTION: important: When the sprayer is used with a generatoror uncontrolled line voltage, the use of Titan’s “Line SurgeProtector” (P/N 800-935) is recommended. WARNING: EXPLOSION OR FIRESolvent and paint fumes can explode or ignite. Propertydamage and/or severe injury can occur. PREVENTION: Do not spray flammable or combustible materials near an openflame, pilot lights or sources of ignition such as hot objects,cigarettes, motors, electrical equipment and electrical appliances.Avoid creating sparks from connecting and disconnecting powercords.Use extreme caution when using materials with a flashpointbelow 100ºF (38ºC). Flashpoint is the temperature that a fluid canproduce enough vapors to ignite.Paint or solvent flowing through the equipment is able to resultin static electricity. Static electricity creates a risk of fire orexplosion in the presence of paint or solvent fumes. All partsof the spray system, including the pump, hose assembly, spraygun and objects in and around the spray area shall be properlygrounded to protect against static discharge and sparks. Use onlyEnglishconductive or grounded high-pressure airless paint sprayer hosesspecified by the manufacturer.Verify that all containers and collection systems are grounded toprevent static discharge.Connect to a grounded outlet and use grounded extension cords(electric models only). Do not use a 3 to 2 adapter.Do not use a paint or solvent containing halogenatedhydrocarbons. Such as chlorine, bleach mildewcide, methylenechloride and trichloroethane. They are not compatible withaluminum. Contact the coating supplier about compatibility ofmaterial with aluminum.Keep spray area well ventilated. Keep a good supply of fresh airmoving through the area to keep the air within the spray area freefrom accumulation of flammable vapors. Keep pump assembly inwell ventilated area. Do not spray pump assembly.Do not smoke in the spray area.Do not operate light switches, engines, or similar spark producingproducts in the spray area.Keep area clean and free of paint or solvent containers, rags, andother flammable materials.Know the contents of the paint and solvents being sprayed.Read all Material Safety Data Sheets (MSDS) and container labelsprovided with the paints and solvents. Follow the paint andsolvent manufacture’s safety instructions.Place pump at least 25 feet (7.62 meters) from the spray object ina well ventilated area (add more hose if necessary). Flammablevapors are often heavier than air. Floor area must be extremelywell ventilated. The pump contains arcing parts that emit sparksand can ignite vapors.Plastic can cause static sparks. Never hang plastic to enclose sprayarea. Do not use plastic drop cloths when spraying flammablematerial.Fire extinguisher equipment shall be present and working. Do not aim the gun at, or spray any person or animal.Keep hands and other body parts away from the discharge. Forexample, do not try to stop leaks with any part of the body.NEVER put your hand in front of the gun. Gloves will not provideprotection against an injection injury.ALWAYS keep the tip guard in place while spraying. The tip guardprovides some protection but is mainly a warning device.Only use a nozzle tip specified by the manufacturer.Use caution when cleaning and changing nozzle tips. In thecase where the nozzle tip clogs while spraying, ALWAYS lockgun trigger, shut pump off, and release all pressure beforeservicing, cleaning tip or guard, or changing tip. Pressure willnot be released by turning off the motor. The PRIME/SPRAYvalve or pressure bleed valve must be turned to their appropriatepositions to relieve system pressure. Refer to PRESSURE RELIEFPROCEDURE described in the pump manual.Do not leave the unit energized or under pressure whileunattended. When the unit is not in use, turn off the unit andrelieve the pressure in accordance with the manufacturer’sinstructions.High-pressure spray is able to inject toxins into the body andcause serious bodily injury. In the event that injection occurs,seek medical attention immediately.Check hoses and parts for signs of damage, a leak can injectmaterial into the skin. Inspect hose before each use. Replace anydamaged hoses or parts. Only use TITAN original-high-pressurehoses in order to ensure functionality, safety and durability.2 Titan Tool Inc. All rights reserved.
Important Safety Information This system is capable of producing 3300 PSI / 228 Bar. Onlyuse replacement parts or accessories that are specified by themanufacturer and that are rated a minimum of 3300 PSI. Thisincludes spray tips, nozzle guards, guns, extensions, fittings, andhose.Always engage the trigger lock when not spraying. Verify thetrigger lock is functioning properly.Verify that all connections are secure before operating the unit. Know how to stop the unit and bleed pressure quickly. Bethoroughly familiar with the controls. Pressure will not bereleased by turning off the motor. The PRIME/SPRAY valveor pressure bleed valve must be turned to their appropriatepositions to relieve system pressure. Refer to PRESSURERELIEF PROCEDURE described in the pump manual. SpecificationsAlways remove the spray tip before flushing or cleaning thesystem.NOTE TO PHYSICIAN:Injection into the skin is a traumatic injury which can lead topossible amputation. It is important to treat the injury as soon aspossible. DO NOT delay treatment to research toxicity. Toxicityis a concern with some coatings injected directly into the bloodstream. Consultation with a plastic surgeon or reconstructive handsurgeon may be advisable.WARNING: HAZARDOUS VAPORSPaints, solvents, insecticides, and other materials canbe harmful if inhaled or come in contact with the body.Vapors can cause severe nausea, fainting, or poisoning. Use a respirator or mask if vapors can be inhaled. Read allinstructions supplied with the mask to be sure it will provide thenecessary protection.Wear protective eyewear.Wear protective clothing as required by coating manufacturer.PREVENTION: Always wear appropriate gloves, eye protection, clothing and arespirator or mask when painting.Do not operate or spray near children. Keep children away fromequipment at all times.Do not overreach or stand on an unstable support. Keep effectivefooting and balance at all times.Stay alert and watch what you are doing.Do not operate the unit when fatigued or under the influence ofdrugs or alcohol.Do not kink or over-bend the hose. Airless hose can develop leaksfrom wear, kinking and abuse. A leak can inject material into theskin.Do not expose the hose to temperatures or pressures in excess ofthose specified by manufacturer.Do not use the hose as a strength member to pull or lift theequipment.Use lowest possible pressure to flush equipment.Follow all appropriate local, state and national codes governingventilation, fire prevention and operation.The United States Government Safety Standards have beenadopted under the Occupational Safety and Health Act (OSHA).These standards, particularly part 1910 of the General Standardsand part 1926 of the Construction Standards should be consulted. Titan Tool Inc. All rights reserved.0.70 (2.6 LPM)Maximum tip sizes0.027”Maximum pressure3300 PSI (22.8 MPa)Power1.55 Brushless motor, 120 V, 60 Hz,11.8 AWeight, skid36 lbs. (16.3 kg)Weight, high rider57 lbs. (25.8 kg)Weight, low rider57 lbs. (25.8 kg)Maximum hose length300’ (91.4 m)Generator requirement5000 Watt (disable idle-down feature)Safety Information. 2Specifications. 3General Description. 4Operation. 4Using the Gun Trigger Lock.4Setup.4Preparing to Paint.5Painting.5Control Panel Indicators.6Digi-Trac Control System Operation. 6-7Pressure Relief Procedure.7Spraying. 8Spraying Technique.8Practice.8Cleanup. 9Maintenance. 9General Repair and Service Notes.9Replacing the Motor.10Replacing the Gears.10Replacing the Transducer.11Replacing the PRIME/SPRAY Valve.11Servicing the Fluid Section. 12-13Replacing the Filters.13Troubleshooting. 14Digi-Trac Control System Error Messages.15Parts Listings. 44Main Assembly.44Siphon Assembly (skid and low rider assembly).46Skid Assembly.46Drive Assembly.47Fluid Section Assembly.48Low Rider Assembly.50High Rider Assembly.51Electrical Schematic.52Labels.52Accessories.53Warranty. 56WARNING: GENERALCan cause severe injury or property damage. Gallons per minute (GPM)Table of ContentsPREVENTION: Before each use, check all hoses for cuts, leaks, abrasion orbulging of cover. Check for damage or movement of couplings.Immediately replace hose if any of those conditions exist. Neverrepair a paint hose. Replace with a conductive high-pressurehose.Do not spray outdoors on windy days.Always unplug cord from outlet before working on equipment(electric models only).3English
General DescriptionSetupPerform the following procedure before plugging in the power cordof an electric unit.1. Ensure that the siphon tube and the return hose are attachedand secure.2. Using a wrench, attach a minimum of 50’ of 1/4” airless sprayhose to the outlet fitting on the sprayer. Tighten securely.3. Attach an airless spray gun to the spray hose. Using twowrenches (one on the gun and one on the hose), tightensecurely.This airless sprayer is a precision power tool used for sprayingmany types of materials. Read and follow this instruction manualcarefully for proper operating instructions, maintenance, and KnobPusherStemDigi-Trac Control SystemScreenNOTE: Do not attach the tip to the spray gun yet. Removethe tip if it is already attached.Make sure all airless hoses and spray guns areelectrically grounded and rated at or above themaximum operating pressure range of the airlesssprayer.Oiler CapOilerbutton4.Make sure the pressure control knob is in its OFF position inthe black zone.5. Make sure the ON/OFF switch is in its OFF position.6. Remove the fill cap with a straight-slot screwdriver, or a coin.Fill the oil reservoir with one ounce of piston seal lubricant(Piston Lube). Replace oiler cap.7. Press oiler button 2-5 times to prime the oiler. Press once forevery eight hours of usage to lubricate the fluid section.Important: Never operate unit for more than ten secondswithout fluid. Operating this unit without fluid will causeunnecessary wear to the packings.8. Fully depress the pusher stem to make sure the inlet ball isfree.9. Make sure the electrical service is 120V, 15 amp minimum.10. Plug the power cord into a properly grounded outlet at least25’ from the spray area.Important: Always use a minimum 12 gauge, three-wireextension cord with a grounded plug. Never remove the thirdprong or use an adapter.Important: After turning pump off, allow 30 seconds for thepower to completely drain from capacitors.PRIME /SPRAY ValveFluid SectionOutlet FittingSiphon TubeReturn TubeOperationThis equipment produces a fluid stream at extremelyhigh pressure. Read and understand the warningsin the Safety Precautions section at the front of thismanual before operating this equipment.Using the Gun Trigger LockPreparing a New SprayerAlways engage the gun’s trigger lock when the gun is not in use.1. To lock the trigger, push in the trigger lock from left to right,when looking at the rear of the gun.2. To unlock the trigger, push the trigger lock from right to left,when looking at the rear of the gun.1If this sprayer is new, it is shipped with test fluid in the fluid section toprevent corrosion during shipment and storage. This fluid must bethoroughly cleaned out of the system with mineral spirits before youbegin spraying.Important: Always keep the trigger lock on the spray gun inthe locked position while preparing the system.1. Place the siphon tube into a container of mineral spirits.2. Place the return hose into a metal waste container.3. Set the pressure to minimum by turning the pressure controlknob to the “MIN” setting.2Gun locked(gun will not spray)Gun unlocked(gun will spray)PressureIndicatorPressureControl KnobPump OFFRAPIDCLEAN4.5.6.7.English4Rapid CleanMove the PRIME/SPRAY valve down to the PRIME position.Turn on the sprayer by moving the ON/OFF switch to the ONposition.Allow the sprayer to run for 15–30 seconds to flush thetest fluid out through the return hose and into the wastecontainer.Turn off the sprayer by moving the ON/OFF switch to the OFFposition. Titan Tool Inc. All rights reserved.
Preparing to PaintPaintingBefore painting, it is important to make sure that the fluid in thesystem is compatible with the paint that is going to be used.1.2.NOTE: Incompatible fluids and paint may cause the valvesto become stuck closed, which would requiredisassembly and cleaning of the sprayer’s fluidsection.3.4.Important: Always keep the trigger lock on the spray gun inthe locked position while preparing the system.1. Place the siphon tube into a container of the appropriatesolvent. Examples of the appropriate solvent are water forlatex paint or mineral spirits for oil-based paints.2. Place the return hose into a metalwaste container.3. Set the pressure to minimum byturning the pressure control knobto the “MIN” setting.RAPIDCLEAN4. Move the PRIME/SPRAY valvedown to the PRIME position.5.6.7.8.9.Move the PRIME/SPRAY valve up to theSPRAY position.10. Turn on the sprayer.11. Unlock the gun by turning the guntrigger lock to the unlocked position.NOTE: Hold the return hose in the wastecontainer when moving the PRIME/SPRAY valve to PRIME in case thesprayer is pressurized.5.6.7.Ground the gun by holding it againstthe edge of the metal containerwhile flushing. Failure to do so maylead to a static electric discharge,which may cause a fire.Turn on the sprayer by moving the ON/OFF switch to the ONposition.Allow the sprayer to run for 15–30 seconds to flush the oldsolvent out through the return hose and into the metal wastecontainer.Turn off the sprayer by moving the ON/OFF switch to the OFFposition.12. Trigger the gun into the metal waste container until all air andsolvent is flushed from the spray hose and paint is flowingfreely from the gun.13. Lock the gun by pushing the gun trigger lock to the lockedposition.14. Turn off the sprayer.15. Attach tip guard and tip to the gun as instructed by the tipguard or tip manuals.NOTE: Make sure that the spray gun does not have a tip ortip guard installed.8.9.10.Move the PRIME/SPRAY valve up tothe SPRAY position.Turn on the sprayer.Unlock the gun by pushing the guntrigger lock to the unlocked position.POSSIBLE INJECTION HAZARD. Do not spray withoutthe tip guard in place. Never trigg
of the spray system, including the pump, hose assembly, spray gun and objects in and around the spray area shall be properly grounded to protect against static discharge and sparks. Use only conductive or grounded high-pressure a