Transcription
Laserfiche WebLinkUser Guide1
Table of ContentsIntroductionWhat is Laserfiche WeblinkLogin Screen334What is it?4Logging into WebLink4Exiting Laserfiche4Folder Browser5Folder Properties Pane5Contents Pane5Search Pane6Quick Search6Document Viewer7What is it?7Text7Document Viewer Toolbar8Metadata8Thumbnails9Annotations9Using WebLink10Printing10Exporting10Viewing WebLink on a Mobile Device102
INTRODUCTIONWHAT IS LASERFICHE WEBLINK?Laserfiche WebLink is a user-friendly public portal site for providing read-only Internet accessdocuments. Laserfiche files include an electronic non- editable image of the document, along withelectronic text, and metadata that creates a searchable repository of document information.The Cayuga Heights Laserfiche Weblink contains the Board of Trustees, Planning Board, and ZoningBoard of Appeals meeting minutes, agendas as well as supportive documentation. The Public Portal canalso be used to view Justice Reports and Local Laws.3
LOGIN SCREENWHAT IS IT?The login screen is used to sign in and access the Laserfiche repository. For security of the documents,all users will have to log in each time they work with Laserfiche.LOGGING INTO LASERFICHELaunch Laserfiche by clicking on any link on the Village’s website that directs you to the LaserficheWebLink. These links can be found on the Board of Trustee’s, Planning Board, and Zoning Board ofAppeals webpage.The Login screen will show the Cayuga Heights Repository with the Username and Passwordautomatically populated. Click Sign In.Note: The launch screen lists the Laserfiche repositories that are available. Verify that the CayugaHeights repository is selected before clicking Sign In.EXITING LASERFICHEWhen you exit Laserfiche, the Sign Out button found on the top right corner of the Laserfiche webpagewill redirect you to the Laserfiche Launch screen.4
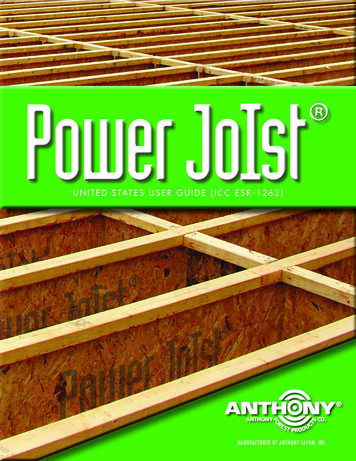
FOLDER BROWSERThe Folder Browser enables users to browse through a Laserfiche repository. It contains:Folder Properties PaneContents PaneSearch PaneQuick SearchQuick SearchSearch PaneFolder Properties PaneContents PaneFolder Properties PaneThe Folder Properties Pane displays the entry properties and metadata of the currently selected Folder.The Entry Properties section displays the folder’s full path, creation, and last modification date. TheMetadata section displays any fields or tags assigned to the selected folder.Note: To hide or display the Metadata and/or Folder Properties sections, toggle on the name of thesection.Contents PaneThe Contents Pane displays either the contents of the currently opened folder or the results of the lastperformed search. The types of items displayed in this pane are imaged documents, electronicdocuments, folders, and shortcuts.To view a documentDouble-click in the Contents Pane.Links are provided above the Contents Pane to each previous folder you navigated through to reachyour current location.5
Search PaneThe Search Pane enables users to search a Laserfiche repository. Search types can be combined torefine search results. Full-text search supports advanced search syntax, which provides more flexibilitywhen searching.Quick SearchThe Quick Search on the Welcome Page and above the Contents Pane in the Folder Browser enablesusers to search text, entry names, fields, annotations, or a combination of these. Additionally, you canselect to search the folder currently open or the entire repository. It is an OR search, meaning one ORthe other of the criteria must be met. For example, performing a search on “Shakespeare” will returndocuments named “Shakespeare,” documents with “Shakespeare” in the text, documents with a fieldvalue of “Shakespeare,” or a combination of these. By default, when using this search, partial matcheswill be returned for entry names, fields, and annotation text. This means the asterisk (*) wildcard(representing missing or no missing characters) is automatically implied, and you do not have to knowthe exact name of the entry to search for it. For instance, performing a document name search for thedocument named “laser” will return documents name “laser,” “Laserfiche,” ”lasers,” etc.To perform a quick search in the Folder BrowserType the search term in the box, select if you want to search the Current Folder or the EntireRepository, and click Search.Note: Quick Search options are configured in the Search Options tab of the WebLink Designer.Note: Partial matches will not be returned for text searches performed with the Quick Search. To returnpartial matches in a text search, use the asterisk (*) wildcard. For example, to return a documentcontaining “report,” “reports,” and/or “reported” in the text, add the asterisk (*) to the end of “report”(since an asterisk represents missing or no missing characters): report*6
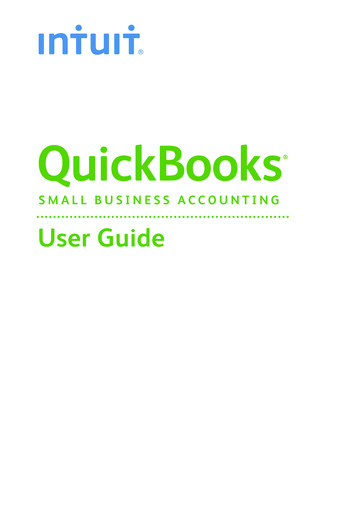
DOCUMENT VIEWERWHAT IS IT?The Document Viewer can display the image pages, text, metadata, thumbnails, and annotations of adocument. To view a document in the Document Viewer, browse to the document you want to viewand click it.ThumbnailsTextDocument Viewer ToolbarMetadataAnnotationsTEXTYou can view the text of documents that have text associated with them. Not all documents will havetext that can be viewed.To view the text of an imaged documentClick View Plain Text in the toolbar.The Text Pane also enables you to move through the text on each page of the document. You can clickPrevious page or Next page in the toolbar or you can type the page number into the Page field and clickGo. Using the scroll wheel on your mouse or the up and down arrows on your keyboard, you can movecontinuously through the text pages. This continuous scroll allows you to see the bottom of a previouspage and the top of the next page in the Text Pane.Note: The text of a document cannot be modified in WebLink. WebLink is a read-only client.7
DOCUMENT VIEWER TOOLBARThe Document Viewer toolbar is displayed about the image in the Document Viewer.Toolbar OptionMETADATAMetadata is additional information about your document. For example, templates, fields, tags, etc. canbe added to your documents to better organize and search for them. You can view the metadata in theMetadata Pane.To view the metadata of a documentOpen the document by clicking it in the Contents Pane.Click Metadata at the top left under the logo.Depending on security and what metadata has been assigned to the document, you should be able toview:Template and field informationDocument properties (creation data, last modified, etc.)8
Tags assigned to the document (as well as tag descriptions and notes)Linked documents (as well as the linked document’s path)Versions of the document (as well as the version’s modification date, path, and notes)If the document you are viewing has links or versions, you can click the linked or versioned document toview it.Note: Metadata cannot be modified in WebLink. WebLink is a read-only client.THUMBNAILSThe Thumbnails Pane enables users to preview image pages of the current document. You can scrollthrough and click on a thumbnail to display the page in the Document Viewer or type the page numberin the Page field in the toolbar and click Go.ANNOTATIONSAnnotations are a way to add additional information to a page of your document. They allow you towork with a Laserfiche document as you would a paper document- for instance, adding sticky notes orhighlighting sections of the document. There are a number of different types of annotations inLaserfiche: some that can be added to both images and text (highlight, redaction, underline, andstrikethrough) and some that can only be added to images (sticky note, stamp, rectangle, text box,callout text, line, polygon, freehand, image, and attachment).Annotations added to a document can be displayed when looking at a document in the DocumentViewer. In addition, sticky note and attachment properties can be viewed by clicking Annotations in theleft pane.To view annotations on a document in the Document ViewerSelect the Show Annotations check box in the toolbar.Note: If the Show Annotations option is not available, ensure you have the See Annotations access rightand that the document you are viewing contains annotations.Note: Annotations cannot be modified in WebLink. WebLink is a read-only client.9
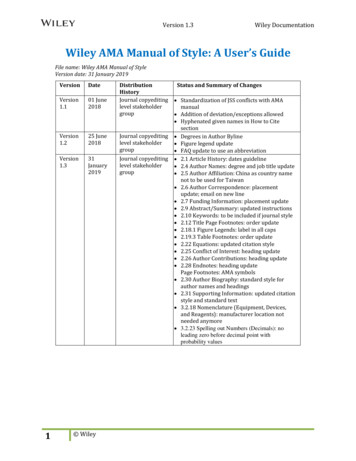
USING WEBLINKPRINTINGTo print a document in WebLink1. Open the document and click Print (as PDF) from the toolbar.2. Type the page numbers of the pages you want to print and click Download & Print.3. Save the PDF, open it, and print it from Adobe Acrobat.Note: If you experience difficulty when printing, enable your browser’s popup blocker to allow WebLinkto send you PDF files.EXPORTINGPDFsWebLink enables users to download images and certain electronic documents as PDFs. A PDF documentgives users more flexibility when viewing and printing an image than a Web browser is able to provide.With PDF, a user can easily zoom in to an image or view multiple images. Printing PDF images results ina higher quality print job than an image printed from a Web browser.To download PDF documents1. Open the document you want to download.2. Click Print (as PDF) from the toolbar.3. Type the numbers of pages you want to download and click Download & Print.If you do not have Adobe Reader installed, you will be prompted for a location to save the file for laterviewing. If you do have Adobe Acrobat Reader, the document will open using it. You will be able toview and print the document just like you would any other PDF file.Note: If you experience difficulty when printing, enable your browser’s popup blocker to allow WebLinkto send you PDF files.Note: By default the WebLink site is configured to allow users to download 300 pages at a time.EMAIL DOCUMENTSTo email links to documents in WebLink, open the document you want to email and click Email in thetoolbar. Enter the appropriate information in the Email To, Your Name, Your Email Address, andMessage fields and click Send.Note: The Email To and Your Name fields are required. When sending an email to multiple recipients,you can separate the email addresses with commas, spaces, or semi-colons.VIEWING WEBLINK ON A MOBILE DEVICEYou can view documents via WebLink on a mobile device. WebLink will detect when you are using amobile browser and optimize the document view for you. By default, only the document image is10
displayed. You can view the document one page at a time, zoom in and out of the image, navigate tothe next and previous page, view the document text, send as email, and download the document. Foradded convenience, you can work with your document using either the toolbar at the top of the page orthe one at the bottom of the page. You can also jump back to the top of the page by clicking Go to Topin the bottom toolbar.Mobile View on an iPhoneTo view the panes along with the document image, click the Show Full Document Information buttonlocated to the far right of the top or bottom toolbar. This enables you to work with the document asyou would if you were with the document as you would if you were just viewing the image, with theadded capability of viewing document metadata, thumbnails, annotations, and entry properties. To goback to viewing the document image only, click the Show Image Pane Only button located to the farright of the top or bottom toolbar.To view the mobile view of the document viewer in a non-mobile browser, navigate to a document andadd M to the end of DocView in the URL. For example:Http://localhost/WebLink8/DocViewM.aspx?id 10811
Laserfiche WebLink is a user-friendly public portal site for providing read-only Internet access documents. Laserfiche files include an electronic non- editable image of the document, along with electronic text, and metadata that