Transcription
One Talk T46S IPdesk phoneuser guidevzw.com/support/one-talk/User guide
User guideContentsWelcome.4Initial setup.4Connecting the phone to power and Ethernet.4Viewing E911 location information.4Configuring Wi-Fi via phone user interface.5Getting to know your desk phone.6Hardware components.6Navigating the display. 7Indicators and notifications. 7Customizing your desk phone. 7About Basic settings. 7Language preferences. 7Time and date.8Display settings.8Sound settings.8Line keys.9Speed dial configuration of a line key.9Intercom key setup.9Using the Intercom key.9Voice Mail setup.10Basic call features.10Make outgoing calls.10Manage multiple lines.10Receive incoming calls.10Ignore a call.10End a call.10Hold a call.10Resume a call.10Mute/unmute your phone’s microphone.10Redial.10Redial last number. 11Block a call. 11Bridge Line. 12Call Barge. 12Remote Group Pickup. 12Call Forwarding. 12Call Move. 13Call Park and Retrieve. 132
User guideCaller Line ID Block. 14Conference calling. 14Do Not Disturb. 14Call History. 14View Call History. 14Delete an individual call log. 15Delete all or a subset of all call logs. 15Blacklist a number from your Call History/remove a number from your blacklist. 15Contact management. 15Local Directory. 15Groups. 17Voice Mail.18System status, troubleshooting and other settings.18Rebooting or resetting phone.19Features. 21Accessibility features. 21For hearing impaired users. 21For vision-impaired and blind users. 22For mobility-impaired users. 22Compatible accessories. 22Important customer information. 23WEEE warning. 23Customer feedback. 23GNU GPL information. 23Copyright. 23Warranty. 23Important 911 emergency response information. 23Declaration of conformity. 24CE mark warning. 24Part 15 FCC Rules. 24Class B digital device or peripheral. 24Important safety precautions. 24Danger–electric shock and fire. 24Learn more:. 24T46S desk phone navigation guide (soft key menu A). 25T46S desk phone navigation guide (soft key menu B). 26T46S desk phone navigation guide (soft key menu). 273
User guideWelcomeViewing E911 location informationThe Verizon T46S IP desk phone is a Voice over IP (VoIP)business phone with nine programmable line keys. The deskphone and the line keys support the integrated service featuresof One TalkSM from Verizon. The T46S features work the sameway on your desk phone, smartphone and tablet computers.Enhanced 911 (E911) is a location technology that enablesemergency responders to know the geographical location of acaller who dials 911. Your One Talk account administrator willconfigure your location. Contact your administrator if your E911address is missing or inaccurate.Initial setupIf your T46S desk phone was not connected and set up byyour IT account administrator, verify the following withyour administrator:Note: This device will not function unless an initial E911 addresshas been added.To view your 911 address, press the Address line key to theright of the LCD screen.1. You have a One Talk number2. Your user information has been updated in the One TalkAdmin Portal with your 911 address and email address3. Your number has been included in any businessgroup featuresConnecting the phone to power and EthernetPowerYou have two options for power: AC power (wall outlet) orPower over Ethernet (PoE). Your system administrator willadvise you which to use.NetworkConnect the included standard Ethernet cable (or otherstandard Ethernet cable) between the internet port on thephone and the port on the wall or on your PoE-capable switch/hub device.StartupAfter your phone is powered on, the system boots up andperforms the following steps:Dynamic Host Configuration Protocol (DHCP)The phone attempts to contact a DHCP server in your networkto obtain valid IPv4 network settings by default.Automatic phone initializationWhen your One Talk phone is connected to the network andpowered on, it will automatically start the initialization process.The LCD screen displays: “Initializing, please wait during thisprocess.” The phone finishes the initialization by loading thesaved configuration.The desk phone is ready for use.4
User guideConfiguring Wi-Fi via phone user interfaceTo access Basic settings:1. Press the Menu soft key while the phone is idle2. Use theto selectkeys to navigate to Basic settings and press3. Scroll to Wi-Fi and press the Enter soft key4. Press the Switch soft key to turn Wi-Fi on5. Press the Save soft key. The phone will automaticallysearch for available wireless Wi-Fi networks in your area6. Select an available wireless network from the list ofavailable networks7. Press the Connect soft key to connect to thewireless network8. If the network is secure, enter its password in the Passwordfield and then tap the OK soft key5
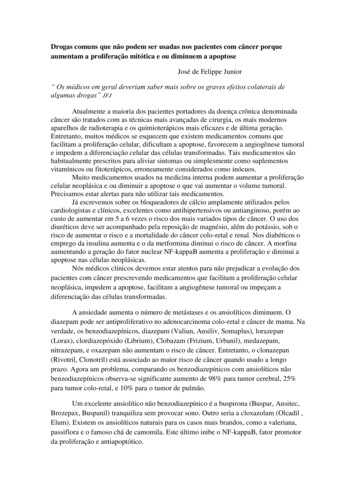
User guideGetting to know your desk phoneHardware components1233984756ItemDescriptionDisplays info about calls, messages, soft keys, time,date and other relevant data, such as:12344LCD screenPower indicator LED Caller IDCall durationIconsMissed call and second incoming callerinformation Prompt textIndicates the status of phone power and some phonefeatures (such as whether they are on or off)Line keysCan be programmed to activate up to three accountsand have phone features assigned to themMute keyToggles to indicate whether a feature is muted or notHeadset keyToggles and indicates whether the phone is inheadset mode or notMessage keyAccesses your Voice Mail messagesHold keyPlace an existing call on holdRedial keyRedials a previously dialed numberTransfer keyTransfers a call to another numberItemDescription5Speakerphone keyToggles unit into hands-free speakerphone mode6Volume keyAdjusts the volume of the handset, headset, speakerand ringer7KeypadProvides the digits, letters and special characters incontext-sensitive applicationsAllows you to scroll through the displayed informationConfirms actions or answers incoming calls8Cancels actions or rejects incoming calls9Soft keysCan be customized as shortcuts to specific features6
User guideNavigating the displayCustomizing your desk phoneAbout Basic settingsSetup and preference options for the following can be found inthe Basic settings menu: Language preferences Time and date Display settings Ringtone and keypad sound settingsIndicators and notificationsTo access Basic settings:LED light status:1. Press the Menu soft key while the phone is idlePower indicator LED2. Use thepresskeys to navigate to Basic settings andto selectLED statusindicatorWhat it meansSolid redThe phone is initializing.Fast flashing redThe phone is ringing or downloading configuration files.Slow flashing redThe phone is receiving a voicemail message.2. Use thekeys to navigate to and select SettingsOffThe phone is not in use.3. Use thekeys to navigate to and select Basic4. Use thekeys to navigate to and select LanguageLine key LEDLanguage preferencesThe default language on the phone’s user interface is English.To change the language of the phone interface:1. Press the Menu soft key to open the main menu5. Scrollselect itLED statusindicatorWhat it meansSolid greenThe line is in use on current device.Solid redThe line in use but on another device.Slow flashing redThe line has been placed on hold from another device.Fast flashing greenThe line is receiving an incoming call.Slow flashing greenThe call is placed on hold from current device.OffThe line is inactive.to your preferred language, highlight and7
User guideTime and dateTime and date are displayed in the middle of the status bar.You can also set your pr
phone and the port on the wall or on your PoE-capable switch/ hub device. Startup After your phone is powered on, the system boots up and performs the following steps: Dynamic Host Configuration Protocol (DHCP) The phone attempts to contact a DHCP server in your network to obtain valid IPv4 network settings by default. Automatic phone .