Transcription
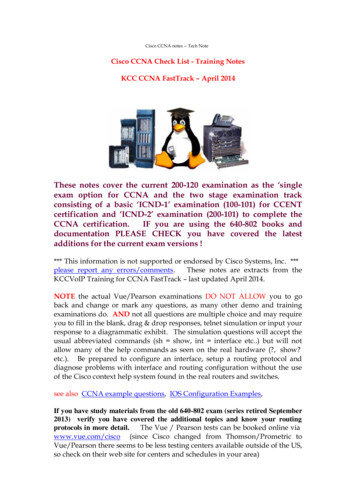
Installation Guidance Note:Marmoleum sheetGeneral AdviceThe appearance, performance and durability of the installed floorcovering will be determined to a large extent by thequality of the prepared subfloor and the conditions in which they are laid.The installation of Marmoleum Sheet should be carried out in accordance with the national code of practice for theinstallation of resilient floor coverings if applicable. Areas to receive flooring should be clean, free from other trades, fullyenclosed and weather tight. Subfloors should be clean, smooth, sound and permanently dry.The open time of the adhesive will depend on site conditions and porosity of the base. It is best practice to conduct anadhesive bond test before starting the installation. Bond testing will assist in identifying both the working characteristicsof the adhesive (waiting and working time) for the site conditions, and also any potential bonding problems.Always conduct moisture tests on all substrates. All ground based level floors should have an effective moisture barrier.Areas to receive flooring shall be adequately lit to allow for proper inspection of the substrate, installation and for finalinspection.It is essential that the laying area is at a steady temperature of minimum 18 C, 48 hours before, during and 48 hours afterinstallation. The material and adhesive should be conditioned in the same environment for at least 24 hours prior to theinstallation. Where the floorcoverings have been stored or transported immediately prior to delivery in temperaturesbelow 10ºC the acclimatization period should be extended to 48 hours. Where national codes of practice exist, they takeprecedence over these guidelines.Ensure that all recommendations for substrate and jobsite conditions are met prior to beginning the installation.Beginning the installation is an implied acceptance of site conditions by the parties involved and liability for any failuredirectly related to inadequate site conditions becomes the responsibility of the installer and/or flooring contractor.Take the Marmoleum rolls of the pallets.Prior to installation rolls should be checked to ensure that the correct colour, batch number and quantity have beenreceived and that the material is in good condition. No claim will be accepted for incorrect colour, pattern or obviousdamage if the material has been fitted.Use material from the same batch/dye lot and install in roll number sequence. The use of different production batcheswill always result in visible shade differences. The batch number is clearly marked on the material packaging and must bechecked before commencement of installation.Marmoleum sheets should be laid in the same direction for seaming.As with all newly installed floor coverings Marmoleum should be protected from heavy traffic, particularly high point loadwheeled traffic, for 72 hours and must not be washed for 48 hours after installation.Marmoleum 01-2019
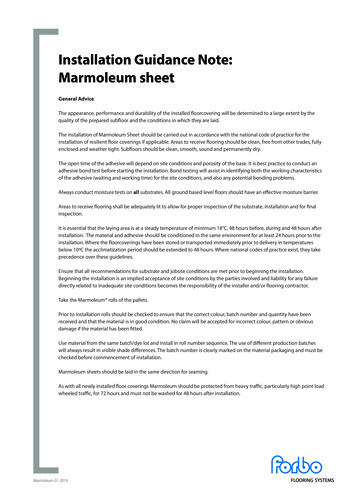
Underfloor heatingForbo flooring products may be installed over underfloor heated floors providing the maximum surface temperature of the substratedoes not exceed 27 C under any condition of use. To enable a secure bond of the adhesive to the substrate, the underfloor heatingsystem should be turned off, or set to the lowest temperature, for a minimum of 48 hours prior to installation of the Forbo flooringmaterial. The temperature of the substrate must not exceed 18 C during the installation of the flooring material. If necessary, analternate heating source should be used to maintain the room temperature at a minimum of 18 C prior to, during, and for 72 hoursafter installation. The temperature of the underfloor heating system can be increased 72 hours following the installation. When raisingthe floor temperature, do so gradually so the substrate and flooring material can adapt to the temperature change together. A rapidtemperature change could result in bonding problems.Adhesive Recommendations and applicationWhen installing Marmoleum Sheet a low emission EC1 adhesive is recommended, such as Forbo Eurocol 614 Eurostar Lino Plus. Ifalternative products are to be used consult with the supplier for more information, guidance and warranty.Use the appropriate trowel recommended by the adhesive supplier to apply the adhesive.Note: Trowels will wear during use, check the trowel both before and during use to ensure that the proper, specified trowel notch isused and maintained.Note: the adhesive must be spread evenly over the entire floor area with particular attention to edges – this will ensure that the sheetis fully bonded at the perimeters.Install one length of sheet at a time, making sure to place the material into wet adhesive and roll afterwards with a 50-70 kg roller,rolling in all directions to ensure a firm bond. It is important to only spread sufficient adhesive that can be covered within the opentime of the adhesive.Areas that cannot be rolled with the large roller e.g. abutments such as door frames or skirting boards should be rolled with a handroller or pressed into the adhesive with a rubbing hammer.Always clean away excess adhesive with a damp cloth before it is allowed to dry.InstallationForbo recommends that Marmoleum and linoleum sheet flooring be installed one sheet at a time. Always install all Marmoleum sheets in the same direction. It is recommended that each sheet be scribed to fit and that the factory edge be properly removedbefore adhering (see below). Seams should always be under-scribed after the material has been placed into the adhesive and rolled.Following these recommendations will give the installer the best opportunity to manage the open and working time of the adhesiveand ensure that the flooring material is placed into wet adhesive.Cut the sheet material to the required lengths and then back roll each cut length before scribing to the long wall and length ends inorder to release any roll tension from the winding of the sheet linoleum. Once the sheet has been back rolled stand the cut lengthsupright in this state for approximately 15 minutes before unrolling for fitting.Note: Whether seams are to be welded or not, they should be cut to leave a nett fit (closed) seam. However, when cutting seams inlinoleum sheet, allowance must be made for a fractional expansion in the width of the hessian backed material as it picks up moisturefrom the adhesive. This expansion is minute and will be halted by the curing of the special linoleum adhesive, but unless allowed forin cutting, tightly cut seams will peak and fail (this is not a product defect).Fitting the first sheetOnce scribed to the walls cut a true edge along the factory edge of the sheet, a Forbo ‘strip and seam cutter’ is designed to carry outthis operation in one cut (Fig.1). Alternatively the factory edge can be trimmed using a straight edge and utility knives with straightand hooked blades. Place the straight edge approximately 2cm in from the factory edge and score the Marmoleum using a utilityknife and a straight blade. After scoring the material cut through the sheet using a utility knife and a hooked blade holding the knifeat an angle to give a slight undercut along the seam (Fig. 2). After trimming the factory edge trace the line of the seam edge onto thesubfloor with a pencil, this will serve as a guide line for spreading the adhesive.Marmoleum 01-2019
Pull the sheet back to approximately half of its length and spread the adhesive ensuring that the adhesive is spread right up to allperimeter edges and the marked pencil line Fig.3. Feed the sheet back into the adhesive and roll immediately first across the widthof the sheet and then along the length to ensure that complete wet adhesive transfer is achieved. Again pay particular attention tothe perimeters Fig.4. A seam roller or rubbing hammer can be used to ensure the sheet is pressed into the adhesive around harderto reach areas such as door frames and overhangs from furniture of fittings.Pull the other half of the sheet back and repeat the above process.As with bight marks (see below), to ensure the end of the linoleum sheet beds well into the adhesive, fold the end of the sheet backdiagonally and feed the hessian backing down into the adhesive with a ‘bouncing action as in the illustration below (Fig.5). Do notmake this so severe as to risk cracking the linoleum. This will ease the tension across the end of the length and the linoleum willhave good contact with the adhesive. Roll thoroughly.Fitting the second (and subsequent) sheet/sUnroll the next sheet and lay it on the floor overlapping the trimmed edge of the first fitted sheet by approximately 2cm. Trim thefactory edge on the opposite side of this sheet as above and mark this edge of the sheet on the subfloor with a pencil. Scribe theends of the sheet. Pull the sheet back halfway and adhere and roll the sheet as above.Marmoleum 01-2019
Forming seamsNet fit seamsA correctly cut seam with a slight undercut will close during the curing of the adhesive and will not open up during the life of thelinoleum. Nett fit seams are often considered to be aesthetically better than welded seams, so if the installer possesses the skills toachieve a good seam and if the application allows, welding of Marmoleum is not obligatory.This is particularly relevant in the case of plain colour Linoleums. Forbo recommends that plain coloured Linoleum such as theMarmoleum Solid collection, are fitted with nett fit seams unless the application determines that welded seams are required.Note: Due to its textured surface, welding of Marmoleum Textura, is not recommended, and matching weld cable is therefore notavailable. Seams of Marmoleum Textura should be nett fit seams.Cutting the seamImmediately after rolling the sheet trace the seam with recess scribers (Fig.6) along the trimmed edge of the first sheet and cutthrough with a utility knife and hooked blade, again with a slight undercut.Once the seam is cut, the cut edge should just fall into place alongside the edge of the first sheet (if the sheet needs to be pushedagainst the previously stuck sheet the seam is too tight and will peak.The Forbo Trimmer (Fig.7) or Wolff Linocut can be used to cut the seam in one operation.Roll the seam with a seam roller to ensure full contact with the adhesive. Remove any excess adhesive with a damp cloth.Repeat the process for the second half of the sheet length.Note: it is important to cut and roll the seam whilst the adhesive is still wet (to avoid peaking seams). Remove any adhesive residuesat the seam straight away with a damp cloth.Marmoleum 01-2019
Tip: If the guide on your recess scribers is too thick (fig. a) it could remove adhesive from the subfloor when scribing the seam.Sanding the bottom of the guide on the recess scriber to reduce its thickness (fig. b) will prevent this and will also help to keep theguide clean and free of adhesive contamination.Tip: check the quality of the seam on completion. If there are any small, isolated, gaps in the length of the finished seam these may befilled using the following technique.1. Clean the area of the repair paying attention to the removal of any loose linoleum fragments or dust.2. Make up a paste by mixing fine shavings, ground or sanded to make a fine dust, from a piece of the original colour linoleum with awaterproof PVA adhesive.3. Fill the area to be repaired with the paste using an appropriate tool such as a spatula, leaving the filler flush with the surface of theMarmoleum. Remove an excess with a damp cloth.4. Smooth the finished repair with a spatula and allow to dry.5. When the filler is completely dry, buff the surface to an even finish, applying a thin coat of diluted floor maintainer if required.Tip: If applying floor maintainer use a small brush or similar to the filler only, thereby avoiding gloss variations in the flooring adjacentto the filler.Note: The procedures and actions described above are suggested to assist in resolution of minor problems. They do not form part ofany official Forbo installation recommendation, and Forbo cannot take responsibility for the long-term effectiveness of any suchrepairs, or warrant the repaired areas.As with any repair, the quality and effectiveness of the work, which includes visual acceptability, will depend on the skill of theoperator. The final acceptance of any repair is at the sole discretion of the client/end user.Welded SeamsGeneral adviceWelding and trimming techniques for linoleum are the same as those used for vinyl products; however, the composition of linoleumweld cable requires a different welding temperature and speed. Problems encountered with welding are usually due to either weldingat the wrong temperature and/or speed of application, or use of incorrect trimming techniques.Seam forming and groovingSeams for welding should be formed in the same manner as above. A net fit seam is still required. Seams should be grooved out to adepth just above the hessian backing (Fig.10). A ‘P’ Type groover (Fig.11) is recommended for manual grooving of seams, however,automatic or power groovers (Fig.12) may be more productive on larger installations. Fig 13 shows the Forbo Groover which uses a hotair to soften the surface of the sheet and built in grooving blades to cut the groove in one operation. If a grooving tool such as anelectric grooving machine is being used a small, consistent, gap ( 0.5mm) may be left to accommodate the guide wheels of thegrooving machine.Marmoleum 01-2019
WeldingSwitch on the hot air gun and allow 5 to 7 minutes for it to reach the selected temperature. Linoleum should be welded at atemperature of approximately 350 C. (see weld gun manual for setting details). Fit the welding nozzle before switching on the hot airgun.If the gun is resting on the floor ensure that the nozzle is not directed at the floor or anywhere dangerous.Weld guns will vary, so it is always advisable to practice weld techniques first on a piece of waste material to match the correct air guntemperature with welding speed. Marmoleum should be welded with a 5mm Speedweld nozzle.Make sure the groove is thoroughly clean before beginning to heat weld. Make sure that all electrical cables are laid out withouttangles and that there are no obstructions along the seam to be welded.Cut the welding cable to a consistent and generous length or unwind sufficient weld rod from the reel and put the reel in a positionwhere you are working towards it. Have the power cable ahead of you if possible.Start at a wall. Thread the cable through and weld moving backwards, away from the wall, maintaining a slight downward pressure sothat the weld nozzle will force the weld cable into the groove. Do not let the cable melt in the nozzle.A good weld is obtained by the correct combination of temperature, speed and downward pressure. The weld cable should beallowed to melt enough so that the melted rod reaches the bottom of the groove. The top of the welding rod should flatten slightlyand a small bead should form on either side of the welding tip (Fig. 10 and 14). After the first 30cm check the weld adhesion is goodby gently pressing the cable in the welded section from side to side. If the speed/heat/pressure combination is incorrect the weld willeither come out or the cable will have melted over the sides of the groove, possibly with charred material either side of the groove. Fig15 below is an example of a weld application that is too hot.Marmoleum 01-2019
TrimmingNote: To avoid unintended damage to the floor covering Forbo recommends to use the Mozart knife for trimming the weld cable. If asharp spatula is being used special care should be given to avoid damaging the sides of the seams.While the cable is still warm trim off most of the top half of the cable down to approximately 0.5mm using a Mozart knife which fitsover the cable or a sharp spatula and slide. This enables the cable to cool more quickly and enables a quick first cut to be madewithout risk of gouging the material.The welding cable will dish slightly (concave downwards) as it cools. Wait until the material is completely cool before trimming flushwith the surface of the sheet with a Mozart knife or a sharp spatula angled slightly across the line of cut. Alternatively, trim flush witha flat profile ‘X-acto’ router blade. This blade is slightly concave, so blunt the corners to avoid scratches on either side of the weld.If trimming pulls out the weld this shows it is unsuccessfully adhered and the seam should be re-done with fresh welding cable.Note: Making the final trim while the welding rod and material is still warm can result in the weld cable being pulled out of the grooveand/or dishing of the weld cable. This may result in subsequent seam soiling problems or cause permanent damage to the surface ofthe flooring.When Marmoleum and Linoleum products are installed adjacent to a vinyl flooring product, Marmoweld welding rod must be used toheat weld the seam if heat welding is specified. A vinyl welding rod will NOT bond to Marmoleum and Linoleum products, butMarmoweld will achieve an adhesive bond to most vinyl flooring products.Joining up a weldTo join a weld in the middle of a seam trim off the loose ends and chamfer down the section to be overlapped with a hand groover.Ensure hot air gets into the groove and heats the cable. As the gun travels over the un-welded section apply pressure and carry theweld on over the section to be joined. Allow to cool and trim as normal (Fig.16).Bight marks in LinoleumDuring the manufacture of linoleum, it is hung in large stoves in continuous festoons up to 16 metres high to mature. At the top, thelinoleum passes over a pole, face inwards, and at the bottom forms a loop, or bight, face outwards. During the 2-3 week curing processthe weight of the material causes the linoleum to mould a little to the pole causing a mark across the width (a pole mark) which isalways cut out at the factory.The fold or bight at the bottom is however more gentle, though sometimes detectable as a slight ridge across the sheet, about 15cmwide (known as a bight mark).With modern flexible linoleum formulations, this can usually be stuck down in 2.5mm or 2.0mm linoleum using normal adhesivespreading techniques provided the site is warm and the bight mark area is well rolled, firstly across the sheet and then along it.With 3.2mm material or if site conditions are unfavourable it may be necessary to adapt the installation technique. Some floor layersprefer instead to cut bight marks out (especially when using 3.2mm thick material).Marmoleum 01-2019
When site conditions are good, bight marks should present no problems using Forbo Eurocol 414 or 614 adhesives correctly spreadwith the specified 2mm x 6mm serrated trowel – a little extra attention is all that is required.Pull back the sheet approximately half its length and spread the adhesive. As the sheet is fed into the wet adhesive and the bight markis reached lean gently on the bight mark to reduce the radius and rock in and out of the adhesive looking to make sure that completewet transfer of adhesive is achieved on the hessian backing over the whole width of the bight mark. Once the remainder of linoleumstill to be fed into adhesive clears the area of the bight mark roll immediately with a 50-70 kg roller as above, dealing with any bubblesor trapped air before moving on. Repeat the rolling of the bight mark at 15 minute intervals until fully bonded to subfloor.An alternative method is to mark the subfloor where the bight mark falls (Fig.8), pull back the sheet and spread the adhesive on thesubfloor stopping just short of the start of the bight mark. Feed the linoleum into the wet adhesive up to this point and roll in bothdirections as above. Next spread the adhesive over the area of subfloor to be covered by the bight mark (Fig.9). Lean gently on the bightmark to reduce the radius and rock in and out of the adhesive looking to make sure complete
Installation Forbo recommends that Marmoleum and linoleum sheet flooring be installed one sheet at a time. Always install all Marmoleum sheets in the same direction. It is recommended that each sheet be scribed to fit and that the fact