Transcription
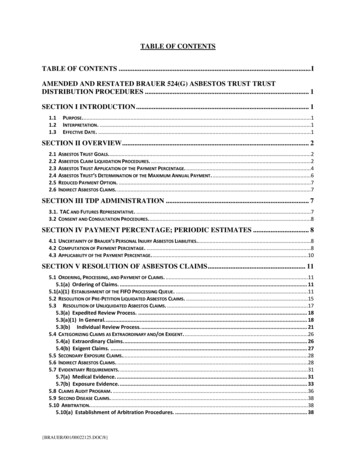
Table of ContentsForeword1. Installation Training. . . . . . . . . . . . . . . . . . . . . . . . . . . . . . . . . . 37. Adhesives . . . . . . . . . . . . . . . . . . . . . . . . . . . . . . . . . . . . . . . . . . 212. Product Descriptions. . . . . . . . . . . . . . . . . . . . . . . . . . . . . . . . . 48. Installation . . . . . . . . . . . . . . . . . . . . . . . . . . . . . . . . . . . . . . . . . 23Linoleum Sheet. . . . . . . . . . . . . . . . . . . . . . . . . . . . . . . . . . . . . . . . 23Linoleum Tile. . . . . . . . . . . . . . . . . . . . . . . . . . . . . . . . . . . . . . . . . . 30Heat Welding. . . . . . . . . . . . . . . . . . . . . . . . . . . . . . . . . . . . . . . . . . 34Flash Coving. . . . . . . . . . . . . . . . . . . . . . . . . . . . . . . . . . . . . . . . . . . 38Repairs 423. Application Chart . . . . . . . . . . . . . . . . . . . . . . . . . . . . . . . . . . . . 54. Fast Facts per Product. . . . . . . . . . . . . . . . . . . . . . . . . . . . . . . . 6Marmoleum Sheet. . . . . . . . . . . . . . . . . . . . . . . . . . . . . . . . . . . 6Marmoleum Tile . . . . . . . . . . . . . . . . . . . . . . . . . . . . . . . . . . . . . 75. General Installation Guidelines. . . . . . . . . . . . . . . . . . . . . . 13Jobsite Conditions. . . . . . . . . . . . . . . . . . . . . . . . . . . . . . . . . . 13Material Storage and Handling. . . . . . . . . . . . . . . . . . . . . . 13Color Matching. . . . . . . . . . . . . . . . . . . . . . . . . . . . . . . . . . . . . 139. Tools and Accessories. . . . . . . . . . . . . . . . . . . . . . . . . . . . . . . 4310.Warranty . . . . . . . . . . . . . . . . . . . . . . . . . . . . . . . . . . . . . . . . . . . 466. Substrate Evaluation and Preparation. . . . . . . . . . . . . . . . 14Definitions. . . . . . . . . . . . . . . . . . . . . . . . . . . . . . . . . . . . . . . . . . 14Substrate Evaluation. . . . . . . . . . . . . . . . . . . . . . . . . . . . . . . . 15Concrete Floors . . . . . . . . . . . . . . . . . . . . . . . . . . . . . . . . . 15Wood Subfloors. . . . . . . . . . . . . . . . . . . . . . . . . . . . . . . . . 15Existing Resilient Flooring . . . . . . . . . . . . . . . . . . . . . . . 16Poured Floors . . . . . . . . . . . . . . . . . . . . . . . . . . . . . . . . . . . 17Radiant Heated Floors. . . . . . . . . . . . . . . . . . . . . . . . . . . 17Moisture Testing. . . . . . . . . . . . . . . . . . . . . . . . . . . . . . . . . 17pH Testing . . . . . . . . . . . . . . . . . . . . . . . . . . . . . . . . . . . . . . 18Substrate Porosity. . . . . . . . . . . . . . . . . . . . . . . . . . . . . . . 18Adhesive Bond Testing . . . . . . . . . . . . . . . . . . . . . . . . . . 19Substrate Preparation. . . . . . . . . . . . . . . . . . . . . . . . . . . . . . . 19Patching and Leveling Materials . . . . . . . . . . . . . . . . . 19Primers . . . . . . . . . . . . . . . . . . . . . . . . . . . . . . . . . . . . . . . . . 20Existing Adhesives. . . . . . . . . . . . . . . . . . . . . . . . . . . . . . . 20Additional Resources. . . . . . . . . . . . . . . . . . . . . . . . . . . . . . . . 20Specification Requirements. . . . . . . . . . . . . . . . . . . . . . 20Organizations. . . . . . . . . . . . . . . . . . . . . . . . . . . . . . . . . . . 202
FOREWORDThe finest floor covering made will not look good nor perform well if it is not installed properly. In the flooring industry, 97%-98% of all complaints are installation, subfloor or maintenance related.The first step to a successful installation is choosing the right floor covering for the particular application. Noone flooring is right for every application. If you have any doubt as to the suitability of a product, check withthe manufacturer.With today’s technology, flooring products, substrate preparation products, adhesives and installation techniques change at a rapid pace. It is the responsibility of the installer to assure that the products are installedin strict adherence to the manufacturer’s recommendations.This installation manual is just one of the many technical support services provided by Forbo Flooring. Donot install any floor covering product until you are fully educated and familiar with installation proceduresand recommendations, and have made sure that all site requirements have been met.IMPORTANT!The procedures described in this manual have been carefully developed to offer the best possible information for a proper and successful installation with Forbo’s flooring products. Following these guidelines willoffer the consumer the full value of the manufacturer’s warranty. Any deviation from these instructions mayresult in an installation failure. Failure to follow these guidelines does not affect the manufacturer’s limitedfive year warranty, but it does increases the chance of an installation failure.4
Installation TrainingPROFESSIONALISM AND ATTITUDEASSOCIATE MECHANIC PROGRAM“Professionalism” is not merely possessing mechanical skillsand knowledge it is also an attitude. Having the right attitude and conducting yourself in a professional manner atall times is essential to gaining the respect of all those youcome into contact with. Above all else, taking pride in yourwork is the key to successful installations.Take the time to review the manufacturer’s installationguidelines. If you ever have any doubts, do not proceed withthe installation. Call your local supplier for further information. The liability of the installation rests solely with theinstaller and flooring contractor. The warranty from themanufacturer covers only the product, and is in no waycontingent upon installation and maintenance practices.Forbo’s ASSOCIATE MECHANIC installation training coversa range of topics and techniques including:subfloor evaluation and preparationMoisture Limitor certificationproduct knowledgetoolsfitting methodsMarmoleum OFESSIONALISMPROFESSIONALISM AND EDUCATIONThis training is designed for experienced resilient flooringinstallers who desire to improve their level of knowledgeand skill.The flooring industry is continually changing. In order toremain successful, those working in the industry must alsochange. Education is the key to this change.The Forbo Associate and Master Mechanic courses arebenchmarks for installation training. In addition to beingdedicated to offering the resilient flooring installer the mostcomprehensive and professional installation training coursesin the industry, Forbo Flooring also offers an array of othereducational opportunities such as product presentations,supplier training seminars, and dealer installation clinics forflooring products, Moisture Limitor, and Bulletin Board Cork.Forbo Flooring installation training courses are PASS/FAIL. In order to qualify for a certificate, the installer mustsuccessfully and satisfactorily complete the installation tasks,have a thorough knowledge of the information presentedthroughout the course, and most importantly, demonstratea professional attitude.Upon successful completion of the course, the installerwill receive a certificate suitable for framing, a laminatedwallet card to carry, and a patch that can be sewn on a shirt,jacket, etc. Qualified installers are maintained in a databaseutilized for referrals throughout North America.Forbo Flooring, Inc.Technical ServicesP.O. Box 667Hazleton, PA 18201Email: info@fL-NA.comWebsite: www.forboflooringNA.comTel: (570) 459-0771Fax: (570) 450-0330Toll Free: 800-842-7839MASTER MECHANIC PROGRAMForbo’s MASTER MECHANIC installation training istailored for the Forbo Associate Mechanic who desiresto reach the highest level in his trade. This intensive andrewarding course covers a range of advanced installationtopics and techniques including:wall installationsaccent heat weldingspecialty toolsflash covingheatwelding flashcove seams and cornersinset and design installationsPROFESSIONALISMTRAINING CENTERSAssociate and Master Mechanic installation training is offered at Forbo’s technical training centers in the followinglocations:Hazleton, PAReno, NVDallas, TXForbo will provide all meals, hotel accommodationsand transportation to/from our facilities and the WilkesBarre/ Scranton airport for our Pennsylvania center; RenoInternational airport for our Reno center; DFW Airport orLove Field for our Texas center.If you are a professional and desire to enhance yourskills and knowledge, contact Forbo or your local supplierfor course dates and an application form.5
fast factsMarmoleum sheetDescription:Marmoleum from Forbo Flooring is made from primarily natural ingredients which consist of oxidized linseedoil, rosins, cork and/or wood flour, all of which are calendered onto a carrier sheet. Depending on thecalendering method used and the composition, various types of linoleum can be manufactured.Marmoleum sheet is calendered onto a jute back.GAUGE:1/10” (2.5 mm)WIDTH:79” (2 meters)LENGTH:105’ (32 meters)INSTALLATION FAST FACTS Marmoleum may be installed on approved substrates on all grade levels. The permanent HVAC must be operational and set at a minimum of 68o F (20o C) at least one week prior to installation.Acclimate material to jobsite conditions for a minimum of 48 hrs. prior to installation. Always conduct moisture tests on all concrete slabs regardless of age or grade level. Conduct calcium chloride tests in accordance with ASTM F1869. Concrete moisture vapor emissions must not exceed5.0 lbs. per 1000 sq. ft. in 24 hrs. when using Forbo L910 adhesive, or 3.0 lbs per 1000 sq. ft. in 24 hrs. when using Forbo414 adhesive (available in Canada only). When moisture vapor emissions exceed these requirements, please requestinformation on Forbo Moisture Limitor. Measure the relative humidity in the center of the concrete slab in accordance with ASTM F2170. Relative humidity mustnot exceed 75%. A pH test should be conducted and must not exceed a pH of 10. Always use the highest quality patching and leveling compounds and always follow the manufacturer’s recommendationsfor their use and application. Always conduct an adhesive mat bond test. Bond testing will aid in determining the proper working time of the adhesiveand identify bonding problems prior to the installation. Use Forbo L910 adhesive or Forbo 414 adhesive (available in Canada only) for flat installations and when coving material. Use a 1/16” x 1/16” x 1/16” square notch trowel. Install rolls and cuts in consecutive order. Do Not Reverse sheets for seaming. Install one sheet at a time, making sure to place the material into wet adhesive. Roll immediately with a 100 lb. roller andalways check for proper adhesive transfer. In order to achieve a secure bond there must be a complete wet transfer ofadhesive to the material backing. Underscribe seams and cut material on a slight bevel; refer to seaming procedures. Flat trowel adhesive on the material backing in the area of stove bar marks (double stick), and weigh down after rolling. Heat welding is optional; but recommended. Use Marmoweld or Artoweld welding rod only. Do not chemical weld. Do not allow heavy traffic or rolling loads for a minimum of 72 hours following the installation. Additional time may benecessary when installing over non-porous substrates. In order to allow the adhesive to dry and cure properly, wait at least five days following the installation before conductingwet cleaning procedures or initial maintenance. Additional time may be necessary when installing over non-poroussubstrates. These are just “Fast Facts”. Complete installation instructions can be found in other sections of this manual.For additional information, contact Forbo Technical Services at (800) 842-7839.6
fast factsMarmoleum tileDescription:Marmoleum from Forbo Flooring is made from primarily natural ingredients which consist of oxidized linseedoil, rosins, cork and/or wood flour, all of which are calendered onto a carrier sheet. Depending on thecalendering method used and the composition, various types of linoleum can be manufactured.Marmoleum Tile is calendered onto a dimnesionally stable polyester backing.GAUGE:1/10” (2.5 mm)TILE SIZE:13” x 13” approximately (33 cm x 33 cm)INSTALLATION FAST FACTS Marmoleum Tile may be installed on approved substrates on all grade levels. The permanent HVAC must be operational and set at a minimum of 68o F (20o C) at least one week prior to installation.Acclimate material to jobsite conditions for a minimum of 48 hrs. prior to installation. Always conduct moisture tests on all concrete slabs regardless of age or grade level. Conduct calcium chloride tests in accordance with ASTM F1869. Concrete moisture vapor emissions must not exceed5.0 lbs. per 1000 sq. ft. in 24 hrs. when using Forbo T940 adhesive, or 3.0 lbs per 1000 sq. ft. in 24 hrs. when usingForbo 414 adhesive (available in Canada only). When moisture vapor emissions exceed these requirements, pleaserequest information on Forbo Moisture Limitor. Measure the relative humidity in the center of the concrete slab in accordance with ASTM F2170. Relative humidity mustnot exceed 75%. A pH test should be conducted and must not exceed a pH of 10. Always use the highest quality patching and leveling compounds and always follow the manufacturer’s recommendationsfor their use and application. Always conduct an adhesive mat bond test. Bond testing will aid in determining the proper working time of the adhesiveand identify bonding problems prior to the installation. Use Forbo T 940 adhesive, or Forbo 414 adhesive (available in Canada only). Use a 1/16” x 1/16” x 1/16” square notch trowel. Install cartons in consecutive order. Install tile in alternating directions (quarter turned). Install tiles into wet adhesive and roll immediately with a 100 lb. roller. Always check for proper adhesive transfer. In orderto achieve a secure bond there must be a complete wet transfer of adhesive to the tile backing. Heat welding is optional. Use Marmoweld welding rod only. Do not chemical weld. Do not allow heavy traffic or rolling loads for a minimum of 72 hours following the installation. Additional time may benecessary when installing over non-porous substrates. In order to allow the adhesive to dry and cure properly, wait at least five days following the installation before conductingwet cleaning procedures or initial maintenance. Additional time may be necessary when installing over non-poroussubstrates. These are just “Fast Facts”. Complete installation instructions can be found in other sections of this manual.For additional information, contact Forbo Technical Services at (800) 842-7839.7
SubfloorsNo floor covering can be any better than the substrate overwhich it is installed. The finished appearance and performance of the floor covering will be determined and affectedby the condition of the substrate. It is essential that all substrates be structurally sound, rigid, smooth, flat, clean, andpermanently dry. The substrate surface must be free of allcontaminants or foreign materials such as dust, wax, paint,grease, oils, solvents, curing and hardening compounds,sealers, and existing adhesives. Substrate evaluation andpreparation should not begin until a stable, conditionedenvironment as described under Jobsite Conditions hasbeen established.Below Grade – A location for a floor structure which isin contact with the ground or with less than 18 inches ofwell-ventilated space between the bottom of the lowesthorizontal structural member and the ground, at any pointand if part or all of the floor is below ground level.NOTE: The results of moisture testing, pH testing, and adhesive bond testing are directly influenced by the environmentin which the tests are conducted. Results of tests conductedprior to establishing a stable, conditioned interior environment should not be relied upon for determining if suitableconditions exist for installation of resilient flooring materials.Changes in the interior environment subsequent to suchtesting may cause conditions to change and lead to installation failures.Underlayment – The layer of material installed on or overthe subfloor to provide a smooth, clean surface to receivethe resilient floor covering.Grade Levels:On Grade – A location for a finished floor with no portionbelow ground level, and with the floor and the ground incontact or separated by less than 18 inches of well-ventilated space between the bottom of the lowest horizontalstructural member and the ground at any point.Above Grade (Suspended) – A location for a finished floorwhere the floor is not in contact with the ground and whichprovides at least 18 inches of well-ventilated space betweenthe bottom of the lowest horizontal structural member andthe ground at any point.Definitions:Subfloor –that structural layer intended to provide supportfor design loadings which may receive resilient floor coverings directly if the surface is suitable or indirectly via anunderlayment if its surface is not suitable.Substrate - the underlying support surface upon which theflooring is directly installed.Subfloor–Underlayment Combination – Designed to meetboth the structural requirements and to provide a smoothsurface to receive the floor covering. Note: Subfloor-Underlayment Combinations are usuallyonly suitable for the installation of textile type floor coverings. For resilient floor coverings, underlayment should beinstalled.Flooring System – All components associated with the installation of flooring materials including, but not limited to,subfloors, substrates, patching and leveling materials, primers or other coatings, moisture control products, adhesives,and finish flooring materials.(Refer to ASTM F141 for additional definitions)
SubfloorsSUBSTRATE EVALUATIONConcrete Subfloors (Refer to ASTM F710)Concrete substrates shall be structurally sound, rigid,smooth, flat, clean, and permanently dry. The concretesurface must be free of all contaminants or foreign materialssuch as dust, paint, wax, grease, oils, solvents, curing andhardening compounds, sealers, and existing adhesives.Wood Subfloors (Refer to ASTM F1482)Wood substrates shall be structurally sound, rigid, smooth,flat, clean, and permanently dry. The wood surface must befree of all contaminants or foreign materials such as dust,paint, wax, grease, oils, solvents, curing and hardening compounds, sealers, and existing adhesives.Concrete substrates shall have a minimum compressivestrength of 3500 psi and a dry density of at least 150 poundsper cubic foot.Wood subfloors should be double construction with a minimum total thickness of 1”. All wood subfloors must have atleast 18” of well-ventilated air space below.Concrete subfloors on or-below grade shall have an acceptable vapor retarder underneath. The vapor retarder shall bepuncture and tear resistant with a minimum thickness of15 mils, and have a permeability rating of 0.3 perms or less.Refer to ASTM E1745. If no vapor retarder is present, contactForbo Technical Services for additional information.Forbo floor coverings should not be installed over woodensubfloors built on sleepers over on grade or below gradeconcrete floors without first making sure that adequate precautions have been taken to ensure the structural integrityof the system, and to prevent moisture migration from theconcrete slab. Proper planning and design will minimize thepotential for flooring system failures generally associatedwith this type of construction.Imperfections such as chips, spalls, cracks, and joints mustbe repaired using suitable patching and leveling materials. Always follow the manufacturer’s recommendations forthe use and application of these products. (see SubstratePreparation)Concrete JointsExpansion and isolation joints - expansion and isolationjoints in concrete are designed to allow for the expansionand contraction of the concrete. All movable joints must behonored in order to eliminate buckling and telegraphing inthe finished resilient flooring cause
Marmoleum installation seaming repairs heatwelding maintenance PROFESSIONALISM This training is designed for experienced resilient flooring installers who desire to improve their level of knowledge and skill. MASTER MECHANIC PROGRAM Forbo’s MASTER MECHANIC installation training is tailored for