Transcription
RPM Tips & Tricks:Mailing Labels / Mailing ListsBackgroundAuctionRPM may be used to create Mailing Labels (in printed form, ‘2‐up’ or ‘3‐up’) or MailingLists (files readable by Microsoft Access or Microsoft Excel). The choice is up to you.With a few simple keystrokes, AuctionRPM allows you to create Mailing Labels for the following: All buyersGeographically‐targeted buyers, based upon Zip CodeBuyers registered for a specific auctionBuyers with an interest in Inventory Categories used in a specific auctionBuyers with interest in one or more Inventory Categories, regardless of auction.Mailing Lists created in a Microsoft Access database format (‘Section 3: Creating Mailing Labels’)contain information found on mailing labels, e.g., names and addresses only.Mailing Lists created in a Microsoft Excel spreadsheet format (‘Section 4: Export Mailing Lists toa Microsoft Excel File’) contain not only names and addresses but also email addresses, inventorycategory preferences, phone numbers, and much more. Try it!Inclusion / Exclusion of buyers in Mailing LabelsBy default, all buyers are eligible to be included in Mailing Labels. To check a buyer’s Mailing Label status, see (Tools – General tab – Master Data – Buyers– Detail – Include this buyer In mailing labels). If checked, buyer is included.Unchecked, buyer is excluded.If the buyer is marked ‘Inactive’ (Tools – General tab – Master Data – Buyers – Detail –Inactive), he will also be excluded from Mailing Labels.Note: Marking the buyer as ‘Inactive’ removes his/her name from display during ‘BuyerLookup’ in the ‘Bidder Registration’ process. To change whether future, added buyers will be included in Mailing Labels or not, see(Tools – General tab – Settings and Defaults – Miscellaneous – Default To Include BuyerIn Mailing Label Print Runs). If checked, newly added buyers will be included.Unchecked, added buyers will be excluded.The balance of this ‘Tips & Tricks’ tutorial will assume that the phrase ‘all buyers’ means ‘allincluded buyers’.Mailing Label Example: ‘Targeted’ Mailing ‐ Matching Inventory Categories with BuyersRev 01/19/2006 KSPage 1 of 10
RPM Tips & Tricks:Mailing Labels / Mailing ListsIn order to target a specific advertising audience, with specific Inventory Category Preferences(“ICPs”), simply associate one or more Inventory Categories to the affected Buyer Master record.Example:Joe has preferences for antiques and kitchen appliances. Suzy likes photographicequipment. Joe’s Buyer Master record has ‘Antiques’ and ‘Kitchen Appliances’ InventoryCategories associated with him; Suzy, ‘Photographic Equipment’.An upcoming auction features 1897 spittoons as well as a new toaster oven. Whenreadying the mailing labels, the target audience is chosen ‘by Inventory Category’, withboth ‘Antiques’ and ‘Kitchen Equipment’ categories chosen.Since Joe has one (or more) of the categories in his Buyer Master record, a Mailing Labelwill be created for him. None of the selected Inventory Categories matches Suzy’s‘Photographic Equipment’ preference. Only Joe’s label will print.Enough talk. Here’s how to set up Mailing Labels:Mailing Labels: All buyers in the Buyer Master table Use (Auctions – Marketing tab – Mailing Labels) to create labels (section 3d, below)Mailing Labels: Geographically‐targeted buyers, based upon Zip code Use (Auctions – Marketing tab – Mailing Labels) to create labels (section 3d, below)Mailing Labels: Bidders Registered for a particular auction Use (Auctions – Marketing tab – Mailing Labels) to create labels (section 3a, below)Mailing Labels: Target Buyers with interest in Inventory Categories used in a specific auction Set up associations between Inventory Categories and Buyers (section 1, below)Set up Inventory Categories related to any specific auction (section 2, below)Use (Auctions – Marketing tab – Mailing Labels) to create labels (section 3b, below)Mailing Labels: Target Buyers with interest in one or more Inventory Categories Set up associations between Inventory Categories and Buyers (section 1, below)Use (Auctions – Marketing tab – Mailing Labels) to create labels (section 3c, below)Note: It may be helpful to pre‐determine and enter Inventory Categories that will be associatedwith buyers or used in an auction. They may be more general in nature (‘Antiques’) or morespecific (‘chambray olive oils’) as the need arises. Fine tune mailing lists in this manner: Themore specific, the finer the target audience. The less specific, more market saturation.Rev 01/19/2006 KSPage 2 of 10
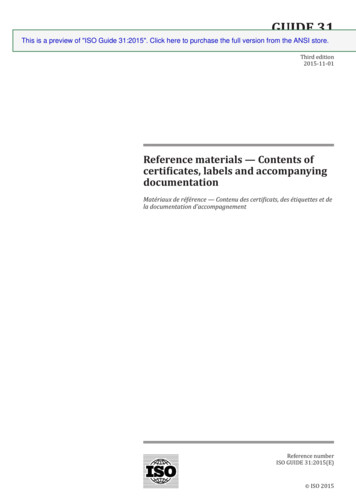
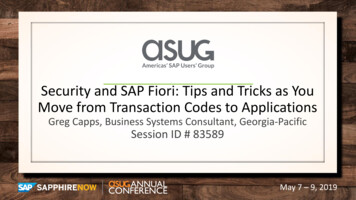
RPM Tips & Tricks:Mailing Labels / Mailing ListsTo add Inventory Categories, go to (Tools – General tab – Master Data – Inventory Categories).Mailing Lists: Export to Microsoft Access Database File Follow procedures listed for Mailing Labels, above. Choose output type ‘External File’.Mailing Lists: Export to Microsoft Excel Spreadsheet File This may be the most effective way to create Mailing Lists. With the wide range ofmanipulative possibilities that exist in Microsoft Excel, this is certainly the most versatilemethod of Mailing List creation. For detailed instructions, see Section 4, below.Section 1: Associating Inventory Categories with Buyers1a. Inventory Category Preference Association: When Buyer Master records are entered ormodifiedPath: Tools – General tab – Master Data – Buyers – Purchasing tabAfter determining the Buyer’s Inventory Category Preferences (“ICPs”), click the ‘Purchasing’tab. Click on ‘Add’ and select one or more Inventory Categories. To remove a category,highlight it, then click ‘Delete’.Note: There is also an opportunity to automatically add one or more ICPs to the buyers using(Auctions – Preparation tab – Schedule An Auction – Marketing – Post Categories to allRegistered/Purchasing Bidders). The option is described in section 2.1b. Inventory Category Preference Association: During Bidder RegistrationRev 01/19/2006 KSPage 3 of 10
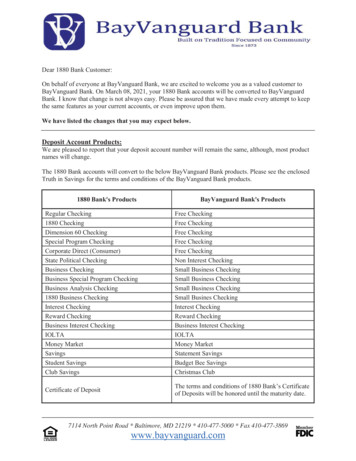
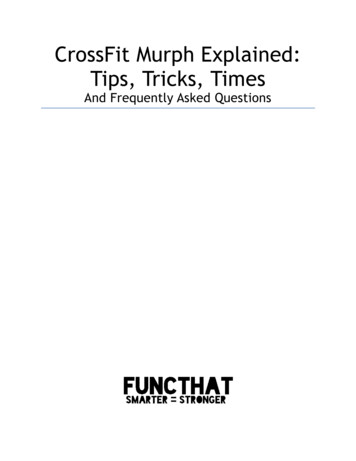
RPM Tips & Tricks:Mailing Labels / Mailing ListsPath: Auctions – Preparation tab – Bidder Registration – Buyer Lookup ‐ search for Buyer, thenEdit or Add/New – Buyers – Purchasing tabUse this method to add/edit ICPs during the auction’s Bidder Registration phase. Simply access(‘Edit’) or add (‘Add/New’) the buyer record. Then, follow instructions in section 1a, above.Section 2: Associating Inventory Categories With Auctions2a. Inventory Category Preference Association: During ‘Schedule An Auction’ ActivityPath: Auctions – Preparation tab – Schedule An Auction – Marketing – Inventory CategoryCodesThis method may be used either before or after the auction. Clicking ‘Auto Select’ causes RPM tosearch all items in the auction for their Inventory Category Codes, and then records and displayseach and every code that was used.Important: When requesting Mailing Labels that are based on Inventory Category Codes used ina specific auction, the program relies on the Inventory Category Codes listed on this screen. Theprogram does not look at the items themselves.Rev 01/19/2006 KSPage 4 of 10
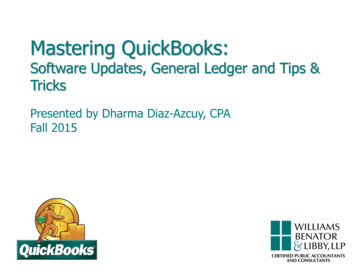
RPM Tips & Tricks:Mailing Labels / Mailing ListsIn the sample auction, shown below, only items with Inventory Categories “Antiques” and“Kitchen Equipment” were present.If desired, the two Inventory Category Codes may now be automatically posted to either ‘AllRegistered Bidders’, or ‘All Purchasing Bidders’ in this specific auction. Simply click theappropriate button.2b. Advanced Inventory Category Preference Association: Fooling the System During‘Schedule An Auction’ ActivityYou may ‘fool’ the system by adding or deleting Inventory Category Codes from this screen. Example 1: In order to tag all bidders who came to this auction as ‘antique auctionbidders’ (perhaps a majority of items were antiques, with very few pieces of KitchenEquipment), highlight Inventory Category Code ‘Kitchen Equipment’, then click ‘Delete’.Only the ‘Antiques’ category is associated with this auction. Next, and as needed, pressthe appropriate ‘Post Categories ’ button. Example 2: We wish to use ‘Inventory Categories’ to indicate who attended each auction,as well as associating them with one or more categories. Here, we ‘fool’ the system:First, since auction primarily dealt with ‘Antiques’, delete the ‘Kitchen Equipment’category.Second, add a new category named ‘Auction 1’ (click ‘Add’, ‘Add/New’, ‘Auction 1’,‘Save’).Rev 01/19/2006 KSPage 5 of 10
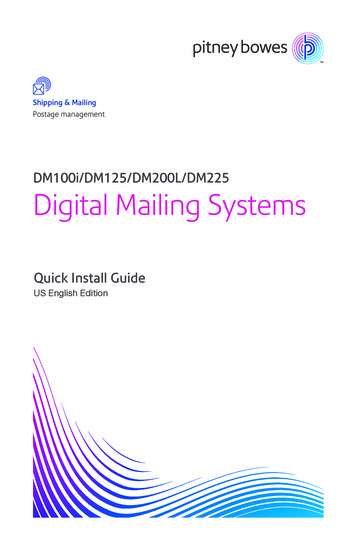
RPM Tips & Tricks:Mailing Labels / Mailing ListsThird, when only ‘Antiques’ and ‘Auction 1’ categories are displayed, press the ‘PostCategories To All Registered Bidders’ button.The beauty of ‘fooling the system’ is that when mailing labels are requested for thosewho attended one or more of auctions #1, #2 and #3, simply use ‘Select By InventoryCategory’, and select Categories for ‘Auction 1’, ‘Auction 2’, and ‘Auction 3’. Thisselection method is both simple and effective.Section 3: Creating Mailing LabelsPath: Auctions – Marketing tab – Mailing LabelsNow that Inventory Categories have been associated with Buyers and Auctions (as needed), allthat is left is to click a button or two and complete the Mailing Label/List process. Let’s go Selection Criteria3a, 3b: Select By Auction3c: Select By Inventory Category3d: Select By Zip code3e. Output FormatNote: To select All Buyers, see section 3d, ‘Select By Zip Code’.3a: Mailing Labels, Selected By Auction (All Registered Bidders for a Specific Auction)Rev 01/19/2006 KSPage 6 of 10
RPM Tips & Tricks:Mailing Labels / Mailing Lists Generally used after an auction to invite attendees to a future auction, or to thank themfor their attendance.Click on the ‘Select By Auction’ checkboxSelect the affected Auction NumberClick the ‘All Buyers Registered For This Auction’ button (labels will be created for allbuyers registered in the specific auction).Select desired output type (see section 3e, below)Click on ‘Print Labels’. Output ‘prints’ to the screen. Click ‘Print’ to print to printer.Note: Alternative method for creation of this variety of Mailing Labels: See (Reports – AllReports – Report #60: ‘Mailing Labels – 3 Columns x 10 Rows – All Buyers For Auction’.Does not allow for ‘Last‐Name‐First To Normal Format’ conversion. Lacks ‘2‐up’ / ‘3‐up’choice.3b: Mailing Labels, Selected By Auction (Select Buyers By Inventory Categories Used In ThisAuction) Generally used to invite all buyers with Inventory Category preferences that match aspecific auction’s Inventory Category selections. Great for advertising an upcomingauction to a targeted audience.Click on the ‘Select By Auction’ checkboxSelect the affected Auction NumberClick the ‘Select Buyers By Inventory Categories Used In This Auction’ button(Categories associated with the specific auction will be matched with those found inBuyer Master records. See Section 1: Associating Inventory Categories With Buyers)Select desired output type (see section 3e, below)Click on ‘Print Labels’. Output ‘prints’ to the screen. Click ‘Print’ to print to printer.Note: Alternative method for creation of this variety of Mailing Label: See (Reports – AllReports – Report #26: ‘Mailing Labels – Interested Buyers For Specific Auction’. Does notallow for ‘Last‐Name‐First To Normal Format’ conversion. Lacks ‘2‐up’ / ‘3‐up’ choice.3c: Mailing Labels, Selected By Buyer’s Inventory Category Preference(s) Generally used to announce an auction to buyers that share one or more InventoryCategory preferences with the selected categories. Similar to 3b, above, but does not relyon selection of any particular auction.Click on the ‘Select By Inventory Category Preference’ checkboxTag (check) any or all Inventory Categories (these Inventory Categories will be matchedwith those found in Buyer Master records. See Section 1: ‘Associating InventoryCategories With Buyers’)Select desired output type (see section 3e, below)Click on ‘Print Labels’. Output ‘prints’ to the screen. Click ‘Print’ to print to printer.Rev 01/19/2006 KSPage 7 of 10
RPM Tips & Tricks:Mailing Labels / Mailing ListsNote: Alternative method for creation of this variety of Mailing Labels: See (Reports – AllReports – Report #58: ‘Mailing Labels – 3 Columns x 10 Rows – By Inventory Category’.Does not allow for ‘Last‐Name‐First To Normal Format’ conversion. Lacks ‘2‐up’ / ‘3‐up’choice.3d: Mailing Labels, Selected By Zip Code Used to target specific regions (Zip Codes) for Mailing Labels. Mailings may be targetedto only local residents using this method.Click on the ‘Select By Zip Code’ checkboxTag (check) any or all Zip Codes. Click on ‘Select All’ or ‘Deselect All’ for fast selection.Select desired output type (see section 3e, below)Click on ‘Print Labels’. Output ‘prints’ to the screen. Click ‘Print’ to print to printer.Notes: Using ‘Select By Zip Code’, to select All Buyers, click on ‘Select All’ (Zip Codes). Alternative method for creation of ‘2‐up’ labels, All Buyers: See (Reports – All Reports –Report #25: ‘Mailing Labels – All Buyers – 2 Columns x 10 Rows’. Does not allow for‘Last‐Name‐First To Normal Format’ conversion. Alternative method for creation of ‘3‐up’ labels, All Buyers: See (Reports – All Reports –Report #93: ‘Mailing Labels – All Buyers – 3 Columns x 10 Rows’. Does not allow for‘Last‐Name‐First To Normal Format’ conversion.3e. Output Format Checkbox ‘Convert Last‐Name‐First To Normal Format’: If checked, this setting willcause ‘Smith, John’ to print as ‘John Smith’. Radio Button ‘Mailing Label’ causes printed output of Mailing Labels. ‘Mailing LabelFormat’ determines whether the labels are printed in ‘2‐up’ (2 columns per page, 1” x 4”labels, Avery 5161) or ‘3‐up’ (3 columns per page, 1” x 2 ¾” labels, Avery 5160). Radio Button ‘External File’ causes output of selected names and addresses to a MicrosoftAccess database file. If this option is selected, and ‘Print labels’ is clicked, select alocation for the file to be saved. The file is then created, and process completedNote: Microsoft Access must be present for this option to be used. If Access is notpresent, an error message will be displayed; no file will be created.Section 4: Export Mailing Lists to a Microsoft Excel FilePath: Reports – All Reports ‐ Report #48: ‘Export Excel Spreadsheet of Buyers’Note: Microsoft Excel must be present for this option to be used. If Excel is not present, an errormessage will be displayed; no file will be created.Rev 01/19/2006 KSPage 8 of 10
RPM Tips & Tricks:Mailing Labels / Mailing ListsMicrosoft Excel provides an extremely powerful method to control Mailing Lists. Excelspreadsheets may be sorted in any fashion desired. The resultant file may be used onsite or sentto a local printing shop for creation of Mailing Labels. Rows and columns may be deleted oradded as needed. The more knowledge gained regarding spreadsheets, the more powerful thetool! Enjoy.Selection Criteria4a, 4b: Select By Auction4c. Select By Inventory Category4d. Option, Minimum Total Sales4e. Option, Sales Date Range4f. Output OptionNote: To select All Buyers, see section 4c, ‘Select By Inventory Category’.4a: Mailing Labels, Selected By Auction (All Registered Bidders for a Specific Auction)See section 3a, above. Click ‘Export’. Select location to save file. Click ‘Save’.4b: Mailing Labels, Selected By Auction (Select Buyers By Inventory Categories Used In ThisAuction)See section 3b, above. Click ‘Export’. Select location to save file. Click ‘Save’.4c: Mailing Labels, Selected By Buyer’s Inventory Category Preference(s)See section 3c, above. Click ‘Export’. Select location to save file. Click ‘Save’.Notes: To select all Inventory Categories, click ‘Select All’. To deselect, click ‘Unselect All’. To select All Buyers, deselect all Inventory Categories by clicking ‘Unselect All’.4d: Option, Minimum Total SalesThis setting, if used, limits the number of data records in the Excel file by choosing only thosebuyers that meet or exceed the entered dollar value in Total Sales.Rev 01/19/2006 KSPage 9 of 10
RPM Tips & Tricks:Mailing Labels / Mailing Lists If no date range is entered in the ‘Optional Sales Date Range’ setting (see 4e, below), theentered ‘Minimum Total Sales’ dollar value is compared to the summation of eachbuyer’s sales from the ‘beginning of time’ to present day.Example: If no ‘Optional Sales Date Range’ is specified, the program calculates a total ofevery purchase made by every buyer. Joe has purchased 123,598.72 since his first visitto the auction, several months ago. ‘Minimum Total Sales’ was entered as 5,000.00. Joewould be included in the resultant Excel file. If a date range is entered in the ‘Optional Sales Date Range’ setting (see 4e, below), theentered ‘Minimum Total Sales’ dollar value is compared to the summation of eachbuyer’s invoiced sales, calculated using the entered ‘From’ date through the entered ‘To’date.Example: If ‘06/01/2004’ through ‘08/01/2004’ is entered as the ‘Optional Sales DateRange’, the program totals the buyer’s invoiced purchases for the specified time frame.Joe purchased 3,598.72 during the time period. ‘Minimum Total Sales’ was entered as 5,000.00. Joe would be excluded from the resultant Excel file.4e: Option, Sales Date RangeThis setting, if used, further limits the number of selected data records to only those where buyerinvoices fall within the ‘Sales Date Range’.Example: If ‘06/01/2004’ through ‘08/01/2004’ is entered as the ‘Optional Sales Date Range’, theprogram selects all buyers who were invoiced during the specified time frame. If a ‘Minimum Total Sales’ is specified (see 4d, above), the program further limits thenumber of records to those buyers who were invoiced during the ‘Sales Date Range’, andmeet the ‘Minimum Total Sales’ requirement.Note: A total of each buyer’s invoiced sales is calculated for the specified ‘Sales Date Range’.The total is then compared to the specified ‘Minimum Total Sales’. If the calculated totalmeets or exceeds ‘Minimum Total Sales’, the record is output to Excel spreadsheet.For examples of the interaction between ‘Optional Sales Date Range’ and ‘Minimum Total Sales’,please see section 4d, above.Note: The ‘Optional Sales Date Range’ specifies a range of Invoice Dates. In older software‘builds’, this setting is titled ‘Auction Dates’. All releases are based on ‘Invoice Dates’, regardlessof title.4f. Output OptionCheckbox ‘Convert Last‐Name‐First To Normal Format’: If checked, this setting will cause‘Smith, John’ to display as ‘John Smith’ in one of the spreadsheet columns.Rev 01/19/2006 KSPage 10 of 10
Mailing Lists created in a Microsoft Access database format (‘Section 3: Creating Mailing Labels’) contain information found on mailing labels, e.g., names and addresses only. . The le