Transcription
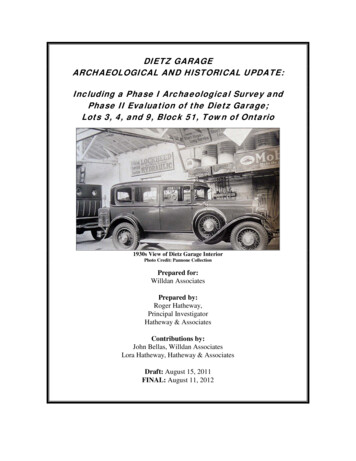
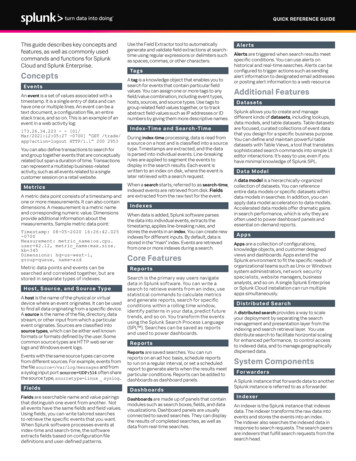
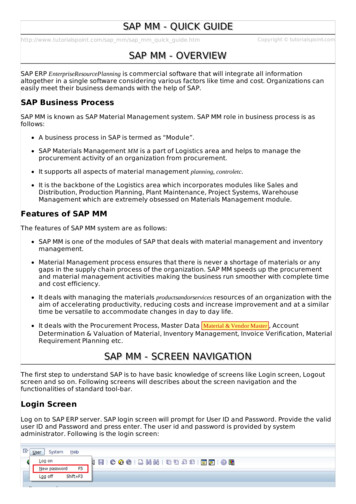
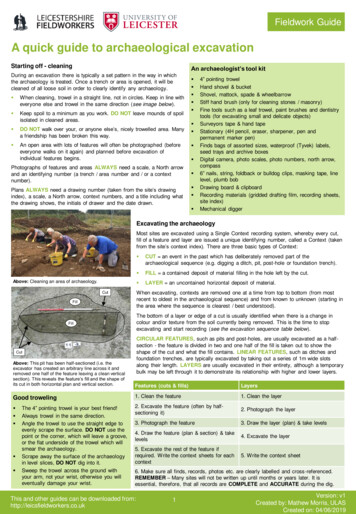
Fieldwork GuideA quick guide to archaeological excavationStarting off - cleaningAn archaeologist’s tool kitDuring an excavation there is typically a set pattern in the way in whichthe archaeology is treated. Once a trench or area is opened, it will becleaned of all loose soil in order to clearly identify any archaeology. When cleaning, trowel in a straight line, not in circles. Keep in line witheveryone else and trowel in the same direction (see image below). Keep spoil to a minimum as you work. DO NOT leave mounds of spoilisolated in cleaned areas. DO NOT walk over your, or anyone else’s, nicely trowelled area. Manya friendship has been broken this way. An open area with lots of features will often be photographed (beforeeveryone walks on it again) and planned before excavation ofindividual features begins.Photographs of features and areas ALWAYS need a scale, a North arrowand an identifying number (a trench / area number and / or a contextnumber).Plans ALWAYS need a drawing number (taken from the site’s drawingindex), a scale, a North arrow, context numbers, and a title including whatthe drawing shows, the initials of drawer and the date drawn. 4” pointing trowelHand shovel & bucketShovel, mattock, spade & wheelbarrowStiff hand brush (only for cleaning stones / masonry)Fine tools such as a leaf trowel, paint brushes and dentistrytools (for excavating small and delicate objects)Surveyors tape & hand tapeStationary (4H pencil, eraser, sharpener, pen andpermanent marker pen)Finds bags of assorted sizes, waterproof (Tyvek) labels,seed trays and archive boxesDigital camera, photo scales, photo numbers, north arrow,compass6” nails, string, foldback or bulldog clips, masking tape, linelevel, plumb bobDrawing board & clipboardRecording materials (gridded drafting film, recording sheets,site index)Mechanical diggerExcavating the archaeologyMost sites are excavated using a Single Context recording system, whereby every cut,fill of a feature and layer are issued a unique identifying number, called a Context (takenfrom the site’s context index). There are three basic types of Context:Above: Cleaning an area of archaeology. CUT an event in the past which has deliberately removed part of thearchaeological sequence (e.g. digging a ditch, pit, post-hole or foundation trench). FILL a contained deposit of material filling in the hole left by the cut. LAYER an uncontained horizontal deposit of material.When excavating, contexts are removed one at a time from top to bottom (from mostrecent to oldest in the archaeological sequence) and from known to unknown (starting inthe area where the sequence is clearest / best understood).CutFillThe bottom of a layer or edge of a cut is usually identified when there is a change incolour and/or texture from the soil currently being removed. This is the time to stopexcavating and start recording (see the excavation sequence table below).FillCIRCULAR FEATURES, such as pits and post-holes, are usually excavated as a halfsection - the feature is divided in two and one half of the fill is taken out to show theshape of the cut and what the fill contains. LINEAR FEATURES, such as ditches andfoundation trenches, are typically excavated by taking out a series of 1m wide slotsalong their length. LAYERS are usually excavated in their entirety, although a temporarybulk may be left through it to demonstrate its relationship with higher and lower layers.CutAbove: This pit has been half-sectioned (i.e. theexcavator has created an arbitrary line across it andremoved one half of the feature leaving a clean verticalsection). This reveals the feature’s fill and the shape ofits cut in both horizontal plan and vertical section.Features (cuts & fills)LayersGood troweling1. Clean the feature1. Clean the layer2. Excavate the feature (often by halfsectioning it)2. Photograph the layer3. Photograph the feature3. Draw the layer (plan) & take levels4. Draw the feature (plan & section) & takelevels4. Excavate the layer5. Excavate the rest of the feature ifrequired. Write the context sheets for eachcontext5. Write the context sheet The 4” pointing trowel is your best friend!Always trowel in the same direction.Angle the trowel to use the straight edge toevenly scrape the surface. DO NOT use thepoint or the corner, which will leave a groove,or the flat underside of the trowel which willsmear the archaeology.Scrape away the surface of the archaeologyin level slices, DO NOT dig into it.Sweep the trowel across the ground withyour arm, not your wrist, otherwise you willeventually damage your wrist.6. Make sure all finds, records, photos etc. are clearly labelled and cross-referenced.REMEMBER – Many sites will not be written up until months or years later. It isessential, therefore, that all records are COMPLETE and ACCURATE during the dig.This and other guides can be downloaded from:http://leicsfieldworkers.co.uk1Version: v1Created by: Mathew Morris, ULASCreated on: 04/06/2019
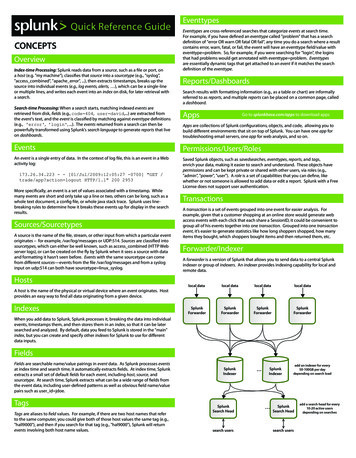
Fieldwork GuideFindsDrawingsFinds are key to dating most features and layers so it isessential to look after them. They MUST always be kept in aclearly labelled tray or bag with the correct context number.A drawing of a feature or layer is often better than a photograph becauseit is possible to highlight context changes more clearly on a drawing.Archaeological drawings are meant to be simple, precise and clearrepresentations of the archaeology. No artistic skills are required!If you are not sure where a find came from, or which context itbelongs to then save it as U/S (unstratified). It is better to losethe finds provenance than mess up the dating sequence.Archaeology is drawn in two ways. PLAN a horizontal representation of the feature/s or areaexcavated. Plans are drawn by taking measurements from a site gridor a base line. Planning points can be created by nails placed in theground but remember, DO NOT remove the nails until your planningpoints have been recorded on the site grid or by dGPS / EDM. SECTION a vertical cross-section through the feature underexcavation showing the relationship between multiple layers, or the filland shape of a cut. Sections use section points in much the same wayas plans (often they are the same planning points) but on a verticalplane with a string line tied between them. A line level is used to makesure the string is perfectly level.Drawings are made on gridded drafting film at two main scales.Above: Plan of a pit.Below: Section across a pit. PLANS are generally drawn at 1:20 so that 1m equals 5cm on thedrawing. SECTIONS are generally drawn at 1:10 so that 1m equals 10cm onthe drawing. Occasionally you might be asked to draw something at 1:50 (1mequals 2cm) or 1:100 (1m equals 1cm).REMEMBER – Draw with a hard pencil (4, 5 or 6H), label all contextnumbers, add a drawing number, title, scale, initials and date. PLANS – Mark the position of section drawings and label them, add aNorth arrow. If a site grid is being used add the grid co-ordinates too. SECTIONS – Orientate the section points (i.e. E, W etc.) and statefacing direction (i.e. south facing).The MatrixTaking a levelStratigraphy is a term used to describe the order in whicharchaeological events (soil layers, cut features and their fills) werecreated. It forms the basis for ALL archaeological excavation andanalysis. Every cut, fill and layer is given a unique context numberwhich is used to create a matrix.Whilst we can draw and photograph features we also need to knowtheir relative height in relation to other features. This is usually doneusing a dumpy level and a telescopic staff – basically a telescope on afixed horizontal plane looking at a big vertical ruler! – or electronicallyusing dGPS / EDM.The matrix is a flow chart which shows the order in which everycontext occurred. To fully understand a site it is CRITICALLYIMPORTANT to record your feature or layer’s stratigraphicrelationship with the surrounding archaeology.A reading is taken on a reference point (called a temporary benchmark or TBM) which has a known height above sea level. This iscalled the back sight (BS). Further readings are taken at relevantpoints on the archaeology, these are called fore sights (FS). What is it ABOVE? What is it BELOW? Is it the SAME ASanother context?Working out the height of the archaeology uses the followingcalculations. These relationships MUST be accurately recorded on thecontext sheet during the excavation. TBM BS Instrument Height (IH) IH – FS Reduced Level (RL, your archaeological spot height).REMEMBER - The matrix seeks only to record the stratigraphicsequence of deposition, not the direct physical contact otherfeatures and layers have with the context. The matrix runs fromthe oldest (or first event) at the bottom, to the newest (or lastevent) at the top.REMEMBER – Record where you took levels on you plan or section.Record the readings for the TBM, BS, FS, RL & IH on your drawing orin a level index.(1)TOPSOIL (1) TOPSOIL (1)(2)(1) (7) SUBSOIL (2)SUBSOIL (2)(2) (8) (3)Right: The matrix for a singlefeature.Far right: If a second featurewas dug later (i.e. cutting theoriginal feature) the matrixwould look like this. (3)(4)(3)[9](7) (3) (8)(5) (5) (5)NATURALCUT [6]2 (5) NATURALCUT [6] CUT [9](4)[6](4)(4)NATURAL[6] NATURAL
Fieldwork GuideHow to Process Archaeological FindsFinds processing is a crucial part of archaeological fieldwork but whilst it may seem selfexplanatory there are a number of important practices which should be followed for good ‘potwashing’.Ideally, finds processing should be carried out during the fieldwork or within days / a week ofits completion. Finds left uncleaned in muddy bags for too long can ‘sweat’, potentiallydamaging them.TIP: If you are unable to process your finds immediately, punch holes in the bags to allow thefinds to breath. Whilst some finds will be more sensitive to being stored dirty, most willsurvive fine if left for a while (see page 2 for guidelines for treatment and storage of finds).What equipment will you need? Washing up bowlsToothbrushes of assorted hardnessWooden cocktail stick / skewerSmall cellulose spongeNewspaperSeed traysFinds bags of assorted sizesWaterproof (Tyvek) labelsPermanent marker penLabellingFinds should be cleaned, recorded and put into labelled seed trays to dry. PLEASE becareful not to mix up the finds from different areas and contexts.A waterproof label or labelled bag MUST be kept with the finds at every stage of washing anddrying. This MUST contain the following information:FieldwalkingTest-pittingExcavationSite CodeSite CodeSite CodeField No.Test-Pit No.Trench or Area No.Transect & Stint or Grid No.Layer No.Context No.Setting up, Washing & Drying1. Lay newspaper down on the work surface, fill one or two washing upbowls with water (about half full) and place on the newspaper. Ifusing two bowls - one is for washing, the other for rinsing.2. Line a seed tray with newspaper, this is the drying tray.3. Take a bag of finds and empty it into a second (unlined) seed tray.Write a label copying what is written on the bag and place it in thedrying tray.4. Select a find. Wash it carefully and thoroughly (see Washing Tips).Rinse in the rinsing bowl and place in the labelled drying tray.Washing TipsMost finds can be washed and left to dry in the drying trays onsite. Non-fragile pieces of pottery, bone or stone should be gentlywashed with clean water and a toothbrush.DO NOT leave finds to soak in the bowl. This can dissolve fragilepottery and metal and may lead to contexts being mixed up if afind is accidentally left in the bowl.Avoid hard scrubbing of finds as this can cause damage. If itlooks like the toothbrush will cause damage, use a spongeinstead. Don’t forget to wash the edges as well as the front andback of finds such as pottery sherds.5. Continue until all finds from the bag are washed. If there are toomany finds for one tray you MUST write finds labels for everyadditional tray.6. Remember, every context / find bag MUST have its own labelledtray. DO NOT mix up the finds.7. Leave the finds for about 3-6 days to thoroughly dry. If they stillhave mud on them they may need rewashing. DO NOT re-bag wetor damp finds.8. Once dry, sort and bag the finds from each context by find type.Select clean, appropriately sized bags to put them in. REMEMBER:Exactly copy the information from the finds label in the drying trayonto the new bag using permanent marker pen.Finds with a lot of soil sticking to them should first be cleanedwith a plastic or wooden implement (NEVER use a metalimplement for cleaning).Use a wooden cocktail stick / skewer to extract mud from hollowsand odd shapes. This is particularly useful for cleaning bone. Ifpossible, remove all mud in the middle of the bone.If the water gets too dirty, replace it with clean water (as a roughguide, if you cannot see down 5cm the water needs changing!).DO NOT dunk large finds like bricks and tiles into the washingwater as they will soak it up and take longer to dry.Health & Safety Some artefacts can have sharp edges, so be careful. Wear GLOVES if you have open cuts or sores on your hands, or ifyou have allergies to elements in the soil, or if your hands react toprolonged contact with water. REMEMBER: Some people are allergic to latex and nitrile gloves. Be alert for COMTAMINANTS in the soil, such as petrol and oil.Keep a look out for asbestos which can look deceptively likepottery.Fragile finds should NEVER be washed. Keep an eye out forpaint on stonework or wall plaster and also for Anglo-Saxon andprehistoric pottery (this usually looks like old biscuit or driedmud!). These can be damaged by washing. Instead, carefullyremove excess soil with a dry toothbrush and allow to dry. DONOT wash metal or organic finds.Use the guidelines on page 2 for what to wash and what not towash.3
Fieldwork GuideGuidelines for post-excavation treatment and storage of ry perforated finds bagBasket/wicker-Keep wet, do not wash or cleanDouble bag, water to cover,keep in wet box.Bone (animal)-WashDry perforated finds bagBone (human)-WashDry perforated finds bagCopperGreen corrosionDry out, do not wash or cleanDry perforated finds bag in drybox with silica gel, cushion withacid free tissue.Ceramic (stable)-WashDry perforated finds bagCeramic (fragile)Soft, breaking up, painteddecorationDry for 2-3 days to hardenbefore washing gentlyDry perforated finds bagFibre-Keep wet, do not wash or cleanDouble bag, water to cover,keep in wet box.Flint artefacts-Wash with fingers/spongeDry perforated finds bagFlint (burnt)StableWashDry perforated finds bagFlint (burnt)Breaking upDry BrushDry perforated finds bagGlass (stable)-WashDry perforated finds bagGlass (medieval or otherwiseunstable)Iridescent (shiny patina/coating),flaking badly, possibly opaqueKeep wet, do not washDouble bag, water to cover,keep in wet box.Gold-WashDry perforated finds bagFlaking gilding-Do not wash or cleanContact conservation labHornLaminatesWash gentlyIronMagnetic attraction, brown orsometimes blue corrosionproductsDry out, do not wash or cleanIron slagVesicularDry out, do not wash or cleanIvoryCriss-cross linesKeep wet, do not wash or cleanJetBlack, shiny, resembles plasticWash gently with fingers/spongeLead/pewterHeavy, grey/white corrosionDry out, do not wash or cleanLeather-Wash gently with fingers/spongePlaster (painted wall)-Damp sponge, do not immersein waterResin (amber)-Keep wet, do not wash or cleanShaleGrey or black, laminatesKeep wet, do not wash or cleanShell (discard unless fromsignificant dump)-Wash gently with fingersDry perforated finds bagSilverBlack/mauve corrosionDry out, do not wash or cleanDry perforated finds bag in drybox with silica gel, cushion withacid free tissue.Stone (except shale or gilded)-Dry brush or washDry perforated finds bagWood-Wash gently with fingers/spongeDouble bag, water to cover,keep in wet box.4Double bag, water to cover,keep in wet box.Dry perforated finds bag in drybox with silica gel, cushion withacid free tissue.Dry perforated finds bag in drybox with silica gel, cushion withacid free tissue.Double bag, water to cover,keep in wet box.Double bag, water to cover,keep in wet box.Dry perforated finds bag in drybox with silica gel, cushion withacid free tissue.Double bag, water to cover,keep in wet box.Dry perforated finds bagDouble bag, water to cover,keep in wet box.Double bag, water to cover,keep in wet box.
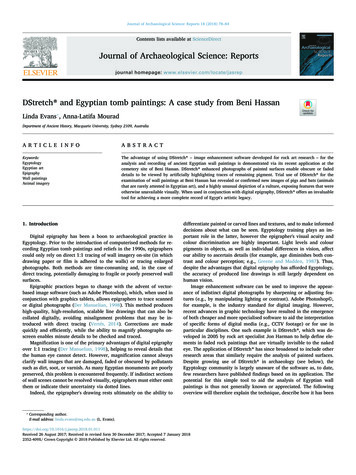
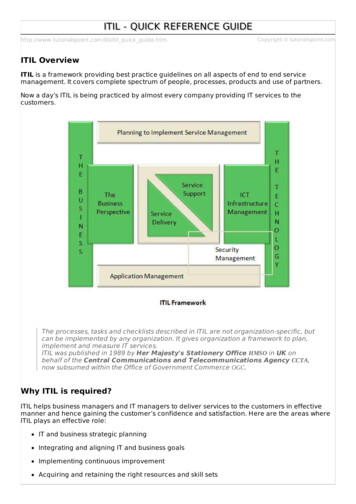
Fieldwork GuideStructure from Motion (SfM) PhotogrammetryWhat is SfM Photogrammetry?Today, SfM Photogrammetry is used in a wide range of fields fromtopographic mapping to the movie and gaming industry and it isincreasingly used for cultural heritage preservation byarchaeologists. It provides a rapid, extremely versatile and costeffective tool for recording and analysing complex objects andsurfaces using computer software which turns a sequence of twodimensional digital photographs into a three-dimensional model.Under suitable conditions, the technique is a powerful method ofcapturing high-resolution georeferenced three-dimensionalsurfaces with complete textures and sub-centimetre accuracy. Itcan be applied to photographs taken during archaeologicalexcavations, building surveys and laboratory conservation.a)The software looks for points of commonality in overlappingphotographs of a single object or surface from which it canextrapolate virtual camera positions and a three-dimensional pointcloud (right, a) which can be converted to a polygon mesh (b). Thephotographs can then be used to render the surface reconstructionto create a photo-realistic effect (c).b)Archaeologists use SfM Photogrammetry for a variety of outputs: To create a plan of a feature or area (to replace a hand-drawnplan) To produce a section or profile across a feature or area (toreplace a hand-drawn section drawing) To create a digital terrain model (DTM) or digital elevationmodel (DEM) – in this way it can be used similar to LiDAR. To produce a complex 3D model to aid analysis of thearchaeological sequence. To produce a 3D model for educational purposes, providing afun and interactive tool that can be used in the classroom byschools to study archaeological material that is no longeraccessible, or is only accessible in museums.c)REMEMBER: Think carefully about what your desired outcomesare for the model, then tailor your survey accordingly. If you onlyneed a simple plan of a spread of stones you will need fewerphotographs than you would for a complex model of a large area.What equipment will I need? A good digital camera or camera phoneGeoreference markersClose range SfM Photogrammetry softwareModelling a medieval stone-lined pit at Highcross Street, Leicester.Using SfM photogrammetry Agisoft Metashape. Image: ULASWhere can I get SfM Photogrammetry software?There are many photogrammetry software tools available. Some are professional, requiring a licence and having an often high associated cost,but there are good open source photogrammetry tools available too. The following is a list of available software. The Leicest ershireFieldworkers has not tried all of these programmes and cannot guarantee that they are all suitable for archaeological recording. COLMAP https://colmap.github.io/index.html# FREE AGISOFT METASHAPE https://www.agisoft.com/ FREE TRIAL MESHROOM https://alicevision.github.io/#meshroom FREE MICMAC https://micmac.ensg.eu/index.php/Accueil FREEAUTODESK iew FREE TRIAL OPENDRONEMAP https://www.opendronemap.org/ FREE iWitnessPRO https://iwitnessphoto.com/ FREE TRIAL REGARD3D http://www.regard3d.org/ FREE PHOTOMODELER https://www.photomodeler.com/ FREE TRIAL VISUALSFM http://ccwu.me/vsfm/ FREE REALITYCAPTURE https://www.capturingreality.com/HomeFREE TRIAL 3DF ZEPHYR https://www.3dflow.net/ FREE VERSION & TRIAL5
Fieldwork GuideHow to record using SfM PhotogrammetryPrepare the feature / area Clean the feature and tidy up the immediate area. Include
The bottom of a layer or edge of a cut is usually identified when there is a change in colour and/or texture from the soil currently being removed. This is the time to stop excavating and start recording (see the excavation sequence table below). CIRCULAR FEATURES, such