Transcription
CAQH ProView Dentist Practice Manager ModuleUser GuideUpdated: November 28, 2017
Table of ContentsChapter 1: Introduction . 1CAQH ProView Overview . 1System Security . 2Chapter 2: Registration. 3Existing Practice Managers . 3New Users – Administrators . 3New Users – Child Accounts . 4Self-Registration . 4Creating a CAQH ProView Username and Password . 6Forgotten Username and/or Password . 7Chapter 3: Home Page . 9Chapter 4: Manage User. 13Manage Account . 13Manage Users . 14Add User. 15Edit User . 16Search for User . 18Chapter 5: Manage Practice . 20Add List . 21Credentialing Contact. 24Practice Location . 25Hospital Affiliation . 28Professional Liability Insurance . 29Chapter 6: Manage Provider List . 31Chapter 7: Bulk Upload . 34Creating a Bulk Upload File . 34Uploading a Bulk Upload File . 34Chapter 8: Export . 37Select Provider(s) to Export . 37Select Sections for Export . 39Single Provider Export . 39Multiple Providers Export . 40Using Saved Sections . 41Review Export Information . 42Export Summary Page . 43Export Confirmation . 44APPENDIX . 45Provider Status . 45CAQH Practice Manager Support Center Desk Information . 46
Dentist Practice Manager User Guide v1.0Chapter 1: IntroductionThe American Dental Association (ADA) and CAQH are working together to make it easier fordentists to enter and share their professional and practice data with dental plans and otherhealthcare organizations by utilizing CAQH ProView . Dentists can enter their professional andpractice information one time, and submit it to multiple participating dental plans andorganizations, reducing their administrative burden and speeding the credentialing process.This data can also be used to update provider directories and other business needs.This new service works with information that U.S. practicing dentists have already entered intotheir profile on ADA.org/godigital. After logging into My ADA, and accepting the terms andconditions, dentists will be redirected to the CAQH ProView Welcome Page. There, they will seecertain prepopulated information from the ADA - or the information they attested to previously- making it easier and quicker for dentists to complete and attest to their CAQH ProView profile.Dentists must follow different steps which are outlined in the Dentists Quick Reference Guideto complete their CAQH ProView profile. Click here to access the Dentist Quick ReferenceGuide.The purpose of this document is to assist you as a Practice Manager in using the CAQH ProViewPractice Manager Module. The Practice Manager Module is designed to allow for commoninformation to be entered at one time for multiple dentists. There is no need to fill outredundant information for each dentist practicing in your office.Note: Practice Managers for dentists follow the same process in entering and exportinginformation as for other healthcare providers.CAQH ProView OverviewCAQH ProView is the healthcare industry’s premier resource for dentists and other healthcareproviders to self-report professional and practice information to payers, hospitals, largeprovider groups and health systems. CAQH ProView eliminates duplicative paperwork for theseorganizations that may require provider profile information for credentialing, directory servicesand other business uses.If you are an office manager or administrator who assists with gathering information forcredentialing or other administrative purposes for multiple dentists, the CAQH ProView PracticeManager Module may facilitate your data entry process. This information will, in turn, becomepart of each dentist’s profile, to which they will attest.The CAQH ProView Practice Manager Module can be accessed at https://proview.caqh.org/pm.The following steps provide you with a high-level overview of the process flow when using theCAQH ProView Practice Manager Module.1 Page
Dentist Practice Manager User Guide v1.01. A dentist is added to the CAQH ProView system either by self-registration atada.org/godigital or via a health plan request.2. Using the CAQH ProView Practice Manager Module, the Practice Manager logs in andcompletes common sections for multiple dentist.3. The Practice Manager adds the applicable dentist to the “Provider List”.4. The Practice Manager exports the applicable sections and indicates which dentist from the“Provider List” the data should be exported to.5. The dentist logs into CAQH ProView, reviews the available exported data, and then canchoose to import the data into the data profile.6. The dentist completes any remaining required fields and the authorization section, whichallows health plans access to the data profile.7. The dentist completes the attestation and uploads any required supporting documentation.8. CAQH reviews the dentist’s supporting documentation for quality.9. The dentist status is marked “Initial Profile Complete” or “Reattestation”. (See Appendix forfull list of provider statuses).10. The completed dentist data profile is available to the Participating Organization.This document will provide additional information and helpful tips for each of the steps thatrelate to the Practice Manager Module. To learn how dentists use CAQH ProView, please referto the CAQH ProView Dentist User Guide.System SecurityThe confidentiality and security of provider information and the privacy of system users arecritical priorities for CAQH. CAQH has implemented information security policies, standards,guidelines, processes, procedures, and best practices to strengthen its security program and toprotect its information assets. CAQH ProView is designed to be compliant with laws andregulations relating to the privacy of individually identifiable information.The CAQH ProView solution is housed in secure datacenters where multiple physical andelectronic safeguards are implemented. Secure Internet access to application screens, use ofpasswords and certificates are used to help ensure only authorized use of the system. PowerfulTransport Layer Security (TLS) encrypts the data in transition; the database content is alsoencrypted at rest and in backup to prevent unauthorized access to CAQH ProView. Onlyauthenticated users have access to their restricted data. Virus detection mechanisms are usedto help ensure that the database and the websites are free of viruses. Routine encrypted backups protect volatile system data and are secured in an off-site storage facility.2 Page
Dentist Practice Manager User Guide v1.0Chapter 2: RegistrationRegistration is required for all Practice Managers to obtain access to the CAQH ProView PracticeManager Module.Existing Practice ManagersFor Practice Managers who were previously registered with the CAQH Universal ProviderDatasource (UPD), go to the CAQH ProView Practice Manager Module athttps://proview.caqh.org/pm (see Figure 01). You can initially sign-in and register with CAQHProView by entering your UPD username and password and clicking “Sign In”. You will beprompted to update your username and password at this time. Refer to “Creating a CAQHProView Username and Password” on page 6 of this guide for the next steps in the process.New Users – AdministratorsIf you were not previously registered with the UPD, you may begin the self-registration processby accessing CAQH ProView at https://proview.caqh.org/pm (see Figure 01) and selecting “Clickhere to register for CAQH ProView”. All users who self-register will automatically be establishedas Administrator user accounts, which allows for access to add or edit “child” user accounts.FIGURE 013 Page
Dentist Practice Manager User Guide v1.0New Users – Child AccountsOnce the Administrator has established an account, the Administrator will be able to add otherAdministrators or Basic Users to the same account. A Basic User cannot add or edit other users,but will have all other privileges and views as the Administrator.When a new user is created in the portal by the Administrator, CAQH ProView will send anemail to the email address of the newly created user. New users will complete theirregistration with the CAQH ProView Practice Manager module by selecting the link contained inthe e-mail. You will be prompted to update your username and password at this time. Refer to“Creating a CAQH ProView Username and Password” on page 6 of this guide for the next stepsin the process.Self-RegistrationUsers who self-register with the Practice Manager Module will need to complete the CAQHProView Practice Manager Self Registration screen. This includes completing your practiceinformation (see Figure 02). The fields marked with an asterisk (*) are required.FIGURE 024 Page
Dentist Practice Manager User Guide v1.0You will also need to provide your user account information (see Figure 03).FIGURE 035 Page
Dentist Practice Manager User Guide v1.0Creating a CAQH ProView Username and PasswordCAQH ProView users will be asked to create a username and password. If you were an existingUPD registered user, you may also be prompted to update your username and password tomeet CAQH ProView requirements (see Figure 04).FIGURE 04CAQH ProView users will also be asked security questions to faciliate account access in case of aforgotten username and/or password. Select three security questions and provide uniqueanswers for each (see Figure 05). Then select “Submit”.FIGURE 056 Page
Dentist Practice Manager User Guide v1.0Forgotten Username and/or PasswordIf you forgot your Username, you may select the “Forgot Username” link on the CAQH ProViewsign-in page. Enter your email address to receive your username in an email (see Figure 07).FIGURE 07If you forgot your Password, you may select the “Forgot Password” link on the CAQH ProViewsign-in page. Enter your username and email address to reset password (see Figure 8). Anemail with a link will be sent to you to reset your password.FIGURE 087 Page
Dentist Practice Manager User Guide v1.0Once you select the link in the email sent to you, enter and re-enter your new password, thenselect “Reset Password” (see Figure 09).FIGURE 09The Password Change confirmation (see Figure 10) will appear when your password has beensuccessfully reset. You can then log into CAQH ProView using your new password.FIGURE 108 Page
Dentist Practice Manager User Guide v1.0Chapter 3: Home PageYou will see the CAQH ProView Practice Manager Module “Home” page after a successful login(see Figure 11).Tip: If you need assistance on the Home page, you can access the “Help” link that isdisplayed in the top right hand corner on the Home page.FIGURE 11The Home page displays five components:1. Exports The Exports section displays a summary of recent exports, the related user whoperformed the export, and the date exported.2. Manage Users This section displays a list of most recent users, their roles and statuses. OnlyAdministrators can view the Manage Users section.3. Message Center The Message Center section displays messages related to your account.9 Page
Dentist Practice Manager User Guide v1.04. Activity Log The Activity Log section displays recent users who have logged into the account andrecent activity within the account.5. Bulk Upload Exceptions This section displays a list of Exception Reports from a Bulk Upload processed file. Onlyusers with Bulk Upload access can view the Bulk Upload Exceptions section.In addition, to these components, across the top of the Home page is a navigation menu, whichallows you to navigate to the four sections of the Practice Manager Module (see Figure 12): Manage Users – Administrator Users can click here to add or edit account users (seeChapter 4). Manage Practice – Click here to enter information common across multiple dentists (seeChapter 5). Manage List – Click here to add, edit, and delete dentists on your provider list (see Chapter6). Export – Click here to begin the export data process to multiple or individual dentistaccounts (see Chapter 8).FIGURE 12A drop-down menu also is available next to the user’s name in the upper right-hand corner (seeFigure 13).FIGURE 1310 P a g e
Dentist Practice Manager User Guide v1.0From this drop-down menu, you can perform the following:1. My Account – Click here to edit or update personal account information. Note: the fieldsmarked with an asterisk (*) are required. Select “Save” when you are finished updating yourinformation (see Figure 14).FIGURE 142. Resources – Click here to access system reference materials, such as the Bulk Upload FileSpecifications.3. Change Password – Click here to update your password.4. Security Questions – Click here to update your security questions.5. Activity Log – Click here to view your activity log, which shows you the types of activities youhave completed recently, along with the date and time of those activities. You are able toselect the arrow next to the “Activity Subject” to expand the activity details (see Figure 15below).11 P a g e
Dentist Practice Manager User Guide v1.0FIGURE 1512 P a g e
Dentist Practice Manager User Guide v1.0Chapter 4: Manage UserIf you are an Administrator, you will have access to the “Manage User” section, where you havethe ability to add, edit or delete user accounts. From the Home Page, click on “Manage Users”on the top navigation bar to begin the process (see Figure 16).FIGURE 16From the “Manage Users” drop-down menu bar, you can perform the following:Manage AccountClick here to edit or update your personal account information. Note: the fields marked with anasterisk (*) are required. Select “Save” when you are finished updating your information (seeFigure 17).FIGURE 1713 P a g e
Dentist Practice Manager User Guide v1.0Manage UsersClick here to add new users to your account, edit user roles and privileges, and search and viewuser profiles (see Figure 18).FIGURE 1814 P a g e
Dentist Practice Manager User Guide v1.0Add UserAn Administrator can create new Administrators or Basic Users by accessing the “Add User” linkon the left-hand navigation pane. The “Add User” screen will appear (see Figure 19 below).FIGURE 1915 P a g e
Dentist Practice Manager User Guide v1.0To add a user, complete the fields and click on “Add User”. Fields marked with an asterisk (*) are required. At the bottom of the screen, you may define the user role as another Administrator oras a Basic User. The only difference between these roles is that Administrators are ableto view the “Manage Users” section. You can also select the check box if the user needs Bulk Upload functionality. If thecheck box is selected, the system will notify CAQH to review the user’s account for BulkUpload functionality. CAQH will then review the user before granting or denying BulkUpload functionality.Edit UserThe Administrator can edit user information by selecting a user name in the “Manage Users”screen (see Figure 20).FIGURE 20The “Edit User” screen will display (see Figure 21 below). Here you can edit the user’s accountinformation, their user role (Administrator or Basic), and their user status (Pending, Active, orSuspended).16 P a g e
Dentist Practice Manager User Guide v1.0FIGURE 2117 P a g e
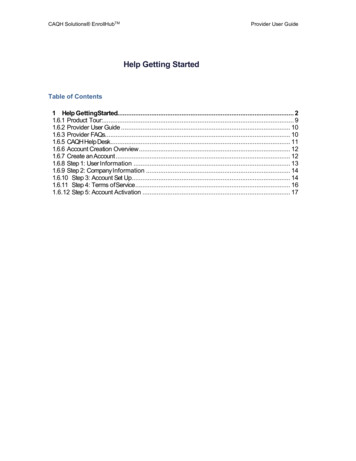
Dentist Practice Manager User Guide v1.0Search for UserAn Administrator can search for a user by selecting “Search for User” and completing any of thefollowing fields (see Figure 22): Username User Type: PM Admin/PM Basic User First Name Last Name User Status: Pending, Active or Suspended E-mail AddressFIGURE 2218 P a g e
Dentist Practice Manager User Guide v1.0A “Search Results” screen will display a list of users that meet your searc
Once the Administrator has established an account, the Administrator will be able to add other Administrators or Basic Users to the same account. A Basic User cannot add or edit other users, but will have all other privileges and views as the Administrator. When a new user is created in the portal by the Administr