Transcription
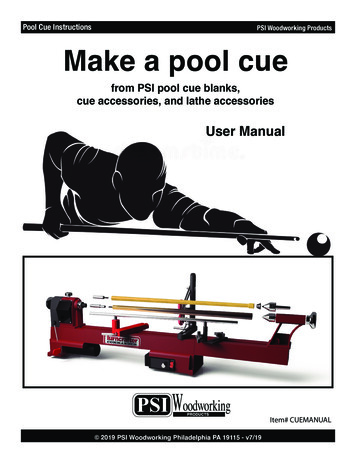
Pool Cue InstructionsPSI Woodworking ProductsMake a pool cuefrom PSI pool cue blanks,cue accessories, and lathe accessoriesUser ManualItem# CUEMANUAL 2019 PSI Woodworking Philadelphia PA 19115 - v7/19
Pool Cue InstructionsPSI Woodworking ProductsWelcome to the Penn State industries Pool Cue Project. This project is both challenging and fun – the result willbe unique hand turned quality pool cue to be proud of. To properly perform in a shooting environment, a poolcue requires the proper size, weight, precision and reliability – you’ll want your favorite cue to last forever.Consequently this kit includes precision quality components.Hardware you’ll need (not included with any cue project sets): Mini or Midi lathe: Requires a split bed (A), bed length must be 30” or longer to mount up the long cue spindles.Variable speed is useful but not essential. Lathe must be fitted with a 60deg live center at the tailstock and a #2Morse taper headstock spindle. Most modern mini and midi lathes are fitted with these components but mayrequire an extension bed to bring the bed length up to 30”. (B) Extension beds for PSI brand lathes:- Free Floating bed extends KWL lathes to 30”: #KWLXBED10 for 10” lathe, #KWLXBED12 for 12” Lathes- Infinite bed extends KWL and TCL style PSI lathes to 42”: #TCLC10XB for 10” lathes, #TCLC12XB for 12” Lathes Measuring calipers: to measure spindle diameters to .001” accuracy (C). Digital Preferred. Sandpaper: Larger sheets (3” x 5” min) from 120grit through 600grit. Wood sanding block (3” x 6” prox) for straight finish sanding Lathe Chisels: 1” Roughing Gouge for rough turning (D) #LX260 or similar. 1” and 1/2" Skew chisel forfinish turning(E) #LX020 and 2X010 or similar. 1/8” Parting tool to cut sizing grooves for the spindle blank tapers(F) #LX420 or similar. Glue – 2 Part epoxy or Cyanoacrylate instant glue (G) to glue decore components onto turned blanks(#PKGLUE2 or similar) Finishing polishes: Sanding sealer for the tip shaft #PKFRICT3 or similar. See appendix 2 for Butt Finish Options Headstock chuck: (H) #CSC3500SE or similar. For final finishing / turning entire cue to match joint connectors.Essential HardwareADCalipersRoughing GougeGHBMin 30"EFSkew ChiselParting Tool2C2 Part EpoxyLathe Chuck 2019 PSI Woodworking Philadelphia PA 19115 - v7/19
Pool Cue InstructionsPSI Woodworking Products[Fig 1] Anatomy of a finished pool cue:BumperButtCollarTipButtJointJointConnector ConnectorFerruleCue Tip30” Butt Blank (shown finished)30” Tip Blank (shown finished)PSI Decore Components: Include all of the Connectors, Butt and tip end componentsGeneral specs for connectors: Made from Ertalyte a composite having great dimensional stability, excellent wear resistance, high strength andeasy machineability. Shaft Connector Size: 5/8” ID 1” OD. Butt collar is (Fig 2) PSI Decore Sets .75” ID, 1-3/8” OD and ¾” long.Decor Sets (Fig 2) :Pre configured for easy selection and decoration of your finished Cue, each set includes sets for butt end,joint connection and tip (*)PSI Decor Sets: [Fig 2]GHJIRubber BumperButt CollarButt nectorJointConnectorsTip BlankComponentsTip FerruleCue TipG) #CUEJS01 (economy) includes: Rubber bumper, 2ea White ¼” Joint collars, tip ferrule and tipH) #CUEJS02 includes: Rubber bumper, Black ¾” Butt Collar, 2ea Black ½” joint collars, 1oz. weight, tip ferrule and tipI) #CUEJS03 includes: Rubber bumper, Black ¾” Butt Collar, 6 piece black and white segmented ring set, 1oz. weight, tip ferrule and tipJ) #CUEJS04 includes: Rubber bumper, Black 3/4” Butt Collar, Bronze Composite (turnable) 1” joint collar, 1 ea Black 1/4” joint collar, 1oz. weight,tip ferrule and tip 2019 PSI Woodworking Philadelphia PA 19115 - v7/193
Pool Cue InstructionsPSI Woodworking Products(*) Current as of printing of this manual. Refer to our website www.pennstateind.com for most current selection)CUE HARDWARE SET(Lathe not included)K Mandrel SetM1 Long ToolrestN FollowrestL Cup CenterM2 Secondary Toolrest BanjoCue Turning Hardware SetThese are four essential accessories specifically designed for turning a PSI pool cue kit. We offer them here as a set—however each accessory can be purchased individually on our website.(combination; #CUENWS)K) Shaft turning mandrel set – We’ve made it easy to mount your blanks to the headstock with this system when youpurchase our Shaft and Butt set. It includes a #2MT male mandrel with a threaded pin to connect to the shaft blank insert.Plus a #2MT female mandrel with an internal thread to connect to the Butt Shaft threaded pin. These mandrels supportthe shafts with the opposite end supported by a live center. Requires lathes with #2MT headstock & tailstocks.(Separate purchase item #CUEMAN)L) Tip end Cup center – Mounts onto a 60deg live center. It Holds the shaft tip precisely for turning—note the shaft tip isextra wide avoid splitting. (Separate purchase item #LCENLTC)M) 30” Long Toolrest (M1) and secondary Banjo (M2)—Necessary for turning down the long 30” Butt and Shaft Blanks.Banjo is necessary to hold the post at the opposite end of the toolrest - compatible with 10” and 12” lathes. (Separatepurchase item #CUEREST)N) Followrest—Supports the long Butt and Tip spindle blanks while turning—similar to a Steadyrest but designed to makeit easy to “follow” the long blanks from end to end without whip.(Separate purchase item#CUELSR2). The 2 wheel configuration allows access to a bl ank of nearly any diameter along the shaft without havingto “work around” the third wheel of a traditional steady rest. With patience and practice, this rest will prove invaluable toyour Cue making (and repairing endeavors). Typical use will involve pressing the blank into the rest with one hand whileyou Cut or Sand with the other hand. With a steady hand, you’ll find the technique of one-handed cutting will be the keyto your executing a precision turned Cue.Cue Blank Sets (See Fig 3)Each set of Cue Blanks sold will include a 30” Butt end blank and 30” Maple Tip end shaft blank. Both blanks are pre tapered to approximate the final taper of your finished cue. Your cue is designed to attach together at the center with an insert in the tip end and a threaded post at the butt end. The threaded insert (Tip end) and Post (butt end) are pre-installedusing a precision metal turning lathe on your blanks to insure accuracy. The advantages of this pre-installation is two fold;1) We’ve done the work to achieve the near impossible task of accurately installing the threaded components – even theslightest error in installing these components manually will lead to a cue that is out of balance. 2) The components attachto your lathe for turning with a precision mandrel set that will match the Butt and Tip end components. Simply insert theproper mandrel, thread on your blank and you’re ready to turn. The tip end (A) will always be the same; Grade A Maplewith a wood “Bubble” at the end to avoid splitting that could occur by inserting a 60degree center into a small diametershaft end. This bubble can be conveniently parted off at the end of the cue making process.4 2019 PSI Woodworking Philadelphia PA 19115 - v7/19
Pool Cue InstructionsPSI Woodworking ProductsFig 3 Cue Blank SetsTip BubbleMaple Shaft Blank(E) Bocote Butt blank(D) Goncalo Alves Butt blank#CUE05(B) Maple Butt blank#CUE01#CUE02#CUE03#CUE04(A) Maple shaft blankCurrent line of blank sets:B) Maple Butt blank & Maple Shaft (economy)C) Rosewood Butt blank w/ Maple ShaftD) Goncalo Alves Butt blank w/ Maple ShaftE) Bocote Butt blank w/ Maple ShaftF) Rosewood4 Prong inlay Butt blank w/ Maple Shaft(C) Rosewood Butt blank(See Fig 3)(F) Rosewood 4 prong Inlay Butt BlankA) Tip End Shaft BlankGrade A Maple with a wood “Bubble” at the end to avoidsplitting that could occur by inserting a 60degree center intoa small diameter shaft end. This bubble can be convenientlyparted off at the end of the cue making process.Fig 4 Lathe Setup for Butt Blank turning4b4c4e4e4d4aSection 1- Getting Started1.1 Select a Cue Blank Set (Fig 3) and Decor set (Fig 2) for your Cue project1.2 Mount the Butt blank 4a and lathe hardware as shown in Fig 4. Start with the #2MT malecomponent of the Cue mandrel set (With bolt extension). (Fig 4b)Mount the Followrest (Fig 4c) midway on the lathe bed.Mount the secondary toolrest banjo toward the tailstock end (Fig 4d)Mount the toolrest with the posts to fit both banjo sleeves. (Fig 4e)Slide the joint connector onto the mandrel shaft and tape on to avoid spinning (4e). (Essential for sizing the tenon) 2019 PSI Woodworking Philadelphia PA 19115 - v7/195
Pool Cue InstructionsPSI Woodworking ProductsIf possible, lock the heasdstock to avoid spinning when mounting the blank. Screw the narrow end of the Butt Blank ontothe threaded post of the Cue Mandrel (4a) until it securely bottoms. Slide the tailstock with the 60deg center to the wideend of the blank and insert the center into the large hole in the end. Lock in place. Position the toolrest (4d) in the center of the wood blank to span both ends, set the height so the top of the bar is slightly lower than the center of the blank.Lock the posts in place.Set the distance between the toolrest bar and blank are about 1/8”from each other along the taper.Blank Diagram (not to scale)Fig 5JointConnectorButtCollar1 L1 varies based on length of joint connector2 L2 size based on butt connector .74" long,1.4"OD,.75 IDSection 2 Turning the Butt Blank2.1 Mark taper diametersUse white labels on the toolrest then mark the diameters along the blank as indicated by Fig 5. (See “Hint” below Use a partingtool to cut grooves at various diameter points along the shaft, then “connect them” by turning the spindle down to the bottom of the tenon cuts. Both the Butt and Tip end shafts use that technique by marking diameters at 6” intervals along theshafts with cut depths as indicated in Fig 5. Use a caliper to check the4 diameters between the shaft ends. It is ok to undercut the tenon slotsFig 6aa bit to allow for finishing but under no circumstances over cut (would resultin an excessively thin cue). Mark your first measurement at the end of the widebutt end. Note that you won’t be cutting grooves at the ends, because of theconnectors. The process will be easier if you turn & install the joint connectorand butt connector tenons first. This will allow you to turn the wood and endconnectors together and give a smooth transition from connector to shaft.Hint: Paste labels alongthe long toolrest with buttdiameter & shafter diametersas shown2.2 Cutting the Butt Collar Tenon (Fig 6a). The butt collars suppliedwith this project are all the same size with a .95” ID, 2-1/4OD and ¾”length. Therefore mark the tenon at the wide end to be cut to 1.265”,i.e. with a tenon .95” dia and 2-1/4” long. Cut the tenon (Fig 6a) Testthe size after you cut by slipping on the butt collar to make sure it is theright size. [Fig 6b] Note that this collar is not “critical” to pool cue functionso if it’s a little loose or long or short it will not effect your game. Glueon the collar at this time with epoxy and allow to dry.Fig 6bFig 6cTurn the collar and blank down to size (1.265") together (Fig 6c) untillevel.6 2019 PSI Woodworking Philadelphia PA 19115 - v7/19
Pool Cue InstructionsPSI Woodworking Products2.3 Cutting the Joint connector Tenon (Fig 7). Joint connectorsall have a 5/8” diameter ID but lengths may vary from ¼” to variouslengths. Use the joint assembly to mark an exact length for your tenon.Be conservative, mark a bit short of the measured length since cuttingtoo long would leave a gap when assembled. We’ve simplified cuttingthe 5/8” tenon by making the Mandrel diameter exactly 5/8” at the pointthat it meets the cue. This will act as a “bushing” to match as you cut thediameter of the tenon. You should still measure along the tenon lengthto make sure the tenon is a perfect cylinder. Start removing wood witha spindle gouge, switch to a skew to smooth the tenon cylinder (5/8 od,.625”), then use a parting tool to make a square connection from woodto your joint connector(s). Slide the (pre-mounted) joint connector frommandrel to tenon and turn until there’s a perfect fit(Fig 7a). When fit,Glue the connectors onto the tenon. This is important because when thecue is assembled, that the joint connection is as solid as possible whenconnectors are dry, turn the connectors & blank down to size together.(Fig 7b)Fig7aFig7b2.4 Cutting the taper (Fig 8a). Position the Followrest at the centerof the blank. Now starting at either end or in the middle of the blankcarefully and slowly turn the spindle down to the bottom of the diameterslots. Measure along the blank with connectors installed to insure properdiameters (.840” at the joint connection, 1.265” at the back.) (Fig 8b)Start removing wood with a spindle or roughing gouge, then transitionto a skew for a smooth slope. Use a straight edge (at least 6” long)and place it along the slope to indicate high and low spots as youproceed. Go slowly sliding your tools along the long toolrest with afirm steady grip. At the ends of the blanks, make a smooth transitionfrom the wood to the plastic joint connector (front) and butt collar (rear)(Fig 6c, 7b) with the skew chisel. If the blank starts to “whip” movethe Followrest closer to the area that you are cutting. If there are slightslope variations, not to worry, the next sanding step will assist flatteningthe slope.Fig 8aFig 8b2.5 Sanding the turned Butt Blank (Fig 9). Wrap sandpapersheets around a 3 x 6” sanding block and sand along the cue taper,attempt to reduce high spots if possible. Start with 150grit and Continueto sand with 240, 350, 400, 600 and perhaps 800 until the shaft iscompletely smooth. Touchup and chisel marks or other irregularitiesalong the way. To help progress with sanding, clean up as much dustas possible after each grit step. Use acetone or denatured alcohol on apaper towel to wipe of excess dust and leftover sanding material. Thesewill evaporate quickly without damaging the wood andremove oils thatcan undermine the final finish. Avoid following the same patterns whensanding – this can reinforce a deep scratch. Try to sand without rhythm,varying lathe speed and sanding motions. Stop the lathe frequently tocheck for stubborn marks and apply extra sanding in those areas toeliminate them. Sanding along the work piece with the lathe off can alsohelp remove stubborn sections.Fig 92.6 Finishing the turned Butt Blank The Butt shaft is the most decorative part of the cue and deserves a great finish.A gloss or semi-gloss finish is the way to go. The finish must be extremely durable because of constant use. (SeeAppendix 2) for Possibilities for final finishes. However, after testing several final finishing methods we found the GluBoost CA finish and process was the most forgiving plus providing a deep rich finish. See Appendix 3) for Glu-Boost applicationinstructions. 2019 PSI Woodworking Philadelphia PA 19115 - v7/197
Pool Cue InstructionsPSI Woodworking ProductsSection 3 Turning the Tip end Shaft Blank – up to the tip3.1 Setup the10a male mandrel 10c Blanklathe per Fig (10).Fig10 Setup for tip blank turningPlace the MaleMandrel component10b(10a male) into theCup centerlathe’s headstock.Place the magneticcup(10b) center on the60 degree tailstockcenter. (note: this willhelp to avoid splittingthe narrow tip end). Screw the wide part of the blank (10c) onto the threaded pin(10a). Slide the tailstock cup point into the holeon the end of the blank. Position the long toolrest along the slope of the blank,position the Followrest at about the centerof the blank(i).Fig 11 Diameter Markings for Tip EndJointConnectorTipFerrule Tip3 L2 varies based on length of joint collar 4 L4 Tip ferrule tenonAgain mark the toolrest with the 6 diameter markings and position thetoolrest so the first mark is at the end of the wide/joint end, then4 marks every 6”, and the last mark is 29” from the wide end of theshaft, just short of the wood “bubble” ad the cue tip end. Then mark 1”in from that point for the ferrule position. Follow the same process asabove in Section 3, using the parting tool to cut slots along the blank.3.2 Install joint connectors-tip end As with the Butt joint con-nectors all require a 5/8” diameter tenon but lengths may vary from¼” to various lengths (up to 1-1/4"). Use the joint connector to get anexact length for your tenon and mark it on the shaft. As with the buttjoint connection tenon, the mandrel has a 5/8” diameter you will useas a bushing as you cut the tenon for the joint connector (12a). Turnto an even cylinder (with 1/2" skew) then remove the shaft from thelathe, test for fit. After the fit is confirmed, spread glue on the tenon toglue on the joint connectors and allow to dry. It’s important here to cutthe connector flat and square at the end for a solid connection to the jointconnectors at the butt end. DON’T cut the tenon at the tip end at thistime since the very narrow diameter may compromise the integrity ofthe shaft as you cutHint: For a perfectthe taper. Turn thesquare tenon, useconnectors and blanka carbide tool withtogether down toa square tip.spec (12b).8Fig 12aFig 12bFig 13aFig 13b 2019 PSI Woodworking Philadelphia PA 19115 - v7/19
Pool Cue InstructionsPSI Woodworking Products3.3 Cut Tip Shaft TaperSince the shaft is so narrow at this end, positioning the Followrestto support the shaft is very important as you cut the shaft down tosize. Use a spindle gouge then a skew chisel (same as with the Buttblank) until you’ve turned the diameters marked by the parting tool.You may want to stabilize the shaft by gripping them together asyou do your final cuts Fig(13a). Use the straight edge to verify thatyour taper is straight. Turn down to.52” at the 1” mark. Sand theblank and connector much the same as done above for the buttblank (Fig 13b)– sand the narrow end of the blank to ½”.Fig 14a.35"Fig 14bSection 4 – Finishing the Tip Shaft4.1 Finishing the tipNow cut the tenon for the ferrule. This is the thinnest part of theshaft and requires the most precision and care. Cut a tenon to.350” (the ID of the Ferrule) about 1-1/16” long between the 27”mark and the wood bubble. (Fig 14a). Part off the wood “bubble” atthe end of the tenon (now about 1-1/16” long). Move the Followrestas close to the tip end as possible. Slide the ferrule onto the tenonto test fit, (Fig 14b) once fitting firmly on the tenon, remove thenglue the ferule onto the tenon. Allow the glue to dry. Holding theFollowrest with one hand, use the other hand to turn the end ofthe blank down to the same diameter as the ferrule (.50). (Fig14c)Part, sand or turn off any excess tenon wood that extends throughthe length of the ferrule. Cut the end of the ferrule square with aparting tool. (Fig 14d)4.2 Applying final finish to the shaft.You only need to usesanding sealer. This end must slide easily through the players handand requires a well sanded but “slippery” finish that the sealer provides.Fig 14c.5"Fig 14dFig 154.3 Installing the tip -Glue the tip onto the end of the ferrulewith Epoxy (other adhesives are recommended in the industry butnot available in our catalog). Advance the tailstock to press the tiponto the ferrule. Allow to dry supported by the Followrest and onehand, (Fig 15) turn and sand the tip even with the ferrule diameter.Prep the tip end with abrasives readily available on-line.Section 5 – Final Finishing5.1 Finishing the center connections together (optional)Fig 16aFig 16b- screw together both ends to make a completed cue. If the jointconnectors do not meet exactly to your expectations then here’sa method to finish them to meet exactly. Insert the 1-1/4” butt endinto a lathe chuck on the headstock.(16a) Carefully tighten thechuck onto the Butt shaft and support the center of the cue withthe Followrest. Holding the shaft against the rest with one hand,turn on the lathe and use a skew chisel then fine sandpaper toeven the connector joints to meet evenly. (16b)5.2 Final Steps (Fig 17) The PSI butt blanks are pre-drilled 7"deep to accept weights up to 3 ozs. (heavier weights are ideal for“break cues”) Select a weight to insert into the Butt end.(1,2, and 3 oz. weights available) The amount of weight is a matter of personal choice but the weight allows play and break actionthat the user prefers. Screw the weight deep as possibleinto the butt end cavity. Cap the butt end by pressing the rubber bumper firmly into the butt end. Your hand turned cue is nowfinished! Enjoy your cue!Fig 17 2019 PSI Woodworking Philadelphia PA 19115 - v7/199
Pool Cue InstructionsPSI Woodworking ProductsAppendix 1) Cue AccessoriesTypeCue TipItem No#CUEXTIPCount Color1Size14mmMaterialTip Ferrule#CUEXFER1White13mm 0 x 1”LPolycarbinateWeight#CUEXW11Zinc Plate 1oz, ½” OD, 2-1/4” LSteelWeight#CUEXW21Zinc Plate 2oz, ½” OD, 2-1/4” LSteelWeight#CUEXW31Zinc Plate 3oz, ½” OD, 2-1/4” LSteelJoint Collar#CUEXJ25W2White1/4” L x 5/8”ID, 1” ODErtalyteJoint Collar#CUEXJ50W2White1/2” L x 5/8”ID, 1” ODErtalyteJoint Collar#CUEXJ25B2Black1/4” L x 5/8”ID, 1” ODErtalyteJoint Collar#CUEXJ50B2Black1/2” L x 5/8”ID, 1” ODErtalyteJoint Collar#CUEXJ10B10Black1/16” L x 5/8”ID, 1” ODErtalyteJointCollar#CUEXJBR1Bronze1”L x 5/8”ID x 1” ODJointCollar#CUEXJBW2B&W1/16” L x 5/8”ID, 1” tt Collar#CUEXBCB1Black¾”L x .95”ID x 1-3/4” OD ErtalyteButt Collar#CUEXBCW1White¾”L x .95”ID x 1-3/4” OD ErtalyteBumper#CUEXBUM1Black1-1/8OD top, .7”insertConnector Set #CUEY102pc setRubberMale/Female 5/16” Bolt Set Metal(Compatible with#CUEMAN MANDREL SET 2019 PSI Woodworking Philadelphia PA 19115 - v7/19Photo
Pool Cue InstructionsPSI Woodworking Products(*) Current as of printing of this manual. Refer to our website www.pennstateind.com for most current selection)Essential Hardware for Cue TurningAppendix 2) Butt finishing optionsFinish Options Butt EndProsConsPSI Item no.Polyurethane SprayEasy to spray (multiple coats), Fastapplication, inexpensiveMedium shine, cannot be touchedup, requires multiple coatsN/AAussie OilEasy to apply (multiple coats) as afriction polish, inexpensive, easy totouch up, Medium shineMay need touch up after continuous use. Requires multiple coats#PKSWAUS2 Part epoxyLong lasting hard surface. Can beapplied with multiple coats for bestresultsMedium to low shine Cannot bere-applied, Expensive. Difficult toapply and finish. Short workingtime#PKGLUE2CA Finishing KitDurable Plastic Hi-Gloss finish,Long lasting, Hard surfaceExpensive, Very difficult and timeconsuming to apply, can’t betouched up, Very short workingtime#PKCAFINKITGlu-Boost Finishing Kit(refer to Appendix)Durable Plastic Hi-Gloss finish,Long lasting, Hard surface, Easy toapply than CA, Longer working timethan CA. fewer. Coats than CA (only2 required)Expensive (but less expensivethan CA) , can’t be touched up#PKGLUSETEasy to apply as a friction polish,inexpensive. Can be touched up.Natural finishSatin or no shine.#PKFRICT3Finish options - Tip endSanding Sealer(Preferred for tip end)Appendix 3) After much trial and error we found that Glu-Boost CA was the most user friendly system for getting a deep rich result.It provided: a long 15 minute “working” time. Required fewer finish applications. Produced a deep rich finish. The 6 piece finishing kit#PKGBCSET contains all of the materials discussed below.Applying GluBoost CAApply GluBoost with thin craft foam or heavy duty plastic bag, such as the bags that contain PSI pen kits. You can insert a folded papertowel on the bag to provide cushion during the application. With the lathe running at a comfortable speed, drip a pool of Fill ‘n FinishThick (blue label) onto the applicator surface and apply to the entire workpiece including any non-wood sections. Use moderate pressure to reduce ripples on the surface. Add additional CA while applying until surface is completely coated.Spray surface with GluDry Accelerator and allow surface to cure for a few minutes. You can then apply additional coats as desired.Always use a fresh applicator for additional coats and accelerator in between coats.Apply a final coat of Fill ‘n Finish Thin (orange label) and spray with accelerator. Allow this to cure a minimum of 15 minutes (overnightis better) before proceeding.Final PolishingUse 400 grit sandpaper to reduce any ripples along the surface until it is smooth. Do not sand aggressively! This step is just to removehigh spots and create uniform surface. Once the surface is smooth, progress to higher grits through at least 600 (higher is better) takingthe same steps as before. Use minimal pressure in lower grits and increase pressure with higher grits to reduce the chance of stubbornmarks. It is very important to remove all scratches from previous grits, but do not sand so much that the GluBoost is stripped from thecue requiring re-application.After sanding to maximum grit. Use Ultrafine Polishing Paper (can be cut into long strips). Start with highest micron paper and progressto lowest micron, using the same techniques as were used when sanding. When finished with polishing paper, use OneStep Plastic Polishto remove any remaining micro-abrasions. Use a generous amount and coat completely with lathe off. Turn on lathe and apply pressurewith polishing cloth or paper towel. Use a clean section of cloth or paper towel to remove polish and buff the surface to a final shine. 2019 PSI Woodworking Philadelphia PA 19115 - v7/1911
Pool Cue InstructionsPSI Woodworking Products 2019 PSI Woodworking Philadelphia PA 19115 - v7/19
Pool Cue Instructions PSI Woodworking Products oodworing hiladelphia A v 5 A) Tip End Shaft Blank Grade A Maple with a wood “Bubble” at the end to avoid split