Transcription
User GuideLinksys E1000Wireless-N Router
Linksys E1000Table of ContentsContentsChapter 1: Product Overview1Top . . . . . . . . . . . . . . . . . . . . . . . . . . . . . . . . . . . . . . . . . . . . . . . . . . . . . . . 1Back . . . . . . . . . . . . . . . . . . . . . . . . . . . . . . . . . . . . . . . . . . . . . . . . . . . . . . . 1Horizontal Placement . . . . . . . . . . . . . . . . . . . . . . . . . . . . . . . . . . . . . . . . . . . 1Wall-Mounting Placement . . . . . . . . . . . . . . . . . . . . . . . . . . . . . . . . . . . . . . . . 2Chapter 2: Cisco Connect3Installation . . . . . . . . . . . . . . . . . . . . . . . . . . . . . . . . . . . . . . . . . . . . . . . . . . 3Main Menu . . . . . . . . . . . . . . . . . . . . . . . . . . . . . . . . . . . . . . . . . . . . . . . . . . 4Computers and Other Devices . . . . . . . . . . . . . . . . . . . . . . . . . . . . . . . . . . . . . . 6Parental Controls . . . . . . . . . . . . . . . . . . . . . . . . . . . . . . . . . . . . . . . . . . . . . . 8Guest Access . . . . . . . . . . . . . . . . . . . . . . . . . . . . . . . . . . . . . . . . . . . . . . . . 10Router Settings . . . . . . . . . . . . . . . . . . . . . . . . . . . . . . . . . . . . . . . . . . . . . . 10How to Exit Cisco Connect . . . . . . . . . . . . . . . . . . . . . . . . . . . . . . . . . . . . . . . 12How to Access Cisco Connect . . . . . . . . . . . . . . . . . . . . . . . . . . . . . . . . . . . . . 12Chapter 3: Advanced Configuration13How to Access the Browser-Based Utility . . . . . . . . . . . . . . . . . . . . . . . . . . . . . . 13Setup Basic Setup . . . . . . . . . . . . . . . . . . . . . . . . . . . . . . . . . . . . . . . . . . . . 13Setup DDNS . . . . . . . . . . . . . . . . . . . . . . . . . . . . . . . . . . . . . . . . . . . . . . . 17Setup MAC Address Clone . . . . . . . . . . . . . . . . . . . . . . . . . . . . . . . . . . . . . . 18Setup Advanced Routing . . . . . . . . . . . . . . . . . . . . . . . . . . . . . . . . . . . . . . . 19Wireless Basic Wireless Settings . . . . . . . . . . . . . . . . . . . . . . . . . . . . . . . . . . . 19Manual Setup . . . . . . . . . . . . . . . . . . . . . . . . . . . . . . . . . . . . . . . . . . . . . . . .20Wireless Wireless Security . . . . . . . . . . . . . . . . . . . . . . . . . . . . . . . . . . . . . . . 21Wireless Wireless MAC Filter . . . . . . . . . . . . . . . . . . . . . . . . . . . . . . . . . . . . . 23Wireless Advanced Wireless Settings . . . . . . . . . . . . . . . . . . . . . . . . . . . . . . . . 24Security Firewall . . . . . . . . . . . . . . . . . . . . . . . . . . . . . . . . . . . . . . . . . . . . . 25Security VPN Passthrough . . . . . . . . . . . . . . . . . . . . . . . . . . . . . . . . . . . . . . 25Access Restrictions Internet Access . . . . . . . . . . . . . . . . . . . . . . . . . . . . . . . . . 26Applications and Gaming Port Range Forwarding . . . . . . . . . . . . . . . . . . . . . . . 28Applications & Gaming Port Range Triggering . . . . . . . . . . . . . . . . . . . . . . . . . .28Applications and Gaming DMZ . . . . . . . . . . . . . . . . . . . . . . . . . . . . . . . . . . . 29Applications and Gaming QoS . . . . . . . . . . . . . . . . . . . . . . . . . . . . . . . . . . . . 29Administration Management . . . . . . . . . . . . . . . . . . . . . . . . . . . . . . . . . . . . 32Administration Log . . . . . . . . . . . . . . . . . . . . . . . . . . . . . . . . . . . . . . . . . . . 33Administration Diagnostics . . . . . . . . . . . . . . . . . . . . . . . . . . . . . . . . . . . . . . 33Administration Factory Defaults . . . . . . . . . . . . . . . . . . . . . . . . . . . . . . . . . . 34Administration Firmware Upgrade . . . . . . . . . . . . . . . . . . . . . . . . . . . . . . . . . 34Status Router . . . . . . . . . . . . . . . . . . . . . . . . . . . . . . . . . . . . . . . . . . . . . . . 35Status Local Network . . . . . . . . . . . . . . . . . . . . . . . . . . . . . . . . . . . . . . . . . .35Status Wireless Network . . . . . . . . . . . . . . . . . . . . . . . . . . . . . . . . . . . . . . . . 36Wireless-N Routerii
Linksys E1000Table of ContentsAppendix A: Troubleshooting37Appendix B: Specifications38Appendix C: Warranty Information39LIMITED WARRANTY . . . . . . . . . . . . . . . . . . . . . . . . . . . . . . . . . . . . . . . . . . . 39Appendix D: Regulatory Information41FCC Statement . . . . . . . . . . . . . . . . . . . . . . . . . . . . . . . . . . . . . . . . . . . . . . . 41FCC Radiation Exposure Statement . . . . . . . . . . . . . . . . . . . . . . . . . . . . . . . . . . 41Safety Notices . . . . . . . . . . . . . . . . . . . . . . . . . . . . . . . . . . . . . . . . . . . . . . . 41Industry Canada Statement . . . . . . . . . . . . . . . . . . . . . . . . . . . . . . . . . . . . . . . 41Avis d’Industrie Canada . . . . . . . . . . . . . . . . . . . . . . . . . . . . . . . . . . . . . . . . . 41Wireless Disclaimer . . . . . . . . . . . . . . . . . . . . . . . . . . . . . . . . . . . . . . . . . . . . 42Avis de non-responsabilité concernant les appareils sans fil . . . . . . . . . . . . . . . . . . 42User Information for Consumer Products Covered by EU Directive 2002/96/EC on WasteElectric and Electronic Equipment (WEEE) . . . . . . . . . . . . . . . . . . . . . . . . . . . . . 42Appendix E: Software End User License Agreement43Cisco Products . . . . . . . . . . . . . . . . . . . . . . . . . . . . . . . . . . . . . . . . . . . . . . . 43Software Licenses . . . . . . . . . . . . . . . . . . . . . . . . . . . . . . . . . . . . . . . . . . . . . 43Wireless-N Routeriii
Linksys E1000Chapter 1: Product OverviewChapter 1: Product OverviewInternet (Blue) The Internet LED lights upwhen there is a connection made through theInternet port. It flashes to indicate networkactivity over the Internet port.Thank you for choosing the Linksys E1000 Wireless-NRouter. The Router lets you access the Internet via awireless connection or through one of its four switchedports. You can also use the Router to share resources suchas computers, printers and files.A variety of security features help to protect your dataand your privacy while you are online. Security featuresinclude Wi‑Fi Protected Access 2 (WPA2) security, whichencrypts data on your wireless network; a Stateful PacketInspection (SPI) firewall to help block unauthorized accessto your Router; and Network Address Translation (NAT)technology, which enhances network protection byallowing your computers to share Internet access througha single, public Internet IP address. (IP stands for InternetProtocol.)Setup and use of the Router is easy using Cisco Connect,the software that is installed when you run the includedCD. Advanced configuration of the Router is availablethrough the provided browser‑based utility.TopPower (Blue) The Power LED lights up whenthe Router is powered on. When the Router goesthrough its self-diagnostic mode during everyboot-up, the LED flashes. When the diagnosticis complete, the LED is continuously lit.BackInternet43 Ethernet 21Reset12VDCPowerInternet Using an Ethernet cable (also calleda network or Internet cable), the Internetport connects the Router to your Internetconnection, which is typically a cable or DigitalSubscriber Line (DSL) modem.4, 3, 2, 1 Using Ethernet cables, these Ethernetports (4, 3, 2, 1) connect the Router to computersand other Ethernet network devices on yourwired network.1, 2, 3, 4 (Blue) These numbered LEDs,corresponding with the numbered ports onthe Router’s back panel, serve two purposes.The LED is continuously lit when the Routeris connected to a device through that port. Itflashes to indicate network activity over thatport.Wi-Fi Protected Setup Button If you haveclient devices, such as wireless adapters,that support Wi-Fi Protected Setup, then youcan use the Wi-Fi Protected Setup button toautomatically configure wireless security foryour wireless network.Reset The Reset button is located on the rightside of the product label. There are two ways toreset the Router to its factory defaults. Either pressand hold the Reset Button for approximatelyfive seconds, or restore the defaults from theAdministration Factory Defaults screen inthe Router’s browser-based utility (refer toAdministration Factory Defaults, page 34).Power The Power port connects to theincluded power adapter.Horizontal PlacementThe Router has four rubber feet on its bottom panel. Placethe Router on a level surface near an electrical outlet.To use Wi-Fi Protected Setup, refer toWi-Fi Protected Setup, page 20.Wireless (Blue) The Wireless LED lights upwhen the wireless feature is enabled. It flasheswhen the Router sends or receives data overthe wireless network.Wireless-N Router1
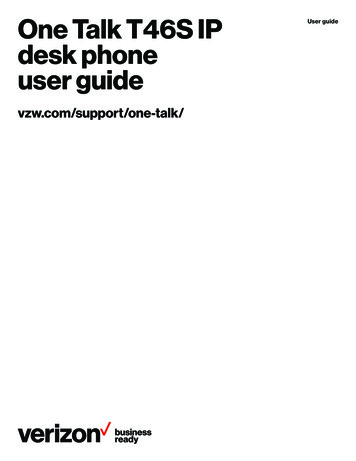
Linksys E1000Chapter 1: Product OverviewWall-Mounting PlacementThe Router has two wall-mount slots on its bottom panel.The distance between the slots is 152 mm.Two screws are needed to mount the Router.Suggested Mounting Hardware2.5-3.0 mm4-5 mm1-1.5 mmNOTE: Cisco is not responsible for damagesincurred by unsecured wall-mounting hardware.Follow these instructions:1. Determine where you want to mount the Router. Makesure that the wall you use is smooth, flat, dry, andsturdy. Also make sure the location is within reach ofan electrical outlet.2. Drill two holes into the wall. Make sure the holes are152 mm apart.3. Insert a screw into each hole and leave 3 mmof its head exposed.4. Position the Router so the wall-mount slots line upwith the two screws.5. Place the wall-mount slots over the screws and slidethe Router down until the screws fit snugly into thewall-mount slots.152 mmPrint this page at 100% size.Cut along the dotted line, and place on the wall to drill precise spacing.Wall-Mounting TemplateWireless-N Router2
Linksys E1000Chapter 2: Cisco ConnectChapter 2: Cisco ConnectDuring installation, the setup software installs CiscoConnect on your computer. Cisco Connect offers optionsto connect additional computers or devices to the Routerand allows you to change the Router’s settings.InstallationMac OS Xa. Double-click the CD on your desktop.b. Double-click Setup.3. Read the Software End User License Agreement.To accept the agreement and continue with theinstallation, click Next.To install the Router:1. Insert the CD into your CD-ROM drive.License Agreement4. The connection steps are displayed.Insert CD2. Click Set up your Linksys Router.DVD/CD-RW Drive (E:) LinksysRouter SetupAlways do this for software and games:AutoPlayDVD/CD-RW Drive (E:) LinksysRouter SetupInstall or run programAlways do this for software and games:Install or run programSet up your Linksys RouterPublished by Cisco Consumer Products LLCGeneral optionsOpen folder to view filesusing Windows ExplorerSpeed up my systemusing Windows ReadyBoostSet up your Linksys RouterPublished by Cisco Consumer Products LLCGeneral optionsSet AutoPlay defaults in Control PanelOpen folder to view filesusing Windows ExplorerSpeed up my systemusing Windows ReadyBoostSet AutoPlay defaults in Control PanelConnection Overviewa. Plug the power cord into the Power port on theback of the Router.Set Up Your Linksys RouterIf you do not see this, access setup on the CD directly.To do so, perform the following steps for your specificoperating system:Internet43 Ethernet 21Reset12VDCPowerWindows 7a. Go to Start Computer.b. Double-click your CD-ROM drive.Connect to Power PortWindows Vistaa. Go to Start Computer.b. Double-click your CD-ROM drive.Windows XPa. Go to Start My Computer and select yourCD‑ROM drive.b. Double-click Setup.exe.Wireless-N Router3
Linksys E1000Chapter 2: Cisco Connectb. Plug the power adapter into an electrical outlet.6. The installation is complete. Click OK.Connect to Electrical Outletc. Unplug the existing Ethernet cable from yourcomputer and plug it into the yellow port labeledInternet on the back of the Router. Click Next.Internet43 Ethernet 21Reset12VDCPowerInstallation is CompleteNOTE: If you have any problems during theinstallation process, refer to the FrequentlyAsked Questions in the setup software, or use acomputer with an active Internet connection tovisit www.linksys.com/support.Main MenuWhen Cisco Connect starts up, the main menu appears:Connect Ethernet CableNOTE: You can view detailed connection stepsby clickingin the setup software.NOTE: If the setup software detects multiplerouters, then select the serial number of yourRouter. The serial number is located on theleft side of the product label, which is on thebottom of the Router.5. Please wait while the setup software is setting up theRouter.Main MenuStatus information is displayed in the upper right corner: online secureYour local network is secure, and your Internetconnection is available. offline secureYour local network is secure; however, your Internetconnection is not available. To repair your Internetconnection, follow the on-screen instructions.NOTE: A group of computers or other devicesconnected to a router is a local network.The router allows the networked devices tocommunicate with each other.Please WaitWireless-N Router4
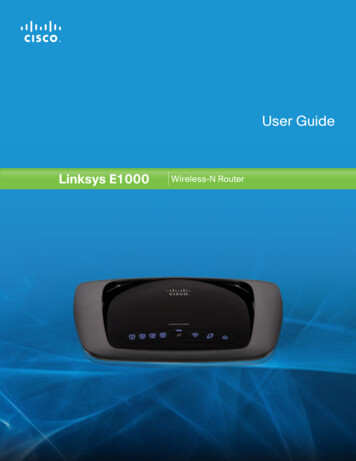
Linksys E1000Chapter 2: Cisco ConnectThe main menu offers four options: Computers anddevices, Parental controls, Guest access, and Routersettings.NOTE: To view the FAQs for more information,click Need help?Main Menu – Computers and DevicesUse this option to connect another computer or device tothe Router.There is x device(s) connected to your router Thenumber of devices connected to the Router is displayed.Local Access versus Guest AccessAdd device To connect another computer ordevice to the Router, click Add device and go toComputers and Other Devices, page 6.You can connect computers or devices to your Router bygiving them local access (Computers and devices option)orguest access (Guest access option).Main Menu – Parental ControlsComputers and devices with local access will haveaccess to the Internet and to other devices on yourlocal network, including shared computers andprinters that are connected to the Router. Local accesscan be given to a wired or wireless device. Refer toComputers and Other Devices, page 6 for moreinformation.Guest access allows you to provide guests visiting yourhome with Internet access. Your guests will not have accessto your other computers or personal data. Provide yourguest with the guest network name and password. Guestcomputers must connect to your network using a wirelessnetwork connection. Refer to Main Menu – Guest Access,page 5 and Guest Access, page 10 for more information.The following diagram shows a typical example of howlocal access and guest access are used in the same home.Guest Access versus Local Access DiagramInternetParental controls restrict Internet access for up to fivecomputers. For the computers you select, you can block orlimit Internet access to specific times. You can also blockspecific websites.Parental controls restrictions are being applied to xdevice(s) The number of devices with parental controlsrestrictions is displayed.Change To enable parental controls or change settings,click Change and go to Parental Controls, page 8.Main Menu – Guest AccessGuest access provides Internet access only; it does notprovide access to the local network and its resources. Forexample, the guest computer cannot print to a printer onthe local network or copy files to a computer on the localnetwork.Guest access helps minimize exposure of your localnetwork. To grant Internet access to friends or family,provide the guest network name and password displayedon this screen.Guests can connect to x-guest using the passwordxyz When a guest wants Internet access in your home,have the guest do the following:Family NotebookPrinterModemRouter1. Connect to the wireless guest network, which is thename of your wireless network followed by -guest.2. Open a web browser.Guest Notebook12123. On the login screen, enter the password of your guestnetwork. Then click Login.Change To disable guest access or change settings, clickChange and go to Guest Access, page 10.Guest Access (Internet Access Only)Local AccessMain Menu – Router SettingsUse this option to personalize the Router’s settings.Router name is x The name of the Router is displayed.Change To change settings, click Change and go toRouter Settings, page 10.Wireless-N Router5
Linksys E1000Chapter 2: Cisco ConnectComputers and Other DevicesConnect with the Easy Setup KeyThe Computers and other devices screen appears.1. Insert the Easy Setup Key into an available USB port onthe computer that you want to connect to the Router.Computers and Other DevicesComputer Click this option to connect another computerin your home. Go to Computer, page 6.Wireless printer Click this option to connect a wirelessprinter. Go to Wireless Printer, page 7.Other devices Click this option to connect a device thatis not a computer, such as a smartphone or game console.Go to Connect Manually, page 7.ComputerYou can use a USB flash drive to create an Easy Setup Key,which holds the wireless settings for the Router. Thenyou can use the Easy Setup Key to connect additionalcomputers to the Router. Select the appropriate option:Connecting Another Computer2. On that computer, click Connect to your LinksysRouter. (If you do not see this, access the Easy SetupKey through Windows Explorer or the Finder, anddouble‑click Connect.)Follow the on-screen instructions to connect thatcomputer to the Router.3. Come back to this computer. On the Connectinganother computer screen, click Next.4. Enter a name that will be used to identify the newlyadded computer. Then click Finish.Yes, I have an Easy Setup Key If you already have anEasy Setup Key, select this option. Click Next and go toConnect with the Easy Setup Key, page 6.No, I don’t have an Easy Setup Key — create a newone now If you want to create or update an EasySetup Key, select this option. Click Next and go toCreate or Update the Easy Setup Key, page 7.I want to connect manually using my wirelesssettings If you want to connect manually (without anEasy Setup Key), select this option. Click Next and go toConnect Manually, page 7.Name Your DeviceDo You Have an Easy Setup Key?Wireless-N Rout
Linksys E1000 Chapter 1: Product Overview Wireless-N Router 2 Wall-Mounting Placement The Router has two wall-mount slots on its