Transcription
Owner’s Use and Care GuideGuide d’utilisation et soin de PropriètaireModel ModèleDDR5009REE DDR6009REE DDR7009REECAUTION: Read andfollow all safety rulesand operatinginstructions before firstuse of this product.MISE EN GARDE:Veuillez lireattentivement lesconsignes de sécurité etles directivesd’utilisation avantl’utilisation initiale de ceproduit.PORTABLE DEHUMIDIFIERTable of contents. 1DÉSHUMIDIFICATEUR PORTATIFTable des matières. . . . . . . . . . . . . . . . . . . . . . . . . . . . . . . . . . . . . . . . . . . . . . . . 14KEEP THESE INSTRUCTIONS FOR FUTURE REFERENCE: If the Dehumidifier changes ownership, be surethis manual accompanies the unit.CONSERVER CES INSTRUCTIONS POUR CONSULTATION ULTÉRIEURE: En cas de revente du déshumidificateur, cemanuel doit être inclus avec l’appareil.Danby Products Ltd, PO Box 1778, Guelph, Ontario Canada N1H 6Z9Danby Products Inc, PO Box 669, Findlay, Ohio USA 45839-0669Version 3.02.09 JF
TABLE OF CONTENTSINTRODUCTION. 2WARNING- IMPORTANT NOTICEFor your SafetyGrounding Instructions. 3.3. 3ELECTRICAL SPECIFICATIONS.4. 4Unit SpecificationsFEATURESUnit Parts Identified.5. 5FUNCTION EXPLANATION.6OPERATING INSTRUCTIONS.7Remote Control.7Factory Default Settings. 8Defrost.9Dehumidifier.9Air Filter.9CONTINUOUS DRAIN INSTRUCTIONSCAUTIONS. . . . . . . . . . . . . . . . . 10. . . . . . . . . . . . . . . . . . . . . . . . . . . . . . . . . . . . . . . . . . . . 11CARE AND MAINTENANCE. . . . . . . . . . . . . . . . . . . . . . . . . . . . 12TROUBLESHOOTING. . . . . . . . . . . . . . . . . . . . . . . . . . . . 12Warranty. . . . . . . . . . . . . . . . . . . . . . . . . . . . . . . . . . . . . . . . . . . . . . . . . 131
INTRODUCTIONThank you for choosing a Danby appliance to provide you and your family with all of the “HomeComfort” requirements of your home, cottage, or office. This Owner’s Use and Care Guide willprovide you with valuable information necessary for the proper care and maintenance of your newappliance. If properly maintained, your Danby appliance will give you many years of trouble freeoperation. Please take a few moments to read the instructions thoroughly and familiarize yourselfwith all of the operational aspects of this appliance.Your Danby Portable Dehumidifier is a multi-functional room air-exchanging, air-processingappliance, designed to offer you the functions of Dehumidifying, and Independent Fan. Eachindividual mode is featured with “oscillating” air swing capabilities. This unit can be convenientlymoved from room to room within your home and set up in just minutes. Imagine the convenience of4 Season Home Comfort at your fingertips, anywhere, anytime.For easy reference, may we suggest you attach a copy of your sales slip/receipt to this page, alongwith the following information, located on the manufacturers nameplate on the rear panel of the unit.Model Number:Serial Number:Date of Purchase:This information will be necessary if your unit requires servicing and/or for general inquiries. Tocontact a Customer Service Representative, call Danby TOLL FREE:1-800-26(1-800-263-2629)KEEP THESE INSTRUCTIONS FOR FUTURE REFERENCE.CAUTION: Do not leave this unit unattended or operate in an area where people or animalsmay not be able to react quickly. A failed unit may cause over-heating, resulting in personal injury orproperty damage.2
WARNING- IMPORTANT NOTICESNOTEThe WARNING instructions issued in this manual are not meant to cover all possible conditions and situationsthat may occur. It must be understood that common sense, caution, and carefulness are factors that cannot bebuilt into all appliances. These factors must be supplied by the person(s) installing, maintaining, or operatingthe appliance. Failure to install, maintain, and/or operate the equipment according to the manufacturer’sinstructions may result in conditions which can produce bodily injury and/or property damage. Contact yourdealer, service agent, or the manufacturer about any problems or conditions you do not fully understand.For Danby Customer Service call 1-800-26-/ 1-800-263-2629FOR YOURSAFETYTo reduce the risk of fire or explosion, do not store or use gasoline or other flammable vapors or liquids in thevicinity of this or any other appliance.To reduce the risk of fire, electric shock, or personal injury, all wiring andgrounding must conform with the latest edition of Local and NationalElectrical codes.It is the customer’s responsibility to have the wiring and fuses checked by a qualified electrician to make sureadequate electrical power is available.ELECTRICAL SERVICEINFORMATIONThis appliance is designed to operate on a separate branch, polarized, three-wire, effectively grounded 120Volt 60 Hertz (alternating current) circuit protected by a 15 ampere fuse, equivalent fuse or circuit breaker.The three-prong grounding plug on the power cord should be plugged directly into a polarized, three slot,effectively grounded receptacle rated 110/120 V.A.C.GROUNDINGINSTRUCTIONSImproper connection of the equipment-grounding conductor can result in a risk of electrical shock. Checkwith a qualified electrician or serviceman if you are in doubt as to whether your appliance outlets are properlygrounded.This appliance must be grounded. In the event of malfunction or breakdown, grounding will reduce the risk ofelectrical shock by providing a path of least resistance for electrical current. This appliance is equipped with acord having an equipment-grounding conductor and 3 prong grounding plug. The plug must be connected intoan outlet that is properly installed and grounded in accordance with all local codes and ordinances.Do not modify the plug provided with this appliance. If it will not fit the outlet, have a proper outlet installedby a qualified electrician.If the household electrical supply does not meet the above specifications, or it you are not sure your home hasan effective ground, have a qualified electrician or your local electrical utility company check it and correctany problems.3
ELECTRICAL SPECIFICATIONS1) All wiring must comply with local and national electrical codes and be installed by a qualified electrician.If you have any questions regarding the following instructions, contact a qualified electrician.2) Check available power supply and resolve any wiring problems BEFORE installation and operation of thisunit.3) For your safety and protection, this unit is grounded through the power cord plug when plugged into amatching wall outlet. If you are not sure whether the wall outlets in your home are properly grounded, pleaseconsult a qualified electrician. DO NOT USE PLUG ADAPTERS OR EXTENSION CORDS.4) The manufacturers nameplate is located on the rear wall of the water tank compartment. The nameplatecontains electrical and other technical data specific to this unit.5) To avoid the possibility of personal injury, always disconnect the power supply before attempting to cleanand/or service the unit.UNIT SPECIFICATIONSModel Number:DDR5009REEDDR6009REEDDR7009REEDehumidifying Capacity (Pints/ Liters)50 / 23.760 / 28.570 / 33Electrical Requirements115 V / 60 Hz115 V / 60 Hz115 V / 60 HzPower Input (Watts)600640770Rated Amperage (Dehumidifying)5.567Air Flow Circulation- High Fan Speed(Cubic Feet per Minute)238294324Type of RefrigerantR-410AR-410AR-410AWater Tank Capacity (Pints / Liters)14.2 / 6.814.2 / 6.814.2 / 6.8Operating Noise Level (dB A)54.85555.3Unit Dimensions (W x H x D)15 4/16” x 23 10/16” x 11 2/16” 15 4/16” x 23 10/16” x 11 2/16” 15 4/16” x 23 10/16” x 11 2/16”Net Weight (kg / lbs)16.2 / 35.819.5 / 4319.7 / 43.4NOTE: Specifications are subject to change without notice, for further improvements.4
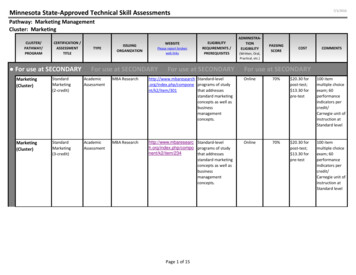
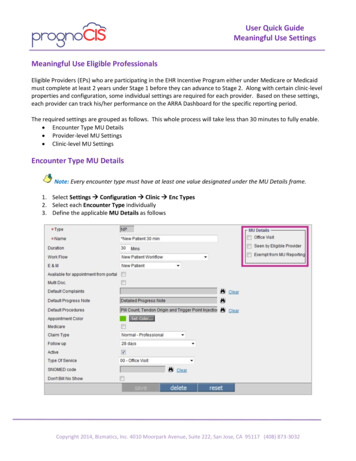
FEATURES1) Soft Touch (Electronic) Control Key Pads8) Full Bucket Indicator Light2) Remote Control9) Easy Roll Castors (4)3) Auto-Sensing Humidity Control10) Front Mounted Water Tank (Removable)4) Adjustable Humidity Settings (30%-90%)11) Direct Drain Option (Hose not Included) StandardGardan Hose can be used5) 2 Fan Speed Settings (High/Low)6) Delay Start Protection (compressor)12) Quiet Operation13) Removable Air Filter7) Auto-Defrost (De-Icer)UNIT PARTSIDENTIFICATIONControl PanelMoist AirIntakeHandleDehumidifiedDry Air VentAir FilterDrain BucketRoll Castors5Continuous DrainOutlet
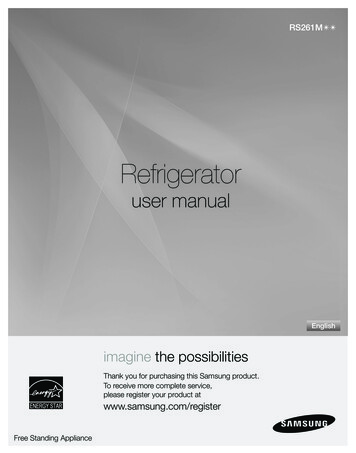
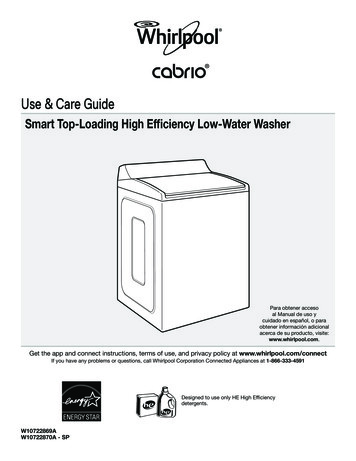
FUNCTION EXPLANATION8675912436) SET HUMIDITY/CURRENT HUMIDITYDISPLAY: When machine is running, it displays thecurrent humidity. Press UP or DOWN buttons toselect humidity setting. The humidity is adjusted inincrements of 5% by each press. Adjustable range iswithin 30%RH to 90%RH. 10 seconds after settinghumidity, the display will change back to the currenthumidity.1) POWER Button: On / Off2) FAN SPEED Button: High / Low3) TIMER Button:When unit is operating, press TIMER to set numberof hours desired until unit will shut off.When unit is in stand-by, press TIMER to set number7) CURRENT TEMP / TIMER SET DISPLAY:of hours desired until unit will turn on.When machine is running, it displays the currenttemperature. Press the TIMER button to set theSetting timer from 1-24 hours. To cancel the timer,machine to shut off automatically after specifiedproceed as above but set the “timer off” to zero (0)amount of time. 10 seconds after displaying the timer,hours.the display will change back to current temperauture.4) C/ F Button: Press the C/ F button to toggle8) DEFROST LIGHT: When temperature is low,between Celsius and Fahrenheit.unit enters defrost mode and defrost light illuminates.5) Receiving Sensor9) BUCKET FULL LIGHT: When water tank isfull, bucket full light illuminates.6
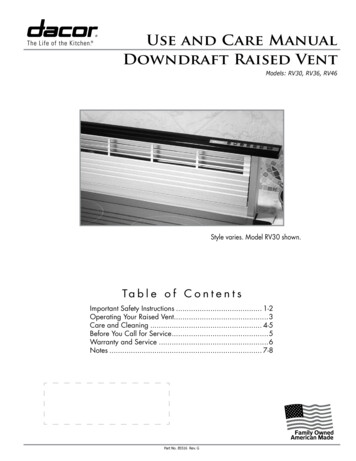
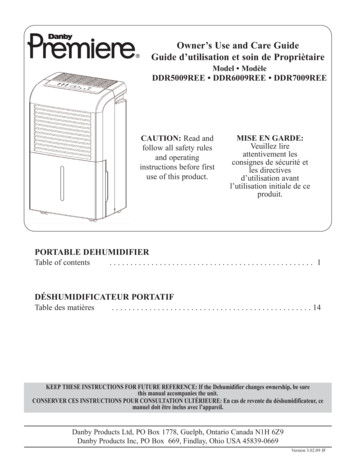
OPERATING INSTRUCTIONSREMOTECONTROL1) Power Key: On / Off2) Fan Speed Key: High/Low3) On / Off Timer Key:In running mode: Auto switch OffIn standby mode: Auto switch on4) Temperature display selector button (Celsius / Fahrenheit): Press the C/ F switch button to toggle between C and F.5) Timer / Temperature Buttons:A) Used for adjusting the timer and thermostat.B) The default display is room temperature.C) When “ ” or “-” button is pressed, the set temperature is displayed andmay be adjusted. After 10 seconds the display will revert back to roomtemperature.14253The remote operates within a range of 6 meters (16.4 ft.) from the receiverlocated inside the main unit. Any obstruction between the receiver andremote may cause signal interference, limiting the ability to program themain unit.This Class B digital apparatus complies with Canadian ICES-003.PLACING BATTERIESIN REMOTE CONTROLThe functions work the same as your dehumidifier’s touch controls.Batteries: Remove the cover on the back of the remote controller and insert the batteries with the ( ) and (-)poles pointing in the proper direction.CAUTION: Use only AAA or IEC R03 1.5V batteries.Remove the batteries if the remote controller isnot used for one month or longer. Do not attempt to recharge the supplied batteries. All batteries should bereplaced at the same time. Do not dispose of the batteries in a fire as they may explode.7
OPERATING INSTRUCTIONS (cont’d)1) Place the product in an upright position on a flat, stable, and heat-resistantSTARTMake sure there is nothing flammable or heat sensitive within 100cmOPERATION surface.(39 inches). Operating the product in any other position could cause a hazard.2) Insert the plug into a suitable wall socket (Fig. 1) Thedehumidifier is suitable for operating on an electricity supply havingthe same voltage as that shown on its rating label.3) Make sure the water tank is correctly located. After switching onthe machine for the first time, if the “Bucket Full” light illuminates,pull out the water tank, and check that the “float” lever is able tomove freely, then return the water tank to the correct position (Fig.2).Fig. 1Fig. 2WATER FULLINDICATORLIGHT(RED)When the water tank is full and/or incorrectly positioned inside the cabinet, the waterfull red light turns on and remains on until such time that the tank is emptied and/orcorrectly re-positioned.This condition will result in the immediate shut down of the dehumidifying system (both compressor and fanmotor operations are terminated). This is a safety feature. When the water tank is emptied and/or correctlyre-positioned, the dehumidifier will resume operation automatically.NOTE: It may take several minutes before operating conditions resume.BUCKET FULL When the water tank is full the machine will stop and theLIGHT ON“Bucket Full” light will illuminate.The water tank should be carefully removed from the machine by sliding itoutward from the front of the unit, and it should be emptied. When the emptytank is replaced properly in the machine, the unit will start up and run normally(Fig. 3).Fig. 3Please useboth handsto carefullyempty thewater tank.FACTORYDEFAULT SETTINGEach time the unit is disconnected/re-connected and/or in the event of a power failure, the electronic circuitboard automatically defaults to the following factory setting:Humidity Setting: 60%Fan Speed: LowNOTE: In the event of a power failure, all previous settings are automatically erased/cancelled. If yourprogram setting was different from the above (default setting) it will be necessary to re-program your settings.When the unit is switched “Off” manually (using the on/off keypad) the unit will always default to the lastprogram setting that was used.Proper installation of the water tank is crucial in maintaining reliable dehumidifieroperation
dehumidifier is suitable for operating on an electricity supply having the same voltage as that shown on its rating label. 3) Make sure the water tank is correctly located. After switching on the machine for the first time, if the “Bucket Full” light illuminates, pull out the water tank, and check that the