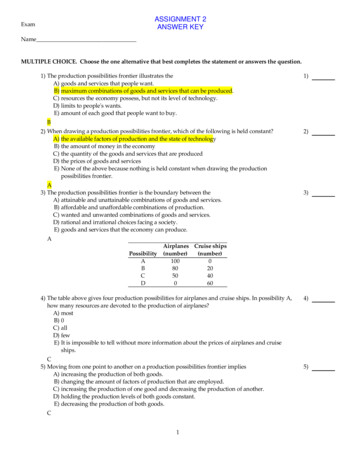
Transcription
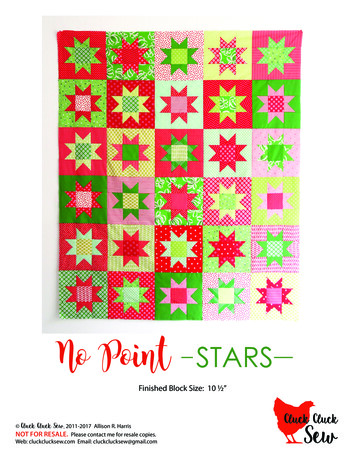
No Point STARSFinished Block Size: 10 1/2” CluckCluck Sew, 2011-2017 Allison R. HarrisNOT FOR RESALE. Please contact me for resale copies.Web: cluckclucksew.com Email: cluckclucksew@gmail.comCluck CluckSew
A quick note about material requirements: Each block in this quilt uses one fat quarter, but also leaves a lot ofscraps from the fat quarter. It may seem like a lot of fabric, butyou will have a lot left over for another project!Material Requirements:CribThrowTwinQueenKing(Cover Quilt)42" x 52 1/2"52 1/2" x 63"63" x 84"94 1/2" x 94 1/2"105" x 94 1/2"Color 1fabric*10 FatQuarters or1/4 yards15 FatQuarters or1/4 yards24 FatQuarters or1/4 yards41 FatQuarters or1/4 yards45 FatQuarters or1/4 yardsColor 2fabric*10 FatQuarters or1/4 yards15 FatQuarters or1/4 yards24 FatQuarters or1/4 yards40 FatQuarters or1/4 yards45 FatQuarters or1/4 yardsBacking3 yards3 1/2 yards5 1/2 yards8 3/4 yards9 1/2 yardsBinding3/8 yard1/2 yard3/4 yard1 yard1 yard* I used two colors (red and green) to make my quilt, but you can use asmany colors as you like. If you are using just one color or a varietyof colors, just combine the Color 1 and 2 fabric requirements(for example the Throw size requires 30 fat quarters total).Before you begin: Please read through all of the instructions. All seam allowances are 1/4”. The assumed width of fabric is 40", and 20” for fat quarters. "Right sides together" has been abbreviated to "RST". "Width of the fabric" has been abbreviated to "WOF".NOT FOR RESALE
Cutting Instructions:1. Cut each Fat Quarter into 2 strips 4”, and 2 strips 3” along the 18” side of the fat quarter. Sub-cut the 4” stripsinto 9 squares 4” x 4”, and sub-cut the 3” strips into 8 squares 3” x 3”.21” side of Fat Quarter4” strip4” squares4” strip4” squares3” strip3” squaresscrap3” strip3” squaresscrapScrap2. If starting with 1/4 yards instead, cut one strip 4” x WOF, and one strip 3” x WOF. Sub-cut the 4” strip into 9squares 4” x 4”, and sub-cut the 3” strip into 8 squares 3” x 3”.3. From the binding fabric cut:2 1/2" x WOF strips:CribThrowTwinQueenKing6781011Assemble the Blocks:1. To make one block gather 8 of the 4” squares from one of thecolors of fabric (in this case green), and from the other color offabric, gather 1 square 4”, and 8 squares 3”.9 - 4” squares8 - 3” squaresI mixed up the center squares in my quilt with the other fabricsto add interest to the blocks.2. On one of the outer 4” squares, place a 3” square in the bottom corner RST as shown. Draw a diagonalpencil line from corner to corner on the wrong side of the 3” square as shown (see my note down belowfor a much easier way to do this!). Sew on the pencil line. Trim the corner leaving 1/4”, and press thecorner out.Visit my post “The TriangleCorner Trick” on my blog to skipmarking diagonal lines and saveTONS of time!pencil ertrick.html
3. Repeat in the adjacent bottom corner of the square with another 3” square. When finished the unit shouldstill measure 4” x 4”, square up as needed.Repeat to make 4 of these units.Make 44. Layout the block units as shown. Sew the units into 3 rows as shown, press the seams in the directionindicated by the arrows in the image. This will allow the seams to nest when you sew the quilt together.The blocks should measure 11” square. Repeat to make the following number of blocks:Blocks to make:CribThrowTwinQueenKing2030488190Quilt Assembly:1. Layout the blocks into rows as shown in the table below and layout diagrams. If you are using two colors,alternate between the two colors as you layout your blocks as I did. Rotate the blocks as needed so that theseams of adjacent blocks will nest!Blocks in each row:Number of rows:Crib45Throw56Twin68Queen99King109Row 1Shown in a Throw size.Row 2NOT FOR RESALE
2. Sew the blocks into rows RST. Press the rows in alternating directions (press row 1 seams to the right, row 2seams to the left, etc).3. Pin and sew the rows RST to complete the quilt top. sh the Quilt:1. For the Crib, Throw & Twin, cut the length of the backing in half, making 2 equal pieces. For the Queen &King size, cut the length of the backing in 3 equal pieces. Trim selvages, and sew a selvage end from eachpiece RST.2. Layer the quilt top, batting, and backing. Baste and quilt as desired.3. Trim away the excess batting/backing, and bind. A free guide to finishing your quilt can be found atcluckclucksewpatterns.com under the Wholesale tab.NOT FOR RESALECluck CluckSewFor more free tutorials and patterns visit www.cluckclucksew.com and click the Tutorialstab at the top.For more patterns visit my shop at cluckclucksewshop.com
3. Trim away the excess batting/backing, and bind. A free guide to finishing your quilt can be found at cluckclucksewpatterns.com under the Wholesale tab. Crib Throw Twin Queen King King Queen Twin Throw 2. Sew the blocks into rows RST. Press the rows in alternating directions (press ro