Transcription
Title pageMedisoftRelease NotesBusiness Performance ServicesFebruary 2015Produced in Cork, Ireland
Copyright noticeCopyright noticeCopyright 2015 McKesson Corporation and/or one of its subsidiaries. All RightsReserved.Use of this documentation and related software is governed by a license agreement. Thisdocumentation and related software contain confidential, proprietary, and trade secretinformation of McKesson Corporation and/or one of its subsidiaries, and is protected underUnited States and international copyright and other intellectual property laws. Use,disclosure, reproduction, modification, distribution, or storage in a retrieval system in anyform or by any means is prohibited without the prior express written permission ofMcKesson Corporation and/or one of its subsidiaries. This documentation and relatedsoftware is subject to change without notice.Publication dateFebruary 2015Produced in Cork, IrelandProductMedisoft, Version 20Corporate addressMcKesson Corporation 5995 Windward Parkway Alpharetta, GA 30005404-338-6000iiVersion 20
Table of contentsTable of contentsChapter 1 - Enhancements . . . . . . . . . . . . . . . . . . . . . . . . . . . . . . . . . . . . . . . . . . . . . . . . . . . 1Medisoft Desktop . . . . . . . . . . . . . . . . . . . . . . . . . . . . . . . . . . . . . . . . . . . . . . . . . . . . . . 2After Upgrading from Releases prior to Medisoft 19 . . . . . . . . . . . . . . . . . . . . . . . . 2Patient Intake . . . . . . . . . . . . . . . . . . . . . . . . . . . . . . . . . . . . . . . . . . . . . . . . . . . . . 2Additional Medisoft Enhancements . . . . . . . . . . . . . . . . . . . . . . . . . . . . . . . . . . . . . . . 11Unprocessed Charges . . . . . . . . . . . . . . . . . . . . . . . . . . . . . . . . . . . . . . . . . . . . . 11ICD-10 Code Date. . . . . . . . . . . . . . . . . . . . . . . . . . . . . . . . . . . . . . . . . . . . . . . . . 11Mobile Transactions . . . . . . . . . . . . . . . . . . . . . . . . . . . . . . . . . . . . . . . . . . . . . . . 11Advantage Data Provider . . . . . . . . . . . . . . . . . . . . . . . . . . . . . . . . . . . . . . . . . . . 11Checksum Removed. . . . . . . . . . . . . . . . . . . . . . . . . . . . . . . . . . . . . . . . . . . . . . . 12Medisoft Mobile . . . . . . . . . . . . . . . . . . . . . . . . . . . . . . . . . . . . . . . . . . . . . . . . . . . . . . 13Finding the Mobile app . . . . . . . . . . . . . . . . . . . . . . . . . . . . . . . . . . . . . . . . . . . . . 13Appointments screen . . . . . . . . . . . . . . . . . . . . . . . . . . . . . . . . . . . . . . . . . . . . . . 13Patient Quick Add . . . . . . . . . . . . . . . . . . . . . . . . . . . . . . . . . . . . . . . . . . . . . . . . . 19Patient Intake . . . . . . . . . . . . . . . . . . . . . . . . . . . . . . . . . . . . . . . . . . . . . . . . . . . . 20Revenue Management . . . . . . . . . . . . . . . . . . . . . . . . . . . . . . . . . . . . . . . . . . . . . . . . 28Diagnose Mobile . . . . . . . . . . . . . . . . . . . . . . . . . . . . . . . . . . . . . . . . . . . . . . . . . . . . . 29New buttons . . . . . . . . . . . . . . . . . . . . . . . . . . . . . . . . . . . . . . . . . . . . . . . . . . . . . 29Running the Clear ICD-10 utility . . . . . . . . . . . . . . . . . . . . . . . . . . . . . . . . . . . . . . . . . 31Chapter 2 - Resolved Issues . . . . . . . . . . . . . . . . . . . . . . . . . . . . . . . . . . . . . . . . . . . . . . . . . 35Chapter 3 - General Guidelines for Customizable Forms for Patient Intake . . . . . . . . . . 37Medical History Template . . . . . . . . . . . . . . . . . . . . . . . . . . . . . . . . . . . . . . . . . . . . . .Location on server. . . . . . . . . . . . . . . . . . . . . . . . . . . . . . . . . . . . . . . . . . . . . . . . .Practice Forms . . . . . . . . . . . . . . . . . . . . . . . . . . . . . . . . . . . . . . . . . . . . . . . . . . . . . .Location on Server . . . . . . . . . . . . . . . . . . . . . . . . . . . . . . . . . . . . . . . . . . . . . . . .McKesson-provided Forms . . . . . . . . . . . . . . . . . . . . . . . . . . . . . . . . . . . . . . . . . .Example. . . . . . . . . . . . . . . . . . . . . . . . . . . . . . . . . . . . . . . . . . . . . . . . . . . . . . . . . . . .Troubleshooting tips . . . . . . . . . . . . . . . . . . . . . . . . . . . . . . . . . . . . . . . . . . . . . . . . . .Examples . . . . . . . . . . . . . . . . . . . . . . . . . . . . . . . . . . . . . . . . . . . . . . . . . . . . . . . . . . .Intake Form Example: . . . . . . . . . . . . . . . . . . . . . . . . . . . . . . . . . . . . . . . . . . . . . .Details on Connectivity Enhancements . . . . . . . . . . . . . . . . . . . . . . . . . . . . . . . . . . . .How to Get Started . . . . . . . . . . . . . . . . . . . . . . . . . . . . . . . . . . . . . . . . . . . . . . . .Downloading the new .jar file prior to March 2, 2015 . . . . . . . . . . . . . . . . . . . . . .Adding the new EMF mailbox URL to Revenue Management . . . . . . . . . . . . . . .Downloading the new .jar file after March 2, 2015 . . . . . . . . . . . . . . . . . . . . . . . .Adding the new EMF mailbox URL to Revenue Management . . . . . . . . . . . . . . .February 2015Release NotesVersion 20383841414143454650555556606164iii
Table of contentsivRelease NotesVersion 20February 2015
Chapter 1 - EnhancementsThis chapter presents a high-level description of the following enhancements to the Medisoft system.In this chapterTopicSee pageMedisoft Desktop2Patient Intake2Additional Medisoft Enhancements11ICD-10 Code Date11Mobile Transactions11Advantage Data Provider11Checksum Removed12Medisoft Mobile13Patient selection15Week at a Glance16Patient Intake20February 2015Release NotesVersion 201
Medisoft DesktopChapter 1 - EnhancementsMedisoft DesktopAfter Upgrading from Releases prior to Medisoft 19Medisoft 19 was the ICD-10 Ready release of Medisoft. Prior to using Medisoft 20, review theRelease Notes for Medisoft 19, as they have all of the features that were added to make MedisoftICD-10 ready. You can find those release notes here: %20Product%20Release%20Notes.Note: You do NOT need to perform the Before or After Install sections in the Medisoft 19 ReleaseNotes.If you have upgraded from Medisoft 18 or earlier, you must run the Clear ICD-10 utility to ensurethat no ICD-9 codes remain in the ICD-10 fields on the Enter Diagnosis screen. For steps to run theutility, see “Running the Clear ICD-10 utility” on page 31.Patient IntakePatient Intake is available only in Medisoft Network Professional. You may see an option for thisfeature in Basic and Advanced but you must have Network Professional to use it.You can now process and manage patient information entered by a patient from a mobile device.New and existing patients can enter information from a device in the physician’s office and it will betransferred to your core application so that you can update the patient’s information.The mobile app is supported on iPads with display dimensions of 9.5 inches or greater and Androidtablets (coming soon) with display dimensions of 10 inches or greater. It is not for use with theiPhone or Android phones. See the system requirements for supported Android tablets.Setting upGranting permissionsThe following permissions are used in the Pending Patient Screen. You must have thesepermissions to access the Pending Patient screens. If you do not, you will receive a No Accesswarning and will need to have someone with permission perform a Security Override. Patients/Guarantors and Cases - New Patient Patients/Guarantors and Cases - Edit Patient Patients/Guarantors and Cases - New Case Patients/Guarantors and Cases - Edit Case Patients/Guarantors and Cases - Copy Case Insurance Carrier List - New Insurance Carrier Insurance Carrier List - Edit Insurance Carrier Addresses - New Address Entry Addresses - Edit Address Entry2Release NotesVersion 20February 2015
Chapter 1 - EnhancementsNew Menu Option Referring Providers - New Referring Provider Referring Providers - Edit Referring Provider Provider List - New Provider Provider List - Edit ProviderIf you have your Program Options set to Use Patient Quick Entry for New/Edit, you must have thefollowing permission set to True: Patient Quick Entry - New/EditTo delete a patient from the Pending Patients list, you must have permission to delete patients.New Menu OptionThere is a new menu option on the Activities menu: Pending Patients. Selecting this option willopen the Pending Patients List.Figure 1. Activities menuFebruary 2015Release NotesVersion 203
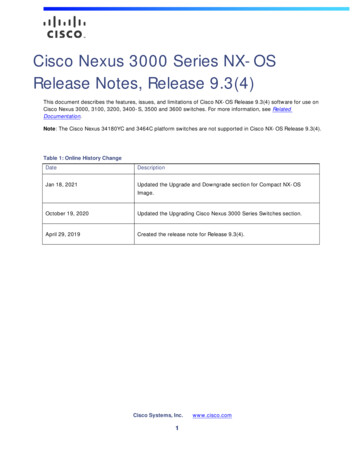
New Pending Patient ListChapter 1 - EnhancementsNew Pending Patient ListThis screen will show you all of the patients who have entered information from a mobile device,and whose information you have not processed. No information is saved on the mobile device.Figure 2. Pending Patients ListClicking Edit or double-clicking a line item will open the Pending Patients screen. Highlight a lineitem in the grid and click Delete to delete the record if it was entered in error.This screen will refresh automatically; however, you can still manually refresh by clicking Refresh.Note that the provider information that appears is the provider that the patient is scheduled to see,not the assigned provider.IntakeDate fieldAn IntakeDate field has been added to the Pending Patient table (MWMPP). It includes the dateand time that the intake record was added. This field will not appear on the grid by default.To add this field to the grid:1. Click the black dot in the upper left hand corner of the Pending Patient grid. The Grid Columnsscreen appears.2. Click the Add Field button.3. Scroll down to IntakeDate and click the OK button,4. Move the field to the place you want it to appear on the grid.Note: if you are using the Demo version of Medisoft, this screen will not be available.4Release NotesVersion 20February 2015
Chapter 1 - EnhancementsNew Grid Columns screenNew Grid Columns screenThe Pending Patient list is customizable. Click the black dot to the left of Assigned Provider in thegrid heading to open the Grid Columns screen.Figure 3. Grid Columns screenYou can use this screen to add or remove columns from the list, as well as change the order of thecolumns.February 2015Release NotesVersion 205
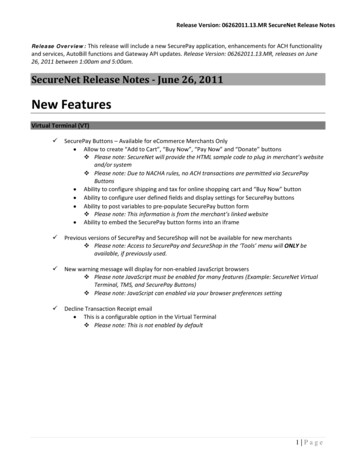
New Pending Patients screenChapter 1 - EnhancementsNew Pending Patients screenThe Pending Patients screen will open when you double-click a line item on the Pending PatientsList or when you select a line item and click the Edit button.Figure 4. Pending Patients screenNew patientsFor new patients, information appears on the screen as follows:6ElementDescriptionLeft-hand columnThis column will display all of the information entered by the patientthat can be saved in the patient record in Medisoft.Right-hand columnThis column will display all of the information that the patient enteredin the mobile application. All fields will be highlighted in yellow toindicate that it is new information for the patient’s record. You can usethe check boxes to select which information you want to transfer tothe patient’s permanent record in Medisoft.Release NotesVersion 20February 2015
Chapter 1 - EnhancementsNew Pending Patients screenElementDescriptionCaseThe patient information must include a case. To create a new case,right-click on the Case field and select New Case.Figure 5. Case Description screenEnter a description and click Save.Existing patientsFor existing patients, information appears as follows:ElementDescriptionLeft-hand columnThis column shows the information for the patient that currently existsin Medisoft.Right-hand columnThis column shows the information that the patient entered in themobile application. Fields that are highlighted in yellow are those thatdiffer from what is currently in the patient’s record in Medisoft. Selectthe check boxes for the information that you want to update inMedisoft.CaseThe value in the Case field will default to the value determined byProgram Options in Medisoft (Data Entry tab - Case Default field), ifthe patient has an existing case. You can right-click on the Case fieldand create a new case or copy an existing case. In addition, you canuse the drop-down to select a different case.When you click Save on the Pending Patients screen, the patient’s record will be created orupdated and all of this information placed on the New Patient Intake Information screen (see “NewPatient Intake Data screen” on page 9).Some of the information entered by the patient on the mobile device will not be transferred to theleft-hand column. This includes referring provider subscriber insurance guarantor employerTo update Medisoft with this information, you must open that record manually. For example, thepatient can enter guarantor information while using the mobile device but this information will notFebruary 2015Release NotesVersion 207
New Pending Patients screenChapter 1 - Enhancementsbe entered in Medisoft automatically. In the screen sample below (Figure 6 on page 8), note thatthe right-hand column displays information entered by the patient from the mobile device, but thereare no corresponding fields on the left-hand column for Medisoft. The Guarantor information mustbe updated manually.Figure 6. Pending Patients screen If there will be a new guarantor, right-click the Guarantor field and select New Guarantor. ThePatient/Guarantor screen will appear and you can create a new record using the patiententered information from the right-hand column. If this patient is associated with an existing guarantor, select the existing guarantor from theGuarantor drop-down. Then, if you need to update the guarantor’s record, right-click theGuarantor field and select Edit Guarantor.Note: If you delete a case and the patient has completed a patient intake associated with that case,the patient intake will be deleted.8Release NotesVersion 20February 2015
Chapter 1 - EnhancementsUpdated Case screenUpdated Case screenNew menu optionThere is a new option on the Case screen: Patient Intake Information.Figure 7. Case screenClicking this option will open the Patient Intake Data screen. This option will be grayed out if thepatient has never used the Patient Intake feature of the mobile application.New Patient Intake Data screenThere is a new screen: Patient Intake Data. This screen will show you the information that thepatient entered from the mobile application. Intakes will appear by date. In addition, forms that theFebruary 2015Release NotesVersion 209
New Patient Intake Data screenChapter 1 - Enhancementspatient completed will appear as separate items in the left column. Click an item on the left to seewhat was entered.Figure 8. Patient Intake Data screenClick the Print button to print the information; or click the Close button to close the screen.10Release NotesVersion 20February 2015
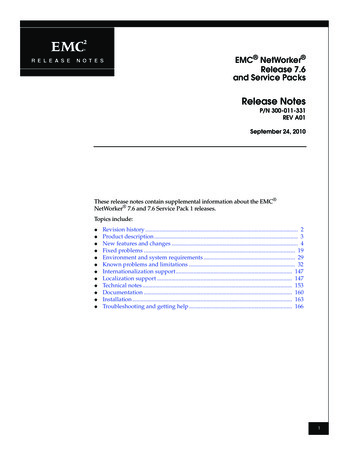
Chapter 1 - EnhancementsAdditional Medisoft EnhancementsAdditional Medisoft EnhancementsUnprocessed ChargesThere are new Date Range fields on the Unprocessed Charges screen.Figure 9. Unprocessed Charges screenYou now have the ability to set a date range in Unprocessed Charges. Setting a date range canimprove the performance of processing if you have a large number of charges to process. Thedefault values for both ‘Date From’ and ‘Date To’ will be the current date. If you set the ‘Date To’ toa date prior to the ‘Date From’, you will see charges only for the value in the Date To field.Once you set your date range, click the Apply button to refresh the screen with the new dates.Note that performance is degraded when the date range is a large span.ICD-10 Code DateThe hard-coded value for the date that ICD-10 codes become live has been updated for receiptswhere there was no insurance carrier or the case was a Cash Case. The new value is 10/1/2015.Mobile TransactionsThe value for Facility selected on the Mobile device superbill will now appear in UnprocessedTransactions. Previously, Medisoft was using the value set up in the case.Advantage Data ProviderAdvantage Data Provider, which Revenue Management uses to communicate with the server, hasbeen updated to version 11.10.February 2015Release NotesVersion 2011
Checksum RemovedChapter 1 - EnhancementsChecksum RemovedMPIC checksum validation has been removed from Medisoft.12Release NotesVersion 20February 2015
Chapter 1 - EnhancementsMedisoft MobileMedisoft MobileIf you reboot your server or manually restart the mobile connection service, the mobile connectionservice can take up to 5 minutes to restart.Finding the Mobile app1. Go to the App Store.2. Search for Medisoft v20.3. Download Medisoft v20.Figure 10. Medisoft Mobile iconAppointments screenUpdated Appointments screenThe appointments screen allows viewing by providers. You can navigate to view appointments for asingle provider or multiple providers. You can view appointments for the current day or moveforward or backward to see future or past appointments.February 2015Release NotesVersion 2013
Updated Appointments screenChapter 1 - EnhancementsDate selectionTapping on the date allows you to select a different date. Tapping on the or allows you to movebackward or forward a day. Use the slide gesture to change the month.Figure 11. Date selectionMultiple provider selectionTapping on the Provider name allows you to select a different provider or multiple providers. If no providers are selected, the display will show Select Provider. If you have a single provider selected, the display will show the provider’s name. When you have multiple providers selected, the display will show Selected Providers.When you have multiple providers selected, tapping the or will display the appointments for theprevious or next provider displayed.14Release NotesVersion 20February 2015
Chapter 1 - EnhancementsUpdated Appointments screenFigure 12. Provider selectionPatient selectionTapping the patient’s appointment will display the patient’s information on the Patient Card on theright side of the screen. The patient’s information initially appears in collapsed format. Tap thearrow button at the right to expand the patient card.Figure 13. Patient selectionNew iconsThere are two new icons on the Appointments screen. The table below lists the icons and theirdescriptions.IconDescriptionThis icon shows you if charges have been sent for the appointment.February 2015Release NotesVersion 2015
Week at a GlanceIconChapter 1 - EnhancementsDescriptionThis icon shows you if patient intake was completed for the patient.These icons appear next to the appointment when Patient Intake has been completed or whencharges have been sent.Figure 14. Appointment with iconsWeek at a GlanceYou can also view the entire week by clicking the Week at a Glance buttonin the top right.Figure 15. Week at a glance screenThis button will be disabled if you have multiple providers selected. Use it only with a singleprovider.You can tap a patient to open the patient view or click the Done button to return to the homepage.16Release NotesVersion 20February 2015
Chapter 1 - EnhancementsNew default settingsNew default settingsQuick AddThere is a new default setting on the Settings screen: Quick Add.Figure 16. Settings screenThe table below describes the two switch settings.SettingDescriptionOnThe device will open the Quick Add screenwhen you search for a patient and tap AddPatient. The Patient Intake option will behidden. For more information, see “PatientQuick Add” on page 19.OffPerforming a patient search will open theSearch screen so you can search for apatient. The Patient Intake button will beavailable. For more information, see“Updated Patient Search” on page 20.To change this setting:1. On the main screen, click the Settingsicon. The Superbill Template appears.2. Tap the Settings link at the top right of the screen. The Settings screen appears.3. Select your setting.4. Tap Done.Fe
Medisoft Desktop Chapter 1 - Enhancements Medisoft Desktop After Upgrading from Releases prior to Medisoft 19 Medisoft 19 was the ICD-10 Ready release of Medisoft. Prior to using Medisoft 20, review the Release Notes for Medisoft