Transcription
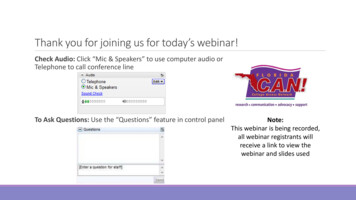
Welcome and thank youfor selecting the LifelineService!The Lifeline Communicatorallows you to summonassistance 24 hours a day bysimply pushing your PersonalHelp Button. This SetupGuide will walk you through 6simple steps for activating yourLifeline Service. If you haveany questions, please contactPhilips Lifeline.Quick Setup GuidePackage ContentsorCommunicatorAutoAlertPersonalHelp ButtonorClassicPersonalHelp ButtonSlimlinePersonalHelp ButtonOptional Accessory:Voice ExtensionPowercordPhonecord
Before you beginSelect a location for the Communicator In the area of the home where you spend most of your time – for large homes,place the Communicator near the center of the home to ensure a greater range Where there is an electrical outlet that is near a phone jack and not controlledby a wall switch (it’s okay if a phone is already plugged into the jack) Where there is a flat surface to put the Communicator on – avoid tableclothsand padded surfaces because they can make it difficult for the Lifeline PersonalResponse Associate to hear you Away from sources of noise (television, radio, air conditioner, etc.) Away from the refrigerator and microwave2
Before you beginOptional Accessory: Voice ExtensionIf you do not havea Voice Extension,please proceed to page 11.3
Select a location for your Voice Extension In a part of your home that is either a) more than 50 feet away from the base orb) on another floor – typical locations for the Voice Extension are a second-floorbedroom or the basement On a flat, hard surface – avoid tablecloths and padded surfaces because theycan make it difficult for the Personal Response Associate to hear you Near an electrical outlet (that is not controlled by a wall switch) and a phone jack Away from sources of noise (television, radio, air conditioner, etc.)4
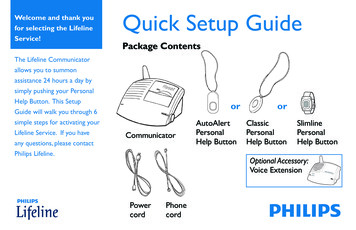
NoteA source of loud noise (television, radio, etc.)can interfere with your communication with thePersonal Response Associate. In cases when asource of loud noise prevents voicecommunication with thePersonal Response Associate,Lifeline will still send help whenCommunicator basewe receive your Help Call.Voice ExtensionMulti-story home5
STEP 1: Voice ExtensionPlug in the Voice Extension power cord Plug the black power cord into an electrical outletNOT controlled by a wall switch.VoiceExtensionElectricalwall outlet6Power cordPhone
Plug the Voice Extension phone cord into a wall jack Plug the phone cord into a phone jack on the wall. If you already have aphone plugged into this jack, you will have to temporarily disconnect thephone and reconnect it in the next step.Voice ExtensionNOTE:Your Voice Extension shouldnot be connected through yourtelephone, a phone splitter,an answering machine, or anyother device. These devicesshould connect through yourVoice Extension’s auxiliaryphone jack.PhonejackPhonePhone cord from Lifeline7
Connect your phone to the Voice Extension (optional) If you did not disconnect your phone from the wall jack,you may skip this step and go to the next step. I f you unplugged your phone from the wall jack during theprevious step, then plug the cord from your phone into thepurple jack at the back of the Voice Extension. If you have completed this step correctly, you should heara dial tone on your phone.8
PhoneVoice ExtensionFrom wall jackFrom your phone9
Turn on the Voice Extension Slide the power switch on the back of theVoice Extension to the ON position.Voice ExtensionON10OFF
STEP 1: CommunicatorInstalling your CommunicatorA prerecorded voice will help guide you through the setup process using this SetupGuide. After each step, you will press the blinking Reset Bar to move on to the nextinstruction. Slide the power switch on the back of theCommunicator to the ON position. Use the volume control on the side of theunit if the voice is too loud or too soft.11
STEP 2: CommunicatorPlace the Communicator in the proper location In the area of the home where you spend most of your time – for large homes,place the Communicator near the center of the home to ensure a greater range Where there is an electrical outlet that is near a phone jack and not controlledby a wall switch (it’s okay if a phone is already plugged into the jack) Where there is a flat surface to put the Communicator on – avoid tableclothsand padded surfaces because they can make it difficult for the Lifeline PersonalResponse Associate to hear you Away from sources of noise (television, radio, air conditioner, etc.) Away from the refrigerator and microwave12
Finding a proper locationCommunicatorPhonePhone ElectricaloutletjackPress the blinking Reset Barwhen this step is completed.13
STEP 3: CommunicatorPlug in the power cord Plug the black power cord into an electrical outlet NOT controlled by a wallswitch. When you have completed this step, the Communicator will say:“Good. We detect power.”14
CommunicatorPhoneElectricaloutletPower cordPress the blinking Reset Barwhen this step is completed.15
STEP 4: CommunicatorPlug the phone cord into a wall jack Plug the clear end of the phone cord supplied with the Communicatorinto a wall jack. If you already have a phone plugged into this jack, you will have to temporarilydisconnect this phone and reconnect it in the next step. When you have completed this step, the Communicator will say:“Good. Your Communicator is now plugged in.”NOTE:Your Lifeline unit should not be connected through your telephone, aphone splitter, an answering machine, or any other device. These devicesshould connect through your Voice Extension’s auxiliary phone jack.16
CommunicatorPhonePhonejackPhone cordfrom LifelinePress the blinking Reset Barwhen this step is completed.17
STEP 5: CommunicatorConnect your phone to the Communicator (optional) If you did not disconnect your phone from the wall jack, you may skipthis step and go to the next step. If you unplugged your phone from the wall jack during the previous step,then plug the cord from your phone into the purple jack on the back ofthe Communicator. If you have completed this step correctly, you should hear a dial toneon your phone.18
PhoneCommunicatorFrom wall jackFrom your phonePress the blinking Reset Barwhen this step is completed.19
STEP 6: CommunicatorConduct a range test with your waterproof Personal Help ButtonThe Communicator provides coverage inside your home and may provide coverage in thearea immediately outside (in the yard, etc.). The range test will show which areas will becovered. Place the waterproof Personal Help Button around your neck or on your wrist. Press the blinking Reset Bar to start the range test. The Communicator will say:“Begin the button range test.” Release the Reset Bar. Walk around the home with the Personal Help Button. In each room, push your waterproof Personal Help Button to see if the Communicatorresponds with a “beep.” The “beep” indicates that the Help Button is within rangeof the Communicator from that location, and it would be able to send a Help Call tothe Lifeline Response Center. Continue moving around the home. Be sure to check the bathroom and all other rooms.20
NOTE: In some cases, movingthe Communicator to anotherlocation will improve itscoverage of the living areas.BEEP!Press the blinking Reset Barwhen this step is completed.21
STEP 7: CommunicatorCall Lifeline with your Personal Help ButtonMake your first call to Lifeline by pushing your Help Button.This will confirm that everything is working properly. Push the waterproof Personal Help Button you are wearing. The Communicator will respond with a “beep” and the message:“Your welcome call is now being dialed. Please wait.” After your call hasbeen connected to Lifeline, your Communicator will announce: “Your call hasbeen connected; someone will be right with you.” A specially trained Lifeline Personal Response Associate will quickly answer the calland welcome you to the Lifeline Service. If you have any questions, the PersonalResponse Associate can answer them for you.22
23
iImportant safety information Be sure to read your User’s Manual. It contains other important informationabout your Lifeline Service. Wear your waterproof Personal Help Button at all times, especially in theshower and in bed. Keep the Communicator cords away from heat and sharp edges. Also, makesure that all cords are positioned away from areas where someone might tripover them. Do not use any attachment or accessory that is not intended for usewith this system.24
iImportant safety information Use caution when installing or modifying telephone lines. Never install telephone wiring during a lightning storm. Never touch bare telephone wires or terminals unless the telephoneline has been disconnected at the service box. Unplug the Communicator from the wall outlet before cleaning.See User’s Manual for cleaning instructions. Before you switch telephone services, please contact Philips Lifeline.25
Notes26
Notes27
Philips Lifeline111 Lawrence StreetFramingham, MA 01702-8156Tel: 1-800-451-0525www.lifelinesystems.comPhilips Lifeline Canada95 Barber Greene Road, Suite 105Toronto, Ontario, Canada M3C 3E9Tel: 1-800-387-8120www.lifeline.ca 2010. All rights reserved.Button signal range may vary due to environmental factors.P/N 0940487, Rev. 04
See User’s Manual for cleaning instructions. Before you switch telephone services, please contact Philips Lifeline. i Important ety saf ormationinf. Notes 26 . Notes 27. Philips Lifeline 111 Lawrence Street Framingham,