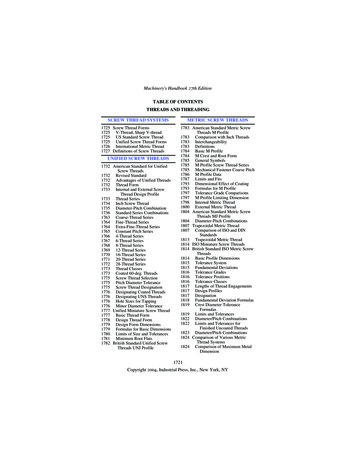
Transcription
GlobalSCAPE Secure FTP Server, v3Quick Start Guide for Interoperability withCisco Unified Communications Manager
GlobalSCAPE, Inc. (GSB)Corporate HeadquartersAddress:4500 Lockhill-Selma Road, Suite 150San Antonio, TX (USA) 78249Sales: (210) 308-8267Sales (Toll Free): (800) 290-5054Technical Support: (210) 366-3993Web Support: http://www.globalscape.com/support/ 2008 GlobalSCAPE, Inc. All Rights ReservedOctober 16, 2008
ContentsIntroduction . 4System Requirements for Secure FTP Server . 4Download the Software. 5Install, Activate, and Configure Secure FTP Server . 6Activate the SFTP Module . 17Configure the SFTP Connection . 17Configure the Cisco Unified Communications Manager for Use with Secure FTP Server . 20Getting Help . 21Windows-Specific Procedures . 22Creating a Windows User Account . 22Create/Edit Windows Registry Keys for TCP/IP Performance Tuning . 26Page 3 of 28
IntroductionThe topics below provide instructions for installing and configuring Secure FTP Server and its SFTPmodule to interoperate with Cisco Unified Communications Manager versions 5.1.x and 6.1.x.For the quickest, most error-free installation, have this Quick Start Guide open or printed out so that youcan perform each of the steps in order as described in this guide.1. Visit GlobalSCAPE's "Cisco-certified" page, http://www.globalscape.com/gsftps/cisco, to orderSecure FTP Server configured for Cisco Unified Communications Manager interoperability or torequest a trial serial number. The serial number and a download link will be sent to you via e-mail.2. Install the Server and the SFTP module and Activate Secure FTP Server.3. Activate the SFTP module.4. Configure the SFTP connection.5. Configure Cisco Unified Communications Manager to use Secure FTP Server as its SFTP serverSystem Requirements for Secure FTP ServerRuns on Windows 2000 Professional, Windows XP Professional, Windows Server 2003 orWindows Server 2003 x64Super VGA (1,024x768) or higher-resolution video adapter and monitor for the administratorinterface1 GB of RAMFor more information about Secure FTP Server:For instructions for adding user accounts and other Secure FTP Server configuration procedures,refer to the in-application help or the online help Request a trial serial number or purchase Secure FTP Server configured for Cisco UnifiedCommunications Manager interoperability athttp://www.globalscape.com/promo/gsftps cisco.aspx.For more information about GlobalSCAPE's Secure FTP Server, refer tohttp://www.globalscape.com/gsftps/.Page 4 of 28
GlobalSCAPE Secure FTP Server, v3Download the SoftwareGlobalSCAPE's "Cisco-certified" page, www.globalscape.com/gsftps/cisco, provides information and linksfor requesting a trial serial number or purchasing Secure FTP Server. The executable installs both theServer and the SFTP module.If you click Request a Trial, the Try Secure FTP Server page appears:Click Secure FTP Server(the SSH2 module is included inthe trial)If you click Purchase, the Purchase Secure FTP Server page appears:Click one of theSecure FTP Serveroptionsandone of theSSH2 Add-onModule optionsAfter you complete the purchase or trial form and provide your contact information, the serial number anddownload link are emailed to you automatically. Follow the instructions in the email to download theprogram, then follow the instructions below to install, activate, and configure Secure FTP Server. Keepyour email handy so that you can copy the serial number from the email and paste it into the serialnumber box.Page 5 of 28
GlobalSCAPE Secure FTP Server, v3The instructions below are for installing the Server and SFTP module without the Auditing and ReportingModule (ARM) database and HTTPS module. For detailed instructions for installing the Server with ARMand/or HTTPS, simply follow the instructions in the wizard or refer to the Secure FTP Server online helpat stall, Activate, and Configure Secure FTP ServerThe instructions below are continuous from installing, activating, to configuring. The entire process willtake less than ten minutes.The screenshots in this document were taken in various versions of Windows. Your interface willdiffer depending on the version of Windows that you are using.To install, activate, and configure Secure FTP Server1. Double-click the executable to start the installer. The Welcome page appears.2. Click Next. The License Agreement appears.Page 6 of 28
GlobalSCAPE Secure FTP Server, v33. You must read and then accept the license agreement (click Yes) in order to continue.4. Click Next. The Destination Location page appears.5. Specify the folder in which to install Secure FTP Server, then click Next. The SelectComponents page appears.Page 7 of 28
GlobalSCAPE Secure FTP Server, v3The FTP Server and Administrator Interface check boxes are selected by default.FTP Server: This component installs the Server and the modules.Administrator Interface: This component is the administrative interface for the server. Itmust be installed on the server computer and it may be installed on another computer toprovide remote administration over TCP/IP.If the installer offers the option to install the Auditing and Reporting module and you do notneed the database, you can clear the check box and continue with the installation asdescribed below. If you want to install the database, follow the instructions in the installerand/or refer to the Secure FTP Server online /.6. Click Next. The Administrator Account Settings page appears.Page 8 of 28
GlobalSCAPE Secure FTP Server, v37. Create a username and password that you will use to connect to and administer Secure FTPServer, then click OK.If the administrator username or password is lost, you will not be able to administer theServer. Resetting the administrator account is possible, but will result in the loss of alluser- and group-specific settings.The programs are installed and the Finished Setup page appears.8. The Launch Administrator Interface check box is selected by default. Leave it selected so thatyou can continue with activation and configuration.If the Launch Administrator Interface check box is selected, the installation processmoves immediately to activation.If you clear the check box, installation of the Secure FTP Server is complete, but youmust click the desktop icon or Start menu icon to open the Administrator Interface toconfigure and activate the Server and SFTP module before you can connect to it.9. Select the View README file check box if you want to read the release notes, then clickFinished.At this point, installation is complete. The wizard continues directly into activation andconfiguration; however, if you need to stop now, you can activate and configure theServer later. Simply open the Administrator interface by clicking its icon on the Start menuor desktop and the wizard will continue from step 11.Page 9 of 28
GlobalSCAPE Secure FTP Server, v3The GlobalSCAPE Secure FTP Server Administrator and Connect to FTP Server dialog boxappear.10. Provide the administrator Username and Password that you created during installation, thenclick Connect. The Welcome dialog box appears.Page 10 of 28
GlobalSCAPE Secure FTP Server, v311. You are prompted to provide a trial or purchased serial number to continue. Click Enter TrialSerial Number or Enter Serial Number and follow the instructions.If you have not yet received a serial number, refer tohttp://www.globalscape.com/promo/gsftps cisco.aspx to purchase or request atrial serial number.The Registration wizard appears.12. Type or paste your serial number into the Serial Number box, then click Next. The PersonalDetails page appears.Page 11 of 28
GlobalSCAPE Secure FTP Server, v313. GlobalSCAPE Customer Support can use the information on this page to look up your account ifyou need to contact Customer Support. Complete the personal details fields, then click Next.Secure FTP Server contacts the registration server to activate the serial number.In step 11, if you clicked Enter Serial Number, but provided a trial serial number instead of apurchased serial number, registration fails and an error message appears. If you clicked EnterSerial Number in error, you can click Cancel to try again.If registration is successful, the Registration Successful page appears.Page 12 of 28
GlobalSCAPE Secure FTP Server, v314. Click Finish.At this point, activation of the Server is complete. The wizard continues directly intoconfiguration; however, if you need to stop now, you can configure the Server later.Simply open the Administrator interface by clicking its icon on the Start menu or desktop,and click Continue Trial; the wizard will continue from step 15.The Create New Site wizard appears.15. Provide a Name for the Site or keep the default name. The name you provide here will appear inthe Server tree, error messages, logs, and the database, if used.16. Click the Listening IP list, then click the down arrow and click the address of the computer orkeep the default of All incoming.Page 13 of 28
GlobalSCAPE Secure FTP Server, v317. (Refer to the screen shot in step 14, if necessary.) In the Port box, type or select the port numberon which the Server listens for FTP connections. The default port used for FTP connections is 21,however, you can enter any value between 1 and 65,535. (You must configure FTP in this initialsetup; you can turn off plain FTP access on the Connection Options tab after configuration iscomplete.)Assigning port numbers under 1024 may lead to conflicts with other programsrunning on your computer.18. (Refer to the screen shot in step 14, if necessary.) The FTP connection to the Server is called aSite. If you want the connection to be available immediately, select the Start site automaticallyafter creation check box. Otherwise, you can clear the check box and start the Site later. Forexample, if you are not going to allow FTP connections to the site, you can leave the Start siteautomatically after creation check box cleared, and then later start the site manually after youhave configured SFTP.19. (Refer to the screen shot in step 14, if necessary.) Specify the Authentication method. Thedefault method is GlobalSCAPE Secure FTP Server Authentication. GlobalSCAPE Authenticationdoes not rely on outside sources for user information. All information in the authenticationdatabase is encrypted and protected from the operating system and can only be modified throughthe Administrator.If you need to use NT Authentication, see Creating a site that uses NT authentication inthe Secure FTP Server online help.If you need to use ODBC authentication, see Creating a site that uses ODBCauthentication in the Secure FTP Server online help.20. Click Next. The Authentication Options page appears.21. Provide the path at which to store the user database. Leave the default path unless you want tostore the authentication database in a new location.Page 14 of 28
GlobalSCAPE Secure FTP Server, v322. (Refer to the screen shot in step 20, if necessary.) In the User list refresh interval box, specifyhow often the Server should check the authentication database for new users (Never, every 5,15, or 30 minutes, 1, 2, 6, or 12 hours, or once per day).23. Click Next. The final page of the wizard appears.24. In the Default FTP Root Folder area, specify a path to the root folder for the site.25. Select the Create standard subfolders check box to automatically create Bin, Pub, Usr andIncoming folders with appropriate permissions under the root folder. (This is selected by default,but is only necessary if you are trying to mimic a typical default *nix Server setup.)26. Select the Enable anonymous access to the server check box to create an anonymousaccount that does not require a password. The account will have limited permissions.27. Select the Auto assign home folders to site users check box to automatically create a userfolder under \Site Root\Usr\ when a new user is added.28. Click Finish. If the root folder has not already been created, you are prompted to do so.29. Click Yes. The folder is created and the Create New Site wizard closes.Page 15 of 28
GlobalSCAPE Secure FTP Server, v3Secure FTP Server is now configured to allow FTP connections at the IP address and port that youspecified. In the next steps, you will configure SFTP access and disable FTP, if necessary.At this point, the Server is installed and activated and a standard site is created. If youneed to stop now, you can configure the Site later. Simply open the Administratorinterface by clicking its icon on the Start menu or desktop, and click k; the wizard willcontinue from step 15.Next:Activate the SFTP module so that you can configure it to allow the Site to use SFTP to connectto Secure FTP Server.Page 16 of 28
GlobalSCAPE Secure FTP Server, v3Activate the SFTP ModuleYou cannot enable SFTP until you activate the module with either the trial or a purchased serial number.If you are activating a trial serial number, the SFTP module can be enabled and used during the trialperiod without a separate license. That is, you only need to perform this procedure if you purchased aseparate license for the SFTP module.To activate the module1. On the main menu, click Help Enter SFTP Module Serial Number.The Registration Wizard appears.2. Follow the instructions in the wizard to activate the module. (Refer to the procedure for activatingthe Server, if necessary.)Configure the SFTP ConnectionAfter you have activated the SFTP module, you must configure the SFTP port, the .pvk file to use for theSSH2 public/private key pair, the algorithms you want to allow for encrypting SFTP sessions, andalgorithms to use for message authentication.To configure SFTP1. In the left pane, click the Site.2. In the right pane, click the SFTP Settings tab.Page 17 of 28
GlobalSCAPE Secure FTP Server, v33. Select the Enable SFTP check box.4. In the SFTP Port box, specify which port to use, if different from the default of port 22.5. In the Site key pair box, provide the path to the .pvk file to use for the SSH2 public/private keypair. (Refer to the screen shot in step 2, if necessary.)If you do not yet have a key pair, click Create to create a key pair. The Create SSH2Public/Private Keypair dialog box appears. Type a name for the key pair and thelocation to store it, then click Finish. The Server generates and stores the key pair.Page 18 of 28
GlobalSCAPE Secure FTP Server, v36. In the Use encryption algorithms list, select the check boxes for the algorithms you want toallow for encrypting SFTP sessions. The Server tries each selected algorithm with the client untilone is agreed upon. (Refer to the screen shot in step 2, if necessary.)5. In the Use MAC algorithms list, select the check boxes for the algorithms to use for messageauthentication. The Server tries each selected MAC with the client until an algorithm is agreedupon. (Refer to the screen shot in step 2, if necessary.)7. Click Apply. A message appears telling you that the Site must be restarted for the changes totake effect.8. Click Yes. Setup of Secure FTP Server and the SFTP module are complete.To disable FTP connections to Secure FTP Server1. If you do not want to allow FTP connections to Secure FTP Server, on the Connection Optionstab, clear the Enable FTP access on port check box.2. Click Apply to save the changes on the Server. A message appears telling you that the Site mustbe restarted for the changes to take effect.3. Click Yes. Secure FTP Server is now configured to allow only SFTP connections.Next:If necessary, refer to the Secure FTP Server help documentation to configure secure remoteadministration of the Server, add users and permission Groups, define automated event rules,and generate reports.Page 19 of 28
GlobalSCAPE Secure FTP Server, v3Configure the Cisco Unified Communications Manager for Use with Secure FTPServerCisco Unified Communications Manager enables administrators to use SFTP servers for variousfunctions, including to store system backups, send call detail records (CDRs) and call managementrecords (CMRs) to 3rd-party billing servers, send trace and log files from a Cisco Unified CommunicationsManager server to another server on the network, and to access files during software installation andupgrades. For information on how to configure SFTP servers in Cisco Unified Communications Managerapplications to perform these functions, refer to the appropriate Cisco Unified Communications Managerdocumentation, as described below.The following documents are available at the following w/ps556/prod maintenance guides list.html.Cisco Unified Serviceability Administration Guide—Describes how to send CDRs and CMRs to3rd-party billing servers.Disaster Recovery System Administration Guide—Describes how to store system backups.Cisco Unified Real-Time Monitoring Tool Administration Guide—Describes how to downloadtrace and log files.Cisco Unified Communications Operating System Administration Guide—Describes how toaccess upgrade file during the upgrade process to newer versions of Cisco UnifiedCommunications Manager.The following documents are available at the following w/ps556/prod installation guides list.html.Installing Cisco Unified Communications Manager—Describes how to access upgrade files duringthe installation process.Upgrading to Cisco Unified Communications Manager from Cisco Unified CommunicationsManager 4.x Releases—Describes how to access the Data Migration Assistant TAR file andupgrade files during an upgrade from supported Cisco Unified Communications Manager 4.xreleasesPage 20 of 28
GlobalSCAPE Secure FTP Server, v3Getting HelpFor fast answers to most questions, please visit the GlobalSCAPE Help Center. Our Customer Serviceteam can answer your questions about software activation and registration or help with order problems. Ifyou need technical assistance with your software, please submit your question to the Technical Supportteam.The GlobalSCAPE User Forum is a great place to find information or seek help from the globalcommunity of GlobalSCAPE customers and product experts.The GlobalSCAPE Knowledge Base (KB) is a dynamic compendium of information on ourproducts.Subscribe to the RSS feed to keep abreast of the latest KB articles. Copy and paste this URLhttp://kb.globalscape.com/rssfeed.aspx into your RSS feed reader. (See below for examples.)Subscribe to GlobalSCAPE E-Mail Announcements Sign up for the GlobalSCAPE Newsletter,press releases, product announcements, and other GlobalSCAPE news.Recover a Lost Serial Number - If you know the e-mail address you used when you activated thesoftware, we can send it to you at your new address.Contact Customer Service by phone or e-mail.Contact Sales by calling 1-800-290-5054 or 1-210-308-8267, or use
Secure FTP Server configured for Cisco Unified Communications Manager interoperability or to request a trial serial number. The serial number and a download link will be sent to you via e-mail. 2. Install the Server and the SFTP module and Activate Secure FTP Server. 3. Activate the SFTP module.File Size: 1MBPage Count: 28