Transcription
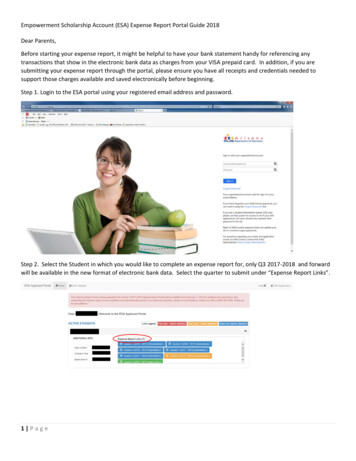
Empowerment Scholarship Account (ESA) Expense Report Portal Guide 2018Dear Parents,Before starting your expense report, it might be helpful to have your bank statement handy for referencing anytransactions that show in the electronic bank data as charges from your VISA prepaid card. In addition, if you aresubmitting your expense report through the portal, please ensure you have all receipts and credentials needed tosupport those charges available and saved electronically before beginning.Step 1. Login to the ESA portal using your registered email address and password.Step 2. Select the Student in which you would like to complete an expense report for, only Q3 2017‐2018 and forwardwill be available in the new format of electronic bank data. Select the quarter to submit under “Expense Report Links”.1 Page
Empowerment Scholarship Account (ESA) Expense Report Portal Guide 2018Step 3. After clicking on the quarter that you need to submit, you will see all the charges made on you VISA prepaid cardup to the date of logging in for that time period. Example: Q3 timeframe: January 1st to March 20th. Anything chargedafter you completely submit your expense report will move to the next reporting period.2 Page
Empowerment Scholarship Account (ESA) Expense Report Portal Guide 2018Step 4. Click on the Blue “Categorize Expense” button next to the expense you want to categorize. Next, the “SelectExpense Type” window pops up. Select by clicking on the correct expense type.Step 5. If Selecting “Tutoring Service” You will need to provide the receipt and credential as you previously wererequired in the ESA portal expense reports.3 Page
Empowerment Scholarship Account (ESA) Expense Report Portal Guide 2018Step 5. Complete the required fields of: Vendor Facility, Tutor Name, Applicant has Verified the Credentials (check thebox), Tutor Credential Type, Credential Field of Study and Tutoring Subject. Attach the Receipt with the “Select File”blue button. Then click “Save” button.Step 6. Select a previous credential from the drop‐down list, or upload the Credential for the Tutor by selecting a filefrom your computer with the “Browse” button. Then click the “Save” button.Step 7. Your expense is now entered. You can repeat the steps for all expenses, attach all receipts and credentials asrequired.Step 8. If an expense already has a pre‐populated category, please click on the “Expense/Refund Type” to attach receiptand supporting documents as needed. You will not be able to submit the entire expense report if there are receiptsmissing.4 Page
Empowerment Scholarship Account (ESA) Expense Report Portal Guide 2018Step 9. When you have finished, they should all say “complete” under the “status” column. The “Submit ExpenseReport” green button then becomes available to submit all documentation. Submit your expense report.5 Page
Empowerment Scholarship Account (ESA) Expense Report Portal Guide 2018Step 10. Complete the Verification Form, this should pop up after you click the “submit” button. Check all three boxes,type your name in the “Signature of Parent/Guardian of Qualified Student” box and click the “Submit Expense Report”button. You will receive a confirmation email to confirm the expense report has been completely submitted.6 Page
Empowerment Scholarship Account (ESA) Expense Report Portal Guide 2018 1 Page Dear Parents, Before starting your expense report, it might be helpful to have your bank statement handy for referencing any transactions that show in the electronic bank data as