Transcription
Captiva InputAccel 6.5 TutorialM. Scott RothFebruary 2012v1.0www.armedia.commsroth.wordpress.com
Table of Contents12Introduction . 51.1Process Overview . 61.2Architecture Overview . 8CaptureFlow Designer . 92.1Process Design . 92.2IA Values and Custom Values. 102.2.1IA Values. 112.2.2Custom Values . 122.2.3My Assignments . 122.3Branching . 142.4Compiling . 152.5Installing the Process . 152.5.1Installation . 152.5.2Copy and Paste Settings . 162.63User Roles and Security . 17Module Setup. 213.1ScanPlus . 223.1.1Scanner. 223.1.2Event Actions . 233.1.3Auto-Batch Creation. 243.2Image Enhancement . 253.3OCR. 253.4Indexing . 273.5Documentum Export . 293.5.1Connection Info . 29
3.5.2Storage Structure . 303.5.3Cabinet . 303.5.4Folders. 313.5.5Document Metadata Definition . 333.5.6Document Content Definition . 343.6ODBC Export. 353.6.1ODBC Connection . 353.6.2ODBC Export Module Configuration . 363.6.2.1Data Source Connection . 363.6.2.2Mappings. 363.6.2.2.1 SQL Query . 373.6.2.2.2 Parameters . 373.74Testing and Debugging. 394.15Multi . 38Admin Console . 394.1.1Batch Settings - Tasks . 394.1.2IA and Custom Values . 404.1.3Clearing Errors and Retriggering steps. 414.1.4Logs . 424.2The InputAccel Database . 434.3InputAccel Reports . 444.4Process Developer Batch Debugging . 444.5ODBC Log. 454.6IA Server Debug Mode . 464.7SQL Server Profiler . 46Wrap Up . 475.1Advanced Topics . 475.1.1Logging and Reporting . 48
5.1.2Module Scripting . 485.1.3Custom Modules . 485.1.4Web Services . 485.2Thanks . 485.3About the Author . 49
1 IntroductionI recently developed and deployed a Captiva InputAccel v6.5 solution for a customer. Prior tothis project, I had never had any exposure to InputAccel, but figured “how hard could it be?”.Well, it turned out to be much harder -- and simpler -- than I expected. Let me explain.Here’s why it was harder: First, there is virtually zero information on the Internet or the EDN about how to setupand develop a solution using InputAccel. One good website I found, EMCCaptiva.net,was all about version 5.3 of InputAccel. InputAccel went through a major redesign withversion 6, so not much of this website was relevant.The documentation that comes with InputAccel can be overwhelming. Much of thedocumentation is contained in hyperlinked Windows help files and, at least to my mind,doesn’t provide enough context or flow to function as a tutorial.There are at least five different ways to configure and deploy InputAccel discussed in theinstallation documentation. However, the discussions are all predicated upon youknowing something about InputAccel and don’t offer any best practices or rules of thumbto get you started.The CaptureFlow Designer, the new GUI design tool that was released with InputAccelversion 6.0 has no documentation, though it does have online help and some sampleprocesses that are helpful. Because this tool is so new, no one on the Internet or EDNprofessed knowledge of how to use it either.Any process built in Process Developer (the previous InputAccel process developmenttool) is not compatible with CaptureFlow Designer. This means there is no way toreverse-engineer an existing process into the new tool for learning purposes.There is not a unified debugging environment. Tracking down an error or root cause of afailed process step requires checking several logs and servers.And last, much of the “development” of an InputAccel process is configuration of themodules. However, most of this configuration is hidden and not obvious. There is alsono unified development/configuration environment, so I was continually bouncing aroundamong the various modules to get the process configured and running.Here’s why developing, configuring and deploying an InputAccel solution was easier than Iexpected (the caveat being: “once I figured it out”): First, the CaptureFlow Designer GUI tool is easy to use once you get the hang of it. Yousimply drag modules from a pallet onto a workspace and connect them to form yourprocess. Hopefully future versions of the tool will continue to refine its function andexpand its capabilities (e.g., better error handling, better custom variable configuration,direct access to module setup, etc.).M. Scott Roth / Armedia5
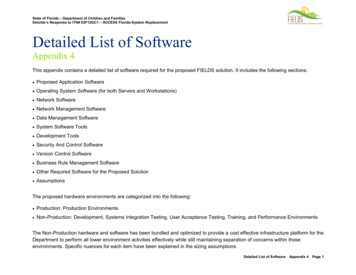
The InputAccel modules are really powerful, and with a few clicks, can be configured totake care of most of your needs. It is obvious that a lot of thought has gone into thesemodules and their capabilities.Once I understood where a problem occurred or a tweak needed to be made, it wassimple to make the necessary corrections with just a few clicks of the mouse.Finally, I didn’t have to do any real programming per se to get my process built. I diduse some built-in functions and variables though, to manipulate the data I was interestedin collecting.The purpose of this paper is to describe the simple process I designed and implemented usingCaptureFlow Designer, various InputAccel modules, and the InputAccel AdministrationConsole. I have tried to capture the “gotchas” I encountered and tips for avoiding them orremedying them, and advice given to me by seasoned InputAccel developers. My hope is thatsomeone will benefit from this narrative.The remainder of this document is structured as follows: The remaining subsections in this section discuss the business process I needed toimplement and the architecture of my InputAccel environment. Section 2 discusses the CaptureFlow Designer GUI tool and how I implemented theprocess described in section 1.1. It touches on the two major functions of the tool:process flow design and custom variables. Section 3 discusses how to complete the implementation of the process by configuring(referred to as “setting up”) each of the InputAccel modules. Section 4 covers how to test and debug your process once it has been compiled andinstalled. Section 5 contains the conclusion of my InputAccel experience.1.1 Process OverviewThe business process I needed to implement was fairly simple. A handful of users scan blackand white documents (correspondence) at their desks, provide basic index information, and savethe documents to a content management system (Documentum). The capture process needed tocreate an OCR version of the document, convert it to PDF, update an external database, and storethe document in a particular folder hierarchy in the content management system.Figure 1 depicts my capture process.M. Scott Roth / Armedia6
Figure 1Scanning ProcessOne note to make here: the users were used to scanning and indexing their own documents.This setup is a little different from how InputAccel usually works. Usually, the tasks in anInputAccel process are executed by different people in more of a pipeline paradigm. Forexample, scanner operators do nothing but scan documents and make sure the quality isacceptable. Once they release the document, it flows to a QA person who applies imageenhancement filters and techniques to improve the quality of the documents. QA releases thedocument to someone who reads the document and applies the indexing metadata, etc.In my process, a single person performs both the scanning and indexing. All of the other tasksare automated. The result of this configuration is that when users apply indexing metadata totheir documents, they see all the other users’ documents in the IndexPlus module’s queue. Formy customer this was okay, but it is not the normal implementation of InputAccel.In addition, there is a branch in the logic I have not depicted here, but will discuss in Section 2.1.During the Indexing step, if the user fails to enter a ‘Case Number’, the ‘Update ODBCDatabase’ step is skipped.M. Scott Roth / Armedia7
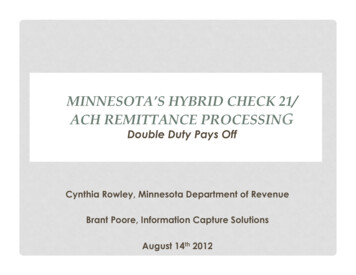
1.2 Architecture OverviewFigure 2 contains the hardware architecture for my solution.Figure 2My InputAccel ArchitectureA few notes about this architecture: Depending upon the size of the scanned documents and the configurations in place,OCRing and automatic image enhancement running on the same computer could be aprocess bottleneck. For high volume and/or large documents, these processes should berun on separate servers or workstations. As previously noted in Section 1.1, the scanning task and the indexing task should beperformed by different users, and therefore, the scanning and indexing software wouldusually reside on different workstations.M. Scott Roth / Armedia8
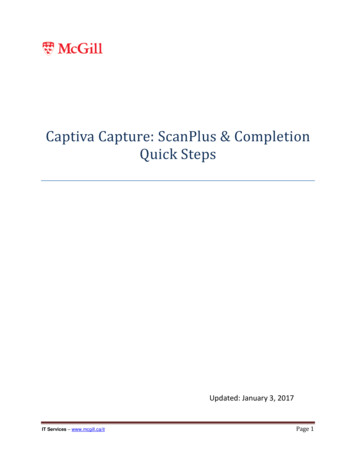
2 CaptureFlow DesignerCaptureFlow Designer is InputAccel’s (IA) new GUI-based, process development tool. Itreplaces the Process Builder tool, though Process Builder is still shipped with InputAccel andstill works perfectly fine.2.1 Process DesignFigure 3 depicts my interpretation of the scanning process discussed Section 1.1.Figure 3M. Scott Roth / ArmediaCaptureFlow Manager9
When you create a new process in CaptureFlow Designer, you are presented with a short, defaultprocess already defined. This default process consists of a Create node, a ScanPlus step, aProcess node, and an End node. To build a process, you simply drag steps from the pallet on theleft, onto the canvas on the right, somewhere between the Process and End nodes. CaptureFlowDesigner keeps the diagram looking neat by automatically sliding steps and nodes toaccommodate additions and deletions to the process.Once all the steps of your process are in place and in the right order, right-click on each one torename them. The name you give each step here will be the name used later by the InputAccelserver while processing documents.In addition to naming your steps, you must also indicate at what level each step is triggered. Youdo this by right-clicking each step and choosing the Level option. Your choices of trigger levelvary by step, but are generally between 0 and 7. Essentially you are telling each step what levelin the stack of scanned pages each operation should occur. For example, documents are scannedand released to the InputAccel server in batches. Image enhancement is applied to each page inthe batch. Indexing occurs on a per-document basis. See the Captiva InputAccel document,System Overview: The Basics of InputAccel, for a good description of what these trigger levelsare and what they do.For my process, I set the following levels:IA mExportUpdateDatabaseEndBatch (Level 7)Page (Level 0)Document (Level 1)Document (Level 1)Document (Level 1)Document (Level 1)Delete Batch2.2 IA Values and Custom ValuesYou probably noticed that between each of the steps and nodes there are hyperlinks named 0Values. Clicking these hyperlinks opens the Assign Values window (see Figure 4). This iswhere you assign what data and content is passed from one step to the next in your process.These assignments are critical. If you don’t pass the right information from one step to the next,the succeeding step may not have enough information to execute properly, or it may not betriggered at all.When you insert steps into the CaptureFlow Designer process, some of these variables aredefined for you. For example, when you inserted the ImageEnhancement step after the Processnode, CaptureFlow Designer automatically assigned ImageEnhancment:0.ImageInput ScanPlus:0.OutputImage. This assignment passes the scanned pages from theScanPlus step to the ImageEnhancement step. Without this assignment, theImageEnhancement step would never trigger.M. Scott Roth / Armedia10
Figure 4CaptureFlow Designer with Assign Value Window2.2.1 IA ValuesInputAccel has hundreds of pre-defined variables that can contain or receive values throughoutthe process. These pre-defined values are called “IA Values”, and just like steps, they exist andoperate at different levels. You can find descriptions of many of these variables by clicking theHelp button in the CaptureFlow Designer tool bar, and searching on “IA Values”.When you click the IA Value link on the Assign to line in the Assign Values window, theassignment window expands and the autocomplete feature engages to display the names of all ofthe steps in your process. Simply select the step that contains the IA value you would like to set.Next, you will be presented with a numbered list, 0 – 7. These represent the trigger levels atwhich the IA values are defined. Select a level and autocomplete will display a list of allavailable IA values at that level. Choose a value and click OK to close the assignment window.M. Scott Roth / Armedia11
Next, click the Expression link next to the IA Value you just created. The assignmentwindow will open but the autocomplete feature does not automatically engage. This is becauseyou can assign hard coded literals to IA Values by just entering the values here. If you want touse autocomplete to assign an IA Value from another step, just start typing and it will begindisplaying options.Once you have completed an assignment, you will notice a More link on the right side of theAssign Values window for the assignment you just made. If you click on the More link, theassignment window will expand to display some options for applying conditions to yourassignment. Note that the condi
and released to the InputAccel server in batches. Image enhancement is applied to each page in the batch. Indexing occurs on a per-document basis. See the Captiva InputAccel document, System Overview: The Basics of InputAccel, for a good description of what these trigger levels are and what they do. For my process, I set the following levels:File Size: 2MB