Transcription
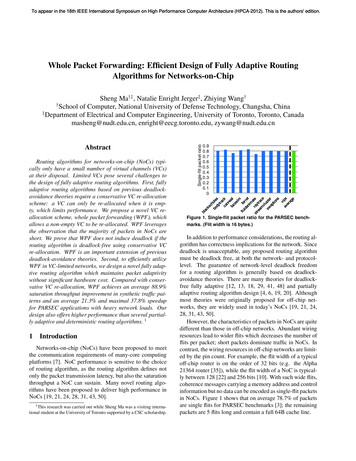
VNS Equatorial platform (55) – USER Guide 2022USER GUIDEEQUATORIAL PLATFORM (55) WITH VERTICAL NORTH SECTORSFor latitude between 52 and 57 N/S1 Page
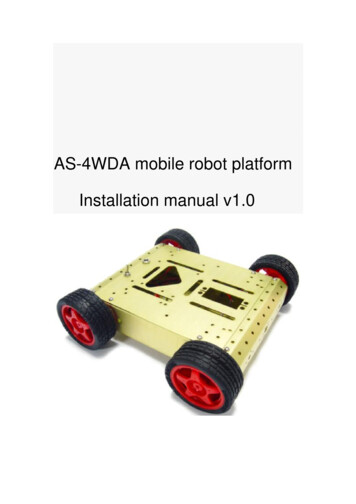
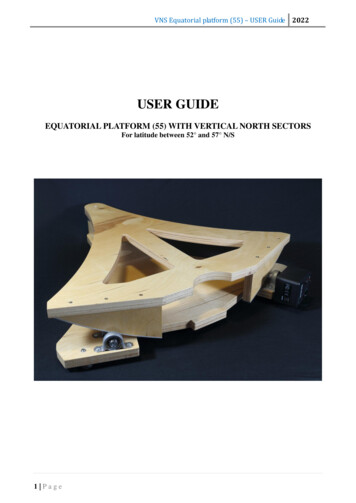
VNS Equatorial platform (55) – USER Guide 2022①②③④⑤⑥⑦⑧⑨2 PageTOP ROCKING PLATEVERTICAL NORTH SECTORSALUMINUM BEAKBOTTOM SUPPORT PLATEEQ2 PRECISION DC MOTOR DRIVESOUTHERN SECTOR SUPPORTSPHERICAL BEARING SUPPORTBEARING ROLLERSADJUSTABLE LEGS
VNS Equatorial platform (55) – USER Guide 2022I. OVERVIEWAlthough characterized by easy handling, a dobsonian telescope has the disadvantage that itmust be moved continuously to keep the observed object in the field of view. One solution would beto purchase a GOTO kit that can also provide tracking, but it is a fairly expensive option andrequires interventions with permanent effects on the telescope mount. Instead, an equatorialplatform can be used immediately after purchase, it’s easy to setup, without the need forintervention on the telescope, and can also be used for several astronomical instruments.Simply place your telescope on the platform, switch ON the battery-powered motor and theset object remains in the eyepiece - without manual tracking! You can also observe at highmagnification and focus entirely on the subject. Even the photography of the Moon and planetsbecomes so possible.The equatorial platform will track your Dobson for about an hour, then it will need to bereset. But that is done easily and quickly.The equatorial platform provide optimum accuracy for all locations between 52 and 57 north and south latitude and can also be used beyond this area.Fig. 1 Platform “START” positionFig. 2 Platform “END” positionII. PACKAGE CONTENT1.2.3.4.5.Box containing the EQ2 motor ⑤ with custom bracket, small inbus key;TOP ROCKING PLATE ①;BOTTOM SUPPORT PLATE ④;User manual;Not included: 9V battery and Phillips screwdriver.III. MOTOR INSTALLATIONTo avoid damage during transport, the EQ2 motor is delivered unassembled in a protectivebox.To mount the EQ2 motor, follow the steps below:1. Unpack the EQ2 motor from the box and remove the 2 screw knobs at the front panel andtake off the housing;2. Connect a 9V battery (not included) to the terminal block and set it into the dedicated place.We advise you to keep an additional reserve battery in an accessories kit of your telescope;3. Using a Phillips screwdriver, unscrew the screw marked in Fig. 2a, taking care not to lose3 Page
VNS Equatorial platform (55) – USER Guide 2022the nut underneath;4. Insert the motor shaft into the roller marked in fig. 2b and then tighten the roller screw,taking care to match the chamfered part of the motor shaft with the roller screw (attention:the shaft enters without play, so you may need to insert it by slightly twisting it);5. Turn the EQ2 motor counterclockwise until the bracket reaches the position in Fig. 2c andthen fix the screw marked in Fig. 2a. taking care not to overtighten it;6. Install the housing by securing it with the 2 screws on the front panel.Fig. 2aFig. 2bFig. 2cFig. 2dIV. SET UP (for visual use)1. Set THE BOTTOM SUPPORT PLATE ④ on a hard surface with the motor ⑤ facing north,then shim the platform as needed so it is level and sits solidly on the ground. Use a bubblelevel or an app on your Smartphone.NOTE: Although the platform is built to operate at a latitude of 55 degrees (when leveled),it can be used at other latitudes by simply raising or lowering the adjustable legs. If, forexample, you want to use the platform for a latitude of 52 degrees, then lower thenorthern part of the platform from the adjustable legs, or raise the southern part of theplatform and vice versa for 57 degrees.2. Polar alignment for visual use is easy. After THE BOTTOM SUPPORT PLATE ④ isleveled, make sure its center line points roughly toward Polaris. (See the illustration below).During the day a compass can be used, taking care to allow for the true north/magnetic northoffset for your location. Then fix THE TOP ROCKING PLATE ①, taking care that thealuminum "beak" ③ enters completely in the bearing with spherical joint.4 Page
VNS Equatorial platform (55) – USER Guide 20223. For astrophotography, more accurate polar alignment can be achieved with the standard"star-drift" method, as with any equatorial mount. A dedicated chapter can be found on theend of this guide.4. Now put your mount and the scope on the TOP ROCKING PLATE ① and set the platformto START position (fig. 1). You are ready to go.V. TRACKING1. Turn ON the EQ2 motor ⑤ (using the " ON-OFF " switch on the control panel);2. Set the N-S switch to the N position (for the Northern hemisphere) and S (for the southernhemisphere) and turn the potentiometer counterclockwise (for the lowest motor speed);3. Aim the telescope at a star near the meridian at a height of about 45 degrees above thehorizon. Using an eyepiece with the highest possible magnification, adjust the motor speedfrom the potentiometer until the star remains in the center of the eyepiece for as long aspossible. After these adjustments, the mount is ready for visual observing.VI. RESETThe equatorial platform will track your Dobson for about an hour, then it will need to bereset. At the end of the tracking run, the platform's drive roller will slip on the curved foot. To resetthe platform for another tracking run, simply slide the upper half of the platform (with the telescopeon) back over the rollers by lifting about 1 cm and pulling on the NW corner as shown below.NOTE: It is very important to lift and then pull on the upper half of the platform, becausethe curved foot of the Vertical North Sector ② has a non-slip surface, which can scratch thedrive roller of the platform. Reset the platform as soon as it reaches the END position (fig.2).5 Page
VNS Equatorial platform (55) – USER Guide 2022VII.BATTERYThe equatorial platform works with 9V 6LR61 batteries. For a longer battery life, werecommend using alkaline batteries. The battery needs to be replaced if it can no longer keepobjects in the field of view even when the potentiometer is turned to maximum. Adjustment isnecessary because the travel speed depends on the actual battery voltage. To change the battery,remove the housing by unscrewing the 2 screws in fig. 3, and replace the old battery with a new one,taking care not to damage the battery connector or cables. Fix the battery in the dedicated place andmount the housing, taking care to orient the holes for the buttons and fasten it with the two screws.Remove the battery if you are not using the platform for an extended period of time.Fig. 3 EQ2 precision DC motor driveVIII.MAINTENANCE1. Keep your Platform as clean and dry as practical;2. Occasionally clean the surfaces of the curved "feet" and bearing rollers;3. Store the platform in a dry place, free of moisture. Avoid using it in conditions of excessivemoisture, as it can affect the wood surface. The wood surface can be varnished if it degradesover time. To do this, use water-based varnish;4. Keep out the battery when not in use.IX. TECHNICAL DATA:Model: equatorial platform for latitudes between 52 - 57 N and S;Dimensions: (LxWxH) 580 x 460 x 96mm (without motor and adjustable legs);Weight: 3.5 kg;Mount type: - equatorial with vertical northern sectors;GOTO control - no;Power supply: alkaline battery type 6LR61 (9V) 1 pc;Load capacity: 30 kg;6 Page
VNS Equatorial platform (55) – USER Guide 2022Suitable for: Dobson telescopes up to 250mm in diameter (distance between the legs of thetelescope base less than 45cm);Material: birch plywood;Color: varnished natural wood;Plywood thickness: 18mm;Manual guidance: no;Motor: Eq2 DC motor;Operating temperature: -10 40 C;Tracking time: 1 hour, requiring manual reset.X. ASTROPHOTOGRAPHY (advanced users)If polar aligned, the equatorial platform can also be used to photograph the Planets, theMoon or bright Deep Sky Objects using short exposures. The following guide can be used for polaralignment using a Newton telescope and a medium/wide filed eyepiece without other accessorieslike Barlow, coma corrector, prisms, etc.To polar align your equatorial platform follow the next steps:1. Move the tracking platform to the “START” position (fig. 1);2. With the tracking motor turned off, center Polaris in a medium power eyepiece. Use awide-field eyepiece if one is available;3. Next move the platform a small amount in the tracking direction by lifting about 1 cmthe NW corner and then push it in the NE direction.NOTE: It is very important to lift and then pull/push on the upper half of the platform,because the curved foot of the Vertical North Sector ② has a non-slip surface, whichcan scratch the drive roller of the platform.4. Orient your head so your eyes are parallel with the optical tube and observe wherePolaris has moved in the eyepiece. If Polaris had moved up after pushing it through thetracking direction, rotate the platform in the clockwise direction. If Polaris had moveddown after pushing it through the tracking direction, rotate the platform in theanticlockwise direction. Re-center the star in the eyepiece and continue with step nr.3and nr. 4 until the star no longer move up or down. If you reach the END position,RESET the platform and repeat the polar alignment procedure.5. Left/right movements of Polaris indicate the platform north or south end needs to beraised/lowered. This can be done with the Adjustable legs ⑨ or adding shims to theappropriate end’s feet. If the star has moved to the right of the field of view, then raisethe south side of the platform with adjustable feet, or lower it if the star has moved to theleft.6. After each adjustment of the platform, repeat the process until Polaris stays centered forthe entire movement of the tracking platform. Start with small movements of tracking soPolaris stays in the field of view in case the error is large. Gradually increase the amountof tracking movement as the error decreases until the platform can be moved all the wayto the stop.7. Adjust the tracking speed of the motor according to the chapter TRACKING. Whenshooting high resolution image like planets or the Moon, the motor unit may requiresmall corrections with the potentiometer to keep the object in the image field.7 Page
VNS Equatorial platform (55) – USER Guide 2022XI. EQUATORIAL PLATFORM - PHOTO DETAILS8 Page
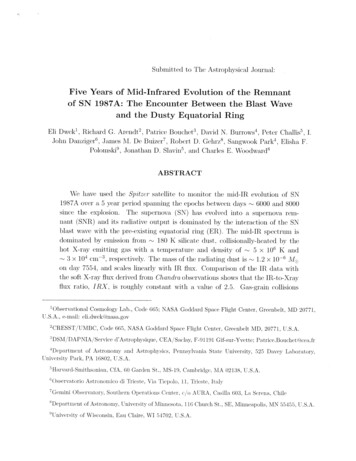
VNS Equatorial platform (55) – USER Guide 2022XII.APPENDIXASTROPHOTO EXAMPLES - WHAT CAN YOU ACHIEVE / EXPECTLunar and planetary photographyPlanet SaturnDate: 03.09.2021Time (UT):Camera: ZWO ASI 120MCTelescope: SkywatcherDobson 200/1200mmMount: VNS Eq platformExposure: 10ms (about 500frames stacked inAutostakkert and waveletsapplied in Registax)Planet JupiterDate: 03.09.2021Time (UT):Camera: ZWO ASI 120MCTelescope: SkywatcherDobson 200/1200mmMount: VNS Eq platformExposure: 10ms (about 400frames stacked inAutostakkert and waveletsapplied in Registax)9 Page
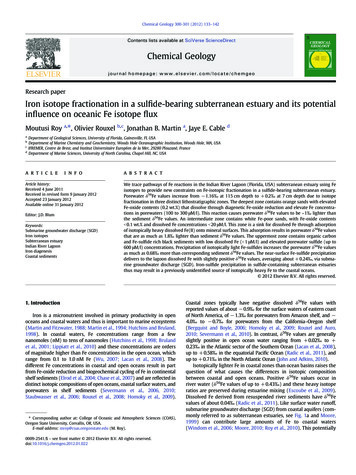
VNS Equatorial platform (55) – USER Guide 2022The above images were experiments using a 15 inch ultra compact dobsonian telescope and theVNS equatorial platform on medium atmospheric turbulence.Short exposure prime focus photography (lucky imaging) (below)Ring Nebula (M57)Date: 03.09.2021Camera: ZWO ASI 120MCTelescope: Skywatcher Dobson 200/1200mm on VNS Eq platformExposure: 5s at 95% gain (54 frames stacked in DeepSky Stacker – 4 minutes and 30 secondsintegrated time)Albireo double star (below)Date: 03.09.2021Camera: ZWO ASI 120MCSkywatcher Dobson 200/1200mm on VNS Eq platformMount:Exposure: 5s at 95% gain (100 frames stacked in DeepSky Stacker – 8 minutes and 20 secondsintegrated time)10 P a g e
VNS Equatorial platform (55) – USER Guide 202211 P a g e
The above images were experiments using a 15 inch ultra compact dobsonian telescope and the VNS equatorial platform on medium atmospheric turbulence. Short exposure prime focus photography (lucky imaging) (below) Ring Nebula (M57) Date: 03.09.2021 Camera: ZWO ASI 120MC Telescope: Skywatcher Dobson 200/1200mm on VNS Eq platform