Transcription
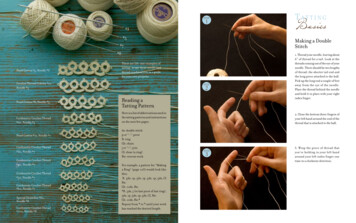
Peyote Stitch Projectsfrom Beading Daily:7 Free Peyote Stitch Projectsplus Bonus Guide to Readinga Peyote Stitch Pattern
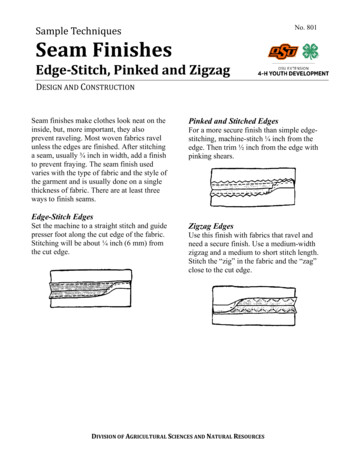
Peyote Stitch Projects from Beading Daily:7 Free Peyote Stitch Projects plus Bonus Guide to Reading a Peyote Stitch PatternFinger Food!Confetti SpiralPearly Mosaic designRRRRRRRRRRRRRRRRRRRRRRRby LESLIE ROGALSKI,EDITOR IN CHIEF p. 1projectlibraryby lisa kan p 5by Marilyn T. Aronson p. 3e 52ote stitch ladder stitch (see pages 118–119 for how-tos)Summer Bird HouseEarringsDragonfly Ginkgo NecklacePlayful PeyoteToggle Claspssummer bird house earringsby melinda barta p. 7by judi wood p. 10by Judi WoodTOOLS:MATERIALS:pirate's plunderDelica beads in six colors2 3mm pearl or crystal2 ear wiresB whiteabeadingthreadHow to SizeReadPeyoteFrench wire or gimpStitch1 yardPattern:of waxed threadby barbara ellis p. 11Sharp scissorsSize 12 beading needleSKILL LEVELBeginnerHow to Mark Your Place inTECHNIQUESa Peyote Stitch PatternPeyote StitchBrick StitchStep 1 With 1 yard of waxed thread, beginning peyote pattern at the point indicated. So that there are no threadsshowing, start the brick weave with 2 beads and immediately start the second row with 2 more beads—this can bea little tricky, but with practice and a good grip it can be done. Weave in new beads by going down to the first rowand up into the second row. After the first two rows are done continue working with traditional brick stitch. Work thedesign up the first half.Step 2 At the top of the house, string a 3mm bead, a small bit of gimp, and the earring finding. Pass back through the3mm bead and into the top of the house and thread through the design to the beg. Continue beading the second halfof the house.Work the thread into the beads, secure with a knot and trim close to work.n Wedekindby dustin wedekindp. 14ick-stitch an arched window that forms the clasp for a skull-faced lampworkedwindow and button with a spine of accent beads and surround them withf Jack Sparrow.ContentsJudi Wood is a professional full-time artist who has won many awards at juried fine artsshows along the east coast. See more of her work online at www.judiwood.com.by Jennifer VanBenschoten p. 17by Jennifer VanBenschoten p. 18Copyright Interweave Press LLC. Not to be reprinted. All rights reserved.page 1iipublishers of Beadwork Magazine join the online beading community at BeadingDaily.com
Peyote Stitch Projects from Beading Daily:7 Free Peyote Stitch Projects plus Bonus Guide to Reading a Peyote Stitch PatternPeyote stitch was not the easiest beading stitch for me tolearn. After somehow making my first peyote stitch amuletbag using flat, even-count peyote stitch, I suddenly foundmyself completely bewildered as to how I actually workedthe stitch. I spent several years trying to master peyote stitch,until a wonderful teacher showed me an easy way to worktubular peyote stitch. Once I got the hang of it, I was hooked!Apparently, I’m not alone. There are so many peyote stitchbeading designs out there, it seems like we’ll never run out ofways to change up peyote stitch and create amazing beadwork with this popular beading stitch.We’ve assembled a new collection –– and included a fewold favorites – of peyote stitch patterns just for our Beading Dailyreaders that shows off the versatility of peyote stitch, and how creative you can get with this age-old off-loom beadweaving stitch. A simple band of peyote stitch doesn’t have to be simple atall when you add a striking, graphic pattern and your favoritecolors, like in Leslie Rogalski’s Finger Food peyote stitchedrings. These work up so fast that you’ll be making them inevery color to match your favorite outfits! Tubular peyote stitch gets fancy when you change upthe beads in each round. Marilyn T. Aronson’s Confetti Spiral looks like you made lots of complicated increases anddecreases throughout this colorful peyote rope, but just usingdifferent sizes of seed beads is what creates the ins and outsof this peyote stitch bracelet. Circular peyote stitch is another basic peyote stitchtechnique that gets the royal treatment in Lisa Kan’s PearlyMosaic necklace. You’ll find yourself loving the soothingrhythm of flat, circular peyote stitch as you work up a seriesof components with your favorite seed beads to assemble intoa stunning peyote stitch necklace. Enjoy the best of both tubular and circular peyote stitchwith Melinda Barta’s Playful Peyote Clasps. These easy-to-makeclasps let you create a whole range of beaded jewelry design possibilities, including options for those with sensitivities to metals. Try your hand at some shaped peyote stitch with a pair of JudiWood’s Summer Bird House Earrings. These delicate little earringswork up fast while teaching you how to achieve lines and shapeswhen working in flat peyote stitch. For a more challenging shaped peyote stitch project, make Barbara Ellis’ Dragonfly Gingko Necklace. Combine a striking shapedpeyote stitch pendant with other favorite beading stitches to createa piece of artistic beaded jewelry for any occasion! Once you’re confident with your peyote stitch skills, free formpeyote stitch comes together easily, so stitch up one of DustinWedekind’s Pirate’s Plunder necklaces. Use your favorite skullbeads and a treasure trove of your favorite seed beads to make astunning peyote stitched neck adornment!Finally, if you’ve ever been frustrated in trying to read and followa charted peyote stitch pattern, you’re not alone. So we’ve includeda couple of our favorite Beading Daily blogs all about ways to markyour place in a peyote stitch pattern and how to interpret thosepeyote stitch patterns for making beautiful beaded jewelry!So, think of this eBook as a way to expand your peyote stitchskills, learn some new bead stitching tricks, and come away with awhole wardrobe of beautiful beaded jewelry. After making a few ofthese free beading projects, we think you’ll understand why beadersaround the world love peyote stitch!Bead Happy,Jennifer VanBenschoten, Beading Daily editorPeyote Stitch Projects from Beading Daily:editor, beadingdaily JENNIFER VANBENSCHOTENphotography JOE COCA, ANN SWANSONProjects and information are for inspiration and personal use only. BeadingDaily, Beadwork, and Stringing do not recommend, approve, or endorse any of the advertisers, products, services, orviews advertised in this publication. Nor do BeadingDaily, Beadwork, or Stringing evaluate the advertisers’ claims in any way. You should, therefore, use your own judgment in evaluating theadvertisers, products, services, and views advertised in BeadingDaily, Beadwork, and Stringing.iii
Finger Food!LESLIE ROGALSKI, EDITOR IN CHIEFPhoto by Frank DeSantis.WHAT YOU NEED Matching colors of size 11 cylinder beads Size 12 (thin) beading needles WildFire beading thread Scissors Bead mat Bead Stopper (optional)This project is ideal for beginners who want to learn this popularstitch, and regular peyote fans will find these rings almostinstant gratification. Stripes make the pattern easy to follow, andsize 11 cylinder beads fit together smoothly. You’ll not only learnthe stitch, you’ll want to make these by the handful!The best beginner peyote tip ever!Peyote has a distinct in and out (or up and down) positioning ofbeads. New beads are stitched between the out beads. The first fewrows of peyote tend to twist, making it harder to recognize which beadyou next pass through. The first beads you string create the first tworows, and stitching the third row is where many beginners get lost. Ineven–count peyote, stitching is always doneFigure 1through the out beads, with new beads fitting between them likebricks, or like the teeth of a zipper.To pull the first row away from the second and make it instantlyclear which beads are the out beads: Take another long, thin needleand pass it through every other bead, starting with the last bead youstrung, and making sure not to pass through the bead with the tailthread. Pull row 1 down, away from row 2. Row 2 beads stick up, sothey’re the out beads.More wonderful beadwork projects are available at shop.beadingdaily.com/jewelryprojects 2012 Interweave Press LLC. Not to be reprinted. All rights reserved.page 1Figure 2
Artist’s TipPouring the beads next to each other helps you decide if you likethe colors together.Step 1: Create a 4-bead-widering in two colors, one for an insidestripe 2 beads wide, and one for theoutside borders. Pour out 4 piles inorder of the stripes: A-B-B-A.Step 2: String a 30” length ofWildFire on a needle. To prevent losing beads during your first few rows,string a stopper bead or place asmall sized Bead Stopper leaving a 6”tail. You can also wind the tailaround your non-dominant forefinger and hold it as you proceed.Step 3: String your first 2 rows,picking up 4 beads in order as they’repiled: A-B-B-A. Slide them all downto the stopper or your finger. Righties have the needle exiting towardsthe right, lefties towards the left.Step 4: Row 3: String 1A, skipthe border bead A in row 1 (whichFigure 1means, don’t sew through it) andpass through color B. The new Abead should sit right on top of the Ayou just skipped in row 1 (Figure 1).Figure 1Step 5: String 1B, skip over thesecond B you strung in row 1 andpass through the other border A inrow 2. Again, the new bead should sitdirectly on top of the skipped bead(Figure 2).Step 6: Row 4: String 1A. Skipthe border bead A in row 1 and passback through 1B in row 2. The new Abead should sit right on top of the Ayou just skipped in thepreviousFigure4 row (Figure 3).Step 7: String 1B, skip the Bbead in the previous row and passthrough the other border A bead.NoticeFigure4 how the beads fit betweeneach other as you stitch. You can seethe stripes forming (Figure 4).Step 8: Continue working inpeyote until the band is long enoughto fit comfortably over your finger.To “zip” together the ends, you donot string any new beads, but sewthrough the in and out beads so theyinterlock. Look at the ends of anedge stripe. One end bead must bean in bead, the other an out bead, tointerlock properly. Add or remove arow of beads to suit your desired fit.Did you know?Bead colors can look differentin tubes. For the best colormatching, pour some out tocompare!Figure 1Figure 1Step 9: Bring the ends togetherinaring.Figure1 Notice how the in and outbeads will fit together. Pass throughbeadwork to exit an end borderbead. Depending on your ring length,you may be exiting either an in or anFigure1 If you’re exiting an out borout bead.der bead, you will pass through a Bbead on the other side. If your borFigure2 is an in bead, you willderexit beadpass through the border out bead onthe other side. Continue to sew backand forth through the out beads in azigzag fashion and snug the threadFigureto pull2your ring together (Figure 5).Figure 2Figure 2Figure 2Figure 3Figure 3Figure 3Step 10: Try on your ring. Ifyou’re satisfied with the fit, tie a discrete, secure square knot with the4 threads, keepingtail andFigureworkingthe knot close to the beadwork.Weave any remaining threads intothe beadwork along existing threadpaths asif workingFigure4 in peyote.Figure 4Figure 4Figure 5Figure 5Figure 5Step 11: Thread the tail on theneedleand5repeat to weave in thisFigurethread as in Step 9.Figure 6RESOURCES: Check your local bead store.WildFire: Beadalon, www.beadalon.com.Bead Stopper, www.beadstopper.com,Figure 5Figure 6More wonderful beadwork projects are available at shop.beadingdaily.com/jewelryprojects 2012 Interweave Press LLC. Not to be reprinted. All rights reserved.page 2
Confetti Spiralby Marilyn T. AronsonCreate your own fiesta using vivid, bold colors in a Dutch spiral,where simply changing bead sizes in tubular peyote creates adynamic twist effect. Once you get the hang of the spiralingstitches, you’ll have a samba on your wrist in no time!More wonderful beadwork projects are available at shop.beadingdaily.com/jewelryprojects 2012 Interweave Press LLC. Not to be reprinted. All rights reserved.page 3
Finished size: 10"Materials10 g lime green opaque size 11 Japanese seed beads (A)10 g turquoise opaque size 8 Japanese seed beads (B)10 g salmon opaque size 8 Czechseed beads (C)10 g lavender luster size 8 seedbeads (D)15 g amethyst translucent size 6 Japanese seed beads (E)15 g lavender milky size 6 Czech orJapanese seed beads (F)15 g silver-lined orange transparentsize 6 Japanese seed beads (G)1 lime green 17mm plastic shank buttonSmoke FireLine 6 lb beading thread1: Spiral body. Work roundsof tubular peyote stitch with differentsize beads to form a spiral:Rounds 1 and 2: Use 5' of thread tostring 2E, 2F, 2G, 2B, 2D, 2C, and 9A,leaving an 18" tail. Pass through allbeads again to make a circle; exit fromthe first E.Round 3: Work peyote stitcharound with 1 bead in each stitch: 1E,1F, 1G, 1B, 1D, 1C, and 4A. Exit thefirst E to step up for the next round(Figure 1).End Rounds 1 and 2: Exit the finalround’s E; work 1A in each stitch.End Round 3 (decrease): Work theround, making a decrease in everyother stitch.End Round 4: Work 1A in eachstitch.End Round 5 (decrease): Work theround, making a decrease in everyother stitch.End Round 6: Work 1A in eachstitch. Weave through the beads ofthis round again to tighten. If there isa gap in the middle, string 1B andweave through beads on the other side ofthe gap.ToolsSize 11 or 12 beading needleScissorsover the button. Pass through the A inRound 5 opposite the one last exited.Weave through beads to exit from thefirst bead of the loop.Round 3: Work 4 stitches using 1Ain each. Work 1 stitch using 1B. Complete the round using 1A in each stitch(Figure 4). Repeat the thread path toreinforce. Secure the thread and trim.Figure 1Rounds 4 and on: Repeat Round 3until you reach the desired length;continue the pattern by always addingthe same bead from which you exited.2: End decrease. Use A towork decrease rounds in circularpeyote stitch (Figure 2):Figure 2Figure 33: Button. Weave throughbeads to exit from a bead of EndRound 5. String 7A, 1D, the button,1D, and 7A. Pass through the A inRound 5 opposite the one you lastexited (Figure 3). Repeat the threadpath several times to reinforce. Securethe thread and trim.4: End decrease andloop. Thread the needle with thetail thread. Repeat Step 2 to decreasethe end. Weave through beads to exitfrom a bead of End Round 5.Rounds 1 and 2: String 19A orenough to make a loop that fits snuglyFigure 4Marilyn T. Aronson of Van Nuys, California,has been beading for fifteen years. Sheteaches at area bead shops and can becontacted at bogieandbeads@roadrunner.com. She thanks her friend Lynn Bermanfor inspiring her to teach this project.Resources: Check your local bead shop orcontact: Seed beads: San Francisco Arts &Crafts, (707) 935-6756, www.sanfranciscoartscrafts.com and The San GabrielBead Company, (626) 447-7753, www.beadcompany.com.More wonderful beadwork projects are available at shop.beadingdaily.com/jewelryprojects 2012 Interweave Press LLC. Not to be reprinted. All rights reserved.page 4
Pearly Mosaic designPearly Mosaicby Lisa Kandesign by lisa Kanoriginally published in Beadwork, June/July 2007Mosaic tile work inspired this necklacein colors chosen to mimic the sea. Byutilizing both transparent and opaqueJapanese seed beads in two sizes, 15 and 11 , Lisa added subtle texturalinterest to the design. Instead ofincreasing peyote stitches, one- and twodrop peyote is used to expand the ringuniformly. Although made in the samepattern, the rings have alternating colorsand connecting them in a particularsequence adds a sense of controlledrandomness and movement. The pearlclasp closure provides a seamlessconnection and is modeled after a balland-socket concept.Finished size:19"Materials:6 g bronze size 15 seed beads (A)Joe Coca4 g each size 15 seed beads in chartreuse luster, silverlined teal, teal metallic matte, and olive AB matte (A)3 g each size 11 seed beads in matching colors (B)1 g sage iris matte size 8 seed beads (C)3 olivine 6mm cubic zirconia faceted drops24 aqua sage 6mm freshwater pearlsTan Silamide beading threadBeeswaxtools:Size 12 beading needleScissorstechnique: Circular Peyote StitchPeyote Stitch Projects from beadingdaily: 7 free Peyote Stitch Patterns Interweave Press Not to be reprinted All rights reserved www.beadingdaily.comMore wonderful beadwork projects are available at shop.beadingdaily.com/jewelryprojects 2012 Interweave Press LLC. Not to be reprinted. All rights reserved.page 5
e1gure 2Peyote Stitch Projects from beadingdaily: 7 free peyote stitch patternsGetting started1: Strap rings. Work one- andtwo-drop cir-cular peyote stitch,changing size and color for eachround as indicated; step up atthe end of each round by passingthrough the first bead(s) of thatround:Rounds 1–2: Use 2' ofconditioned thread to string20A, leaving a short tail; tiean over-hand knot to form aFigure 1circle. Pass through2 beads,tie another knot, andrepeat once more; trim thetail thread.Round 3: String 1A; skip 1bead and pass throughthe following bead in theprevious round. Repeat,working 1A in each stitchfor a total of 10 beads; stepup by passing through thePeyote Stitch Projects from beadingdaily: 7 free peyote stitch patternsfirst bead of this roundFigure 2(Figure 1).Tie anoverhandknot,threadintostitch;the centerRound4: Changecolorandweavework 2Ain eachstep upofbyring,andtrim.Set aside.passingthroughthe first 2 beads of this round (Figure 2).Round5: Matchingthe pre-viousround’scolor,1B isin not2: Focalring. RepeatRounds 1–6,usinganyworkA thateach stitch.bronze.Rounds6–7:Changeandstitch.work 2B in each stitch.Round7: Work2Acolorin eachRound8: Usingworkin each nd’s color, work 2BCenter:Weavethrough beads to exit from a high bead inin eachstitch.the first10:round.String1 pearlthroughRoundWork1A, 1C,and and1A inpasseachstitch. 1A on theoppositesideof thering. Passthe pearl andRound11:Usingbronze,workback2A inthrougheach stitch.through rk 3).1 pearl; weave throughRepeatto 2A in the last round.Small drop: Usingbeadstwiceto exit fromreinforce,thenweavebronze, string 2A, 1 drop, and 2A; pass through the 2A ofthroughexitthe beadsring, alltothebeads just strung to reinforce, the 2A offrom the2A ringin again,the lastand the next 5 beads of the last two roundsround;(Figureset aside4a).withouttrimmingthethread(theLarge drop: Usingbronze, string 2A, 1B, 2A, 1 drop, and 2A;threadpasswillbackbe usedfor the 1B. String 2A; pass through the 2A ofthroughconnect-ingtherings).all the beads just strung, through the 2Athe ring,throughRepeatagain,to makesecondandathenext 5 beads (Figure 4b).Work a second smallring withthe samedrop,then colorweavecombination.10 toFigure 3throughMakebeadsadditionalrings,exit pairsfromofthethirdalternatingbetweenC towardthe shinytop ofand matte beads in blue and greentones,theusingthebronzebeads as accents.ring.Make1ringforthebutton3: Connections. Arrange closure,a omitting the pearl center.the rings in the desiredbsequence, 11 for eachstrapthe fromnecklace,PeyoteStitchofProjectsbeadingdaily: 7 free peyote stitch patternsFigure 4one strap mirroring thePeyote BeaRound 4: Change color and work 2A in each stitch; step up bypassing through the first 2 beads of this round (Figure 2).Round 5: Matching the pre-vious round’s color, work 1B ineach stitch.Rounds 6–7: Change color and work 2B in each stitch.Tie an8:overhandknot, workweavethe center of ring,other strap. With the working thread exiting from 1C of theRoundUsing bronze,2Athreadin eachintostitch.and trim.Set aside.focal ring, pass through the 2A that are on the opposite edgeCenter:Weavethrough beads to exit from a high bead in2:theFocalRepeat1–6,passusingany A1Athatnotfrom the working thread of the first strap ring. Pass throughfirstring.round.StringRounds1 pearl andthroughonisthebronze.the 1C and 2A several times to secure, then weave throughopposite side of the ring. Pass back through the pearl andRound7:Work2Aineachstitch.the focal ring to exit from the third C, and re-peat to connectthrough the bead first exited (Figure ork2Bthe first ring of the second strap. Secure the thread in theRepeattwicetoineachstitch.focal ring before trimming.Repeat to connect 11 rings for eachreinforce, then weaveRound10:Work1A,1C,and1Aineachstitch.strap, using the tail threads and passing through 2A of eachthrough beads to exitRound11:Usingbronze,work2Aineachstitch.ring and securing each successive thread. Con-nect the claspfrom 2A in the ring (the ring without a pearl cen-ter) at the end of one strap.round; set aside singClasp: With the thread exiting from the last 2A of the 11-ringtrimming the thread (thebronze,stringstrap, using bronze, string 5A, 1B, 2A, 1 pearl, and 1A; passthreadwill beused2A,for1 drop, and 2A; pass through the 2A ofthe ring, theall thebeads just strung to reinforce, the 2A ofback through the pearl, string 2A, pass back through theconnect-ingrings).thetoringagain,and the next 5 beads of the last two rounds1B, string 5A, and pass through the 2A of the last roundRepeatmakea secondof the ring. Pass through all the beads again to reinforce.ring (Figurewith the4a).same colorLarge drop: Usingstring 2A, 1B, 2A, 1 drop,and2A;Secure the thread in the ring before trimming.combination.Make bronze,10Figure 3pass backthe 1B. String 2A; pass through the 2A ofadditionalpairsthroughof rings,resources:the ring,throughshinyall thestrung,throughthe 2Aalternatingbetweenandbeadsmattejustbeadsin blueand greenCheck your local bead shop or contact: Cubic zir-conia: Africaagain,next 5beadsbeadsas(Figure4b).Work a second smalltones,usingandthethebronzeaccents.Stones, (626) 962-5800, africas-tones.com or sure,omittingthepearlcenter.presented by beadingdailyLisa Kan's Pearly Mosaic4Freshwaterpearls: MosaicLisa Kan Designs, lisakan.com. Seedpresentedbeads:by beadingthrough beads toLisa Kan's PearlyOut On A Whim, (707) 664-8343, whimbeads.com; San Gabrielexit from the thirdBead Company, (626) 447-7753, beadcompany.com.C toward the top ofthe ring.a3: Connections. Arrangethe rings in the desiredbsequence, 11 for each More wonderful beadwork projects are available at shop.beadingdaily.com/jewelryprojects 2012 Interweave Press LLC. Not to be reprinted. All rights reserved.strap of the necklace,Figure 4 page 6one strap mirroring the
Playful Peyote Toggle Claspsb y me l i n d a b a r t aFinish your next project withthis easily customizable toggle clasp.Not only are the gold collars fun toplay with because they slide around thetoggle ring, but they also help hold thetoggle bar in place when worn.techniquec ircular and flat peyote stitchSee p. 94 for helpful techniqueinformation.Materials24k gold–electroplated size 15 seedbeads for collars (A)Size 15 seed beads for toggle ring (B)Size 11 seed beads for toggle ring andbar (C)Glass 3 4mm dropsNylon or 4 lb braided beading thread incolorto match beadsToolsScissorsSize 10 beading needleFinished size: 1" (ring)Artist’s TipAttach your design to this clasp any number of ways: For beadwoven designs,stitch the ends of your bracelet or necklace directly into the B beads of the ringand bar. For designs strung on beadingwire, string 1 crimp tube, enough seedbeads to cover the wire, and the ring;pass back through the tube and crimp.For the bar, attach 2 collars 1 bead spaceapart in Step 3 and attach the beadingwire as before, allowing the wire to nestlebetween the collars.More wonderful beadwork projects are available at shop.beadingdaily.com/jewelryprojects 2012 Interweave Press LLC. Not to be reprinted. All rights reserved.page 7
but they also help hold then place when worn.nd flattch1) ToggLe rINg. Use circular peyotelsplated size 15 seeds (a)ds for toggle ring (B)ds for toggle ring and bar (c)opsded beading thread in coloreedlesize: 1"(ring)stitch to form the toggle ring by stitchingtwo sides off of a central ring and thenzipping the sides together along the outside edge:Center ring: Use 3' of thread to string44B. Tie a knot to form a circle. Passthrough the first bead strung. Workone round of circular peyote stitchwith 1B in each stitch (Photo 1). Note:Step up for each new round by passingthrough the first bead added in thecurrent round (Photo 2).Side 2, Round 1: Work 1C in each stitch.Weave through beads to exit an upbead on the other side of the centerring (Fig. 1). Note: You will return tothis side after working Side 1; thisround is worked now to make it easierwhen you return to finish this side.Side 1, Round 1: Work 1C in each stitch(Photo 3).Side 1, Rounds 2–4: Work 1C in each stitch(Photo 4 and Fig. 2). Note: Work with tightthread tension in Rounds 3 and 4 sothe beadwork cups. Weave throughbeads to exit Side 2, Round 1.Side 2, Rounds 2 and 3: Work 1C in eachstitch (Photo 5).’s tipesign to this clasp anyys: For beadwoven dee ends of your braceletrectly into the B beads ofar. For designs strung onstring 1 crimp tube,eads to cover the wire,pass back through thep. For the bar, attachad space apart in Step 3e beading wire as before,wire to nestle betweenFig. 1: Working the center ring and Round 1, Side 2Fig. 2: Completing Side 1rk magazine, Interweave Press LLC. Not to be reprinted. All rights reserved.Beadworkonline1 of 2More wonderful beadwork projects are available at shop.beadingdaily.com/jewelryprojects 2012 Interweave Press LLC. Not to be reprinted. All rights reserved.page 8
Photo 1: Stitching the center ringPhoto 2: Stepping up for Side 2, Round 1Photo 3: Stitching Side 1, Round 1Photo 4: Stitching Side 1, Round 3Photo 5: Beginning Side 2, Round 3Photo 6: Zipping Side 1, Round 4 to Side 2, Round 3Fold the sides uptoward each other sothat Side 1, Round 4meets Side 2, Round3. Zip the edgestogether (Photo 6 andFig. 3). Repeat theFig. 3: Zippingthread path to reinSide 1, Round 4force. Secure theto Side 2, Round 3thread and trim.Zipping:2) ToggLe bAr. Use flat peyote stitchto work the bar half of the clasp:Bar: Use 3' of thread to work a strip of flatpeyote 16C wide and 12 rows long. Zipthe edges together as before to form atube.aEnds: Weave throughbeads to exit from anbend bead, away fromthe beadwork. String1A, 1 drop, and 1A(Fig. 4a). Pass downthrough 1B at theopposite side of theFig. 4: Embelopening in the tube.lishing an end ofthe toggle barString 1A, passthrough the drop, and string 1A. Passdown through 1B adjacent to the firstone exited and pass up through thenext (Fig. 4b). String 1A, pass throughthe drop, string 1A, and pass downthrough the 1B on the opposite sideof the opening in the tube. Repeat thethread paths to reinforce. Weave throughbeads to exit the other end of the tubeand repeat embellishments.3) goLd CoLLArs. Embellish the ringand bar as desired:Ring: Use 2' of thread and flat peyotestitch to work a strip 2A or 4A wideand long enough to wrap around thering (about 26 rows). Pass one end ofthe strip through the ring and zip itclosed (Fig. 5). Secure the thread andtrim.Bar: Use 2' of thread and flat peyote stitchto work a strip 2A wide and longenough to wrap around the bar (about28 rows). Wrap the strip around thecenter of the bar and zip it closed.Weave in and out through some of theC of the bar and A of the collar tosecure the collar. Secure the threadand trim. MeLINdA bArTA is editor of Beadwork magazine.she is the author of Custom Cool Jewelry: Create200 Personalized Pendants, Charms, and Clasps(interweave, 2008) and Hip to Stitch (interweave,2005) and coauthor of the new book Mixed Metals:Creating Contemporary Jewelry with Silver, Gold,Copper, Brass & More (interweave, 2009). Visitwww.melindabarta.com.resourCesFig. 5: Zipping together the endsof a collarCheck your local bead shop or contact:one-G nylon and Fireline braided beadingthreads and beads: Beyond Beadery, (800) 8405548, www.beyondbeadery.com.BeadworkMore wonderful beadwork projects are available at shop.beadingdaily.com/jewelryprojects 2012 Interweave Press LLC. Not to be reprinted. All rights reserved.page 9online2 of 2
seEarrinSummer Bird House Earriby Judi Woodby JudiWoodby Judi WoodTOOLS:MATERIALS: Step 1: TOOLS:With1 ssorsSharp scissorsMATERIALS:Delica beads in six Delica beads in sixningcolorspeyote pattern at the point indicated. So thatSize 12showing,beadingcolorsthere are no threadsstartneedlethe brick weave2 3mm pearl or crystal2Delica3mm pearlor crystalbeadsin six colorswith 2 beads and immediately start the second row2 ear wiresBeginner2 ear wires23mmpearlorcrystalwith 2 more beads—this can be a little tricky, butSize B white beadingSize B white beading threadwith practice and a good grip it can be done. Weave2 ear wires French wire or gimpthreadBeginnerin new beads by going down to the first row and upFrenchor gimpSize Bwirewhitebeadingthread1yardofwaxedthreadinto the second row. AfterPeyotethe first Stitchtwo rows are1 yard of waxedFrench wire or gimpthreaddone continue working withtraditionalBrickStitch brickMATERIALS:SKILL LEVELSKILL LEVELTECHNIQUESTECHNIQUESstitch. Work the design up the first half.1 yard of waxed threadTOOLS:Peyote StitchWith1yardofwaxedthread,beginningpatternat the point indicated. So tStep1Step2: At thetop of thepeyotehouse, stringa 3mmSharp scissorsBrickStitcha smallgimp, andearring finding.Size 12 beadingshowing, start the rt the second row with 2needlea littleSKILLWithLEVEL1 yard ofand upBeginnerPass back andthroughthe 3mmand beintodone.the topWeave in new beads by gotricky, but with practicea goodgripbeadit canwaxed thread, ofbeginningpatternat thepoint indicated. So thatthe house andpeyotethread throughthe designtheinto the second row. After the first two rows are d
an in bead, the other an out bead, to interlock properly. Add or remove a row of beads to suit your desired fit. Step 9: Bring the ends together in a ring. Notice how the in and out beads will fit together. Pass through beadwork to exit an end border bead. Depending on your ring length, you may