Transcription
Software Defined Access (SDA) toApplication Centric Infrastructure(ACI) Integration Lab GuideFay-Ann Lee, Technical Marketing EngineerAmericas HeadquartersCisco Systems, Inc.170 West Tasman DriveSan Jose, CA 95134-1706USAhttp://www.cisco.comPage 1 of 41
Tel: 408 526-4000800 553-NETS (6387)Fax: 408 527-0883Page 2 of 41
NOTICE. ALL STATEMENTS, INFORMATION, AND RECOMMENDATIONS IN THIS MANUAL ARE BELIEVED TO BE ACCURATE BUT AREPRESENTED WITHOUT WARRANTY OF ANY KIND, EXPRESSED OR IMPLIED. USERS MUST TAKE FULL RESPONSIBILITY FOR THEIRAPPLICATION OF ANY PRODUCTS.THE SOFTWARE LICENSE AND LIMITED WARRANTY FOR THE ACCOMPANYING PRODUCT ARE SET FORTH IN THE INFORMATIONPACKET THAT SHIPPED WITH THE PRODUCT AND ARE INCORPORATED HEREIN BY THIS REFERENCE. IF YOU ARE UNABLE TOLOCATE THE SOFTWARE LICENSE OR LIMITED WARRANTY, CONTACT YOUR CISCO REPRESENTATIVE FOR A COPY.NOTWITHSTANDING ANY OTHER WARRANTY HEREIN, ALL DOCUMENT FILES AND SOFTWARE OF THESE SUPPLIERS AREPROVIDED 'AS IS' WITH ALL FAULTS. CISCO AND THIRD-PARTY SUPPLIERS DISCLAIM ALL WARRANTIES, EXPRESSED OR IMPLIED,INCLUDING, WITHOUT LIMITATION, THOSE OF MERCHANTABILITY, FITNESS FOR A PARTICULAR PURPOSE ANDNONINFRINGEMENT OR ARISING FROM A COURSE OF DEALING, USAGE, OR TRADE PRACTICE.IN NO EVENT SHALL CISCO OR ITS SUPPLIERS BE LIABLE FOR ANY INDIRECT, SPECIAL, CONSEQUENTIAL, OR INCIDENTALDAMAGES, INCLUDING, WITHOUT LIMITATION, LOST PROFITS OR LOSS OR DAMAGE TO DATA ARISING OUT OF THE USE ORINABILITY TO USE THIS MANUAL, EVEN IF CISCO OR ITS SUPPLIERS HAVE BEEN ADVISED OF THE POSSIBILITY OF SUCHDAMAGES.Cisco and the Cisco logo are trademarks or registered trademarks of Cisco and/or its affiliates in the U.S. and other countries. To view a list ofCisco trademarks, go to this URL: http://www.cisco.com/go/trademarks.Third-party trademarks mentioned are the property of their respective owners. The use of the word partner does not imply a partnershiprelationship between Cisco and any other company. (1110R)Copyright 2012 Cisco Systems, Inc. All rights reserved.Page 3 of 41
Table of ContentsTable of Contents . 4Cisco Multidomain: SDA-ACI Integration. 6Lab Overview . 7Section 1: Campus Policy . 8Section 2: SDA-ACI Integration . 8Section 3: Common Use Cases. 8Overall Lab Topology . 8Assumptions . 8Before you begin . 9Terminology. 9Connecting to Lab Devices (for reference only). 9Connect to a POD . 9Lab Exercise 1: SD-Access Baseline (Segmentation Policy Focus Only) . 9Cisco Identity Services Engine . 9Cisco pxGrid . 10Cisco Software Defined Access . 10Cisco DNA Center . 11Sharing SGTs from ISE to DNAC . 11Lab Exercise 2: Authenticating and Authorizing a host to connect to the SDA fabric . 14SGT Assignment for Authenticated Users . 14Connecting a host to the network . 16Lab Exericse 3: Enabling ISE to ACI Integration . 19Import APIC Certificate into ISE . 19Security Group Tag Numbering for APIC EPGs. 21Learning IP-EPG mappings. 22Enabling ISE SXP . 22Configuring a SXP Peer. 23ACI Settings in ISE . 24SXP Propagation . 25Lab Exercise 4: Shared Policy Group Verification . 26APIC Internal EPGs converted to Security Groups . 26TrustSec Security Groups converted to ACI External EPGs . 27Internal Endpoints (IEPs) converted in ISE as IP-Mappings . 28Verify ISE IP Mappings are converted to External EPG Subnets . 28Page 4 of 41
Lab Exercise 5: Campus Identity provided to ACI . 29Lab Exercise 6: ACI Context provided to SDA Policy Domain . 32Enabling Group-Based Enforcement on the SDA Border . 32Making the SDA Border aware of APIC IP-SGT (EPG) mapping. 33Appendix. 39Phase 1 Solution Testing . Error! Bookmark not defined.Phase 1 Considerations. Error! Bookmark not defined.Page 5 of 41
Cisco Multidomain: SDA-ACI IntegrationCisco Multidomain is a program to enable customers to use common policies across multiple operationaldomains using Cisco products, essentially to simplify policy management for customers using Ciscotechnology in multiple operational domains.This is necessary because customer’s policy challenges are not specific to a place in the network, butspans all across campus, wan, data center, and cloud environments.This program is also intended to enable customers to get started with advanced Cisco policy capabilitiesin any given domain and make it easy to extend their policy management capabilities into other domainseasily; to provide competitive differentiation for all Cisco products in scope.The initial phase of this program starts with SDA-ACI Integration which is focused on enabling policyobjects to be shared across between the sd-access domain.ACI shares some base characteristics with SDA in that it provides policy for base segmentation, QoS,path selection, and service chaining via a construct called endpoint groups (EPGs). Endpoint groups tocustomers are synonymous with Scalable Groups used in SDA, hence customers have asked forinteroperability between EPGs and SGTs, so that they can apply policy within the data center leveraginggroups using context from SDA. In addition, customers would like to use the EPGs from the data centerto invoke services in the campus and WAN based on SGT/EPG pairs into and out of the data center.SDA-ACI ScenariosThis program is also intended to enable the development of common policy management acrossdomains, by providing common groups for future multi-domain management applications to leverage.Page 6 of 41
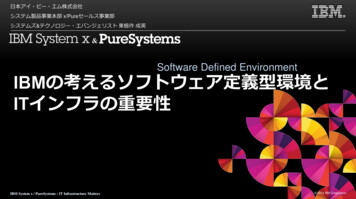
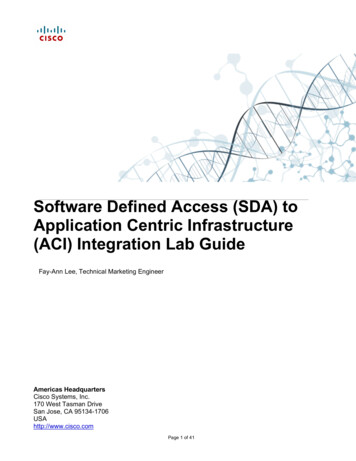
The starting point for this program is the Phase 1 SDA-ACI integration illustrated below :Note: Please reference Appendix for scale informationSDA-ACI integration via the use of ISE provides the ability to interconnect the administrative domains ofSDA and ACI to provide policy normalization to simplify security design, operations, and compliance.Lab OverviewThis lab is divided into three main sections:Page 7 of 41
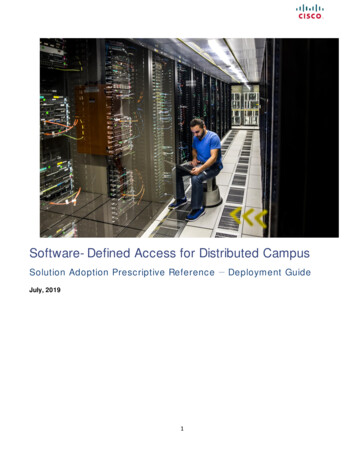
Section 1: Campus Policy Exercise 1: Lab topology and brief introduction to how DNAC and ISE interact with each other toprovide segmentation within a sd-access environment. Exercise 2: Authenticating and Authorizing a host to connect to the SDA fabricSection 2: SDA-ACI Integration Exercise 3: Integrating APIC with DNAC and ISE Exercise 4: Validation that DNAC, ISE, and APIC are integrated and sharing group informationSection 3: Common Use Cases Use Case 1: Campus Identity provided to ACIUse Case 2: Application context provided to SD-Access Policy DomainOverall Lab TopologyAssumptionsThis lab assumes: The student is familiar with the Cisco Identity Services Engine features and functions The student is familiar with DNA Center features and functions The student is familiar with Scalable Group/SGT and SGACL functionsPage 8 of 41
Before you beginToday, terminology for the same policy constructs differ between Cisco Identity Services Engine, CiscoApplication Centric Infrastructure, and Cisco DNA Center. In this lab the term “group” is used to meanscalable group/security group/endpoint group. The term “policy” refers to policies defined by the use ofgroups. TerminologyDNACScalable GroupAccess ContractGroup-Based AccessControlISESecurity GroupSecurity Group ACLsTrustSec PolicyAPICEndpoint GroupContractGroup based accessConnecting to Lab Devices (for reference only)Note:To access the lab, you must first connect to the Admin PC. The Admin PC provides a launching point for access to allthe other lab componentsNote:Admin PC access is through RDP, therefore you must have an RDP client installed on your computerConnect to a PODStep 1 Launch the Remote Desktop application on your systema. Connect to your POD Admin PC using RDPb. Login as admin / ISEisC00LNote: All lab configurations can be performed from the Admin client PC.Lab Exercise 1: SD-Access Baseline (Segmentation PolicyFocus Only)Cisco Identity Services EngineCisco Identity Services Engine (ISE) is a next generation identity and access control policy platform thatenables enterprises to enforce compliance, enhance infrastructure security, and streamline their serviceoperations.Page 9 of 41
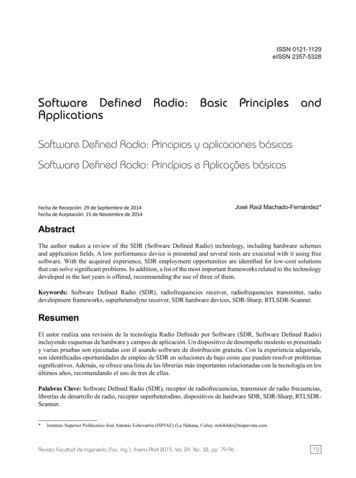
ISE is used to manage authentication, authorization and deploy SGT policies within Cisco SD Access.ISE is also the AAA server used in SD-Access.Cisco pxGridCisco pxGrid (Platform Exchange Grid) is an open, scalable, and IETF standards-driven data-sharingplatformCisco DNAC subscribes as a pxGrid client to ISE to obtain the SGT’s from ISE through this pxGrid(Publish Exchange Grid) client/server relationship.This lab begins with ISE and pxGrid pre-configured to: Share SGT information via pxGrid to DNA CenterAssociate authenticated users to the Doctors SGTAuthorize the group Doctors access to the networkCisco Software Defined AccessCisco Software Defined Access (SD-Access) takes a two-tiered approach to segmentation. Virtualnetworks (VNs) are used to divide the physical network into logical segments to provide completeisolation between traffic and devices in one VN from that of other VNs. This separation is sometimesreferred to as macro-segmentation.Within a VN finer control, commonly called micro-segmentation or group-based segmentation, isachieved with scalable groups (SGs).In this lab, the sd-access network is divided into two VNs, User and IOT, to completely isolate usersfrom IOT devices. Then scalable groups needed to achieve the segmentation goals within these VNshave been mapped by DNA Center.This lab solely focuses on group-based segmentation.Page 10 of 41
Cisco DNA Center 1.3.1DNAC is the central policy authoring tool for sd-access networks. Policy administrators create policieson DNAC and DNAC writes these policies to ISE. ISE then deploys the policies to the network devices.The groups used in these policies are learned from ISE via pxGrid.In this lab, the pxgrid connection between DNAC and ISE is already established. In the steps below youwill be able to see how quickly group information is exchanged between DNAC and ISE.Sharing SGTs from DNAC to ISEBy default DNAC comes with 19 pre-defined Scalable Groups.Using Chrome, log in to DNAC-ACI (https://10.1.100.100) (admin/SGTsr0x!)Navigate to Policyà Group-Based Access ControlàScalable GroupsPage 11 of 41
These default groups are automatically synchronized with ISE. These groups are visible as SecurityGroups on ISEOn the upper right corner, click “Create Scalable Group”Create a scalable group named Doctors. Be sure to select the “Users VN” and to check thebox “Propagate to ACI”Page 12 of 41
Note: Checking the box “propagate to ACI” tells ISE to share this group with APICClick SaveUpon clicking save, a sync status indicator appears beside the Doctors group to indicate the sync statuswith ISEPage 13 of 41
Log in to ISE. Use the Chrome bookmark, “ISE” (admin/SGTsr0x!)Navigate to PolicyàGroup-Based Access ControlàScalable Groups to view the newlyadded Doctors Security Group with “propagate to ACI” enabledLab Exercise 2: Authenticating and Authorizing a host toconnect to the SDA fabricSGT Assignment for Authenticated UsersIn the steps above, you created a new scalable group named “Doctors”. This group must bedynamically assigned to users that connect to the network. An ISE authorization policy is used to do theassignment.In the steps below, you will walk through configuring an ISE policy set. A policy set is a grouping ofauthentication and authorization policies logically grouped together for Administrative ease.This lab utilizes a pre-configured “Campus Users” policy set. The policy set is configured to allow anywired 802.1x users authenticate against any configured user identity store and if any one of the users isan employee, the Doctors SGT is assigned to them. Let’s see what this policy set looks like:On ISE, navigate to PolicyàPolicy Sets. Take a moment to digest the configured CampusUsers policy set. This policy will match any authentications that match the “Wired 802.1X”condition.Now click the “ ” icon in the Campus Users policy window as shown belowClick on the Authentication Policy as shown below and view the policy configurationPage 14 of 41
As shown above, we are making use of the default authentication policy for simplicity. This policy hasno specific conditions that must be met and any configured user identity store, indicated by“All User ID Stores”, is used to authenticate the 802.1x users.Click on Authorization Policy as shown belowThe pre-configured authorization policy assigns the Employees security group to ISE internal users inthe Employees group.For simplicity, change the Security Groups column from Employees to Doctors will associatethe newly created Doctors SGT to the users.Scroll down to click SavePage 15 of 41
Connecting a host to the networkIn the steps below, we will connect a user to the network. The client pc is connected to int g1/0/1 whichhas been preconfigured for Dot1x. Upon successful authentication, the user will be dynamicallyassigned the Doctor SGT by matching the authorization rule configured in the steps in the previoussection.Additionally, there are no access-control/segmentation policies in place in the sd-access domain. InACI, a contract was preconfigured to “Permit All” traffic in. The routed connection between the Campusand the ACI fabric has been already configured, so basically it is just routing at this point.Therefore, the newly connected user will be able to reach the EMR server hosted in the Data Center.Note: To limit the need to go back and forth between applications, you will view the preconfigured “Permit All”contract in APIC later in the labOn your desktop, look for the Remote Desktop Manager applicationChose the Client1 window. Log in as employee1/SGTsr0x!Page 16 of 41
Note: Client1 is a windows virtual machine, not a physical pc.Within the remote desktop app, click on Edge to navigate to the switch’s consoleShut/no shut int g1/0/1 to initiate Dot1xEdge#conf tEnter configuration commands, one per line.Edge(config)#int g1/0/1Edge(config-if)#shutEdge(config-if)#no shutEnd with CNTL/Z.Verify the Dot1x session is successfulPage 17 of 41
Edge(config-if)#do sho auth session int g1/0/1 detailsInterface: GigabitEthernet1/0/1IIF-ID: 0x157C6C72MAC Address: 0050.56a3.7c7eIPv6 Address: fe80::3d92:6ea0:f938:9c21IPv4 Address: 172.16.101.201User-Name: employee1Status: AuthorizedDomain: DATAOper host mode: multi-authOper control dir: bothSession timeout: N/ACommon Session ID: 0502A8C000000309A273A279Acct Session ID: 0x00000301Handle: 0xe90002ffCurrent Policy: PMAP DefaultWiredDot1xClosedAuth 1X MABServer Policies:Vlan Group:SGT Value:Vlan: 102117Method status list:Methoddot1xStateAuthc SuccessNote: If the status is not “Authorized”, please go back and shut/no shut the switchport.Note: Please make a note of the assigned IP address and SGT value. These will be needed later in this lab.Page 18 of 41
On the client pc, open Chrome and click the EMR bookmark. The Cisco HealthConnectionsCenter portal should appearLab Exericse 3: Enabling ISE to ACI IntegrationImport APIC Certificate into ISEThe communication between APIC and ISE uses SSL. In this lab, APIC uses a self-signed certificate.Therefore, the APIC certificate must be imported into the ISE certificate store.From the Browser window of the APIC controller click to the left of the URL bar as shownbelow. Select “Certificate” to view the certificate. When viewing the certificate, click the“Details” tab to export the certificate to your local computer.Page 19 of 41
From the ISE UI, navigate to ficates.Click import to import the APIC certificate to the ISE Certificate Store.Page 20 of 41
Security Group Tag Numbering for APIC EPGsUnder Work Centers àTrustSec àSettingsà General TrustSec SettingsThe EPGs that are received by ISE will be assigned a SGT value. Go to the Security Group TagNumbering for APIC EPGs and Check to modify the SGT value to any number. By default it is 10,000and is unchecked. If unchecked the EPGs, which are received by ISE, will be assigned a SGT valuefrom 10,000.Page 21 of 41
Learning IP-EPG mappingsISE SXP is used to learn and share IP to group mappings to and from ISE. While the communicationbetween ISE and APIC is handled by REST APIs, not SXP, ISE SXP MUST be enabled and configuredin order for ISE to register the IP to EPG mappings learned from APICNote: You may skip to “ACI Settings in ISE” since the items are pre-configured. This section is added becauseoften the items configured here are the MOST COMMON reason why SDA-ACI integration “doesn’t work”Enabling ISE SXPNavigate to AdministrationàSystemàDeployment and select ISE-1Validate that “Enable SXP Service” is checkedPage 22 of 41
Navigate to Work CentersàTrustSecàSettingsàSXP SettingsCheck “Add radius mappings into SXP IP SGT mapping table”Optional: Check “Publish SXP bindings on PxGrid”. This is necessary to share bindings withPxGrid consumersConfiguring a SXP PeerNavigate to Work CentersàTrustSecàSXPàSXP DevicesAdd a SXP peerNote: This peer is the network device that you want to target IP-SGT mappings to for enforcement. For example,in this lab, we will use the sd-access border to enforce North to South communications.Note: A dummy address can be used when there is no need to actually share mappings to a network devicePage 23 of 41
ACI Settings in ISEUnder Work CentersàTrustSecà SettingsàACI SettingsCheck the TrustSec-ACI Policy Element Exchange and fill in the settings as pictured below.Note: For example, if my assigned pod is #2, the credentials would beAdmin name: pod2Password: SGTsr0x1 (same for all pods)Tenant name: SDAACI Pod2L3 Route: (same for all pods)Note: The tenant and L3Out names are case sensitive. Additionally, double check your pod information.Entering in the incorrect information can cause you to connect to a different pod.Click the Test Settings to validate the connectionPage 24 of 41
Note: ISE supports a single cluster of 3 APIC controllers. Currently, ISE supports single Tenant and a single L3Outlogical connectionReview the Naming Convention settings for new SGTs and EPGs. The configured suffix willbe appended to the converted SGTs and EPGs in ISE and APIC. In the example bellow,EPG and SGT will be appendedCheck “TrustSec-ACI Policy Element Exchange” at the top of the screen before clicking SaveSXP PropagationBefore configuring the SXP Propagation settings there is a concept of SXP Domains that needs to beunderstood. An SXP Domain is a collection of SXP Devices and the administrator can decide whichdomain to send IP-SGT mappings to. This is not mandatory to create a new SXP domain, as a DefaultDomain already exists in ISE.Click Save.Once saved ISE and the APIC controller will start sharing the policy group information (SGTs & EPGs)with each other. The internal EPGs from APIC will be converted to Security Groups on ISE andautomatically shared to Cisco DNA Center via PxGrid. Likewise, the Security Groups originating fromISE will be converted to external EPGs on APIC.þ End of Exercise: You have successfully completed this exercise.next section.Page 25 of 41Proceed to
Lab Exercise 4: Shared Policy Group VerificationAPIC Internal EPGs converted to Security GroupsLog into APIC (pod#/SGTsr0x1)From the APIC controller navigate to TenantsàSDAACI Pod#-- Application Profiles àAPàApplication EPGs to view the list of internal EPGs (EMR and Finance)Go back to DNAC and navigate to PolicyàGroup-Based Access ControlàScalableGroups. You should see the EMR and Finance EPGs listedPage 26 of 41
Note: ISE supports only 32 characters SGT name whereas ACI supports a 64 character EPG. In these cases thename will be truncated and the full EPG name details can be viewed in the description.TrustSec Security Groups converted to ACI External EPGsThe SGTs from the ISE are propagated as External Endpoint Groups (EEPGs) in ACI. Validate that fromthe APIC controller UI by navigating toNavigate to Tenant àNetworking -- External Routed Networks -- L3OutClick ‘Networks’ to see the propagated Security Groups from ISE as the new EEPGs with asuffix ‘ SGT’Page 27 of 41
Internal Endpoints (IEPs) converted in ISE as IP-MappingsOnce the EPGs are converted to the relevant SGTs in ISE, the Endpoints (EPs) of the EPGs areconverted to IP-Mappings under the All SXP Mappings in ISEOn ISE, navigate to Work CentersàTrustSec àSXP à All SXP MappingsLook for the newly created IP-SGT Mappings of the Security Groups (of EPGs) with the relevant SXPDomainNote: The mapping for the Finance EPG is not listed because the VM does not have an IP.Verify ISE IP Mappings are converted to External EPG SubnetsAs soon as the SGTs from ISE are converted to External Endpoint Groups (EEPGs) in ACI, the IP-SGTMappings will also be converted to Subnets (/32) under the EEPGs.On APIC, navigate to Tenants à Networking à External Routed Networks à L3OutàNetworksExpand Networks and scroll to select “Doctors SGT”. On the resulting window on the right,scroll down to view “Subnets”. The IP of the client is shown hereþ End of Exercise: You have successfully completed this exercise.next section.Now that EPGs and SGTs are shared, let’s look at some common use casesPage 28 of 41Proceed to
Lab Exercise 5: Campus Identity provided to ACINow that APIC has learned about the Doctors group of campus users and their associated addresses,APIC has more specific context on and visibility of the traffic incoming to the data center. Administratorscan use this context to create more granular segmentation policies.Before SDA-ACI IntegrationAfter SDA-ACI IntegrationIn the steps below you will create a contract to allow Doctors access to the EMR server. But beforecreating a new contract, let’s revisit the user’s access.On the client pc, clear the browser cache and re-launch the EMR portal page. THIS WILLFAIL.From the DOS prompt, launch a continuous ping to EMR (get the IP address from Chrome).These pings will also FAIL.Failure reason: Now that the user’s IP is identified as “Doctor”, a contract specifically allowing doctorsaccess to EMR is required.On APIC, navigate to TenantàApplication ProfilesàAPTo the right of the window, choose TopologyPage 29 of 41
On the resulting window, you can see the preconfigured policy for L3Out to EMR accessNow create a contract specifically to allow Doctors to EMRSelect the “Layer 3” icon,result will look similar to this:, drag it to center of the screen, and release your mouse. TheChoose Doctors in the dropdown list and click OKPage 30 of 41
Select the Contract icon,, and without releasing your mouse drag it to touch EMR andthen Doctors SGT. The result will look similar to this:Once you let go of the mouse, configure the resulting screen as follows:Page 31 of 41
Click OK to finalize the configurationNavigate back to the client pc. The pings and EMR portal should work now.Lab Exercise 6: ACI Context provided to SDA Policy DomainNow that ACI is integrated with DNAC so that DNAC is aware of ACI EPGs, you can configure policiesto permit/deny traffic from the SDA fabric to the ACI fabric.In the following steps, you will configure and deploy a group-based policy to drop traffic sourced fromDoctors SGT to EMR EPG on the sd-access border switch (as the traffic exists the SDA fabric) so thatthe traffic does not need to traverse the network to only to be dropped at the ACI fabric leaf.Enabling Group-Based Enforcement on the SDA BorderGroup-based enforcement is not enabled by default on the border. Because this lab has chosen to usethe SDA border as an enforcement point, enforcement must be enabled manuallyNavigate to the Remote Desktop Client Manager application and select Border.Enter config t and enable cts enforcementCts role-based enforcementCts role-based enforcement vlan 3002Note:“cts role-based enforcement” enables enforcement globallyNote:“cts role-based enforcement vlan 3002” enables enforcement specifically for the User VN. To enable enforcement forany configured VLAN, the command would be “cts role-based enforcement vlan all”Page 32 of 41
Note:Due to DNAC automation, vlan 3002 may not be the User VN. Type “show int vlan 3003”. If vlan 3003 is mapped tothe User VN, enable enforcement for vlan 3003 insteadMaking the SDA Border aware of APIC IP-SGT (EPG) mappingIn step 45, you verified that ISE learned the IP-EPG mapping for the EMR server. However, in order forthe SDA border to enforce traffic, the border needs have the IP-EPG mapping as well. In the stepsbelow, you will configure ISE SXP to forward the learned mapping from ISE to the SDA border.On ISE, navigate to Work CentersàTrustSecàSXPàSXP DevicesClick Add and fill in the configuration details as follows:Click SaveGo back to the ssh connection to the border to configure the SXP peering back to ISEBorder#conf tcts sxp enablects sxp connection peer 10.1.100.21 source 172.16.101.254 password default mode local listenerhold-time 0 0 vrf User VNcts sxp default password 0 Cisco123To check the SXP connection status typePage 33 of 41
Border#show cts sxp connection vrf User VN ß Don’t forget to type thisSXP: EnabledHighest Version Supported: 4Default Password : SetDefault Source IP: Not SetConnection retry open period: 120 secsReconcile period: 120 secsRetry open timer is runningPeer-Sequence traverse limit for export: Not SetPeer-Sequence traverse limit for import: Not er IP: 10.1.100.21Source IP: 172.16.101.254Conn status: OnConn version: 4Conn capability : IPv4-IPv6-SubnetConn hold time: 120 secondsLocal mode: SXP ListenerConnection inst# : 1TCP conn fd: 1TCP conn password: default SXP passwordHold timer is runningDuration since last state change: 0:00:01:45 (dd:hr:mm:sec)Total num of SXP Connections 1Note:If the connection status shows as OFF, double check the SXP settings in ISE, in particular the password-both sides ofthe connection must use the same passwordVerify the IP-SGT mapping for EMR is in the SXP tableBorder#show cts role-based sgt-map vrf User VN all%IPv6 protocol is not enabled in VRF User VNActive IPv4-SGT Bindings InformationIP AddressSGTSource 192.168.11.10010001SXP (Note: The 3rd IP octect will differ per pod)IP-SGT Active Bindings Summary
Within a VN finer control, commonly called micro-segmentation or group-based segmentation, is achieved with scalable groups (SGs). In this lab, the sd-access network is divided into two VNs, User and IOT, to completely isolate users from IOT devices. Then scalable groups needed to achieve the segmentation goals within these VNs