Transcription
USER GUIDECompact Wireless-GUSB Network Adapterwith SpeedBoosterModel: WUSB54GSC
About This GuideAbout This GuideIcon DescriptionsWhile reading through the User Guide you may seevarious icons that call attention to specific items. Below isa description of these icons:NOTE: This check mark indicates that there isa note of interest and is something that youshould pay special attention to while using theproduct.WARNING: This exclamation point indicatesthat there is a caution or warning and it issomething that could damage your property orproduct.WEB: This globe icon indicates a noteworthywebsite address or e-mail address.Online ResourcesWebsite addresses in this document are listed withouthttp:// in front of the address because most current webbrowsers do not require it. If you use an older web browser,you may have to add http:// in front of the web ys www.linksys.com/glossaryNetwork Securitywww.linksys.com/securityCopyright and TrademarksLinksys, Cisco and the Cisco Logo areregistered trademarks or trademarksof Cisco Systems, Inc. and/or itsaffiliates in the U.S. and certain othercountries. Copyright 2008 CiscoSystems, Inc. All rights reserved.Other brands and product names aretrademarks or registered trademarksof their respective holders.Compact Wireless-G USB Network Adapter with SpeedBoosteri
Table of ContentsChapter 1: Product Overview1LED . . . . . . . . . . . . . . . . . . . . . . . . . . . . . . . . . . . . . . . . . . . . . . . . . . . . . . . 1Chapter 2: Wireless Security Checklist2General Network Security Guidelines . . . . . . . . . . . . . . . . . . . . . . . . . . . . . . . . . 2Additional Security Tips . . . . . . . . . . . . . . . . . . . . . . . . . . . . . . . . . . . . . . . . . . 2Chapter 3: Advanced Configuration3How to Access the Wireless Network Monitor . . . . . . . . . . . . . . . . . . . . . . . . . . . . 3How to Use the Wireless Network Monitor . . . . . . . . . . . . . . . . . . . . . . . . . . . . . . 3Link Information . . . . . . . . . . . . . . . . . . . . . . . . . . . . . . . . . . . . . . . . . . . . . . . 3Profiles . . . . . . . . . . . . . . . . . . . . . . . . . . . . . . . . . . . . . . . . . . . . . . . . . . . . . 6Appendix A: Troubleshooting14Appendix B: Windows Vista Zero Configuration15Windows Vista Configuration . . . . . . . . . . . . . . . . . . . . . . . . . . . . . . . . . . . . . . 15New Wireless Connection . . . . . . . . . . . . . . . . . . . . . . . . . . . . . . . . . . . . . . . . 15Appendix C: Windows XP Wireless Zero Configuration18Windows XP Wireless Zero Configuration . . . . . . . . . . . . . . . . . . . . . . . . . . . . . . 18Appendix D: Specifications20Appendix E: Warranty Information21Limited Warranty . . . . . . . . . . . . . . . . . . . . . . . . . . . . . . . . . . . . . . . . . . . . . 21Exclusions and Limitations . . . . . . . . . . . . . . . . . . . . . . . . . . . . . . . . . . . . . . . 21Obtaining Warranty Service . . . . . . . . . . . . . . . . . . . . . . . . . . . . . . . . . . . . . . . 21Technical Support . . . . . . . . . . . . . . . . . . . . . . . . . . . . . . . . . . . . . . . . . . . . . 22Appendix F: Regulatory Information23FCC Statement . . . . . . . . . . . . . . . . . . . . . . . . . . . . . . . . . . . . . . . . . . . . . . . 23FCC Radiation Exposure Statement . . . . . . . . . . . . . . . . . . . . . . . . . . . . . . . . . . 23Safety Notices . . . . . . . . . . . . . . . . . . . . . . . . . . . . . . . . . . . . . . . . . . . . . . . 23Industry Canada Statement . . . . . . . . . . . . . . . . . . . . . . . . . . . . . . . . . . . . . . . 23Avis d’Industrie Canada . . . . . . . . . . . . . . . . . . . . . . . . . . . . . . . . . . . . . . . . . 24Wireless Disclaimer . . . . . . . . . . . . . . . . . . . . . . . . . . . . . . . . . . . . . . . . . . . . 24Avis de non-responsabilité concernant les appareils sans fil . . . . . . . . . . . . . . . . . . 24User Information for Consumer Products Covered by EU Directive 2002/96/EC on WasteElectric and Electronic Equipment (WEEE) . . . . . . . . . . . . . . . . . . . . . . . . . . . . . 25Appendix G: Software License Agreement29Software in Linksys Products . . . . . . . . . . . . . . . . . . . . . . . . . . . . . . . . . . . . . . 29Software Licenses . . . . . . . . . . . . . . . . . . . . . . . . . . . . . . . . . . . . . . . . . . . . . 29Compact Wireless-G USB Network Adapter with SpeedBoosterii
Product OverviewChapter 1Chapter 1:Product OverviewThank you for choosing the Compact Wireless-G USBNetwork Adapter with SpeedBooster. With this Adapter,your wireless networking experience will be faster andeasier than ever.Using the latest wireless networking technology, theAdapter adds or upgrades wireless connectivity onyour notebook computer. To help protect your data andprivacy, you can use industrial-strength WPA2 encryptionto protect your wireless connection. The included SetupWizard will walk you through configuring the Adapter toyour network’s settings, step by step.LEDLink (Green) The LED flashes when there iswireless network activity.Compact Wireless-G USB Network Adapter with SpeedBooster1
Wireless Security ChecklistChapter 2Chapter 2:Wireless Security ChecklistWireless networks are convenient and easy to install, sohomes with high-speed Internet access are adopting themat a rapid pace. Because wireless networking operates bysending information over radio waves, it can be morevulnerable to intruders than a traditional wired network.Like signals from your cellular or cordless phones, signalsfrom your wireless network can also be intercepted. Sinceyou cannot physically prevent someone from connectingto your wireless network, you need to take some additionalsteps to keep your network secure.1. Change the default wirelessnetwork name or SSIDWireless devices have a default wireless network nameor Service Set Identifier (SSID) set by the factory. Thisis the name of your wireless network, and can be upto 32 characters in length. Linksys wireless productsuse linksys as the default wireless network name. Youshould change the wireless network name to somethingunique to distinguish your wireless network from otherwireless networks that may exist around you, but do notuse personal information (such as your Social Securitynumber) because this information may be available foranyone to see when browsing for wireless networks.2. Change the default passwordFor wireless products such as access points and routers,you will be asked for a password when you want to changetheir settings. These devices have a default password setby the factory. The Linksys default password is admin.Hackers know these defaults and may try to use themto access your wireless device and change your networksettings. To thwart any unauthorized changes, customizethe device’s password so it will be hard to guess.3. Enable MAC address filteringLinksys routers give you the ability to enable Media AccessControl (MAC) address filtering. The MAC address is aunique series of numbers and letters assigned to everynetworking device. With MAC address filtering enabled,wireless network access is provided solely for wirelessdevices with specific MAC addresses. For example, you canspecify the MAC address of each computer in your homeso that only those computers can access your wirelessnetwork.Compact Wireless-G USB Network Adapter with SpeedBooster4. Enable encryptionEncryption protects data transmitted over a wirelessnetwork. Wi-Fi Protected Access (WPA/WPA2) and WiredEquivalency Privacy (WEP) offer different levels of securityfor wireless communication.A network encrypted with WPA/WPA2 is more securethan a network encrypted with WEP, because WPA/WPA2uses dynamic key encryption. To protect the informationas it passes over the airwaves, you should enable thehighest level of encryption supported by your networkequipment.WEP is an older encryption standard and may be theonly option available on some older devices that do notsupport WPA.General Network Security GuidelinesWireless network security is useless if the underlyingnetwork is not secure. Password protect all computers on the network andindividually password protect sensitive files. Change passwords on a regular basis. Install anti-virus software and personal firewallsoftware. Disable file sharing (peer-to-peer). Some applicationsmay open file sharing without your consent and/orknowledge.Additional Security Tips Keep wireless routers, access points, or gateways awayfrom exterior walls and windows. Turn wireless routers, access points, or gatewaysoff when they are not being used (at night, duringvacations). Use strong passphrases that are at least eight charactersin length. Combine letters and numbers to avoid usingstandard words that can be found in the dictionary.WEB: For more information on wirelesssecurity, visit www.linksys.com/security2
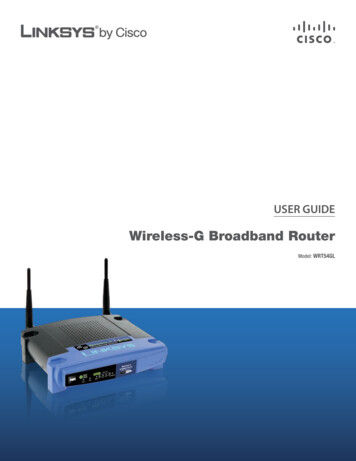
ConfigurationChapter 3Chapter 3:Advanced ConfigurationFor Windows 2000 and Windows XP users, advancedconfiguration is performed through the Wireless NetworkMonitor (the Monitor). Windows Vista users should refer toAppendix B: Windows Vista Wireless Zero Configuration.Link InformationThe Link Information screen displays network mode, signalstrength, and link quality information about the currentconnection. Click More Information for additional statusinformation.Use the Advanced Configuration feature to check the linkinformation, search for available wireless networks, orcreate profiles that hold different configuration settings.Diagnostics are performed through the Diagnostic utility.Use it to detect the Adapter, test the driver and Monitor,and troubleshoot if needed.How to Access the Wireless NetworkMonitorAfter installing the Adapter, the Monitor icon appears inthe system tray of your computer. If the Monitor is enabled,the icon is green. If the Monitor is disabled or the Adapteris not inserted, the icon is gray.Wireless Network Monitor IconDouble-click the icon to open the Monitor.How to Use the Wireless Network MonitorThe opening screen of the Monitor is the Link Informationscreen. From this screen, you can find out how strong thecurrent wireless signal is and how good the connection’squality is. Click More Information to view additionalstatus information about the current connection. To searchfor available wireless networks, click the Connect tab.To perform configuration changes or create connectionprofiles, click the Profiles tab.Link InformationAd-Hoc Mode or Infrastructure Mode The screenindicates whether the Adapter is currently working in adhoc or infrastructure mode.Signal Strength The Signal Strength bar indicates signalstrength.Link Quality The Link Quality bar indicates the quality ofthe wireless network connection.Click More Information to view additional informationabout the wireless network connection on the WirelessNetwork Status screen.Wireless Network StatusThe Wireless Network Status screen provides informationon your current network settings.Wireless Network StatusCompact Wireless-G USB Network Adapter with SpeedBooster3
ConfigurationChapter 3Status This shows the status of the wireless networkconnection.SSID This is the unique name (SSID) of the wirelessnetwork.Wireless Network StatisticsThe Wireless Networks Statistics screen provides statisticson your current network settings.Wireless Mode This is the mode of the wireless networkcurrently in use.Transfer Rate This is the data transfer rate of the currentconnection.Channelnetwork.This is the channel used by your wirelessSecurity This is the status of the wireless securityfeature.Authentication This isauthentication method.yourwirelessnetwork’sIP Address This is the IP Address of the Adapter.Subnet Mask This is the Adapter’s Subnet Mask.Default Gateway This is the Default Gateway address.DNS This is the DNS address of the Adapter.DHCP Client This displays the Adapter’s status as a DHCPclient.MAC Address This is the MAC address of the wirelessnetwork’s wireless router or access point.Signal Strength The Signal Strength bar indicates thesignal strength.Link Quality The Link Quality bar indicates the quality ofthe wireless network connection.Click Back to return to the initial Link Information screen.Click Statistics to go to the Wireless Network Statisticsscreen. Click Save to Profile to save the currently activeconnection settings to a profile.Wireless Network StatisticsTransmit Rate This is the data transmission rate ofthe current connection. (In Auto mode, the Adapterdynamically shifts to the fastest data transmission rate atany given time.)Receive Rate This is the rate that the Adapter receivesdata.Packets Received This shows the packets that theAdapter receives, in real time, after connecting to thewireless network or after clicking Refresh.Packets Transmitted This shows the packets that theAdapter transmits, in real time, after connecting to thewireless network or after clicking Refresh.Bytes Received This shows the bytes that the Adapterreceives, in real time, after connecting to the wirelessnetwork or after clicking Refresh.Driver Version This shows the Adapter’s driver version.Noise Level This shows the level of background noisethat affects the wireless signal. A lower reading translatesinto a higher quality signal.Signal Strength This is the intensity of the wireless signalthat the Adapter receives.Up Time This indicates the length of the most recentconnection to a wireless network.Total Up Time This indicates the cumulative total of theAdapter’s connection time.Signal Strength The Signal Strength bar indicates thesignal strength.Link Quality The Link Quality bar indicates the quality ofthe wireless network connection.Compact Wireless-G USB Network Adapter with SpeedBooster4
ConfigurationChapter 3Click Back to return to the initial Link Informationscreen. Click Status to go to the Wireless Network Statusscreen. Click Save to Profile to save the currently activeconnection settings to a profile. Click Refresh to reset thestatistics.Connect To connect to one of the networks on the list,select the wireless network, and click Connect. If thenetwork’s wireless security is enabled, then you will viewthis screen:Site SurveyThis screen displays a list of available networks in the tableon the left. You may click SSID, CH (Channel), or Signal tosort by that field.SSID This is the SSID or unique name of the wirelessnetwork.CH This is the channel that the network uses.Signal This is the percentage of signal strength, from 0to 100%.Click ContinueMake sure you have the security settings of your wirelessnetwork, and then click Continue.Proceed to the instructions for the wireless security screenyou see:WEP (Wired Equivalent Privacy)If the network has WEP encryption enabled, then you seethe WEP Key Needed for Connection screen.Site SurveySite InformationFor each network selected, the following settings arelisted:SSID This is the SSID or unique name of the wirelessnetwork.Wireless Mode This is the mode of the wireless networkcurrently in use.Channel This is the channel to which the wireless networkdevices are set.Security This is the status of the wireless securityfeature.MAC Address This is the MAC address of the wirelessnetwork’s wireless router or access point.Refresh Click Refresh to perform a new search forwireless devices.Compact Wireless-G USB Network Adapter with SpeedBoosterWEP SecurityWEP Select 64-bit or 128-bit encryption.Passphrase Enter the network’s Passphrase, so aWEP key is automatically generated. The passphrase iscase-sensitive and must be 16 or fewer alphanumericcharacters. It must match the passphrase of your otherwireless network devices and is compatible with Linksyswireless products only. (For non-Linksys wireless products,enter the WEP key manually.)5
ConfigurationChapter 3WEP Key 1 If you do not have the Passphrase, enterthe WEP key, which must match the WEP key of yourwireless network. For 64-bit encryption, enter exactly 10hexadecimal characters (“0” to “9” and “A” to “F”.) For 128 ‑bitencryption, enter exactly 26 hexadecimal characters.Passphrase Enter the network’s Passphrase (Pre-SharedKey) of 8-63 characters.To connect to the network, click Connect. To cancel theconnection, click Cancel.ProfilesTo connect to the network, click Connect. To cancel theconnection, click Cancel.If the network has WPA Personal security enabled, thenyou see the WPA Personal Needed for Connection screen.The Profiles screen lets you save different configurationprofiles for different network setups. The table on the leftdisplays a list of available profiles with their profile namesand wireless network names.WPA-Personal SecurityProfilesWPA (Wi-Fi Protected Access)Encryption Select the type of algorithm you want to use,TKIP or AES.Passphrase Enter the network’s Passphrase (Pre-SharedKey) of 8-63 characters.To connect to the network, click Connect. To cancel theconnection, click Cancel.WPA2 (Wi-Fi Protected Access 2)If the network has WPA2 Personal security enabled, thenyou see the WPA2 Personal Needed for Connection screen.Profile This is the name of the profile.SSID This is the SSID or unique name of the wirelessnetwork.Profile InformationFor each profile selected, the following are listed:Wireless Mode This is the mode of the wireless networkcurrently in use.Transfer Rate This is the transfer rate setting.Channel This is the channel used by your wirelessnetwork.Security This is the status of the wireless security.Authentication This is the authentication setting for thenetwork.Connect To connect to a wireless network using a specificprofile, select the profile, and click Connect.New Click New to create a new profile. See the nextsection, “Create a New Profile,” for instructions.Edit Select the profile you want to change and click Edit.WPA2-Personal SecurityCompact Wireless-G USB Network Adapter with SpeedBoosterImport Click Import to import a profile that is saved inanother location. Select the appropriate file, and clickOpen.6
ConfigurationChapter 3Export Select the profile you want to save in a differentlocation, and click Export. Direct Windows to theappropriate folder, and click Save.Delete Select the profile you want to delete and clickDelete.Create a ProfileThe available networks for the Profile are in the table onthe center of the screen by SSID.NOTE: If you want to export more than oneprofile, you must export them one at a time.Available Wireless NetworksThe next screen is the Available Wireless Networks screen.Creating a Profile1. If you have wireless security enabled on your network,continue to step 2. If you do not have wireless securityenabled, continue to step 3.Available Wireless Networks2. If the network’s wireless security is enabled, Selectthe wireless network you wish to connect to and clickConnect. (If you do not see your network listed, youcan click Refresh to see the list.) Then you will viewthis screen:The networks available to this Adapter will be listed onthis screen.Refresh Click Refresh to update the Available WirelessNetwork list.Connect Click Connect to connect to one of the availablenetworks.Advanced Setup Select this option to set up the adaptermanually if your network is not listed in the AvailableWireless Network list.The setup for each option is described, step by step, underthe appropriate heading on the following pages.Click ContinueClick Exit to close the Setup Wizard, if you wish to set upthe Adapter later.Make sure you have the security settings of your wirelessnetwork, and then click Continue.Click Connect to Network to connect to your network.Proceed to the instructions for the wireless security screenyou see:Compact Wireless-G USB Network Adapter with SpeedBooster7
ConfigurationChapter 3WEPIf the network has WEP encryption enabled, then you seethe WEP Key Needed for Connection screen.Encryption Select the type of algorithm you want to use,TKIP or AES.Passphrase Enter the network’s Passphrase (Pre-sharedKey) of 8-63 characters.Click Connect and proceed to step 3.WPA2 PersonalIf the network has WPA2 Personal security enabled, thenyou see the WPA2 Personal Needed for Connection screen.WEP SecurityWEP Select 64-bit or 128-bit encryption.Passphrase Enter the network’s Passphrase, so aWEP key is automatically generated. The passphrase iscase-sensitive and must be 16 or fewer alphanumericcharacters. It must match the passphrase of your otherwireless network devices and is compatible with Linksyswireless products only. (For non-Linksys wireless products,enter the WEP key manually.)WEP Key 1 If you do not have the Passphrase, enterthe WEP key, which must match the WEP key of yourwireless network. For 64-bit encryption, enter exactly 10hexadecimal characters (“0” to “9” and “A” to “F”.) For 128 ‑bitencryption, enter exactly 26 hexadecimal characters.WPA2-Personal SecurityPassphrase Enter the network’s Passphrase (Pre-sharedKey) of 8-63 characters.Click Connect and proceed to step 3.3. After the profile installs, the Congratulations screenappears. Click Finish.Click Connect and proceed to step 3.WPA PersonalIf the network has WPA Personal security enabled, thenyou see the WPA Personal Needed for Connection screen.CongratulationsCongratulations! The profile issuccessfully configured.WPA-Personal SecurityCompact Wireless-G USB Network Adapter with SpeedBooster8
ConfigurationChapter 3Advanced Setup–– Default Gateway Enter the IP address of yourIf your network is not listed with the available networks,use Advanced Setup.–– DNS 1 and DNS 2 Enter the DNS address of yournetwork’s Gateway.wired Ethernet network.Click Next to continue, or click Back to return to theprevious screen.3. The Wireless Mode screen shows a choice of twowireless modes.Available Wireless Networks1. Click Advanced Setup on the Available WirelessNetworks screen to set up the Adapter manually.2. The Network Settings screen appears.Wireless Mode–– Infrastructure Mode Select this mode if you wantto connect to a wireless router or access point.–– Ad-Hoc Mode Select this mode if you want toconnect to another wireless device directly withoutusing a wireless router or access point.–– SSID Enter a wireless network name (SSID) thatmust be used for all devices in your wirelessnetwork. It is case-sensitive and should be a uniquename to help prevent others from entering yournetwork.Click Next to continue, or click Back to return to theprevious screen.Wireless NetworkIf your network has a router or other DHCP server, selectObtain network settings automatically (DHCP).4. If you chose Infrastructure Mode, go to step 5 now.If you chose Ad-Hoc Mode, the Ad-Hoc Mode Settingsscreen appears.If your network does not have a DHCP server or router,select Specify network settings. Enter an IP Address,Subnet Mask, Default Gateway, and DNS addressesappropriate for your network. You must specify theIP Address and Subnet Mask on this screen. If you areunsure about the Default Gateway and DNS addresses,leave these fields blank.–– IP Address This IP Address must be unique toyour network.–– Subnet Mask The Adapter’s Subnet Mask must bethe same as your wired network’s Subnet Mask.Compact Wireless-G USB Network Adapter with SpeedBooster9
ConfigurationChapter 3than WPA. RADIUS stands for Remote AuthenticationDial-In User Service. Click Next to continue, or clickBack to return to the previous screen.Proceed to the section for your security method.WEPMake sure the settings you configure match the settingsof your wireless network.Ad-Hoc Mode Settings–– Channel Select the correct channel for yourwireless network. If you are unsure about whichchannel to use, keep the default, Auto.–– Network ModeSelect the network mode inwhich your wireless network will operate. In MixedMode, Wireless-B and Wireless-G devices can bothoperate on the network, though at a slower speed.In G-Only Mode, no Wireless-B devices can operatein the network.Click Next to continue, or click Back to return to theprevious screen.5. If your wireless network does not have wireless security,select Disabled and then click Next to continue.Proceed to step 6.WEPWEP Select 64-bit or 128-bit encryption.Passphrase Enter the network’s Passphrase, so a WEPkey is automatically generated. It is case-sensitive andshould not be longer than 16 alphanumeric characters.This passphrase must match the passphrase of your otherwireless network devices and is compatible with Linksyswireless products only. (If you have any non-Linksyswireless products, enter the WEP key manually on thoseproducts.)WEP Key If you do not have the Passphrase, enter theWEP key of your wireless network. For 64-bit encryption,enter exactly 10 hexadecimal characters. For 128-bitencryption, enter exactly 26 hexadecimal characters. Validhexadecimal characters are “0” to “9” and “A” to “F”.Advanced UsersTX Key The default is 1. If your network’s wireless routeror access point uses transmit key number 2, 3, or 4, selectthe appropriate number.Wireless SecurityIf your wireless network has wireless security, selectthe method of security used: WEP, WPA Personal,WPA2 Personal, WPA Enterprise, WPA2 Enterprise, orRADIUS. WEP stands for Wired Equivalent Privacy, andWPA stands for Wi-Fi Protected Access. WPA2 standsfor Wi-Fi Protected Access 2. WPA is a stronger securitymethod than WEP. WPA2 is a stronger security methodCompact Wireless-G USB Network Adapter with SpeedBoosterAuthentication The default is Open System. For OpenSystem authentication, the sender and the recipient donot share a WEP key for authentication. For Shared Keyauthentication, both the sender and the recipient share aWEP key for authentication.Click Next to continue, or click Back to return to theprevious screen.10
ConfigurationChapter 3WPA PersonalWPA EnterpriseWPA Personal offers two encryption methods, TKIP andAES, with dynamic encryption keys.WPA Enterprise features WPA security used in coordinationwith a RADIUS server. (This should only be used when aRADIUS server is connected to the Router.) WPA Enterpriseoffers two authentication methods, EAP-TLS and PEAP,as well as two encryption methods, TKIP and AES, withdynamic encryption keys.Authentication Select the authentication method yournetwork is using, EAP-TLS or PEAP.EAP-TLSWPA PersonalEncryption Select TKIP or AES.Passphrase Enter the network’s Passphrase (Pre-sharedKey) of 8‑63 characters.Click Next to continue, or click Back to return to theprevious screen.WPA2 PersonalWPA Enterprise - EAP-TLSWPA2 Personal uses the encryption method, AES, withdynamic encryption keys.If you selected EAP-TLS, configure the following:Login Name Enter the login name of your wirelessnetwork.Server Name Enter the name of the authentication server(this is optional).Certificate Select the certificate you installed toauthenticate you on your wireless network.Encryption Select the type of encryption, TKIP or AES.Click Next to continue, or click Back to return to theprevious screen.WPA2 PersonalPassphrase Enter the network’s Passphras (Pre-sharedKey) of 8‑63 characters.Click Next to continue, or click Back to return to theprevious screen.Compact Wireless-G USB Network Adapter with SpeedBooster11
ConfigurationChapter 3RADIUSPEAPRADIUS features use of a RADIUS server. (This shouldonly be used when a RADIUS server is connected to theRouter.) RADIUS offers two authentication types: EAP-TLSand PEAP.Authentication Select the authentication method yournetwork is using, EAP-TLS or PEAP.EAP-TLSWPA Enterprise - PEAPIf you selected PEAP, configure the following:Login Name Enter the login name of your wirelessnetwork.Password Enter the password of your wireless network.Server Name Enter the name of the authentication server(this is optional).Certificate Select the certificate you installed toauthenticate you on your wireless network. If you want touse any certificate, keep the default, Trust Any.Inner Authen. Select the authentication method usedinside the PEAP tunnel.RADIUS - EAP-TLSIf you selected EAP-TLS, configure the following:Login Name Enter the login name of your wirelessnetwork.Encryption Select the type of encryption, TKIP or AES.Server Name Enter the name of the authentication server(this is optional).Click Next to continue, or click Back to return to theprevious screen.Certificate Select the certificate you installed toauthenticate you on your wireless network.Click Next to continue, or click Back to return to theprevious screen.Compact Wireless-G USB Network Adapter with SpeedBooster12
ConfigurationChapter 37. The Congratulations screen appears. Click Connect toNetwork to implement the new settings immediatelyand return to the Link Information screen. Click Returnto Profiles screen to keep the current settings activeand return to the Profiles screen.PEAPRADIUS - PEAPIf you selected PEAP, configure the following:Login Name Enter the login name of your wirelessnetwork.Password Enter the password of your wireless network.Server Name Enter the name of the authentication server(this is optional).CongratulationsCongratulations! Th
Chapter 3 Configuration Compact Wireless-G USB Network Adapter with SpeedBooster 4 Status This shows the status of the wireless network connection. SSID This is the unique name (SSID) of the wireless network. Wireless Mode This is the mode of the wireless network currently in use. Transfer Rate This is the data transfer rate of the current