Transcription
Microsoft Visual Studio 2010 : The BasicsThis is meant to be a quick tutorial to help understand some of the basics of Microsoft Visual Studio2010 (from here on just “Visual Studio”).VISUAL STUDIO IS AN IDEVisual Studio is a tool that aids in the development of software systems. It is what is known as anIntegrated Development Environment, IDE. There are a variety of IDEs used in industry that supportvarious languages, operating systems, and hardware. For developing systems intended to run onWindows or that want to take advantage of other Microsoft technologies, Visual Studio is the standard.An IDE is not necessary to create software. For years systems were developed using a simple text editor1and some set of build tools such as a compiler, linker, and debugger2. Since C/C is a mid‐levellanguage and the source code is compiled to object code specific to an OS and underlying hardware, theplatform, compilers and linkers are platform specific.The simplest IDEs are GUIs that provide a text editor and are layered on top of the compiler and linker.They can typically display multiple files at a time and compilation/linking is a matter of a button click. Ascompilers and linkers can be configured via command line parameters, IDEs provide dialogs for the userto specify such parameters in a friendlier way.Modern IDEs offer far more power. In addition to simple editing, compiling, and linking, relationshipsbetween and contents of files and libraries can be viewed and manipulated visually. Some IDE, VisualStudio being one, enable the modeling of GUIs for which it generates source code. Further, largesoftware applications often require the use of multiple languages and components distributed acrossmultiple machines in varied locations and IDEs can help manage that complexity.One of the most powerful features today’s IDEs offer is a robust debugging environment. They providevarious ways to interact with an executable by starting and stopping the execution as well as observingand modifying its state at pretty much any point.CASE ToolsA class of IDEs is Computer Aided Software Engineering tools. These tools enable the design of a systemto be defined visually. These tools typically offer a way to synchronize the design artifacts with theimplementation artifacts:1One of early text editors for Unix was vi. It is a bit challenging to use at first but once mastered it is incrediblyefficient. vi is still in use today though it’s competitor, Emacs, gained much popularity for Unix‐based systems andtoday is probably the most common.2For years, and in wide use still, the standard tool set was developed and provided by GNU (gnu.org) andcollectively called GNU Compiler Collection (gcc.gnu.org).
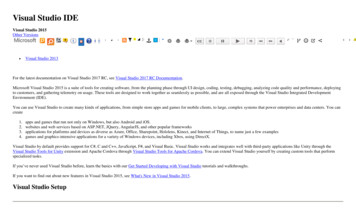
Forward Engineering: The design captured in the CASE tool can generate source code files –generally at least creating the files, establishing dependencies between them, and creatingclass/function stubs. Reverse Engineering: The source code is analyzed and visualizations are generated. Roundtrip Engineering: Performing both forward and reverse engineering.Visual Studio is not a case tool but it can be integrated with CASE tools. For example, Microsoft Visio(Enterprise Architects edition) enables roundtrip engineering. [I personally don’t think Visio does a goodjob but the functionality is there. I mention it only because it’s a tool many have used for other types ofdiagramming.]STARTING VISUAL STUDIOIDEs such as Visual Studio can be a little overwhelming as they are intended to support professionalapplication development and hence have many features. There is a overhead to getting started whichmeans it’s not as simple as writing a little code and the compile and run it. Taking the time to learn touse to the tool to create simple programs will pay dividends in the end. As your skills evolve and yoursystems become more complicated the more advanced features will become useful.Before you can do anything you will need to start the application: Start Programs MS Visual Studio 2010 MS Visual Studio 2010If you’re using a Vista or Windows 7 interface, you may have to search for the application as younormally would.If you are starting Visual Studio for the first time, you will be presented with a dialog asking you tochoose your default environment. Select “Visual C Development Settings”. (If you have chosenotherwise previously, that’s fine.) Visual Studio will then take a little while to configure itself and display.When it finally is ready, you should see something like what is in Figure 1 : What Visual Studio 2010looks like when it starts.The window is divided into a collection of views. The tool can be reconfigured to organize the views in away that is useful to you. At first leave the tool in its default setting until you become more familiar withit. You can see all possible views by inspecting the options in the “View” menu. However, the views weare most interested in are Solutions Explorer. This is the space on the left side of the window (you can see its name in thetitle bar of the subwindow). A solution is a collection of projects. A project contains source filesand configuration information relating to a system or subsystem. At the bottom of the SolutionExplorer column you will tabs for Class View, Property Manager, and Team Explorer. We won’t
use these but, of course, you can switch between the tabs. This is worth noting in the event youdon’t see the Solution Explorer in that column. Start Page. When you first start Visual Studio you will see this homepage. It has a variety ofshortcuts and resources. I occasionally use the “Recent Projects” list but for the most part I closeit right away. You can accomplish everything you need via the application menus. You can closethe Start Page view by clicking on the ‘x’ in the upper right corner. Code Definition Window. You will find this view useful as the semester progresses. As youevolve your code and compile it, this window will show you function definitions. In the shortterm, it’s going to look very cryptic – and even once you’re rather proficient with C/C it will attimes look cryptic – but you will come to find it useful. For now, if you like, you can close it byclicking the ‘x’ in the upper right corner. Output. The results of your compilation and linking will appear here. This is where you will seethe errors you need to correct. You will often find errors highlighted in the source as well. Someerrors will be subtle and you will have to read through the build output (which can be a bittricky).The space where the Start Page view is located is called the Tabbed Document area. Any view can beplaced or removed from this view. See Section on docking.
Figure 1 : What Visual Studio 2010 looks like when it starts.VIEW MANAGEMENTThere are a variety of display options for views. Inevitably you will modify the layout of Visual Studio inan unintentional way. The most fundamental thing to know is how to restore order. To return to theoriginal configuration as is displayed when you first start the application: Window Reset Window LayoutHiding and Unhiding ViewsViews can be opened and closed. Simply, HideoClick on the ‘x’ in the view’s title baroClick on the black triangle and select “Hide”oRight click on the view’s title bar and select “Hide”
UnhideoSelect “View [the view you want to see]”As an example, suppose we start with the default layout as in Figure 1. To close the Start Page view, clickon the ‘x’. This will result in what is depicted in Figure 2.Figure 2 : Visual Studio appearance after the Start Page view is closed.Auto HidingViews can be configured to auto hide. This means they are minimized when not actively engaged. This isprobably the most useful feature. It enables you to quickly access views you need but gets them out ofthe way when you don’t need them.To auto hide a view: Press the vertical push pin next to the ‘x’.oNote that the pin will appear horizontal when you show the view later.oClick on the black triangle and select “Auto Hide”
oRight click on the view’s title bar and select “Auto Hide”Try this: With the default view, as in Figure 1, press the pushpin of the Solution Explorer View. The viewwill collapse and small buttons will appear on the left‐hand side. Further, the Start Page and CodeDefinition views will expand to fill the window. You can see this in Figure 3.Figure 3 : The Solution Explorer View is auto hidden on the left side of the window.To access the Solution Explorer again, just hover the mouse over the Solution Explorer button and it willreappear as in Figure 4. (Note: I couldn’t capture the mouse in the image but it is hovering over thebutton.)While the mouse is in the Solution Explorer area, the view remains visible. As soon as the mouse leavesthe area it will disappear.To “un auto hide”, you can Select View [The view you want to “un auto hide”]
With the view visible, press the now horizontal push pin to the right of the ‘x’ Dock the view (see below)Figure 4 : To view the Solution Explorer, hover the mouse over the Solution Explorer button. (Note: The mouse isn't visible.)FloatingEach view can float. This means the view is detached from the application window and acts (somewhat)as a window on its own. To float a view: Double‐click on the view’s title bar; or Click on the black triangle and select “Float” Right click on the view’s title bar and select “Float”Floating is a bit anti‐Windows (more of a Unix‐X/Motif thing, really) but it can be useful. It’srecommended that you avoid floating views until you get the hang of the tool.
To un‐float a view, Dock the view (see below)Try this: With the default view, as in Figure 1, double click the Solution Explorer view’s title bar. Theview will detach from the Visual Studio window and “float” on the desktop as in Figure 5. Notice that theVisual Studio is always one layer down than the floating view.Figure 5 : The Solution Explorer view is floating outside the Visual Studio window.Note: While I was preparing this document and playing around with layout, I was able to get the SolutionExplorer view to float as above. However, I also encountered a situation where trying to float theSolution Explorer resulted in the Start Page floating. This isn’t what should happen and I was able toreturn things to normal. Unless you plan on floating views regularly, don’t worry if this happens to you.Just restore the default layout and you’ll be good to go.
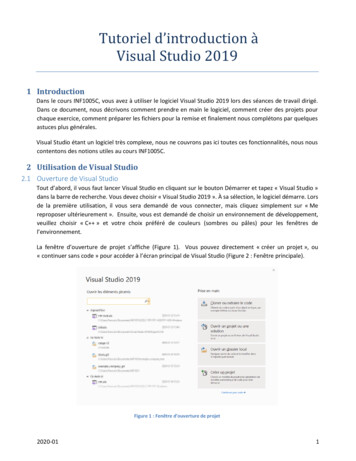
DockingDocking a view means to make it permanently visible within the application’s window. Docking is theopposite of floating but it also will undo auto hiding. There are two flavors of docking: Dock. This places the view in a position in the window that is NOT in the Tabbed Document area. Dock as Tabbed Document. This places the view as its own tab in the Tabbed Document area.Redo the floating example but this time select “Dock as Tabbed Document” to see how it works. Note:You can toggle a view between the two options.Docking is rather flexible. If you grab a view by its title bar and start to move it, in the Visual Studiowindow area, you will see a set of overlays appear. You can cause the view to dock in various locationsby dragging the view onto one of the overlays. Try it if you’d like but we’re not going to discuss it furtherhere. You can make a mess rather quickly. If this turns out to be the case, just restore the default layout.PROJECTSNow that you have an understanding of how to control the layout of the tool it’s time to enable writingcode, building, and executing.In order to do anything in Visual Studio, you need to define a project. A project is where your sourcecode, resource files, and general configurations are maintained. A project can represent a simpleprogram, an application, a subsystem, or a library. For the purposes of CMPSC 121, a project will containa specific program. Each example will be its own project and each assignment will be its own project.Technically, projects are contained in a solution. A solution is essentially a collection of projects. Largesystems can be decomposed into subsystems. Using projects to represent subsystems helps keep thingstidy. We don’t have to worry about creating our solutions manually. However, we will need to knowhow to open an existing solution which we discuss later.Creating a New ProjectTo create a project, we select File New Project This will cause a dialog to appear that looks like what is depicted in Figure 6. As Visual Studio supportsmultiple languages and styles of systems, there are numerous configurations form which to choose. Forstandard console applications (which is what you need to create for CMPSC 121): Select “Visual C ” as from the Installed Templates Select “Win32 Console Application”
In the “Name” field, change “ Enter name ” to “HelloWorld” (no quotes) Leave the “Location” field as it is (for now) Click “OK”Figure 6 : The New Project dialog.This will result in another dialog, the Application Wizard, depicted in Figure 7. Click on “Application Settings” or click “Next”The next page of the dialog, shown in Figure 8, allows you to configure your project. Under “Application Type” make sure “Console Application” is selected Under “Additional Options” check “Empty Project” Click “Finish”
In Visual Studio you should now see a project listed in the Solution Explorer view. An example of this isin Figure 9.Figure 7 : Project Application Wizard
Figure 8 : The second page of the Application Wizard provides project settings.
Figure 9 : The Hello World project is now showing in the Solution Explorer.Several folders appear in the Solution Explorer. We are primarily going to be concerned with the folder“Source Files” as this is where we will put our source code files.We now take a look at how to import an existing project into a solution.File StructureVisual Studio projects are stored as a folder. The folder name is the name you give your project. Let’stake a look at the file structure generated when we created the project in the previous section. Observein Figure 6 the “Location” field has the following path: c:\hhs10 storage\hhs10 files\visual studio 2010\ProjectsYour path will look a little different. The key is that there will be a folder called “Visual Studio 2010” inyour “My Documents” (or just “Documents” depending on your Windows flavor) folder and it willcontain a folder Projects. Looking at a tree view, starting at the Visual Studio 2010 folder, the filehierarchy should look like the following:
‐Visual Studio 2010 -- Projects - VSMacros80 - HelloWorldÅ This is the solution folder - HelloWorld Å This is the project folder - HelloWorld.vcxproj - HelloWorld.vcxproj.filters - HelloWorld.vcxproj.user - HelloWorld.opensdf - HelloWorld.slnÅ The file you double click to open the solution - HelloWorld.suo[Sorry for the above. I couldn’t get the view I wanted to be capture an image.]Much like a project, a solution is just a folder with a collection of files relating to the configuration of thesolution. The easiest way to tell a folder is a solution folder is that it contains a “.sln” file. If you arenavigating a file structure, encounter a “.sln” file and double click it, the solution will open in VisualStudio3.If you want to copy/relocate an entire solution, copy/relocate the solution folder. If you want to copy aproject, copy the project folder. Relative to the file structure, there is nothing wrong with relocating aproject folder. However, keep in mind that a solution keeps track of a project and deleting a projectfolder from the file system leaves the solution with a reference to a non‐existing folder.3This statement is true provide Visual Studio is installed on the machine and it’s an appropriate version; e.g., aproblem will (most likely) occur if you try to open a Visual Studio 2010 solution with Visual Studio 2007.
Removing and Deleting ProjectsSolutions are containers for projects. At some point you may want to remove a project from yoursolution. To remove a project, right click on the project name and select “Remove project”. Thisremoves a reference to the project in the solution. This does not delete the project from the disk.To delete a project from the disk, you need to delete the project folder via Windows Explorer (notInternet Explorer).If you delete a project without first removing it from the solution you will get an error when you openthe solution. This isn’t a problem. Just remove the project.Importing an Existing ProjectKnowing how to import a project is going to be useful for two reasons. First, there will be times that Isend an example to you in the form of a project and you need to know how to include that into yoursolution. The second is due to the fact that the lab computers at PSNK delete all files you create on themachines when you log out. So, you are going to need to move your project to a different storagedevice; e.g., your PASS space or a thumb drive.To import a project: Select “File Open Project/Solution ” Navigate to the project folder Go into the project folder Select the file with extension “.vcxproj” Click “Open” Click “OK” when prompted to add the project to the solutionTry removing the HelloWorld project from the solution and then importing it.CREATING, BUILDING, AND EXECUTING A PROGRAMWe are now in the position to write a program, build it, and the execute it.Creating the Source FileOur program’s code will be captured in a file with the extension “.cpp”. For CMPSC 121, you will almostalways create a single file. Later courses will certainly require you to create and maintain multiple sourcefiles as well as headers.
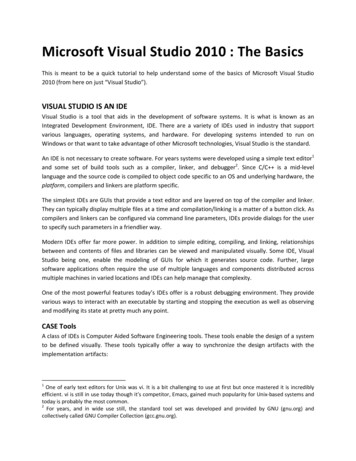
To create the source file: Right click on the project name Select “Add New item ”The dialog depicted in Figure 10 should appear.We need to create a implementation file. In the context of C/C , an implementation file contains codethat can be compiled into object code and then linked into an application. An implementation file hasthe extension “.cpp”. This is why the file type we need to create is of type “C (.cpp)”.Now, with the “C (.cpp)” type select For the “Name” field, replace “ Enter name ” with “main” (no quotes) Don’t change the “Location” field Click “Add”Figure 10 : The New Item dialog.
As is depicted in Figure 11 a new file will appear in your Solution Explorer view nested inside the SourceFiles and an editor will open in the Tabbed Documents area where you can start writing your code.Now, in the editor place the following code:#include iostream using namespace std;void main() {cout “Hello, world.” endl;}Don’t copy and paste the code. Type it in by hand. Typing in example code by hand is good practice as itforces you to think about structure and syntax. You also need to be careful when you copy text fromdocuments like Word and PowerPoint. Those applications a different character set than C/C . Theresult is a number of errors that take time to remove, especially if you are just learning.Figure 11 : The result of adding main.cpp to the project.
Save the file by pressing ctrl‐s (get used to hotkeys!) and then Select “Build Build HelloWorld”You will see output start to appear in the Output view. If all goes correctly you should see something tothe effect of1 ‐‐‐‐‐‐ Build started: Project: HelloWorld, Configuration: Debug Win32 ‐‐‐‐‐‐1 main.cpp1 HelloWorld.vcxproj ‐ HelloWorld\Debug\HelloWorld.exe [the path is modified to fit] Build: 1 succeeded, 0 failed, 0 up‐to‐date, 0 skipped If the last line reads Build: 0 succeeded, 1 failed, 0 up‐to‐date, 0 skipped you have an error. Double check that your code is like the above and read the output as that will giveyou a hint as to the error. (Sometimes it’s very cryptic and may not be all that useful).Once you have built successfully, run the program by Selecting “Debug Start without Debugging”When the application runs a console window will appear, like the one in Figure 12, and you should seethe output of the program.Figure 12 : The consol window that appears. This is the shell in which your program is running.
Microsoft Visual Studio 2010 : The Basics This is meant to be a quick tutorial to help understand some of the basics of Microsoft Visual Studio 2010 (from here on just "Visual Studio"). VISUAL STUDIO IS AN IDE Visual Studio is a tool that aids in the development of software systems.