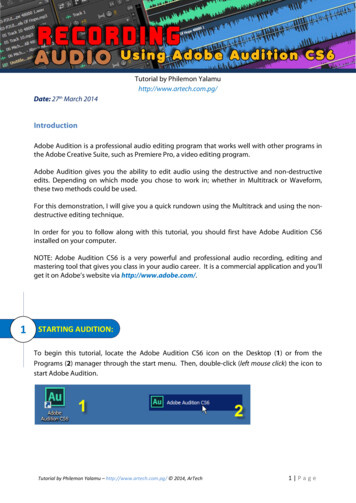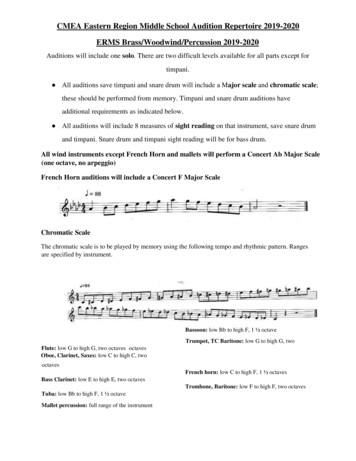
Transcription
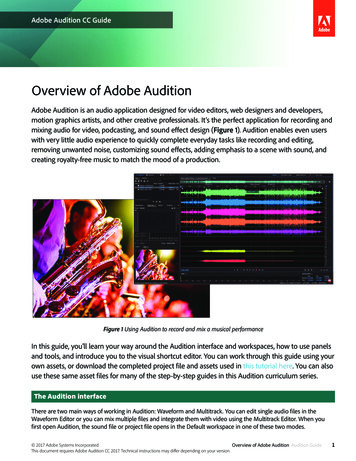
Adobe Audition CC GuideOverview of Adobe AuditionAdobe Audition is an audio application designed for video editors, web designers and developers,motion graphics artists, and other creative professionals. It’s the perfect application for recording andmixing audio for video, podcasting, and sound effect design (Figure 1). Audition enables even userswith very little audio experience to quickly complete everyday tasks like recording and editing,removing unwanted noise, customizing sound effects, adding emphasis to a scene with sound, andcreating royalty-free music to match the mood of a production.Figure 1 Using Audition to record and mix a musical performanceIn this guide, you’ll learn your way around the Audition interface and workspaces, how to use panelsand tools, and introduce you to the visual shortcut editor. You can work through this guide using yourown assets, or download the completed project file and assets used in this tutorial here. You can alsouse these same asset files for many of the step-by-step guides in this Audition curriculum series.The Audition interfaceThere are two main ways of working in Audition: Waveform and Multitrack. You can edit single audio files in theWaveform Editor or you can mix multiple files and integrate them with video using the Multitrack Editor. When youfirst open Audition, the sound file or project file opens in the Default workspace in one of these two modes. 2017 Adobe Systems Incorporated.Overview of Adobe Audition Audition GuideThis document requires Adobe Audition CC 2017. Technical instructions may differ depending on your version.1
In the Waveform Editor (Figure 2), the Editor panel provides a visual representation of sound waves as a series ofpositive and negative peaks. Below the panel’s default waveform display, which is ideal for evaluating audio amplitude,you can view audio in the spectral display, which reveals audio frequency (low bass to high treble). The spectral displayis perfect for removing unwanted sounds, such as coughs and other gure 2 The Audition Waveform EditorThe Multitrack Editor (Figure 3) is a comprehensive, flexible, real-time editing environment where you can mixtogether multiple audio tracks to create layered soundtracks and musical compositions. You can record and mix trackswith each track can contain as many clips as you need—the only limits are your imagination. The all-in-one EssentialSound panel, accessible only in the Multitrack Editor, wide set of options and tools for mixing and sound repair.EssentialSoundpanelMultitrackbuttonFigure 3 The Audition Multitrack Editor 2017 Adobe Systems Incorporated.Overview of Adobe Audition Audition GuideThis document requires Adobe Audition CC 2017. Technical instructions may differ depending on your version.2
It’s important to remember that the Waveform and Multitrack editors use different editing methods, and each hasunique advantages. The Waveform Editor uses a destructive method, which changes audio data, permanently alteringsaved files. Such permanent changes are preferable when converting sample rate and bit depth, mastering, or batchprocessing. The Multitrack Editor uses a nondestructive method, which is impermanent and instantaneous, requiringmore processing power, but increasing flexibility. This flexibility is preferable when gradually building and reevaluatinga multilayered musical composition or video soundtrack.You can combine destructive and nondestructive editing to suit the needs of a project. If a multitrack clip requiresdestructive editing, for example, simply double-click it to enter the Waveform Editor. Likewise, if an edited waveformcontains recent changes that you dislike, use the Undo command to revert to previous states—destructive edits aren’tapplied until you save a file.Audition workspacesAll of the user interfaces across Adobe’s video and audio applications provide options for consistent and customizableworkspaces. These applications can have similar panels (like Media, History, and Essential Sound) as well as their ownunique panels (in Audition: Project, Effects Rack, and Frequency Analysis and more). You move and group panels in thesame way across products.The Audition interface is divided into panels organized in an arrangement called a workspace in both the Waveformand Multitrack modes. You can select a prearranged workspace using the workspace panel. Audition includes severaloptions that optimize the layout of panels for specific tasks including a default option for the most common editingtasks, radio production, video mixing, and others (Figure 4). Click the chevron icon ( ) to open the Overflow menu,which shows other workspace layouts not displayed in the Workspace panel.Overflow menuFigure 4 Workspace panelWhen you choose any one of these workspaces, the current workspace is rearranged according to the new selection.To choose a workspace:1.Start Audition.2. Open an audio file in the Waveform Editor, or anAudition project file (Figure 5) in the MultitrackEditor.Figure 5 Audition project file 2017 Adobe Systems Incorporated.Overview of Adobe Audition Audition GuideThis document requires Adobe Audition CC 2017. Technical instructions may differ depending on your version.3
3. Click through the options in the Workspace panel, including Edit Audio to Video, Radio Production, EssentialVideo Mixing, and others that may be hidden in the overflow menu.Observe how the workspace layout and panels are rearranged according to the selection (Figure 6).Figure 6 Edit Audio to Video (left), Radio Production (center), and Essential Video Mixing (right) workspacesCustomizing your workspaceIn addition to the default workspace layouts, you can also customize a workspace by arranging panels in the layoutthat best suits your working style. As you rearrange panels, the other panels resize automatically to fit the window. Youcan create and save several workspaces for different tasks—for example, one for editing and one for previewing.As you customize a workspace, the application tracks your changes, storing the most recent layout. To store a specificlayout more permanently, save it as a custom workspace. Saved custom workspaces appear in the Workspace menu,where you can return to and reset them.To save a custom workspace:1.To create a custom workspace, move and manipulate panels in Audition to a create a unique layout (Figure 7).Figure 7 Custom Default workspace layout 2017 Adobe Systems Incorporated.Overview of Adobe Audition Audition GuideThis document requires Adobe Audition CC 2017. Technical instructions may differ depending on your version.4
2. Click the Workspace menu icon and select Save asNew Workspace (Figure 8).Workspace menuThe New Workspace dialog box appears (Figure 9).3. Name your workspace.4. Click OK.Your new workspace is added to the Workspacepanel. If not immediately visible, click the overflowmenu to view (Figure 10).Figure 8 Workspace menuFigure 9 New Workspace dialog boxFigure 10 Workspace panel optionsTo save changes to default workspaces:1.To save changes made to one of the default workspaces, click the Workspace menu icon and select Save Changesto this Workspace (Figure 8).To reset a workspace:1.To reset the current workspace to its original layout of panels, click the Workspace menu icon and select Reset toSaved Layout (Figure 8). 2017 Adobe Systems Incorporated.Overview of Adobe Audition Audition GuideThis document requires Adobe Audition CC 2017. Technical instructions may differ depending on your version.5
About panelsAudition includes many powerful panels and options that allow you to perform a wide range of audio editing, leveladjustments, effects, video preview, and other tasks (Figure 11). To see the full list of panels, select Window from theAudition menu and review the options.Spectral Frequency Display / Spectral Pitch Display buttonsFilesWaveformToolbarEditor and Mixer panelsCTIZoom navigatorMultitrackEffects, Markers, and Properties panelsHistory and Video panelsLevelsEssential SoundTransport controlsZoom controlsMedia BrowserFigure 11 Audition interface and panelsWhile there are many panels that you can choose from, these are the ones you will use most often: Files panel Displays a list of the files you have open and their properties. By default, files are sortedalphabetically by Name. To sort files based on another property, click the property (Name, Duration, orSample Rate) in the property header. View Waveform Editor and View Multitrack Editor panels Display the waveform for a single audio file in theEditor panel. Or, view the tracks in a multitrack project in the Editor panel. Spectral Frequency Display button Opens the Spectral Frequency Display view in the Editor panel. TheSpectral Frequency Display lets you view the sound by frequency instead of waveform. Spectral FrequencyDisplay shows a waveform by its frequency components, where the x-axis (horizontal ruler) measures timeand the y-axis (vertical ruler) measures frequency. This view lets you analyze audio data to see whichfrequencies are most prevalent. Brighter colors represent greater amplitude components. 2017 Adobe Systems Incorporated.Overview of Adobe Audition Audition GuideThis document requires Adobe Audition CC 2017. Technical instructions may differ depending on your version.6
Spectral Pitch Display button Opens the Spectral Pitch Display view in the Editor panel. The Spectral PitchDisplay lets you view the sound by pitch instead of waveform. Frequency and pitch describe the same thingbut from different viewpoints. While frequency measures the cycle rate of the physical waveform, pitch ishow high or low it sounds when you hear it. Toolbar panel Quick access to tools for selecting and editing audio files. Editor panel By default, the Editor panel displays audio files as waveforms, visual representations of soundwaves. (You can use the Spectral Frequency Display or Spectral Pitch Display button to display spectralfrequencies and pitch as well.) For a stereo file, the left channel appears at the top and the right channelappears at the bottom. For a mono file, its single channel fills the total height of the Editor panel. Use themenu at the top of the Editor panel to choose which open file to display. Mixer panel When a multitrack project is active, the Mixer panel provides an alternative view of a session,revealing many more tracks and controls simultaneously, without showing clips. The Mixer is ideal forrecording automation or mixing large sessions with many tracks. Current-time indicator (CTI) Determines the starting point for playback and moves through the waveform asyou listen to audio files. You can drag the CTI to move quickly from one point in the waveform to another. Zoom navigator panel A view of the entire waveform. At higher zoom levels, you can drag the Zoomnavigator left or right to move to different audio content in the Editor panel. Essential Sound panel Classify your audio clips as Dialogue, Music, SFX, or Ambience and configure and usethe simple controls to unify volume levels, repair sound, improve clarity, and add special effects. Availableonly in Multitrack mode. Media Browser panel Locate and preview media stored on your computer, network, or external storagedevice without leaving the Audition workspace. History panel Instantly revert to any previous change. Use the panel to quickly compare processed andoriginal audio or discard a series of changes that produced undesired results. Video panel Preview video clips as a multitrack session. Precisely synchronize a soundtrack with specificvideo events such as scene changes, title sequences, or special effects. You can customize the Video panel tooptimize it for your monitor size and system speed. Effects Rack panel Insert, edit, and reorder effects; optimize mix levels; and store favorite effect presets. Markers panel Add, move, delete, and navigate to markers in the audio file. A marker refers to a specific timeposition and makes it easy to navigate in a waveform, perform edits, or play back audio. Properties panel Displays properties for the selected file, such as media type and duration. Levels panel Use level meters to monitor the amplitude of incoming and outgoing signals during recordingand playback. The meters show signal levels in dBFS (decibels below full scale), where a level of 0 dB is themaximum amplitude possible before clipping occurs. Transport controls panel Control and adjust playback. You can also start and stop playback by pressing thespacebar. Zoom controls panel Change the magnification and scale of the waveform in the Editor panel. Zoom in forprecise editing. Zoom out to make larger selections.Sometimes you need to view a panel in full-screen to preview, fine tune an edit, or apply an effect. You may also needto use panel menus or context menus to perform advanced actions. Panel menus display commands relative to theactive panel. Context menus display commands relative to the active tool or selected item. 2017 Adobe Systems Incorporated.Overview of Adobe Audition Audition GuideThis document requires Adobe Audition CC 2017. Technical instructions may differ depending on your version.7
To display any panel full-screen:1.Hover your mouse over the panel you want to maximize.2. To make a panel full-screen within the application window, press the accent key ( ). Typically, this key lies just tothe left of the numeral one (1) key. Some see this key as the back quote key or the tilde key. Press the accent keyonce more to restore the panel size (Figure 12).Figure 12 Regular-sized panel (left) and maximized panel (right)3. To preview a sequence in full-screen mode without the application window, press Ctrl ‘ (Windows) or Control ‘(Mac OS).The workspace hides temporarily and the current sequence appears full-screen.4. Press the spacebar to play and stop the video in full-screen mode.5. Press Ctrl ‘ (Windows) or Control ‘ (Mac OS) again t
Adobe Audition is an audio application designed for video editors, web designers and developers, motion graphics artists, and other creative professionals. ItÕs the perfect application for recording and mixing audio for video, podcasting, and sound effect design ( Figure 1 ). Audition enables even users with very little audio experience to quickly complete everyday tasks like recording and .