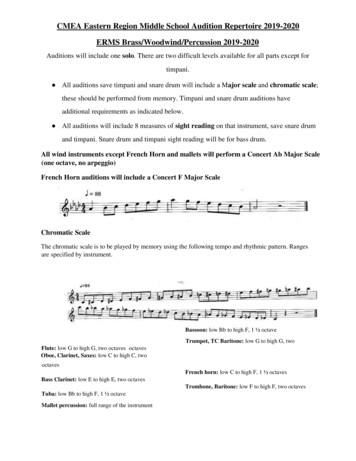
Transcription
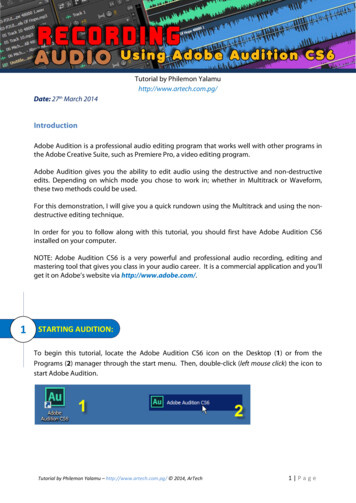
Tutorial by Philemon Yalamuhttp://www.artech.com.pg/Date: 27th March 2014IntroductionAdobe Audition is a professional audio editing program that works well with other programs inthe Adobe Creative Suite, such as Premiere Pro, a video editing program.Adobe Audition gives you the ability to edit audio using the destructive and non-destructiveedits. Depending on which mode you chose to work in; whether in Multitrack or Waveform,these two methods could be used.For this demonstration, I will give you a quick rundown using the Multitrack and using the nondestructive editing technique.In order for you to follow along with this tutorial, you should first have Adobe Audition CS6installed on your computer.NOTE: Adobe Audition CS6 is a very powerful and professional audio recording, editing andmastering tool that gives you class in your audio career. It is a commercial application and you’llget it on Adobe’s website via http://www.adobe.com/.1STARTING AUDITION:To begin this tutorial, locate the Adobe Audition CS6 icon on the Desktop (1) or from thePrograms (2) manager through the start menu. Then, double-click (left mouse click) the icon tostart Adobe Audition.Tutorial by Philemon Yalamu – http://www.artech.com.pg/ 2014, ArTech1 Page
The time you start Adobe Audition CS6 you’ll get the audition interface like the one shownbelow (default workspace).1CREATING SESSIONS:Before you begin working in Audition, you should first create a session. In this tutorial, I’ll takeyou through few steps in creating a session using the Multitrack Session mode. There are twoways to create a Multisession.-The first way is by going to the File menu New Multitrack Session (Shortcut Ctrl N);1-The second way is through Multitrack button in upper left corner of the workspace;2As introduced earlier, I will show you how to record audio using the Multitrack mode and we aregoing to use the non-destructive editing method. Therefore, the second step above will be usedto help us create our Multitrack session.Tutorial by Philemon Yalamu – http://www.artech.com.pg/ 2014, ArTech2 Page
1.1The Multitrack SessionClick the Multitrack button (1 below) to create a new multitrack session.You’ll get a pop-up window upon clicking the Multitrack button. Brief descriptions of eachsection of the pop-up window is given below;2:3:4:5:6:Name your project: e.g audioRecordingLocation where you want to save the file:e.g Save to Desktop, Documents or external hard driveSample Rate: 44.1Bit Depth:16Master:StereoClick the OK Button to proceed to creating your Multitrack sessionIMPORTANT:When creating and saving your files, be sure to know where your files are saved. Keepingall files in one location is not an option but a requirement as it solves issues such as breaksin file linkages especially during times when moving files around. You’ll definitely comeacross such as you go along during your projects.Tutorial by Philemon Yalamu – http://www.artech.com.pg/ 2014, ArTech3 Page
2AUDITION CS6 INTERFACE:Once your session is created, you will get a window like the one below. This is the AdobeAudition CS6 (Multitrack) interface.8bRefer to the below specifications for respective windows above.1. Files window – Contains all the files imported into the project. This is like your library.2. Toolbar – Move tool, Razor blade tool, Time selection tool.3. Workspace – These are the different workspace available for you to choose from orcreate.4. Media Browsers – Contains all the drives for you to choose from when working.5. Multitrack – This is where you will do all of the recording and editing.6. Controls – Contains the control buttons to preview your edits.7. Levels – Allow you to monitor the levels of your audio for all tracks.8. Slider – Shows the current time the audio playback is at. The actual timestamp is at thebottom next to the controls (figure 8b)There are many other windows and layouts to choose from. Using the selection 3 above, youcan select from a wide range of workspace that suits your editing preference. Feel free toexplore the program once you become comfortable with these essential tools.In the next step, I’ll show you how to arm your track(s) and get it ready for recording audio.Tutorial by Philemon Yalamu – http://www.artech.com.pg/ 2014, ArTech4 Page
3ARMING TRACKS:In order for you to start recording audio signals, you should first arm your track(s). However,before you arm your track(s), you should confirm to make sure that the slider is positioned rightat where you’d like to insert your audio. For the case here, I’d rather go to the start of the firsttrack and leave my slider there. Do this by clicking the yellow knob/ button and dragging it tothe (left) placing it at the beginning of the track.Now, you’re ready to arm your track.On each track, there are four buttons (though onewouldn’t be active in most cases). These buttonscarry the initials [M] [S] [R] and [I]Click the button [R] and it should turn red. This iscalled arming and the button is the arm for recordbutton.Your track is now ready to take in recorded audio. Confirm to make sure that you have amicrophone connected to your computer before you start your recording.The next step shows you which button does the recording.4RECORDING AUDIO:When you’re ready to record your audio, press the record button, located at the bottom of themultitrack window (diagram below, circled). This buttonallows you to record audio fromthe microphone.Give .Tutorial by Philemon Yalamu – http://www.artech.com.pg/ 2014, ArTech5 Page
4.1Start RecordingAssuming, you are now ready to start recording. If you are recording voice, don’t start recordingstraight away. Press the record button and allow a few seconds (blank recording) before youstart speaking. You can later cut out any unwanted delays during your editing process.21453The process above is presented in the sequence;51:You arm the selected track by pressing the R button of the chosen track (track 1)2:Move the slider to where you want to start recording the audio3:Press the Record button and the slider will move.4:Give a few seconds break before you start speaking5:Slider moves as you speak, capturing any data coming through the microphoneNAMING TRACKS:You probably would want to give names to your tracks. You can do this prior to recording or ifyou’ve already started recording and wanted to rename the default names to a specific name,simply click within the default name (i.e: Track 1) and type your desired name (i.e: voiceOver).1Tutorial by Philemon Yalamu – http://www.artech.com.pg/ 2014, ArTech26 Page
6SAVING SESSION:Don’t forget to save your session file. Use the Filemenu to do that. Because we already created thename of the file in section 1.1 and specified the filelocation, we can just click on Save to save the file.Now go and click Save (shortcut Ctrl S)Well, that brings us to the end of this tutorial on Recording Audio using Adobe Audition CS6.I would be grateful to go with you further however, I have to attend to some other matters. I’llleave you here and don’t forget, there’s a lot more free tutorials online viahttp://www.artech.com.pg/pages/freeTutes.php. I’m sure there’ll be something useful foryou to learn and there’ll be lots more coming up.7MORE TUTORIALS:For more of our Free tutorials, visit http://www.artech.com.pg/pages/freeTutes.php and check if there’s onethat fits your need. You can even subscribe there to receive free Monthly videos.NOTE: This tutorial gives you the basics of Recording audio using Audition CS6.There are so many other amazing things this application can provide when it comesto editing and manipulating sound. If you need any specific lesson on audition CS6,do send an email via the links from our website; http://www.artech.com.pg/ undercontacts; get the address and send us your request using the email & phone.Copyright 2014, ArTechOTHER TUTORIALS: Digital Media Design Interactive Media Design Web Design Digital VideoTutorial by Philemon Yalamu – http://www.artech.com.pg/ 2014, ArTech Office Applications 3D Graphics Digital Audio 2D Animation7 Page
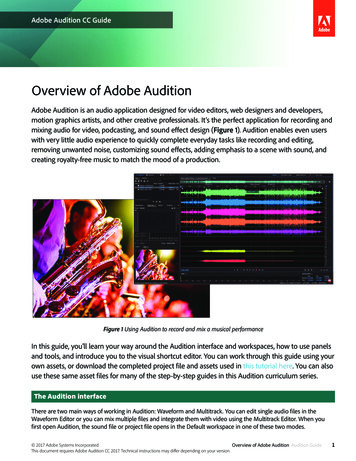
Adobe Audition is a professional audio editing program that works well with other programs in the Adobe Creative Suite, such as Premiere Pro, a video editing program. Adobe Audition gives you the ability to edit audio using the destructive and non-destructive edits. Depending on which mode you chose to work in; whether in Multitrack or Waveform, these two methods could be used. For this .