Transcription
Ninja BlendMax DUO 288
THANK YOUfor purchasing the Nutri Ninja Ninja BlendMax DUO REGISTER YOUR PURCHASEninjakitchen.com1-877-646-5288TIP: You can locate themodel number and datecode on the plug prong.RECORD THIS INFORMATIONModel Number: Date Code: Date of Purchase (Keep receipt): TECHNICAL SPECIFICATIONSVoltage:120V, 60HzWatts:1600WPLEASE READ CAREFULLY AND KEEPFOR FUTURE REFERENCE.These instructions are designed to help you get acomplete understanding of your new Nutri Ninja Ninja BlendMax DUO.If you have any questions, please call ourcustomer service line at 1-877-646-5288.11-877-646-5288
CONTENTSImportant Safety Instructions 3Getting to Know Your Nutri Ninja Ninja BlendMax DUO 7Features 9Before First Use 10Using Your Nutri Ninja Cups 11Using Your MAX 88 oz. Total Crushing Pitcher 15Suggested Uses & Filling Instructions 19Filling Your Nutri Ninja Cup 19Ordering Replacement Parts 19Care & Maintenance 20Cleaning 20Storing 20Resetting the Motor Thermostat 20Troubleshooting Guide 21Warranty 22n i n j a k i tc h e n . c o m2
IMPORTANT SAFETY INSTRUCTIONSPLEASE READ CAREFULLY BEFORE USE FOR HOUSEHOLD USE ONLYWARNINGTo reduce the risk of injury, fire, electrical shock or property damage, basicsafety precautions must always be followed, including the following numberedwarnings and subsequent instructions.Read all instructions prior to using theappliance and its accessories.12 Carefully observe and practice all warningsand instructions. This unit containselectrical connections and moving partsthat potentially present risk to the user.5 Take your time and exercise care duringunpacking and appliance setup. Thisappliance contains sharp, loose blades thatcan cause injury if mishandled.6 Take inventory of all contents to ensure thatyou have all parts needed to properly andsafely operate your appliance.3 This product is provided with a stackedblade assembly. Always exercise care when 7 Unplug the appliance from the outletwhen not in use, before assembling orhandling the stacked blade assembly. Thedisassembling parts, and before cleaning.stacked blade assembly is sharp and isTo unplug, grasp the plug by the bodyNOT locked to the container. It is designedand pull from the outlet. Never unplug byto be removable to facilitate cleaning andgrasping and pulling the flexible cord.replacement if needed. ONLY grasp thestacked blade assembly by the top of the8 Wash all parts that may contact foodshaft. Failure to use care when handling thebefore use. Follow washing instructionsstacked blade assembly will result in a riskcovered in this Instruction Guide.of laceration.9 To protect against the risk of electric shock,4 ALWAYS exercise care when handlingDO NOT submerge the appliance or allow thethe Pro Extractor Blades Assembly. Thepower cord to contact any form of liquid.blades are sharp. ONLY grasp the Pro10DO NOT use this appliance outdoors. It isExtractor Blades Assembly by the outerdesigned for indoor household use only.perimeter of the blade assembly base.Failure to use care when handling the bladeassembly will result in a risk of laceration.31-877-646-5288
11 This appliance has a polarized plug (oneblade is wider than the other). To reduce therisk of electric shock, this plug will fit in apolarized outlet only one way. If the plug doesnot fit fully in the outlet, reverse the plug. If itstill does not fit, contact a qualified electrician.DO NOT modify the plug in any way.16 This appliance is not intended to be usedby people (including children) with reducedphysical, sensory, or mental capabilities,or lack of experience and knowledge,unless they have been given supervision orinstruction concerning use of the applianceby a person responsible for their safety.12 DO NOT operate any appliance witha damaged cord or plug, or after theappliance malfunctions or is dropped ordamaged in any manner. This appliancehas no user-serviceable parts. If damaged,contact SharkNinja for servicing.17 Before each use, inspect blade assembliesfor damage. If a blade is bent or damage issuspected, contact SharkNinja to arrangefor replacement.13 If the supply cord is damaged, it must bereplaced by the manufacturer, its serviceagent, or similar qualified persons in orderto avoid a hazard.14 Extension cords should not be used withthis appliance.15 DO NOT allow young children to operatethis appliance or use as a toy. Closesupervision is necessary when anyappliance is used near children.18 DO NOT attempt to sharpen blades.19 DO NOT allow the cord to hang over theedge of tables or counters. The cord maybecome snagged and pull the appliance offof the work surface.20 DO NOT allow the cord to hang over theedge of table or counter or to contacthot surfaces, including stoves and otherheating appliances.21 ALWAYS use the appliance on a dry andlevel surface.22 NEVER place a blade assembly on themotor base without it first being attachedto its corresponding container (pitcher orcup) and lid.CONTINUED ON PAGE 5SAVE THESE INSTRUCTIONSn i n j a k i tc h e n . c o m4
IMPORTANT SAFETY INSTRUCTIONSPLEASE READ CAREFULLY BEFORE USE FOR HOUSEHOLD USE ONLYWARNINGTo reduce the risk of injury, fire, electrical shock or property damage, basicsafety precautions must always be followed, including the following numberedwarnings and subsequent instructions.23 Keep hands, hair, and clothing out of thecontainer when loading and operating.24 ONLY use attachments and accessoriesthat are provided with the product or arerecommended by SharkNinja.25 During operation and handling of theappliance, avoid contact with moving parts.26 DO NOT operate the appliance with anempty container.27 DO NOT fill containers past the max fill ormax liquid lines.28 DO NOT microwave any containers oraccessories provided with the appliance.29 DO NOT perform grinding operations withthe Nutri Ninja Cups and Pro ExtractorBlades Assembly.30 Before operation, ensure that all utensilsare removed from containers. Failure toremove utensils can cause containers toshatter and potentially result in personalinjury and property damage.51-877-646-528831 Keep hands and utensils out of container whileblending to reduce the risk of severe injury topersons or damage to the blender. A scrapermay be used but must be used ONLY whenthe blender is not running.32 NEVER operate the appliance without lidsand caps in place. DO NOT attempt todefeat the interlock mechanism. Ensurethat the container and lid are properlyinstalled before operation.33 DO NOT expose the containers andaccessories to extreme temperaturechanges. They may experience damage.34 NEVER leave the appliance unattendedwhile in use.35 DO NOT open pour spout cover whileblender is operating.36 DO NOT blend hot liquids. Doing so may resultin a pressure buildup and steam exposure thatcan pose a risk of the user being burned.
37 If you find unmixed ingredients sticking tothe sides of the pitcher, stop the appliance,remove the lid, and use a spatula to dislodgeingredients. NEVER insert your hands intothe pitcher, as you may contact one of theblades and experience a laceration.38 DO NOT attempt to remove the containerand lids from the motor base while themotor and blade assembly is still spinning.Allow the appliance to come to a completestop before removing lids and containers.39 Upon completion of processing, ensure thatthe stacked blade assembly is removedBEFORE emptying pitcher contents. Thestacked blade assembly is to be removedby grasping the top of the shaft and liftingfrom the pitcher. Failure to remove thestacked blade assembly before emptyingthe pitcher results in a risk of laceration.40 Remove the Pro Extractor Blades Assembly from the Nutri Ninja Cup uponcompletion of blending. Do not storeingredients before or after blending them inthe cup with the blade assembly attached.Some foods may contain active ingredientsor release gases that will expand if left ina sealed container, resulting in excessivepressure buildup that can pose a risk ofinjury. For ingredient storage in the cup,use only Spout Lid to cover.41 If the appliance overheats, a thermal switchwill activate and temporarily disable themotor. To reset, unplug the applianceand allow it to cool for approximately 15minutes before using again.42 The maximum wattage rating for thisappliance is based on the configurationof the stacked blade assembly and MAX88 oz. Total Crushing Pitcher. Otherconfigurations may draw less power orcurrent.SAVE THESE INSTRUCTIONSn i n j a k i tc h e n . c o m6
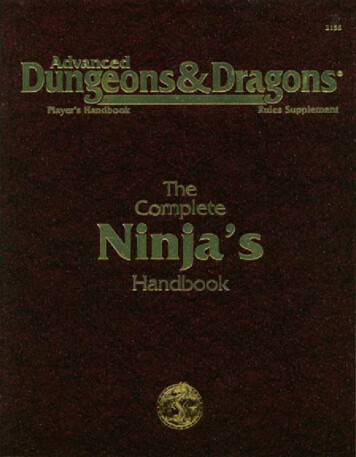
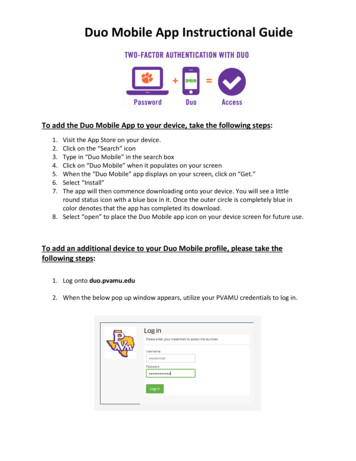
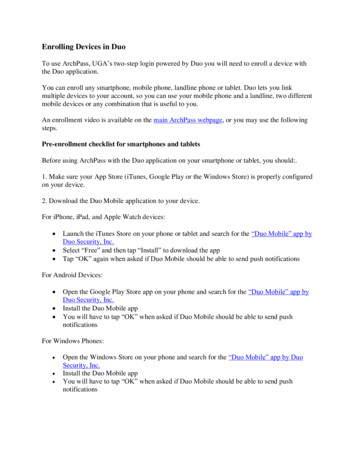
GETTING TO KNOW YOURNUTRI NINJA NINJA BLENDMAX DUO WELCOME!Congratulations onyour purchase. Use thisOwner’s Guide to learnabout the great featuresof your Nutri Ninja Ninja BlendMax DUO.From assembly to useto maintenance, you willfind it all in here.There are a variety ofaccessories that are compatiblewith this blender series.NOTE: The top flap ofyour box shows the selectaccessories that areincluded with your model.If you have any questions,concerns or feedback, we’dlove to hear from you. Giveus a call at 1-877-646-5288or visit ninjakitchen.com/customersupportTo learn more about ourproducts and to findgreat recipes, please visitninjakitchen.com* 80 oz. max liquid capacity.71-877-646-5288MAIN UNITA Motor BaseB Pitcher LidC MAX 88 oz. Total Crushing Pitcher*D Pro Extractor Blades AssemblyEStacked Blade AssemblyF Spout LidG 24 oz. Tritan Nutri Ninja CupH 18 oz. Tritan Nutri Ninja Cup
BADFCEGHn i n j a k i tc h e n . c o m8
FEATURESIMPORTANT: Review allwarnings on pages 3-6before proceeding.DID YOU KNOW? You can take your drinkson the go using the SpoutLids. All containers and lids areBPA free. Our blades, containers andlids are all dishwasher safe. ULSEPOffers greater control of pulsing and blending. Operates only whenthe PULSE button is pressed. Use short presses for short pulses.LOW/MED/HISelect your preferred speed for ultimate control.Auto-iQ BOOST Adds time to any Auto-iQ program so you can control theconsistency of your recipes. The BOOST button togglesbetween YES and NO: select BOOST YES for smoother,creamier results; select BOOST NO for more texture. uto-iQ EXTRACTAIdeal for hard, leafy, or fibrous whole fruits and vegetables,including their skins, seeds, and stems. uto-iQ SMOOTHIEAGreat for creamy, super-smooth drinks made from frozenfruit, ice or dairy products.Auto-iQ PUREEAutomatically blends your ingredients to create silky-smoothdips, sauces and soups.Auto-iQ FROZEN DRINKTakes all the guesswork out of turning ice, juices and fruitinto expertly blended frozen drink. uto-iQ TOTAL CRUSHACrushes ice cubes (including ones made with coffee or juice)to create snow cones and granitas. Also pulverizes frozenberries into powder for a unique twist on frozen desserts.91-877-646-5288
BEFORE FIRST USE1Remove all packaging materials from the appliance. Exercise care when unpacking bladeassemblies. All blade assemblies are sharp.2 The stacked blade assembly is NOT locked in place in its containers. Handle the stackedblade assembly by grasping the top of the shaft.3 Handle the Pro Extractor Blades Assembly by grasping around the perimeter of the bladeassembly base.4 Wash containers, lids and blade assemblies in warm, soapy water using a dishwashingutensil with a handle to avoid direct contact with the blades. Exercise care when handlingblade assemblies, as the blades are sharp.5 Thoroughly rinse and air-dry all parts.6 All attachments are dishwasher safe. It is recommended that the lids and blade assembliesbe placed on the top rack of the dishwasher. Ensure that blade assemblies are removedfrom their containers before placing in the dishwasher. Exercise care when handling bladeassemblies.7 Wipe the motor base with a clean, damp cloth.n i n j a k i tc h e n . c o m10
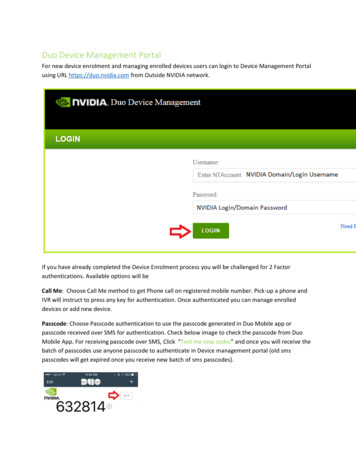
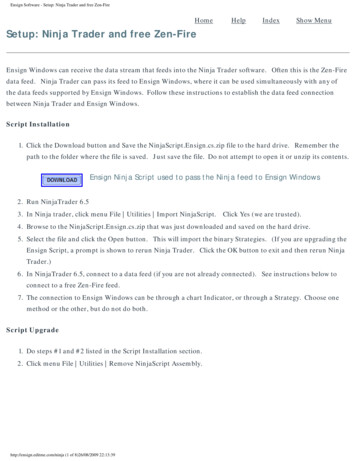
USING YOUR NUTRI NINJA CUPSIMPORTANT: Review allwarnings on pages 3-6before proceeding.TIP: For recommendedloading instructions, checkout page 19.NOTE: Auto-IQ programs have pausesand changes in speedthroughout the cycle.1111-877-646-5288Place the unplugged motorbase on a clean, dry, andlevel surface such as acountertop or table. Pressdownward on the motorbase to adhere the suctioncups to the work surface.Ensure the motor base isconnected to power.2 Add ingredients to the NutriNinja Cup. DO NOT addingredients past the MaxLiquid line on the cup.
3 Install the Pro Extractor Blades Assemblyonto the top of the cup. Twist the lidclockwise until it’s sealed tightly.4 Turn the Nutri Ninja Cup upside down andinstall onto the motor base. Align the tabson the cup with the slots on the base, thentwist until you hear a click. When the unitis connected to power and the container iscorrectly locked on to the motor base, theprogram buttons will illuminate and the unitis ready for use.n i n j a k i tc h e n . c o m12
USING YOUR NUTRI NINJA CUPSIMPORTANT: Review allwarnings on pages 3-6before proceeding.NOTE: Auto-IQ programshave pauses and changes inspeed throughout the cycle.For program descriptions,reference page 9.5 Select the program thatbest suits your recipe.The Auto-iQ feature willautomatically stop theappliance at the end ofthe program. Non-AutoiQ settings will continueto run until the applianceis stopped. To pause theappliance at any time,press the currently activebutton a second time.Reference page 9 forprogram descriptions.131-877-646-52886 To remove the cup from themotor base, turn the cupcounterclockwise and thenlift it off the motor base.
7 Remove the Pro ExtractorBlades Assembly bytwisting the cap counterclockwise. Exercise carewhen handling the bladeassembly, as the bladesare sharp. Do not storeblended contents withthe Pro Extractor BladesAssembly attached.8 Unplug the appliancewhen finished and releasethe motor base from thework surface. To releasethe motor base, gentlypull it toward you. Referto page 20 for storinginstructions.9 To enjoy your drink on thego, place the Spout Lidonto the Nutri Ninja Cupand twist clockwise untilfirmly sealed. For storage,only use Spout Lid tocover.n i n j a k i tc h e n . c o m14
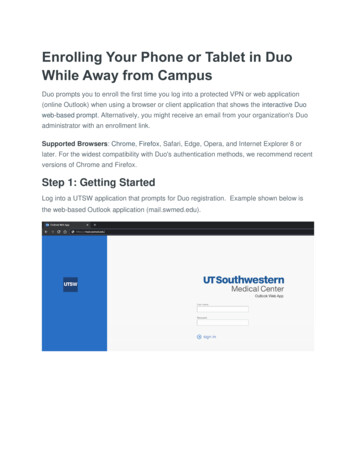
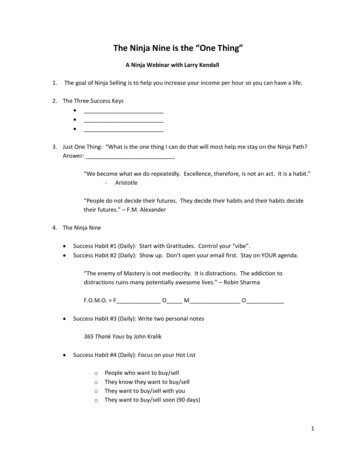
USING YOUR MAX 88 OZ.TOTAL CRUSHING PITCHERIMPORTANT: Review allwarnings on pages 3-6before proceeding.TIP: Select BOOST YESwhen you want a thinner,finer consistency. UseBOOST NO when you wantmore texture.TIP: If the stacked bladeassembly is not fullyseated, you will not beable to install and lock thelid into position.TIP: To learn more aboutthe unit’s programs, checkout page 9.NOTE: DO NOT addingredients beforecompleting installationof the stacked bladeassembly.NOTE: The pitcher canbe installed in two differentorientations. The handlecan be positioned on thefront-right corner of themotor base or the front-leftcorner of the motor base.151-877-646-52881Plug in motor base andplace on a clean, dry,level surface such as acountertop or table. Pressdownward on the motorbase to adhere the suctioncups to the work surface.2 Lower the pitcher onto themotor base. The handleshould be aligned slightlyto the right and the pitchershould be oriented so theLOCK symbols are visibleon the motor base. Thenrotate the container to theleft until you hear a click.
3 Exercising care, grasp thestacked blade assemblyby the top of the shaft andplace it onto the drive gearinside the pitcher. Notethat the blade assemblywill fit loosely onto thedrive gear.4 Add ingredients to thepitcher, making sure notto exceed the Max Fillline on the side of thepitcher. When blendingany kind of liquids, such asbeverages or smoothies,DO NOT exceed the MAXLiquid line on the side ofthe pitcher.5 Place the lid on the pitcher,aligning the trianglesymbol located on the lidwith the triangle symbollocated on the pitcher’shandle. Press down onthe handle until you hear aclick. The triangle symbolsMUST be aligned forthe lid to lock into placeand the appliance tooperate. When the unit isconnected to power andthe container is correctlylocked into the motorbase, the program buttonswill illuminate and the unitis ready for use.n i n j a k i tc h e n . c o m16
USING YOUR MAX 88 OZ.TOTAL CRUSHING PITCHER - CONT.IMPORTANT: Review allwarnings on pages 3-6before proceeding.IMPORTANT: As a safetyfeature, the power light willflash and the motor willbe disabled if the pitcherand lid are not properlyinstalled. If this happens,repeat step 5 on page 16.When the pitcher and lidare properly installed, thepower light will illuminatesolid, indicating theappliance is ready for use.NOTE: For even blending,PLUSE ingredients in shortintervals. For programdescriptions, reference page 9.6 Select the speed orAuto-iQ program thatbest suits your recipe.The Auto-iQ feature willautomatically stop theappliance at the end ofthe program. Non-AutoiQ settings will continueto run until the applianceis stopped. To pause theappliance at any time,press the currently activebutton a second time.171-877-646-52887 When ingredients havereached your desiredconsistency, stop theappliance by pressing thepower button, and wait forthe appliance to come to acomplete stop.8 To remove the pitcher fromthe motor base, turn thepitcher counterclockwise andthen lift it off the motor base.
9 For thinner mixtures, ensurethat the lid is locked intoplace, open the pour spoutcap on the lid and usethe pour spout to emptycontents of the pitcher.10 For thicker mixtures11 Unplug the appliancethat cannot be emptiedwhen finished and releasethrough the pour spout,the motor base from theremove the lid and stackedwork surface. To releaseblade assembly beforethe motor base, placepouring. To remove theyour hands underneath itlid, press the RELEASEand gently pull it towardbutton on the lid and liftyou. Refer to page 20 forthe handle. The lid canstoring instructions.then be removed fromthe pitcher. To remove thestacked blade assembly,carefully grasp the bladeassembly by the top of theshaft and remove from thePitcher. The pitcher canthen be emptied.n i n j a k i tc h e n . c o m18
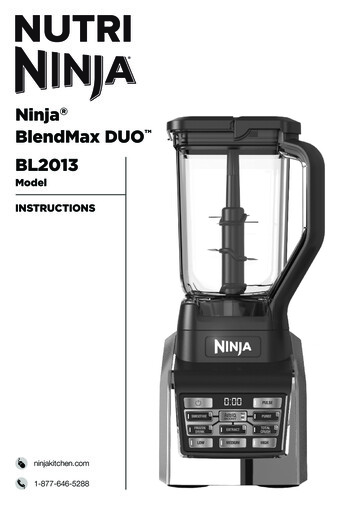
SUGGESTED USES &FILLING INSTRUCTIONSIMPORTANT: Review allwarnings on pages 3-6before proceeding.ORDERINGREPLACEMENT PARTSTo order additional partsand attachments, pleasevisit ninjakitchen.com orcontact customer service at1-877-646-5288.ice,frozen ingredientsseeds, powders,nut buttersliquids, yogurtleafy greens,herbsfresh fruits,veggiesFILLING YOUR NUTRI NINJA CUPFor best results, always follow recipe directions when fillingyour Nutri Ninja Cups. When you’re not using a recipe, use thefollowing guidelines:Start with fresh fruit or veggies (for best results, cut ingredientsin 1-inch chunks). Next add leafy greens or herbs, followed byany liquids like water, juice, milk, or yogurt. Then add seeds,powders or nut butters. Lastly, add ice or frozen ingredients.Remember to securely tighten the Pro Extractor Blades Assembly and don’t overfill the cup.191-877-646-5288
CARE &MAINTENANCECLEANING1Separate all parts.2 Wash all containers in warm, soapy waterwith a soft cloth.3 Hand WashingWash blade assemblies in warm, soapywater using a dishwashing utensil witha handle to avoid direct contact with theblades. Exercise care when handlingblade assemblies as the blades are sharp.Thoroughly rinse and air-dry all parts.DishwasherAll attachments are dishwasher safe. Itis recommended that the lids and bladeassemblies be placed on the top rack of thedishwasher. Ensure that blade assembliesare removed from their containers beforeplacing in the dishwasher. Exercise carewhen handling blade assemblies4 Wipe the motor base with a clean, dampcloth. Allow time to dry before operation.STORINGStore the unit upright and store all bladeassemblies inside or attached to theirrespective containers with their lids locked intoplace.RESETTING THE MOTOR THERMOSTATThis appliance features a unique safety systemthat prevents damage to the motor and drivesystem should you inadvertently overload theappliance. If the appliance is overloaded, themotor will be temporarily disabled. Should thisoccur, follow the reset procedure below.1Unplug the appliance from theelectrical outlet.2 Allow the appliance to cool forapproximately 15 minutes.3 Remove the container lid and blade assembly.Empty the container and ensure no ingredientswere jamming the blade assemblies.4 Reset the unit in accordance with theapplicable instructions for the containerand blade type.IMPORTANT: Ensure that maximumcapacities are not exceeded. This is themost typical cause of appliance overload.If your unit needs servicing, please callCustomer Service at 1-877-646-5288.DO NOT store blended or unblendedingredients in the Nutri Ninja Cup with theblade assembly attached.DO NOT stack items on top of the containers.Store any remaining attachments alongside theappliance or in a cabinet where they will not bedamaged or create a hazard.n i n j a k i tc h e n . c o m20
TROUBLESHOOTINGGUIDEWARNING: To reduce the risk of shock and unintended operation, turnpower off and unplug unit before troubleshooting.Motor doesn’t start or blade assembly doesn’t rotate. Make sure the container is securely placed on motor base.Make sure the lid is securely on container in the correct position (align arrows).The appliance is turned off. Press the power button ( ) to turn on.Check that the plug is securely inserted into the electrical outlet.Check the fuse or circuit breaker.The unit has overloaded. The appliance will stop and the power light will flash. Unplug andwait approximately 15 minutes before using again.The unit has overheated. Unplug and wait approximately 15 minutes before using again.Check to make sure the unit is not overloaded.Food is chopped too fine or is too watery. The food has been over-processed. Use PULSE button for controlled processing.Food collects on lid or on the sides of the container. The mixture is too thick. Add more liquid.You cannot create snow from solid ice. Do not use ice that has been sitting out or has started to melt. Use ice straight from the freezer.Start with a few pulses and then go to a continuous blending cycle.Motor base won’t stick to counter or tabletop. Make sure surface and suction feet are wiped clean. Suction feet will only stick to smooth surfaces.Suction feet WILL NOT stick on some surfaces such as wood, tile and non-polished finishes.DO NOT attempt to use appliance when the motor base is stuck to a surface that is notsecure (cutting board, platter, plates, etc.).You get an “ERR” message. Your Nutri Ninja Ninja BlendMax DUO is able to sense which container is on the motorbase. You may be trying to use a program that is not designed for the container you haveinstalled. The programs will light up, indicating which programs are available for each container.You may also see the “ERR” message if your unit has been running for more than 2 minuteswithin a brief period of time. If this occurs, please unplug the unit for 1 minute before restarting.You have a blinking red light. The unit is not installed properly. For your safety the unit will only be able to be turned onwhen it is properly assembled. Please refer to the assembly pages of this Owner’s Guide forassistance.211-877-646-5288
ONE (1) YEARLIMITED WARRANTYThe 1-Year Limited Warranty applies to purchases made from authorized retailers of SharkNinja Operating LLC.Warranty coverage applies to the original owner and to the original product only and is not transferable.SharkNinja warrants that the unit shall be free from defects in material and workmanship for a period of 1 yearfrom the date of purchase when it is used under normal household conditions and maintained according to therequirements outlined in this Owner’s Guide, subject to the following conditions and exclusions.What is covered by my warranty?1. The original unit and/or non-wearable components deemed defective, in SharkNinja’s sole discretion,will be repaired or replaced for up to 1 year from the original purchase date.2. In the rare event that a replacement unit is issued, the warranty coverage ends six months after thereceipt date of the replacement unit or the remainder of the existing warranty, whichever is greater. Ifthe unit is replaced, SharkNinja reserves the right to replace the unit with one of equal or greater value.What is not covered by my warranty?Our Customer Care/Product Specialists are available to provide all the warranty service options available toyou, including the possibility of upgrading to our VIP Warranty Service Options for select product categories.1.2.3.4.5.6.7.Normal wear and tear of wearable parts (including all blending vessels, lids, blades and blender base)which require regular maintenance and/or replacement to ensure the proper functioning of your unit arenot covered by this warranty.Any unit that has been tampered with or used for commercial purposes.SharkNinja will cover the cost for the customer to send the unit to us for repair or replacement. A feeof 19.95 for return shipping costs will be charged at the time of return shipment of the repaired orreplacement unit.Damage caused by misuse, abuse, or negligent handling, or damage due to mishandling in transit.Consequential and incidental damages.Defects caused by or resulting from damages from shipping or from repairs, service, or alteration to theproduct or any of its parts which have been performed by a repair person not authorized by SharkNinja.Products purchased, used or operated outside of North America.Problems with your unit/How to get service:If your appliance fails to operate properly while in use under normal household conditions within the warrantyperiod, visit ninjakitchen.com for product care/maintenance self-help. Our customer care and productspecialists are also available at 1-877-646-5288 to assist with product support and warranty service options.How to initiate a warranty claim:You must first activate your warranty by registering your unit online at ninjakitchen.com/customersupport(Note: Purchases made directly from SharkNinja are automatically registered with us and the warrantyactivated.) Alternatively, you can call 1-877-646-5288 to have a customer care specialist assist you. Pleasenote, you must call 1-877-646-5288 to initiate a warranty claim. Return and Packing Instruction information willbe provided at that time.The customer care line is open Mon–Fri, 8am–10pm ET and Sat & Sun, 9am–6pm ET.Replacement parts are available for purchase at ninjakitchen.com. For more information on what is classified aswearable and non-wearable parts, please visit ninjawarranty.com.This warranty gives you specific legal rights, and you may also have other rights that vary from state to state.Some states do not permit the exclusion or limitation of incidental or consequential damages, so the abovemay not apply to you.n i n j a k i tc h e n . c o m22
SharkNinja Operating LLCUS: Newton, MA 02459CAN: Ville St-Laurent, QC H4S 1A71-877-646-5288ninjakitchen.comIllustrations may differ from actual product. We are constantly striving to improveour products; therefore the specifications contained herein are subject to changewithout notice.Ninja, Nutri Ninja, Pro Extractor Blades, and Total Crushing are registered trademarksof SharkNinja Operating LLC.Auto-iQ Boost, Auto-iQ, BlendMax and DUO are trademarks of SharkNinja Operating LLC.For SharkNinja U.S. Patent information visit sharkninja.com/USPatents 2016 SharkNinja Operating LLCBL2013 IB 160614 1PRINTED IN CHINA@ninjakitchen
for purchasing the Nutri Ninja Ninja BlendMax DUO PLEASE READ CAREFULLY AND KEEP FOR FUTURE REFERENCE. These instructions are designed to help you get a complete understanding of your new Nutri Ninja Ninja BlendMax DUO. If you have any questions, please call our customer service line at 1-877-646-5288. TECHNICAL SPECIFICATIONS