Transcription
WATER CHILLERS INSTRUCTION MANUAL1/10HP1/41/2HPHPThank you for purchasing an EcoPlus Water Chiller!To get the most out of your chiller and enjoy safe, reliable operation, please thoroughly readand understand this Instruction Manual before operating. Please keep it for future reference.IMPORTANT: After unpacking (or accidental tipover)allow chiller to stand upright for 20 minutes before starting.ContentsSafety Information. 1Features . 2Specifications.2-3Installation.4-5Operation . 6Cleaning & Storage. 7Troubleshooting . 8Parts List & Wiring Diagram. 9Limited Warranty. 10
Safety InformationTo prevent injury to user, others and/or property damage, the following safety instructions must befollowed. Ignoring these instructions may cause harm or damage due to faulty operation.Seriousness is indicated by the following symbols:CAUTIONPossible injury or property damage.WARNING!Possible death or serious injury.WARNING! Do not exceed the rating of the power circuit or share the outlet with other appliances. Do not start or stop the chiller by switching the power source on/off or by plugging orunplugging the power cord. Always use the factory-installed 3-prong, grounded, polarized power plug and cord. Never attempt to operate chiller with a damaged or modified power cord. Do not insert or remove plug from outlet with wet hands or standing in water. Do not place chiller near a heat source, flammable materials or hazardous chemicals. Disconnect the power if strange sounds, smells or smoke come from the unit. Never attempt to take apart or repair the chiller yourself. Repairs must be done by factoryauthorized service personnel. Before cleaning the chiller, always turn off the power and unplug the power cord. Do not drink or use any water drained from the unit.CAUTION Do not install chiller in closets, cabinets or other small spaces. Do not place chiller where water may splash or leak onto the unit. Never cover the intake or exhaust openings with clothes, towels or other objects. Use extreme caution when operating near children, the elderly and infirm. Never insert fingers or foreign objects into ventilation grilles or other openings. Do not place heavy objects on the power cord or run it under carpets and rugs. Do not climb, sit or stand on the chiller, or place objects on top of it. Clean filter every two weeks, making sure it is installed securely. If water enters the chiller due to a leak or spill, turn it off and disconnect the power. Contacta qualified service technician.1
FeaturesYour EcoPlus Water Chiller incorporates the latest in refrigeration technology and manufacturingtechniques to ensure reliability and long service life. Some of these features include: Digital Control System for stable and accurate temperature control High efficiency energy use for economical operation Freon-free R134a refrigeration system that is safe and environmentally friendly Anti-corrosive, pure titanium evaporator Auto overcurrent protection system Retains settings if the unit is unplugged or in case of power outage (auto restart)SpecificationsModelMax. Refrigerated Water VolumeWater Temp. Before Refrigeration(Ambient Temp. 86 F (30 C)1/10 HP1/4 HP1/2 HP42 Gal. (160L)80 Gal. (300L)132 Gal. (500L)82 F (28 C)82 F (28 C)82 F (28 C)61 F (16 C)61 F (16 C)64 F (18 C)Refrigeration Time (Hours)Water Temp. After Refrigeration6.35 oz. (180g)7.76 oz. (220g)9.17 oz. (260g)66 - 317 GPH(250 - 1200 L/H)264 - 660 GPH(1000 - 2500 L/H)317 - 793 GPH(1200 - 3000 L/H)28.7 lbs. (13 Kg)42.5 lbs. (19.3 Kg)43.7 lbs. (19.8 Kg)15.75 x 8.58 x 16.34 in.(400 x 218 x 415 mm)17.13 x 11.61 x 18.5 in.(435 x 295 x 470 mm)18.1 x 12.6 x 23.43 in.(460 x 320 x 595 mm)NOTES:1. Rate of flow is determined by several factors, including size of pump, height of chiller above water pump, size of tubingand any kinks, clogs or other obstructions to water flow.2. Performance tests were done with an ambient room temperature of 86 F (30 C), water temperature (before refrigeration)of 82 F (28 C), and a total water volume of 42 gallons (160L) with 1/10 HP model; 80 gallons (300L) with 1/4 HP model;and 132 gallons (500L) with 1/2 HP model (see Performance Curves on Page 4).3. When the volume of water to be refrigerated is reduced and/or the water and ambient room temperatures are lower,cooling rate and efficiency will be increased.4. Refrigeration efficiency is determined according to the installation location, lighting, heat source(s), pump, filter andother connecting parts. For greatest efficiency, EcoPlus pumps and parts should be used.5. If there is not enough air exchange in the room where chiller is installed, refrigeration efficiency may be reduced.2
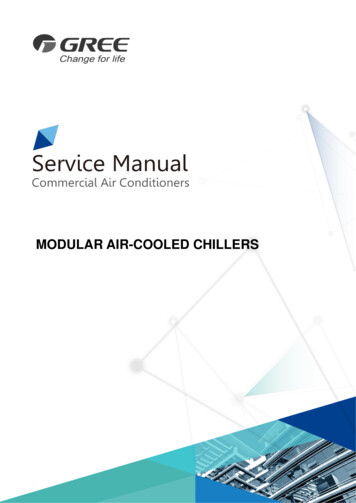
SpecificationsPERFORMANCE CURVESWATER TEMPERATUREModels: 1/10 HP & 1/4 HP F / C86.0 / 3084.2 / 2982.4 / 2880.6 / 2778.8 / 2677.0 / 2575.2 / 2473.4 / 2371.6 / 2269.8 / 2168.0 / 2066.2 / 1964.4 / 1862.6 / 1760.8 / 1659.0 / 15Ambient Temperature: 86 F (30 C) Water Temperature (before refrigeration): 82 F (28 C)Total Water Volume: 1/10 HP – 42 Gal. (160L), 1/4 HP – 80 Gal. (300L)REFRIGERATION TIME (Hours)WATER TEMPERATUREModel: 1/2 HP F / C86.0 / 3084.2 / 2982.4 / 2880.6 / 2778.8 / 2677.0 / 2575.2 / 2473.4 / 2371.6 / 2269.8 / 2168.0 / 2066.2 / 1964.4 / 18Ambient Temperature: 86 F (30 C) Water Temperature (before refrigeration): 82 F (28 C)Total Water Volume: 132 Gal. (500L)REFRIGERATION TIME (Hours)NOTE: Lower water volumes will result in faster temperature drops.3
InstallationUNPACKING THE CHILLERPlease DO NOT dispose of any packaging until you have checked that all parts are included andthe chiller is operational. In the unlikely event of missing parts or damage, contact the retailerwhere you purchased the unit immediately. Do not leave children unattended with the chiller orpackaging. Disposal of all materials must be carried out responsibly, safely and recycledwherever possible.Package Contents: 1 Chiller Unit 1 Instruction Manual 4 Inlet/Outlet Adapters with Nuts and Rubber Seals 1 Spare FuseINSTALLING THE CHILLERFor best results and safest operation, install the chiller indoors in a well ventilated location.DO NOT install outdoors.Operate only ona flat, stable,horizontal surface.Keep out of direct sunlightand away from flammablematerials, moisture,dust and any heatsource.Clearance: allow at least 8” (20cm)in front; 16” (40cm) in rear.16 in(40cm)8 in(20cm)Avoid banging or shaking.Never cover during operation.Do not knock the chiller over or turn it upside down – this may causedamage to the refrigeration system. If unit istipped or knocked over, turn the power OFF.Set the unit upright and level again andwait 20 minutes before switching it back on.IMPORTANT! Provide a grounded power outlet and circuit to be used only for the chiller (any electrical workmust be done by a qualified electrician). Power source must conform to the power requirements specified on the product nameplate. ALWAYS disconnect the power supply when installing or cleaning the chiller.4
InstallationThis chiller does NOT have an internal pump for system circulation.An appropriately sized external pump is required.CHOOSING THE CORRECT EXTERNAL PUMPRequired pump size depends on chiller model, water volume and rate of circulation. Recommendedpump sizes for effective water chilling are within the following ranges:ChillerModelMax. Reservoir VolumeRate of Circulation – Pump Size1/10 HP42 (160)66 - 317 GPH (250 - 1200 LPH)1/4 HP80 (300)264 - 660 GPH (1000 - 2500 LPH)1/2 HP132 (500)317 - 793 GPH (1200 - 3000 LPH)Gallons (Liters)Gallons Per Hour (Liters Per Hour)TYPICAL INSTALLATIONFor the most effective water cooling and energy efficiency, locate chiller below water level. If chillermust be placed above reservoir level, make sure height above pump does not exceed 26 ft. (8m).For best performance, keep hoses as short as possible. The sum of all hose lengths should notexceed 25 ft. (7.6m).WATERLEVELChilled water Chiller Pump(separate from nutrient pump)ChillerChillerIMPORTANT! Always check the following before starting chiller: Water level inside the reservoir is correct and there are no leaks in any hoses or connections. Power supply is correct and the plug is inserted completely into the outlet. Double-check the whole system to make sure there are no breaks or clogs.5
OperationUSING THE DIGITAL CONTROL PANEL“Cooling” Indicator LightSET3-Digit Temperature DisplayUPDOWNTemperature Adjustment ButtonsSetting Water Temperature: To enter a temperature setting, press the SET button and holdfor more than 3 seconds. The previously set temperature will appear on the display. Press the UPor DOWN key to enter a new temperature setting from 37-90 F (3-32 C). To accept, press the SETbutton again (or just wait about 8 seconds and it will automatically store your new setting andrevert to normal operation). The actual water temperature displays continuously while the chilleris working. To Compare Actual and Set Water Temperatures: Press the SET button once. The settemperature will appear, alternating with a display of the actual water temperature (when actualwater temperature is displayed the “Cooling” indicator light goes OFF – when the settemperature is displayed the same indicator FLASHES).Automatic Temperature Control: When the compressor stops for over 3 minutes and watertemperature rises 1 F above the set temperature, the chiller will automatically restart. Once theset water temperature is reached, the “Cooling” indicator light will go off and the compressorwill stop. NOTE: The “Cooling” indicator light will also flash if any protection device (see below)is activated for at least 3 minutes.SPECIAL FUNCTIONS AND PROTECTION DEVICES Temp. Display Adjustment: If necessary, the display of actual water temperature canbe adjusted 2.4 F (1.5 C) up or down. Press the UP and DOWN keys at the same time for6 seconds until the numerical display flashes. Then, press the UP or DOWN keys to adjust. Compressor Protection: If the compressor somehow becomes overloaded, a protectiondevice will automatically shut it off, then attempt a restart after about 3 minutes. Sensor Circuit Protection: If the water temperature sensor has an open or broken circuit,the chiller will shut down and a “P1” or “P2” error message will be displayed.6
Cleaning & StorageCLEANING THE CHILLERAlways make sure unit is unplugged before performing any cleaning!For safe, efficient operation and long service life, it is essential to regularly clean the chiller and allhoses, connections and other components in the system in which it is installed. Thorough cleaningis recommended every 1-2 months, including: Rinse collected debris from filters, external reservoir pump, all inlet and outlet connections,hoses, etc., with clear, lukewarm water. Soap, detergent or bleach is NOT recommended becauseany remaining residues can contaminate the nutrient solution. The chiller housing, digitalcontrol panel, power switch and other external surfaces must be cleaned with a soft, dry cloth.NEVER immerse the chiller in water or spray it down with a hose! Clean air filters every 2 weeks:1. Loosen screw on front cover, turning counterclockwise (Fig. 1).2. Gently pull cover toward you to remove (Fig. 2).3. Loosen screws on attached filter and remove (Fig. 3 & 4).4. Lift bottom clips and pull out to remove side filters (Fig. 5 – 1/4 & 1/2 HP Models only).5. Loosen screws on attached filters and remove (Fig. 6 & 7)6. Remove dust with a brush or vacuum cleaner, or rinse well in lukewarm water (Fig. 8).Make sure filters are thoroughly DRY before reinstalling them.STORING THE CHILLERDisconnect chiller from the system. Gently tilt the unit to drain water out through the inlet andoutlet connections. DO NOT INVERT CHILLER TO DRAIN! Clean and dry filters, wipe down externalsurfaces with a soft cloth, cover with plastic bag, insert into carton and store in a safe, dry place.7
TroubleshootingBefore calling service, check the troubleshooting chartbelow for solutions to the most common problems.SOLUTIONChiller doesn’t runDisplay is blankNot plugged all the way inFuse has blownChange fuseConnected to wrongvoltage and frequencyChiller keepsturning itselfon and offWater not coolingenough (or notat all)Protection devicehas been activatedB. Check ventilation around unit.If heat is not accumulating,wait 3 minutes and unit willautomatically restartWater temperature settingis too highLower water temperaturesettingTotal water volume too highReduce water volumeAir filters are cloggedwith dustClean air filters as directedon Page 7Not enough refrigerantHave qualified personnelreplenish refrigerantCompressor runs normally,but fan stops running andunit can’t dissipate heatFan may need to be replacedby qualified service personnelUnit is noisyand/or rattles8
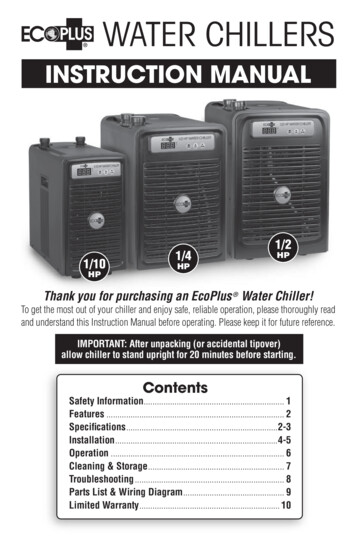
Parts List & Wiring DiagramPARTS LIST1. Digital Control Panel Enclosure2. Circuit Board3. Enclosure Back Cover4. Water Inlet & Outlet Adapters5. Nut6. Housing7. Handle8. Condenser9. Fan10. Compressor11. Base12. Power Switch13. Power Input14. Fuse15. Water Temp. Sensor16. Water Tank17. Intake Air Filter18. Front Cover1/10 HP Model ShownWIRING DIAGRAM9
Limited WarrantySunlight Supply, Inc. One-Year Limited Warranty: The EcoPlus Chiller covered in this manual iswarranted under normal use for one year after purchase date. Any part determined defective in material orworkmanship can be returned to an authorized service location designated by Sunlight Supply, shippingprepaid, and will be repaired or replaced at the option of Sunlight Supply.Limitation of Liability: To the extent allowable under applicable law, Sunlight Supply’s liability forconsequential and incidental damages is expressly disclaimed. Sunlight Supply’s liability in all events is limitedto and shall not exceed the purchase price paid.Warranty Disclaimer: Sunlight Supply provides product information in this literature for the sole purpose ofidentification, and does state or imply that the products are merchantable or fit for a particular purpose, or thatthe products will conform to the descriptions.Product Suitability: Many jurisdictions have codes and regulations governing sales, construction, installationand/or use of products for certain purposes, which may vary from those in neighboring areas. While SunlightSupply attempts to assure that its products comply with such codes, it cannot guarantee compliance, and cannotbe responsible for how the product is installed or used. Before purchase and use of a product, review theproduct applications, and all applicable national and local codes and regulations, and be sure that the product,installation, and use will comply with them. Detach and returnWARRANTY REGISTRATION FORMYour EcoPlus Chiller from Sunlight Supply, Inc. is covered for one (1) full year against manufacturer defects.The warranty information below must be filled out and mailed back with a copy of the purchase receipt forwarranty to be in effect. Abuse, neglect, misuse or mis-application of the product will void the warranty. Select Power Model:1/10 HP1/4 HP1/2 HPEcoPlus Chiller//PRODUCT NAMESERIAL NUMBERDATE OF PURCHASENAMEADDRESSCITY / STATE/ ZIP()PHONEEMAIL ADDRESSWhere purchased:STORE NAMEMail this Product Registration Form within 15 days of purchase to:Sunlight Supply, Inc., EcoPlus Warranty Dept.5408 NE 88th Street - Bldg A, Vancouver WA 98665 USA10
PLEASE BE RESPONSIBLEDO NOT dispose of this product in the trash, on the landscapeor into any unsorted waste stream! It may contain hazardoussubstances that can leach into groundwater and find their wayinto the food chain. This unit contains VALUABLE RESOURCESthat are easy to recycle and re-use. Services availablemay include:A. Municipal Collection Systems: Most cities and towns have recyclingprograms where electronic waste can be turned in for recyclingfree of charge.B. Retailer Return: When buying a new product, many retailers will take backan old product free of charge.C. Manufacturer Return: Many manufacturers accept old products forrecycling free of charge.D. Scrap Dealers: Many scrap dealers will buy old electronics or take themfree of charge. www.ecoplususa.comExclusively distributed by:Sunlight Supply, Inc. / National Garden Wholesale 5408 NE 88th Street - Bldg AVancouver, WA 98665 USAwww.sunlightsupply.com
To get the most out of your chiller and enjoy safe, reliable operation, please thoroughly read and understand this Instruction Manual before operating. Please keep it for future reference. WATER CHILLERS 1/10 HP 1/4 HP 1/2 HP IMPORTANT: After unpacking (or accidental tipover) allow chiller to stand upright for 20 minutes before starting.