Transcription
http://ipfw.eduQuick Guide for InDesign CS6 – May 2013Training: http://ipfw.edu/training
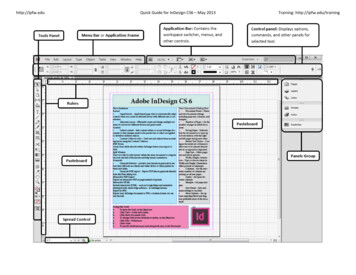
http://ipfw.eduAdobe InDesign CS6New FeaturesLayoutLiquid layout – Apply liquid page rules toautomatically adapt content when userscreate an alternate layout with differentsize or orientation. Alternate Layout – Efficiently create anddesign multiple versions of a layout fordifferent devices and print needs. ContentLinked content – link content within oracross InDesign documents so that changesmade to the parent text or object areapplied to all linked children objects. Content Collector tools – Grab text andobjects from an existing layout using theContent Collector. PDF FormsCreate form fields directly within InDesignbefore your export to PDF.Split WindowView two side-by-side layouts within the samedocument to compare the look and feel of thelayouts and help ensure consistency.GrayscaleGrayscale Preview – preview layouts ingrayscale to see how they will look on ablack-and-white device or when printed inblack and white. Grayscale PDF export – Export PDF files ingrayscale directly from the Print dialog box. Help Desk: helpdesk@ipfw.eduQuick Guide for InDesign CS6 – May 2013Interactive PDF ExportExport an interactive PDF as pages instead ofspreads.Interactive HTMLInclude interactive HTML – such as GoogleMaps and animation developed with AdobeEdge software – in InDesign layouts.Export to PNGExports InDesign documents to PNG, a losslessformat, for use on the web.Creating a New Document1. On the Menu bar, click File.2. Move the cursor over New, clickDocument 3. Modify any desired options.a. Document Preset – Name and savedocument settings including page size,columns, and margins.b. Number of Pages – Set the number ofpages in initial document.c. Facing Pages – Indicates that thedocument is to open up in bookfashion, with the right and left pagesfacing each other.d. Master Text Frame – Configure theinitial set of frames to allow text to beentered directly into it, as opposed toimported.e. Page Size – Offers pager size and layoutoptions.f. Width, Height, Orientation – Type orchoose values in Width and Height.g. Orientation – offers portrait orlandscape layout.h. Columns – Set the automatic number ofcolumns appearing on all new pages.i. Gutter – Set space between columns.Training: http://ipfw.edu/trainingj. Margins – Set page margins.k. Save Preset – Save and name settingsto use later.l. More Options – Set options regardingBleed and slug, non-printable areas ofthe document.4. Click OK.Saving a New Document1. On the Menu bar, click File Save.2. Enter the File name.3. Click Save.Planning the DocumentOpening the Pages Panel1. In the Panels group, click PagesViewing the Master PageNote: Master Page – A master page is like abackground that users can quickly apply tomany pages. Users can create multiple masterpages in a single document.1. In the Pages panel, double-click the Masterpage icon.Page 1
http://ipfw.eduApplying Master to a Page1. In the Pages panel, click the desired pageicon (Note: Not the master page icon).2. Right-click the page, select Apply Mastersto Pages a. The Apply Master dialog box appears.3. Click the Apply Master drop-down menuand select the desired master page.4. If desired, click the To Pages drop-downmenu and select the desired options.a. Or, type in the page number in the ToPages field. (Note: A range of pagenumbers can also be used with acomma or hyphen)5. Click OK.Quick Guide for InDesign CS6 – May 2013Every or Subdivisions fields.Changing Grid Sectors1. On the Menu bar, click Edit.2. Move the cursor over Preferences, selectGrids 3. To specify subdivisions per inch along bothaxes, in the Horizontal or Vertical section,enter the desired numbers in the GridlineHelp Desk: helpdesk@ipfw.eduCreating a Text frame1. From the Tools panel, click the Type Toolicon.RulersViewing Rulers1. On the Menu bar, click View Show Rulers.a. Or press Ctrl R.Configuring Rulers1. On the Menu bar, click Edit.2. Place the cursor over Preferences, clickUnits & Increments a. The Preferences window will pop up.3. To change Horizontal unit of measurement:a. Click the Horizontal drop-down buttonand select the desired option.GridsViewing Grids1. From the Menu bar, click View.2. Move the cursor over Grids & Guides,select Show Document Grid.a. Or press Ctrl ‘Training: http://ipfw.edu/trainingb. Click OK.4. To change Vertical unit of measurement:a. Click the Vertical drop-down buttonand select the desired option.b. Click OK.2. Position the cursor’s crosshatch to thedesired location of the text frame.3. Press and drag the cursor verticallydownward and across the columns to thedesired height and width of the frame.4. Enter the text in the frame.Formatting Characters1. While using the Type Tol, on the Controlpanel, make sure the Character FormattingControls icon is selected.2. To select the text, press and drag tohighlight the text.3. To change the font size, click the drop-downmenu in the font field on the Control panel,then select the desired font size.4. To change the font type, click the font typedrop-down menu and select the desiredfont type.Working with Text Frame – A container for text or graphicobjects.Nameplate – Custom space for the title ofthe publication.5. To change the font style, click the font styledrop-down menu and select the desiredPage 2
http://ipfw.edufont style.6. To change the font color, click the Fill dropdown menu and select a color from the list.Quick Guide for InDesign CS6 – May 2013Changing Text LeadingNote: Leading – The vertical space betweenlines of type.1. Use the Type Tool to highlight the desiredtext.2. Click the Leading drop-down menu andchoose a value.Changing the TrackingNote: Tracking – The spaces betweencharacters in a block of text.Working with Paragraph1. While using the Type Tool, locate theusing the Type ToolNote: To activate the Paragraph FormattingControls panel, click the paragraph icon while1. While using the Type Tool, click betweenthe characters to change the spacing.Locate the Kerning iconon theControl panel.3. Click the drop-down menu and select thedesired option.3. In the First Line Left Indent field, use the upor down arrow button to change the indentvalue.a. Or, type in a value in the field, pressEnter.Applying Paragraph Spacing1. Use the Type Tool to highlight the desiredtext.2. In the Space After field, use the up or downarrow button to adjust the value.:Tracking iconon the Control panel.2. Click the drop-down menu and select thedesired option.Changing the KerningNote: Kerning – The spaces between a pair ofcharacters.Training: http://ipfw.edu/traininga. Or, enter a value in the field, pressEnter.Changing the Paragraph Alignment1. While using the Type Tool, click theCreating a Paragraph StyleUsers can create a paragraph style based on theexisting formatting.Paragraph Formatting Controls iconfrom the Control panel.2. Locate the paragraph alignment section onthe Control panel.1. Use the Type Toolto highlight thedesired text.2. On the Control panel, click the ParagraphStyle icon New Paragraph Style 3. Click the desired alignment.a. The New Paragraph Style windowappears.3. Enter the Style Name.4. Modify any remaining options if desired.5. Click OK when finishes.2.4. Repeat step 1 – 3 to make adjustmentsbetween other pairs of characters.Help Desk: helpdesk@ipfw.eduApplying First Indents1. Click the Type Tool, make sure theParagraph Formatting Controlspanelis activated.2. Place the cursor to the desired location.Page 3
http://ipfw.eduQuick Guide for InDesign CS6 – May 2013Applying Paragraph Style1. Use the Type Tool to highlight the desiredtext.2. On the Control panel, click the ParagraphStyle drop-down menu and select thedesired style.Working with FramesSelection Tools The Selection Toolframe. The Direct Selection Tool– Selects partsor segments of a frame to apply variouseffect.– Selects an entireChanging Alignment within a Text Frame1. From the Tools panel, click the SelectionTool icon.2. Use the Selection Tool to select the desiredtext frame.3. On the Menu bar, click Object Text FrameOptions a. The Text Frame Options dialog boxopens.4. Under Vertical Justification, click the Aligndrop-down menu, select the desired option,e.g., Center.Creating a Frame Using the Frame Tool1. From the Tools panel, click the RectangleFrame Tool icon.2. Position the cursor to the desired area.3. Click and drag to draw a new frame.a. Note: To create a perfect square frame,press and hold the Shift key whilecreating a frame.4. To indicate the frame’s status as a textframe:a. Right-click the frame.b. Place the cursor over Content, clickText.Moving a Frame1. Use the Selection Tool to select the desiredframe.2. Click and drag the frame to the desiredlocation.Creating Headers and Footers1. On the Pages panel, double-click thedesired Master page icon.2. Click the Type Tool.3. Click and drag to create a new text frame.4. Type the header or footer text.a. To insert a special character:i. Right-click the frame, move thecursor over Insert Special Character.ii. Move the cursor over the desiredcharacter type, e.g., Markers.iii. Click the desired option, e.g.,Current Page Number.b. To center the text, click the Justify withlast line aligned center icon on theControl panel.Training: http://ipfw.edu/trainingc. To activate the Text Frame Optionsdialog box, press Ctrl B.i. To specify a vertical justification ofcenter: under Vertical Justification,click the Align drop-down menu Center.ii. Click OK.5. If desired, use the Selection Tooltoadjust the header or footer frame locationon the document.Working with Document PagesCreating a New Page1. On the Pages panel, click the desired pageicon. (Note: The new page will be addedafter the selected page)2. On the bottom of the Pages panel, clickthe Create new page icon.Inserting New Pages1. On the Pages panel, double-click thedesired page icon.5. Click OK.Help Desk: helpdesk@ipfw.eduPage 4
http://ipfw.edu2. Click the context menu on the Pages panel Insert Pages 3. In the Insert Pages pop-up window, specifythe Pages, Insert option, and Master optionfor the new page.4. Click OK.Quick Guide for InDesign CS6 – May 2013Placing Files/Images1. On the Pages panel, double-click thedesired page icon where the file will beplaced.2. On the Menu bar, click File Place a. The Place dialog box appears.3. Locate and select the file, click Open.4. Place the cursor in the desired potion, leftclick the mouse to place the file.Placing File in an Existing Frame1. In the Tools panel, click the Selection Tool Modifying Frame PropertiesStroke and FillThe Fill and Stroke Swatchesin the Tools panel.Resizing a Frame1. In the Tools panel, click the Selection Tool , select the desired frame.2. Click and drag the frame handler(s) to resizethe frame, example below:a. Note: To resize the frame thatconstrains the aspect ratio, press andhold the Shift key while resizing theframe using the corner handler(s).Help Desk: helpdesk@ipfw.eduMove the cursor over Grids and Guides,click Hide Document Grid.To hide Guides, click View.o Move the cursor over Grids and Guides,click Hide Guides.To hide boundaries of frames, click View.o Move the cursor over Extras, click HideFrame Edges.o, then click the desired frame.2. On the Menu bar, click File Place a. The Place dialog box appears.3. Locate and select the desire file, click Open.Deleting a Page1. On the Pages panel, click the desired pageicon.2. On the bottom right corner of the Pagespanel, click the Delete Selected Pages icon(the trash bin icon).3. Click OK.Training: http://ipfw.edu/training can be foundFill – The top left square controls the inside,or the color of an object.Stroke – The bottom right square controlsthe border.Applying Stroke Color1. Click the Selection Tool.2. Select the desired frame.3. Double-click the bottom right squareof Fill and Stroke Swatches Tool.a. Note: This will bring the Stroke squareto the front.4. In the Color Picker pop-up window, use theslider to adjust the color, then use thecrosshair cursor on the left side to pick theHiding Guides, Grids, and Frames To hide the Document Grid, click View onthe Menu bar.Page 5
http://ipfw.edudesired color.a. Or, enter the color code in the RGB,Lab, or CMYK color fields.Quick Guide for InDesign CS6 – May 2013Applying Stroke Weight1. Use the Selection Tool to select the desiredframe.2. On the Control panel, click the strokeweight drop-down menu and select aweight value.Training: http://ipfw.edu/trainingto activate Stroke or Fill.4. Click one of the pre-defined swatches fromthe list.a. Or, on the Menu bar, click Window Stroke.b. In the Stroke panel, change the Weightvalue.Creating a New Swatch1. In the Panels group, click Swatches.2. On the bottom of the Swatches panel, clickthe New Swatch icon.c. Click the arrow buttonthe Stroke panel.a. The newly created swatch will appear atthe end of the list.3. Double-click the new swatch icon to bringup the Swatch Options window.to closeUsing Swatches5. Click OK.Applying Fill Color1. Use the Selection Tool to select the desiredframe.2. Double-click the top left squareof Filland Stroke Swatches Tool.3. In the Color Picker pop-up window, use theslider to adjust the color, then use thecrosshair cursor on the left side to pick tothe desired color.a. Or, enter the color code in the RGB,Lab, or CMYK color fields.4. Click OK.Help Desk: helpdesk@ipfw.eduBesides Color Picker, users will also be able tochange frame color properties using the predefined color in the Swatches panel.Applying Swatch to a Frame1. Use the Selection Tool to select the desiredframe.2. In the Panels group, click Swatches.4. To name the new swatch, un-check Namewith Color Value, then enter a name in theSwatch Name field.5. If desired, change the Color Mode to RGBor Lab.6. Use the sliders to create a new color.7. Click OK when finished.3. On the top-right corner of the Swatchespanel, use the Fill and Stroke Swatches iconDeleting a Swatch1. In the Swatches panel, click the desiredswatch.2. On the bottom right corner of the Swatchespanel, click the Delete Swatch icon (thePage 6
http://ipfw.eduQuick Guide for InDesign CS6 – May 2013Training: http://ipfw.edu/trainingScale Y values, example below:trash bin icon).3. Click OK.Working with Graphics Understanding Graphic FormatsTIFF – Tagged Image File Format, isbitmapped graphics (based on pixels).EPS – Encapsulated PostScript, may containvector graphics (based on objects).GIF – Graphic Interchange Format, it isdesigned with the World Wide Web inmind. This is much smaller in file size thanTIFF and EPS.JPEG – Joint Photographic Experts Group, itis also designed with the World Wide Webin mind. This is also much smaller in file sizethan TIFF and EPS. GIF and JPEG files do notprint out as well as TIFF and EPS, so, avoidusing them in print publications.5. Click OK.There are two ways to resize an image, thescale tool or the image frame handlers.Using the Scale Tool1. Use the Selection Toolto select thedesired image.2. Right-click the regular frame (by default, theregular frame and the image frame havethe same width and height).3. Move the cursor over Transform and clickScale 4. Enter the percentage in the Scale X andScale Y fields.Using the Image Frame HandlersNote: Be careful when selecting the right frame,using the regular frame handlers will resize theframe, not the image.1. Use the Selection Tool to select the desiredimage.2. Move the cursor to the image until thehand cursor and the circle icon appears (thismeans that the cursor is pointing to theimage frame), example below:Understanding Image ResolutionImage Resolution – Refers to the number ofdots per square inch, or dpi. The higher theresolution, the sharper or clearer images.Resizing ImagesNote: Resizing images are different fromresizing frames in InDesign CS 6. In CS 6,InDesign separates the regular frame and theimage frame, therefore, a placed image filecontains two frames, the regular frame and theimage frame, example below:Help Desk: helpdesk@ipfw.edua. Note: By default, the scale willconstrain proportions. To disable this3. Click the image frame. The image frameshould now appears.default feature, click the link iconon the right and enter the Scale X andPage 7
http://ipfw.eduQuick Guide for InDesign CS6 – May 20134. Click and drag the image frame handlers toresize the image, example below:activated), click the desired wrappingoption in the text wrapping section.4. Press the Up, Right, Down, and Left arrowkeys on the keyboard to adjust the positionif desired.a. To constrain the proportions, press andhold the Shift key while resizing.Wrapping Text around a GraphicNote: Users can wrap around the graphic that isplaced inside a text frame.1. Use the Selection Tool to select the graphic(Note: the regular frame).2. To reposition the image:a. Press and hold the Shift key, click theanchor icon on the graphic and drag thegraphic into the desired location withinthe text.3. To change the wrapping option:a. On the Control panel (make sure theCharacter Formatting ControlsHelp Desk: helpdesk@ipfw.eduTraining: http://ipfw.edu/training1. On the Menu bar, click File.2. Move the cursor over Adobe PDF Presetand select the desired PDF quality.a. The Export dialog window appears.3. Browse to the desired location.4. Enter the File name.5. Click Save.Rotating an Object1. Use the Selection Tool to select the desiredobject.2. On the Control panel, locate the RotationAngle icon. Use the Up and Down arrowbuttons to adjust the value.a. Or click the drop-down menu and selectthe pre-defined value.Refining the PublicationExporting as PDF1. On the Menu bar, click File Export a. The Export dialog window appears.2. Browse to the desired location.3. Enter the File name.4. Click the Saves as type drop-down menuand select Adobe PDF (Interactive) orAdobe PDF (Print).5. Click Save.Using Adobe PDF PresetUsers will be able to save the InDesign file into apre-defined Adobe PDF format. These presetsdiffer in print qualities.isPage 8
Edge software - in InDesign layouts. Export to PNG Exports InDesign documents to PNG, a lossless format, for use on the web. Creating a New Document 1. On the Menu bar, click File. 2. Move the cursor over New, click Document 3. Modify any desired options. a. Document Preset - Name and save document settings including page size, columns .