Transcription
Adobe InDesign CS5 Tutorial
Adobe InDesign CS5 is a page-layout software that takes print publishing and page design beyondcurrent boundaries. Replacing popular software such as PageMaker and Quark Express, InDesign is adesktop publishing program that incorporates illustration capabilities into its interface. It also allowsfor cross platform interaction with Illustrator, Photoshop, and Acrobat.NOTE: This tutorial is fairly comprehensive in that it discusses the most common aspects ofInDesign and has been developed to take beginners through the software from start to finish.TABLE O F C O NT ENTS1. Getting StartedPage 32. Setting up the DocumentPage 33. ToolboxPage 44. Organizing the DocumentPage 8 Column SpecificationsPage 9 RulersPage 9 GuidesPage 107. Inserting/Formatting TextPage 118. Type MenuPage 119. Using ColorsPage 1210. Working With Objects (Images, Graphics, and Elements)Page 13 LinksPage 13 Placing ImagesPage 14 Enabling Text WrapsPage 15 GroupingPage 15 LockingPage 1616. SavingPage 1617. Exporting To PDFPage 172
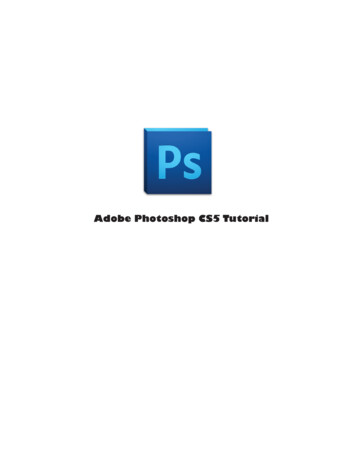
1 . G E TT I NG S TA RT EDBegin by opening Adobe InDesign CS5.On a PC, click Start Programs Adobe InDesign CS5, or click on the InDesign short cuton the desktop.On a Mac, click Macintosh HD Applications Adobe InDesign CS5, or click the InDesignicon in the Dock. (Figure 1)Figure 1. Navigation to InDesign CS5 on a Mac.2 . S ETTI NG U P THE DO C U M ENTSetting up your document correctly from the start will make your job much easier as you work throughyour project. This will require some advanced planning.1. To create a new document, click File New Document. This will open the DocumentSetup dialog box. Here you will be able to set up the correct page size, margins, andpage columns for your document. (Figure 2)Figure 2. Opening a new document in InDesign.3
2. S E TTI NG U P T HE DO C U M ENT C O NT.Options include, but are not limited to:Number of PagesType a value for the total number of pages for this document.Facing PagesSelect this option to make left and right pages face each other in a double-page spread.Deselect this option to let each page stand alone, such as when you plan to print on both sides ofa sheet of paper or want objects to bleed in the binding.Master Text FrameSelect this option to create a text frame the size of the area within the margin guides,matching the column settings you specified. The master text frame is added to the master.Page SizeChoose a page size from the menu, or type values for Width and Height. Page sizerepresents the final size you want after bleeds or trimming other marks outside the page.There are presets for common sizes such as letter, legal, and tabloid.OrientationClick the Portrait (tall) or Landscape (wide) icons. These icons interact dynamically withthe dimensions you enter in Page Size. When Height is the larger value, the portrait iconis selected. When Width is the larger value, the landscape icon is selected. Clicking thedeselected icon switches the Height and Width values.NOTE: The default unit of measurement in InDesign is pica (p0). If you type a value intothe Width or Height text fields and use the abbreviation for inches (in), InDesign willautomatically convert it.BleedAfter clicking More Options, the bleed area is used to align objects that you want toextend all the way to the trim line of your printed document.SlugAfter clicking More Options, the slug area is used for instructions to the printer, sign-offforms, or other information related to your document. The slug area is discarded whenthe document is trimmed to its final page size.2. When you have entered all of your document settings, click OK.NOTE: If you incorrectly enter information in the Document Setup dialog box, or if you need toadjust any of this information while you are working, you can make changes at any time by clicking File Document Setup.3. TO O L B OXIf you used Adobe Photoshop or Adobe InDesign before you should be familiar with thetoolbox in InDesign CS5 as it shares some of the tools from these applications. If you are a novice userof Adobe products you should keep in mind that you might not need to use all the tools. In this tutorial,only the basic tools will be discussed in depth.4
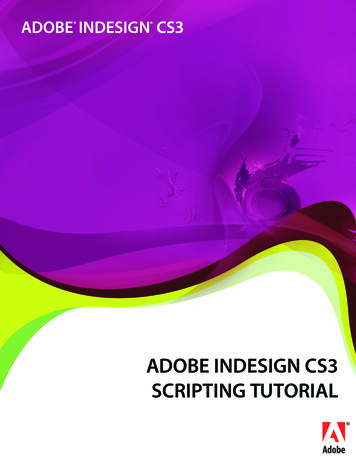
3 . TOO L B OX C O NT.Figure 3. Tools in InDesign.Some tools in the toolbox have additional tools linked to them. These tools have small black trianglesin the right-hand corner. To view the additional tools click and hold down on any tool that has a blacktriangle in the corner. (Figure 4)Figure 4. Extra Tools in InDesign.5
3 . TO O LB OX C O NT.SELECTION TOOLSSelection tool lets youselect entire objects.Direct Selection tool letsyou select points on a pathor contents within a frame.Page tool lets you createmultiple page sizes withina document.Gap tool lets you adjustthe space between objects.DRAWING AND TYPE TOOLSPen tool lets you drawstraight and curved paths.Add Anchor Point tool letsyou add anchor points toa path.Delete Anchor Point toollets you remove anchorpoints from a path.Convert Direction Pointtool lets you convert cornerpoints and smooth points.Type tool lets you createtext frames and select text.Type on a Path tool letsyou create and edit typeon paths.Pencil tool lets you drawa freeform path.Smooth tool lets you remove excess angles froma path.6
3 . TOO L B OX C O NT.DRAWING AND TYPE TOOLS CONT.Erase tool lets you deletepoints on a path.Line tool lets you draw aline segment.Rectangle Frame tool letsyou create a square orrectangle placeholder.Ellipse Frame tool letsyou create a circle or ovalplaceholder.Polygon Frame tool letsyou create a multi-sidedshape placeholder.Rectangle tool lets youcreate a square or rectangle.Ellipse tool lets you create a circle or oval.Polygon tool lets you createmulti-sided shape.Scale tool lets you resizeobjects around a fixedpoint.Shear tool lets you skewobjects around a fixedpoint.TRANSFORMATION TOOLSFree Transform tool letsyou rotate, scale, or shearan object.Rotate tool lets you rotateobjects around a fixedpoint.7
3 . TO O LB OX C O NT.MODIFICATION AND NAVIGATION TOOLSEyedropper tool lets yousample color or type attributes.Measure tool measuresthe distance between twopoints.Gradient Swatch toollets you insert and adjustgradientsGradient Feather tool letsyou fade an object into thebackground.Scissors tool cuts pathsat specified pointsHand tool moves the pageview within the documentwindow.Zoom tool adjusts theview magnification in thedocument window.Note tool lets you add comments.4 . O RG ANIZ I NG T HE DO C U M ENTWorking in InDesign can sometimes call for mathematical precision in the layout of the document. Thissection provides tips on how you can use the available Rulers, Guides, and Column Specifications to makeyour final output precise with the placement of your text and graphics exactly where you want them.Using the Zoom Tool in conjunction with the Guides and Rulers is helpful because it allows you to focusin on specific areas of your documents to make the placement of your text and graphics as accurate aspossible.You can access the Zoom Tool by selecting it from the Tool Box (Fig. 3)The following sections within this tutorial explain: Column Specifications (Page 9) Rulers (Page 9) Guides (Page 10)8
4. O RG ANIZI NG T HE DO C U M ENT C O NT.COLUMN SPECIFICATIONSTo insert columns into your document click Layout Margins and Columns.1. Enter the number of columns you would like in the Number of Columns text field (Fig. 5).2. Enter the space (in inches) that you would like in between your columns in the Gutter text field.3. Make sure the chain image is linked and not broken if you would like InDesign to automaticallymake all the settings the same throughout the rest of your document.Figure 5. Margins and ColumnsRULERSRulers are used to measure the placement of texts andimages in your document. The rulers measure in inches,starting at “0”, and run horizontally and vertically fromthe top left corner of your document.If the Rulers are not displayed, click View Show Rulers(Fig. 6). Or, if the Rulers are being displayed, and you wantto get rid of them, go to View Hide Rulers. Clicking anddragging on the box where the horizontal and verticalrulers meet adjusts the placement of the ruler.NOTE: The rulers must be shown in order to drawGuides, which are described in the next section.Figure 6. Rulers9
4. ORG ANI ZING THE DO C U M ENT C O NT.GUIDESGuides are temporary horizontal and vertical lines that you can set up within your document to producepage layout with mathematical precision. They are not actually drawn into your document; they exist onlyon-screen to help you with your layout. Guides are useful because they help keep all parts of the document aligned properly, and they assist when measuring with the rulers. The Rulers must be shown inorder to insert Guides.Inserting GuidesTo insert a Guide, place your pointer on the Horizontal (or Vertical) ruler at the top of your document.Click and drag down onto the document where you would like your guide to be.You should notice adotted line that correlates with the movement of your pointer. Measure the distance you are pullingyour Guide down at by using the Vertical (Horizontal) ruler on the left of your document. The Guide willappear as a thin aqua line. If you do not like where you placed your Guide, you can move it to anotherpart of the document by clicking and dragging it, or, you can remove it completely by dragging it off of thedocument.“Snap to” GuidesSnapping to a Guide is like “magnetizing” it. If you drag an image or element near a Guide (within a fraction of an inch), the image or element will lock into place with the Guide. To turn snapping on or off, clickView Grids and Guides Snap to Guides (Fig. 7).Hiding GuidesIf you would like to view your document without the aid of the Guides, you can hide them temporarilyby going to View Grids and Guides Hide Guides (Fig. 8).Figure 7. Snap to GuidesFigure 8. Hide Guides10
INS ERTI NG AN D F O RM AT T I NG T EXTNow that you have a basic understanding of setting up a document and using the Tool Box, you can begininserting text. Using the Text Tool (T) (Fig. 3), click onto your page to enable the text cursor. Don’t bediscouraged if the cursor does not line up exactly where you want to place your text – you can moveand format your text later. Begin typing your content. Once you have your raw text on the page you canbegin manipulating it to your liking.Change from the Text Tool to the Pointer Tool and click over your text.You will notice that your texthas been placed into a “box” of sorts. This is called an Element. Many objects and all of your text mustbe within an Element; there is no “freestanding” text in an InDesign document as you might find in aMicrosoft Word document.Using the Pointer Tool, you can move the Element of text around to anywhere you like on the page.Using the “grippers” on the corners of the Element, you can adjust the width and length of the Element. Ifyou do not specify a length for the Element, it will expand according to the length of your text, however,if you adjust the length of the Element to be smaller than your text, your text will not be visible. A redtab below the Element indicates that there is more content within the Element that is not visible (Fig. 9).Figure 9. Left box shows text that fits in the Element. Right box shows that all text is not showing in the Element.TYPE AND PA RAG RA P H M ENUA common way to format and manipulate your text is to use the Type Menu at the top of the screen.InDesign CS4 placed only the basic items in this area, however CS5 adds all the advanced features, as wellas access to the Paragraph menu. When the Type Tool is selected, the Control Pallette should appear atthe top of the screen. If it is not, click Window Control. At the extreme left hand side of the palletteare the two buttons that let you switch back and forth between Type and Paragraph controls.Figure 10. Type PalletteFigure 11. Paragraph Pallette11
US I NG C O L O RSInDesign includes thousands of color options as well as the ability to mix and create your own colors.After opening a new document, the Colors Palette window should appear on the right-hand side of thescreen. If it is not there, click Window Color.InDesign includes 10 default color options within the Swatches Palette (Fig.12). These colors are selectedfrom the two common color models: RGB and CMYK. (Use RGB colors if your output will be on acomputer or TV screen. Use CMYK colors for print documents.)To mix custom colors, open the Color Pallette. Depending on the color mode, you’re using, it willopen in RGB (Fig.13) or CMYK (Fig.14). Mix hues using the slider bars. To add your custom color tothe Swatches Palette, click Add to Swatches.You can also remove colors from the Swatches Palette byclicking and dragging.The new swatch will appear in the Swatches Pallette with the default name set to reflect the colormixture. For example, in Figure 12, pure Cyan in CMYK mode is listed as C 100 M 0 Y 0 K 0. One caneasily change this to something more descriptive by double-clicking the swatch and simply renaming it.Figure 13. RGB color pallette set to blackFigure 12. Default Swatches PalletteFigure 14. CMYK color pallette set to black12
WO RKIN G W I T H O B J EC TSNow that you have learned how to insert and edit text Elements, you need to understand how to workwith other kinds of objects within your document. Nearly every InDesign document will contain text,and/or graphics. Using the three together takes thorough knowledge of InDesign’s capabilities.For the purposes of this tutorial, it is important to understand the kind of “objects” to which this tutorialrefers: Text (Element) - A block of text within a defined “text box” (discussed in a previous section). Image - A picture file with one of the following extensions: .jpg, .gif, .tif, .pct, .bmp, .ai, .pdf, or .png,created in another program such as MS Excel or Photoshop. Graphic - Vector illustration created directly in InDesign using the provided pen or other path tools.The following sections offer an in depth explanation of how to insert and adjust Images, Graphics, andElements within your document. Links (Page 15) Placing Images (Page 15) Enabling Text Wraps (Page 16) Layers and Arranging (Page 17) Grouping (Page 18)LINKSInDesign is primarily a linking device; it can create simple graphics, but it’s strength lies in the way itassembles disparate elements into a cohesive document. As a general rule, when inserting images intoyour document, you should never use the “copy & paste” technique. Instead, save your image files inthe same folder as your InDesign document, and “link” them into the document (discussed in the nextsection).You can view the source location of the images that are linked into your document, as well asother important data such as colorspace and filetype, by going to the Links Palette (Fig. 15). To view thepallette, go to Window Links (Fig.16).Figure 15. Links palletteFigure 16. To view Links pallette13
WO RKI NG WI T H O B J EC TS C O NT.PLACING IMAGESPlace is the function used to insert an image into your document. It is comparable to Microsoft Word’s“Insert Picture from File” function. When you Place something into your document, it is “linked” to thedocument from its current location (as previously mentioned). Therefore, it is recommended that you storeall of your content for your document in the same location.To Place an image into your document do the following:1. Make sure the Pointer Tool is selected. (If the Text Tool is selected when placing an image, the imagewill insert within a blank Element - not as an independent unit. Images within Elements are difficultto format and reposition.)2. Go to File Place.3. Navigate through the pull down menus to find the file that you want to insert. Select the file and hitOK (Fig. 17).4.Your cursor will change into a small grey picture box that represents your “unplaced” image. Findthe approximate location where you want to drop the image and click the mouse once.Once you have Placed the object, switch to the Pointer Tool to move the object to the precise locationwhere you want it. If you want to resize your image, single-click on your image, click the Free TransformTool (E) and you can resize it using the “grippers” – little black squares - that surround the image. Click anddrag a gripper inward or outward to expand or shrink you image as desired. If you would like to maintainthe original proportions of the image when you resize it, hold down the Shift key as you perform theresizing action.Figure 17. “Place” dialogue box14
WO RKI NG WI T H O B J EC TS C O NT.ENABLING TEXT WRAPIf you have a large block of text and would like to insertan image in close proximity without the text or imageoverlapping, you can use a function called Text Wrap(which is used frequently in Microsoft Word.) Using thePointer Tool, click on the image and go to Window Text Wrap. There are several visual options that displaythe different kinds of Text Wraps (Fig. 18). The numericalsettings at the bottom of the window denote how much“buffer space” should be maintained between the imageand the text.Figure 18.Text Wrap palletteGROUPINGFrequently, you will have many Images, Graphics, and Elements on the screen at once. It can be very beneficial to connect several of these together once they are positioned correctly so that you can move all ofthem at once and maintain the relational distance between each of them. This function is called Grouping.To Group two or more objects, do the following:1. Select all of the objects that you want to Group together. This can be done in two ways (both usingthe Pointer Tool): Hold down the Shift key and click on each object individually, or, Starting in an empty space on the page, click and hold the mouse and drag it outward creating a“ghost box” around all of the objects you want to select. When you release the mouse all of theitems within the box should be selected. (Fig. 19)2. Click Object Group (Fig. 20).3. If you click over the newly grouped objects with the pointer tool you will notice that they are boundtogether as one large object. The tip-off is that the bounding box connecting them, which was oncesolid, has now become dashed, and the individual object outlines have disappeared. (Fig. 21).4. To ungroup these objects, click on the grouped objects and hit Object Ungroup.Figure 19. All selected, not groupedFigure 20. Object GroupFigure 21. Grouped15
WO RKI NG WI TH O B J EC TS C O NT.LOCKINGSometimes, you may have an object placed exactly where youwant it and you will want to avoid moving it by accident. (Forexample, if you have a large image or graphic as a backgroundfor the page, you may select it and move it accidentally if youare not careful.) Therefore, InDesign has a function called Locking to help you avoid such accidents. When an object is Locked,it cannot be moved, adjusted, or altered in any way.Figure 22. Object LockTo Lock objects, select them using the Pointer Tool and clickObject Lock Position (Fig. 22). Notice now that InDesignrestricts the object from being altered in any way. To unlock theobject(s), click Object Unlock All on Spread (Fig. 23).NOTE: As with Grouping, you can hold down the Shift key toselect multiple objects.Figure 23. Object UnlockAll on SpreadS AVI NGSaving your document should be a habit when working in InDesign. Saving frequently lessens the risk oflosing the work you have been doing.1. To save your InDesign document go to File Save As.2. The Save As dialogue box will appear (Fig. 24).3. Navigate to the place you would like your document to be saved by using the drop-down menuand navigation window.4. Enter the name of your document in the Save Astext field.5. Click the Save button in the lower right cornerof the dialogue box.6. Check to make sure that your document issaved in the place you intended.Figure 24. File Save AsFigure 24. File Save As16
E XPO RTI NG TO P DFWHAT IS A PDF?Portable Document Format (PDF) files are an excellent way to share page files with others without thecommon hassles of matching applications, fonts, large file sizes, and cross platform compatibility (Macto PC). A PDF file contains all of the elements required to view and print a document that matches theoriginal design in all respects (type style and size, images, color, layout, etc.)PDFs can be viewed and printed without access to the original application that created it. Viewing andprinting is done from Adobe Acrobat Reader, software that can be copied and freely distributed.Another feature of PDF files is their compact nature. These files are compressed in multiple ways to rendera document that is just a fraction of the size of the original document. This makes them very handy fortransportation and storage. This feature enables PDF files to be efficiently attached to e-mail messages.Unlike their originating documents, PDF files are not fully editable, without specialized software. This can beanadvantage when sharing files that you don’t want changed in any way.NOTE: InDesign differs from most programs in the way it creates PDFs.CREATING A PDFWhen you are ready to create the PDF file take the following actions:1. Save your document.2. Go to File Export Adobe PDF.3. A dialogue box will appear asking you to save (Fig. 27); this time, you will be saving the PDF file,not the original document. Name the new file (without deleting the .pdf file extension.) and hit Save.A dialogue box will appear in which you can adjust settings from jpg quality to the particular pagesyou want to include in the PDF (defaults to all). Make changes accordingly and hit OK.Figure 25. File Export Adobe PDFFigure 26. PDF dialogue box.17
Begin by opening Adobe InDesign CS5. On a PC, click Start Programs Adobe InDesign CS5, or click on the InDesign short cut on the desktop. On a Mac, click Macintosh HD Applications Adobe InDesign CS5, or click the InDesign icon in the Dock. (Figure 1) Figure 1. Navigation to InDesign CS5 on a Mac. 2. SETTING UP THE DOCUMENT