Transcription
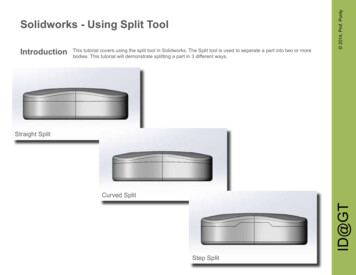
IntroductionThis tutorial covers using the split tool in Solidworks. The Split tool is used to separate a part into two or morebodies. This tutorial will demonstrate splitting a part in 3 different ways. 2014, Prof. PurdySolidworks - Using Split ToolStraight SplitID@GTCurved SplitStep Split
Start by creating a sketch that will be at 90 degrees to the direction you want to cut. For this example, the front plain wasselected.planeID@GTStep 1 2014, Prof. PurdySolidworks - Using Split Tool
Start the sketch by creating a horizontal line (A) where you want to split the body. Then create a loop around one ofthe parts that would result after the split. I this case the top part was encapsulated. Confirm the sketch once the loop iscomplete.InAID@GTStep 2 2014, Prof. PurdySolidworks - Using Split Tool
After confirming the sketch, go to Insert Features Split. 2014, Prof. PurdyStep 3ID@GTSolidworks - Using Split Tool
In the Split tool window, select the sketch you just created. Click on the ‘Cut Part’ button to actually perform the split. 2014, Prof. PurdyStep 4ID@GTSolidworks - Using Split Tool
After you click on ‘Cut Part’, it lists the resulting parts after cutting the original body. Choose the parts you want to keepfrom the list. In this case there were two resulting parts and both of them were chosen. Once you choose all the partsyou want, hit confirm. 2014, Prof. PurdyStep 5ID@GTSolidworks - Using Split Tool
The Feature Tree will now include a folder called Solid Bodies and list the resulting bodies in the folder. 2014, Prof. PurdyStep 6ID@GTSolidworks - Using Split Tool
To create a curved split, all you need to do is change the sketch.Start the sketch by creating a curved line (A) where you want to split the body. Then create a loop around one of theparts that would result after the split. I this case the top part was encapsulated. Repeat steps 3 through 6.InAID@GTStep 7 2014, Prof. PurdySolidworks - Using Split Tool
You can create a step split in similar fashion by just changing the sketch.Start the sketch by creating a step line (A) where you want to split the body. Then create a loop around one of the partsthat would result after the split. I this case the top part was encapsulated. Repeat steps 3 through 6.InID@GTStep 8 2014, Prof. PurdySolidworks - Using Split Tool
IT Soidor in Spit oo 0, Prof. Purdy Straight Split Curved Split Step Split This tutorial covers using the split tool in Solidworks. The Split tool is used to separate a part into two or more