Transcription
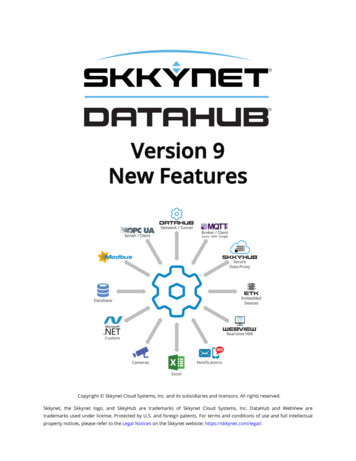
Version 9New Features.ORGNetwork / TunnelServer / ClientBroker / ClientAzure - AWS - GoogleSecureData ProxyEmbeddedDevicesDatabaseReal-time HMICustomCamerasNotificationsExcelCopyright Skkynet Cloud Systems, Inc. and its subsidiaries and licensors. All rights reserved.Skkynet, the Skkynet logo, and SkkyHub are trademarks of Skkynet Cloud Systems, Inc. DataHub and WebView aretrademarks used under license. Protected by U.S. and foreign patents. For terms and conditions of use and full intellectualproperty notices, please refer to the Legal Notices on the Skkynet website: https://skkynet.com/legal/.
space Cogent DataHub Version 9spaceiiiTable of Contents New for Version 9 of Cogent DataHub . ivNotable Changes . 1MQTT Client . 4Overview . 4Make the Connection . 4Exchange Data . 8Pre-Configured Connections . 11Azure IoT Hub . 11Google IoT . 12Amazon IoT Core . 13MQTT Broker . 15Desktop WebView . 18Run Locally . 18Install and Run Remotely . 19DataHub Security . 22Remote Configuration . 24Preparation . 24Configuring a Local DataHub . 25Configuring a Remote DataHub . 29IP Camera Support . 33Change Logs . 34Build 9.0.0-181106 . 34Build 9.0.0-181024 . 34Build 9.0.0-181009 . 34Build 9.0.0-180928 . 35Skkynet Cloud Systems, Inc 2233 Argentia Road Suite 306 Mississauga ON L5N 2X7 1.905.702.7851 https://skkynet.com
space New for Version 9 of Cogent DataHubNew for Version 9 of Cogent DataHubspaceiv DataHub Version 9 improves on the existing features of Version 8 and adds several exciting capabilities to address some common requests of V8 and to extend it further into theIndustrial IoT.Quick Links:Notable Changes MQTT Client MQTT Broker Desktop WebView Remote Configuration IP Camera Change LogsThis booklet contains documentation for just the new features for version 9 ofthe Cogent DataHub. For all other features, please see the Cogent DataHubdocumentation.Skkynet Cloud Systems, Inc 2233 Argentia Road Suite 306 Mississauga ON L5N 2X7 1.905.702.7851 https://skkynet.com
spaceNotable Changesspace1Notable ChangesSystem Requirements CPU Architecture: Intel x64 Windows versions:Windows 7, 8 or 10, Windows Server 2008, 2012 or 2016 .NET Framework version:4.6.164-bit executableDataHub V9 is a 64-bit executable and requires a 64-bit operating system. It is not compatible with 32-bit versions of Windows. In V8 the number of data points in DataHub waslimited to 500,000 or less in a typical installation, and substantially fewer if many connections or memory-heavy protocols like OPC-UA were used. With 64-bit support DataHubcan make use of the full memory of the computer.Installation folder has changedIn Windows, 64-bit applications are installed in the “Program Files” folder, while 32-bit applications are installed in the “Program Files (x86)” folder. DataHub V8 is a 32-bit application, while DataHub V9 is a 64-bit application. To reduce confusion, DataHub V9 will automatically uninstall DataHub V8 when you run the installer. Uninstalling V8 will not deleteyour existing configuration or WebView pages.Due to this change, you may need to modify your existing DataHub configuration. InDataHub V8 there are some settings that refer to the “Program Files (x86)” folder. If you install DataHub V9 on a computer that previously had V8 installer, it will use your existing V8configuration.Tunnel/Mirror- SSL CertificateWeb Server- Document root directory- Error log file- Access log file- SSL certificate fileScripting- Any script loaded from the Program Files (x86) folder.WebView files have changed locationIn DataHub V8 the WebView user content was stored in the Program Files (x86) folder,which is intended to be a read-only protected folder. DataHub V9 now stores all user content in the DataHub configuration folder, so user should never need to modify files in theProgram Files folder. The V8 DataHub installer was relaxing write permissions on somefolders within the Program Files (x86)\Cogent folder. That is now removed from V9.Skkynet Cloud Systems, Inc 2233 Argentia Road Suite 306 Mississauga ON L5N 2X7 1.905.702.7851 https://skkynet.com
spaceNotable Changesspace2All WebView user content is stored in the WebContent folder (see below). In order to access your user content with DataHub V9, such as WebView pages, you must manually copythat content from its V8 folder:C:\Program Files (x86)\Cogent\Cogent \Users\username\AppData\Roaming\Cogent DataHub\WebContent\PagesUser web content is stored in the configuration folderUser web content is now stored in the configuration folder\WebContent folder. Anyfiles placed here are visible to the DataHub Web Server, regardless of the HTML root pathconfigured in the DataHub Web Server option in the Properties window. Files in this folderwith the same name as files in the HTML root will shadow the HTML root, making them inaccessible.OPC UA support for Basic256Sha256 encryptionAfter the original OPC UA implementation in DataHub V8, the OPC Foundation introducedan additional encryption type, named Basic256Sha256. DataHub V9 includes support forthis new encryption. You may need to enable it in the Advanced OPC UA server settings inthe DataHub properties before it is available to your OPC UA client applications.Requires .NET Framework 4.6.1DataHub V9 requires .NET Framework 4.6.1. This .NET framework is not available for Windows XP/2003, so those operating systems are no longer supported.Machines running Desktop WebView and the remote configuration tool require .NETFramework 4.6.1 and 4.5 respectively.No support for Windows XP/2003As noted above, the version of .NET Framework used by DataHub V9 precludes WindowsXP and Windows 2003 Server.Requires the 64-bit version of the OPC Core ComponentsThe OPC Foundation provides a set of OPC Classic tools called the “OPC Core Components”. This a separate product that is typically installed when you install an OPC server.The OPC Core Components provides a service called OPCEnum that acts as a dictionary ofall OPC Classic servers running on a computer. OPCEnum converts a readable name intothe GUID that COM requires to initiate a connection.OPC Core Components comes in both 32-bit and 64-bit versions. The 32-bit version willonly support 32- bit clients and servers, while the 64-bit version will support both 32-bitand 64-bit clients and servers simultaneously.Skkynet Cloud Systems, Inc 2233 Argentia Road Suite 306 Mississauga ON L5N 2X7 1.905.702.7851 https://skkynet.com
spaceNotable Changesspace3DataHub V9 installs the 64-bit version of the OPC Core Components when it is installed. Ifyou install another OPC server afterward, it may replace the 64-bit version of OPCEnumwith a 32-bit version. The effect of running the 32-bit version of OPCEnum is that 32-bitclients will no longer be able to find DataHub V9, and DataHub V9 will no longer be able tofind any OPC servers. In that case, either reinstall the OPC Core Components shipped withDataHub, or type the GUID of the target server explicitly into the DataHub OPC connectionconfiguration.Database (ODBC) connections require 64-bit DSNsThe Database Logging and Query features that connect to SLQ databases via ODBC nowuse 64-bit drivers. All existing DSNs (Data Source Names) will fail to load. You need todelete and re-create the DSNs as 64-bit instead of 32-bit DSNs.Skkynet Cloud Systems, Inc 2233 Argentia Road Suite 306 Mississauga ON L5N 2X7 1.905.702.7851 https://skkynet.com
spaceMQTT Clientspace4MQTT ClientOverviewDataHub V9 introduces an MQTT client feature that allows the DataHub to connect tostandard MQTT brokers as well as Azure IoT Hub, Google IoT Hub, and Amazon IoT Core.The DataHub implements bi-directional data transfer between the MQTT broker and standard industrial protocols. It provides some configurability of the MQTT message format,allowing you to convert directly between MQTT messages and data points. In effect theDataHub can act as an industrial MQTT gateway.MQTT data items are called “topics”. An MQTT topic format consists of an implied hierarchy of names separated by backslash ( / ) characters. For example, plant1/mixer/motor/speed would be a valid MQTT topic. The equivalent name in the DataHub would beplant1:mixer.motor.speed. When configuring MQTT client and broker, you should allow the DataHub to automatically convert MQTT names to DataHub point names by selecting the options Convert dot to slash or Convert slash to dot when offered by theclient and broker configuration.Make the ConnectionThe MQTT Client option lets you configure the Cogent DataHub as anMQTT client to any number of MQTT brokers.MQTT Client ConnectionsThe Cogent DataHub can act as a client to one or more MQTT brokers.Check the Send Data to MQTT Brokers box to enable MQTT client functionality. Since theDataHub can be a client to more than one MQTT broker, you need to specify broker information for each MQTT client connection. Once you have a broker listed, you can activateor deactivate the connection using its On check box.To add a broker, press the Add button to open the Connect to MQTT Broker window described below. To edit a broker connection, double-click it or select it and press the Editbutton to open that window. To remove a broker, highlight it and click the Remove button.Skkynet Cloud Systems, Inc 2233 Argentia Road Suite 306 Mississauga ON L5N 2X7 1.905.702.7851 https://skkynet.com
spaceMQTT Clientspace5The Connect to MQTT Broker windowTo define or edit an MQTT broker connection, click the Add or Edit button to open theConnect to MQTT Broker window:Here you have four initial options: configure a standard MQTT connection, or choose oneof Azure IoT Hub, Google IoT Hub, or Amazon IoT Core. Each of these three broker-specifictabs provides entry fields unique to that connection which assist in filling in the configuration explained below.ConnectionTo configure a standard MQTT connection, click the Standard MQTT radio button and enter the following information:LabelA name used by the Cogent DataHub to identify the connection. There should be nospaces in the name. It doesn't matter what name is chosen, but it should be unique toother connection names.Host Name/IPThe name or IP address of the computer running the MQTT broker you want to connect to.PortThe number of the open port on the MQTT broker that will receive your connection request. Check the WebSocket box if you are making a WebSocket connection.Retry RateThe number of milliseconds to wait before retrying a failed connection.AuthenticationEnter your MQTT broker authentication information, as applicable.Skkynet Cloud Systems, Inc 2233 Argentia Road Suite 306 Mississauga ON L5N 2X7 1.905.702.7851 https://skkynet.com
spaceMQTT Clientspace6Use SSLMQTT over SSL typically uses a self-signed certificate, or one certified by an officialcertificate authority (CA). Here you can enter or browse for one or both of these, aswell as enter a password. Checking the Accept invalid certificates box will have theDataHub attempt to use SSL without a certificate.Client IDAn ID that the broker is expecting for this MQTT connection.UsernameThe user name for this ID.PasswordThe password for this username.Message ContentMQTT does not have a set format for message content; different MQTT brokers often require different formats. You need to know the format used by the broker you are connecting to.Message formatHere you can edit the format of your message to match to the format of the brokeryou are connecting to. Click the Edit Format button to open the Configure Parser window:Skkynet Cloud Systems, Inc 2233 Argentia Road Suite 306 Mississauga ON L5N 2X7 1.905.702.7851 https://skkynet.com
spaceMQTT Clientspace7The JSON Path fields at the top show your current entry. To make changes, edit theMessage Start, Per-Point Format, Per-Point Separator, and the Message Endfields. When you press the OK button your changes will be registered. To make a newentry, such as "PointName", enter a string and the placeholder (like {point} in thisexample) using the same syntax as the other entries in the Per-Point Format entryfield.Quality of serviceMQTT supports 3 levels of quality of service: At Most Once (0) Every message will be delivered on a best-effort basis, similar toUDP. If the message is lost in transit for whatever reason, it is abandoned―the receiver never receives it, and the sender does not know that it was lost. At Least Once (1) Every message will be delivered to a receiver, though sometimesthe same message will be delivered two or more times. The receiver may be able todistinguish the duplicates, but perhaps not. The sender is not aware that the receiver received multiple copies of the message. Exactly Once (2) Every message will be delivered exactly once to the receiver, andthe sender will be aware that it was received.If you are not sure, choose Exactly Once (2), the default.Retain messages on serverNormally an MQTT message that has no subscribers is simply discarded by the broker.This option tells the broker to keep the last message on this topic even if there are nosubscribers.Skkynet Cloud Systems, Inc 2233 Argentia Road Suite 306 Mississauga ON L5N 2X7 1.905.702.7851 https://skkynet.com
spaceMQTT Clientspace8Last Will MessageThe Last Will and Testament (LWT) feature of MQTT automatically generates a message toall other clients if a client fails unexpectedly. Here you can configure that message, as wellas messages for normal startup and shutdown.TopicThe MQTT topic for the message. Leaving this blank will disable the sending of anymessage.Quality of serviceChoose the MQTT quality of service. Please refer to Quality of service (above) formore information.Value when startingThe message you want this client to send on start-up.Value when stoppingThe message you want this client to send on normal shut-down.Value when connection lostThe message you want this client to send on any kind of unexpected shut-down or disconnect.Once you have configured the Connection, Authentication, Message Content,and Last Will Message, we recommend testing the connection by clicking theOK button. This will close the Connect to MQTT Broker and display your entries in the list of configured brokers. The Status should eventually change toRunning.When the connection is tested and working, you are ready to exchange data.Exchange DataOnce your connection is configured, you can create topics on the MQTT broker usingpoints from the DataHub, and/or request topics from the MQTT broker to create corresponding the DataHub points.Push data point to the MQTT serverThis mode allows you to select points from the DataHub data set and to transmit them tothe MQTT server. Normally you should select Convert dot to slash to allow the DataHubSkkynet Cloud Systems, Inc 2233 Argentia Road Suite 306 Mississauga ON L5N 2X7 1.905.702.7851 https://skkynet.com
spaceMQTT Clientspace9to convert point names to valid topic names. You may also choose Also subscribe tochanges in the broker. This will cause the DataHub to listen for changes in the topics andwrite the results back to DataHub points. Not all brokers support subscriptions.Choose the points from the Available Points list and they will appear in the SelectedPoints list. Use the Remove button to remove a selection.The following options apply to all points selected:Add prefix segment to every topicA string gets inserted at the beginning of the DataHub point name, after the domain name. For example, an entry of PRE here would change a point named default:PID1.Mv to default:PRE.PID1.Mv.Convert slash to dotThe MQTT topics use a slash ( / ) character in hierarchical names, while OPC and other industrial protocols typically use a dot ( . ). Keep this option checked to have theDataHub convert DataHub points into MQTT topics.Automatically create point hierarchyThe MQTT protocol supports hierarchical names. Checking this option preserves thehierarchy within the DataHub.Also subscribe to changes in the brokerAllow the broker to write back to these points in the DataHub.Click the OK button to save your changes, or Cancel to cancel them.Pull topics from the MQTT serverThis mode allows you to specify topics in the server that the DataHub should subscribe to.This will cause values in the broker to be written to DataHub points.Skkynet Cloud Systems, Inc 2233 Argentia Road Suite 306 Mississauga ON L5N 2X7 1.905.702.7851 https://skkynet.com
spaceMQTT Clientspace10Click the Add button to enter a point in a pop-up dialog. It will appear in the SelectedPoints list. Use the Edit button to make changes, and the Remove button to remove aselection. The topics should be supplied in MQTT syntax, like this: plant1/mixer/motor/speed. You may specify MQTT topics with the wildcards plus ( ) and hash ( # ). The character is an internal wildcard that matches any string between / delimiters.For example, you can use plant1/ /motor/speed to subscribe to all motor speeds inplant1. The topic name cannot start or end with a . The # character is a terminal wildcard that can only appear at the end of the topic, suchas plant1/mixer/# to subscribe to all topics related to plant1/mixer. You may specifya topic that is just a single # to subscribe to all topics in the broker.The following options apply to all topics:Place all data points into this data domainThis is a convenient way to organize your incoming MQTT connections. Choose any existing DataHub domain, or enter a new name and a new domain will get created in theDataHub.Convert slash to dotThe MQTT protocol typically uses a slash ( / ) character in hierarchical names, whileOPC and other industrial protocols often use a dot ( . ). Checking this option lets youconvert MQTT-style names.Automatically create point hierarchyThe MQTT protocol supports hierarchical names. Checking this option preserves thathierarchy within the DataHub.Also publish changes here to the brokerAllows the DataHub to write values to these points in the broker.Click the OK button to save your changes, or Cancel to cancel them.Skkynet Cloud Systems, Inc 2233 Argentia Road Suite 306 Mississauga ON L5N 2X7 1.905.702.7851 https://skkynet.com
spaceMQTT Clientspace11Pre-Configured ConnectionsBecause MQTT is a messaging protocol, not a data communications protocol, it does notspecify a particular format for making a connection or the data payload. Thus, each MQTTimplementation can be different with its own, unique connection characteristics.Our Standard MQTT option provides a generic way to configure a connection to anyMQTT broker. In addition, we offer the following pre-configured options to facilitate connecting to Azure, Google, or Amazon MQTT brokers.Azure IoT HubTo make a connection to Azure IoT Hub you will need to follow some extra steps. A password must be generated by a separate tool as described in the section called “Azure IoTPassword Creation”Once you have a password, click the Azure IoT Hub radio button and enter the followinginformation:IoT Hub NameThe IoT Hub Name provided by Azure.Device NameA name for the device that you want to connect.Subscribe to cloud-to-device eventsOptionally, you can enter the MQTT message format to receive data and event updates from the IoT Hub.After making your entries, press the Reconfigure button to add that configuration to thelist, and clear the fields for another entry. You will see the necessary information enteredin the Connection, Authentication, and Message Content tabs. You can optionally configure a Last Will Message, if desired.You are now ready to configure your Exchange Data options.Azure IoT Hub does not allow a client application to subscribe to a topic. Thatis the way Azure is designed. It was never intended to be a general-purposeSkkynet Cloud Systems, Inc 2233 Argentia Road Suite 306 Mississauga ON L5N 2X7 1.905.702.7851 https://skkynet.com
spaceMQTT Clientspace12MQTT broker. The only way to get data from Azure via MQTT is through amechanism called “Cloud-to-device events”. There is a setting in the DataHubconfiguration for that. You need to generate the events from the Azure portal. The Azure documentation can provide more information: -hub-devguide-messaging.Azure IoT Password CreationThe Azure IoT password is an SAS token. To generate the SAS token:1.Download Azure Device Explorer /releases2.Scroll down on the page to find a version with SetupDeviceExplorer.msi to install.3.Install and run the Azure Device Explorer.4.Find the IoT Hub Connection String and configure it.a.In Azure portal, select the IoT Hub instance.b.Select Shared access policies.c.Click the iothubowner policy.d.From the pop-up, copy Connection string -- primary key.5.Set the Protocol Gateway HostName to iothubname.azure-devices.net (for example, myiothub.azure-devices.net).6.Click Update.7.Select the Management tab.8.Select the device, e.g., MyDevice.9.Select SAS Token .10. In the pop-up, set the TTL (Days) to a number, like 365.11. Press Generate.12. Copy everything after the string "SharedAccessSignature ". The result should besomething like this:SharedAccessSignature sr datahub1.azuredevices.net%2Fdevices%2Fandrew&sig e 1562933661Be careful not to copy the newline character after the final visible character.This is the SAS token, which you can paste verbatim into the DataHub configuration Password field.Google IoTClick the Google IoT radio button and enter the following information as provided byGoogle:Skkynet Cloud Systems, Inc 2233 Argentia Road Suite 306 Mississauga ON L5N 2X7 1.905.702.7851 https://skkynet.com
spaceMQTT Clientspace13Project IDThe ID for your project.Registry IDYour Registry ID.Device IDThe Device ID for this device.Cloud RegionThe name of the Google cloud server region.Client CertificateThe certificate for this connection.After making your entries, press the Reconfigure button to add that configuration to thelist, and clear the fields for another entry. You will see the necessary information enteredin the Connection, Authentication, and Message Content tabs. You can optionally configure a Last Will Message, if desired.You are now ready to configure your Exchange Data options.Amazon IoT CoreClick the Amazon IoT Core radio button and follow the instructions given in the interface:Amazon IoT Core does not accept connections with quality of service 2, or withmessage retention. Be sure to set the following in the Message Content tab:Skkynet Cloud Systems, Inc 2233 Argentia Road Suite 306 Mississauga ON L5N 2X7 1.905.702.7851 https://skkynet.com
spaceMQTT Clientspace14 Retain messages on broker not checked Quality of service At Most Once or At Least OnceWhen you are finished, you can configure your Exchange Data options.Skkynet Cloud Systems, Inc 2233 Argentia Road Suite 306 Mississauga ON L5N 2X7 1.905.702.7851 https://skkynet.com
spaceMQTT Brokerspace15MQTT BrokerThe MQTT Broker option lets you configure the Cogent DataHub as anaggregation and distribution point for MQTT messages from devicesand MQTT clients. It can operate as a standard MQTT broker, or as agateway broker.These are the configurable options for the MQTT Broker:Enable MQTT BrokerThis box enables or disables all MQTT Broker functionality.Plain text connectionsCheck the box to enable plain text connections, and specify a port. Port 1883 is theMQTT default for plain text.SSL connectionsCheck the box to enable SSL connections, and specify a port. Port 8883 is the MQTTdefault for SSL. If you are using a certificate for SSL connections, you can enter it here.Message ContentHere you can set the DataHub to act as a standard MQTT broker or a gateway broker.Standard MQTT broker:In this mode the DataHub does not interpret MQTT messagesand simply distributes them to its clients according to standard MQTT protocol. To selectthis mode, enable the option Do not process messages, just route them.Gateway broker:In this mode the DataHub still performs the role of a standard MQTTbroker, while at the same time it interprets the incoming messages, mapping them toDataHub points. Messages from clients produce data changes in all configured DataHubprotocols. Changes to data in the DataHub result in messages to MQTT subscribers. MQTTSkkynet Cloud Systems, Inc 2233 Argentia Road Suite 306 Mississauga ON L5N 2X7 1.905.702.7851 https://skkynet.com
spaceMQTT Brokerspace16clients can participate in control systems as peers with OPC, DDE and DHTP clients andserver.Messages can be interpreted in three ways: Treat messages as binary Messages are Base-64 encoded and stored in the DataHubas strings. They are not processed beyond that. Use this mode if you want the DataHubto put the values into data points based on the MQTT topic name. For example, youcould use this mode when the MQTT data is an image. Treat messages as textMessages are interpreted as UTF-8 text and added to theDataHub as point values. No further interpretation is done. Use this mode when theMQTT messages are freeform text or you do not want them to be interpreted further. Interpret messages as JSON data point valuesMessages are expected to be text inJSON format. The DataHub can interpret the messages according to a message formatyou specify. To edit the message format, click the Edit Format button, which opens theConfigure Parser window:The JSON Path fields at the top show your current entry. To make changes, edit the Message Start, Per-Point Format, Per-Point Separator, and the Message End fields.When you press the OK button your changes will be registered. To make a new entry,such as "PointName", enter a string and the placeholder (like {point} in this example), using the same syntax as the other entries in the Per-Point Format entry field.Point NamesSkkynet Cloud Systems, Inc 2233 Argentia Road Suite 306 Mississauga ON L5N 2X7 1.905.702.7851 https://skkynet.com
spaceMQTT Brokerspace17Place all points in this data domainYou can specify a DataHub domain in which all points related to MQTT topics will becollected.Convert slash to dotThe MQTT protocol typically uses a slash ( / ) character in hierarchical names, whileOPC and other industrial protocols often use a dot ( . ). This option will convert MQTTstyle names.Automatically create point hierarchyThe MQTT protocol supports hierarchical names. This option preserves the hierarchywithin the DataHub.OptionsRequire authenticationEnable the MQTT protocol's support for authentication based on usernames and passwords.Accept WebSocket connectionsAllow clients to connect via WebSocket.Do not echo messages to the originating writerForward messages to all clients except the client that originates the message.Overflow ManagementWhen the broker receives messages more quickly than clients can accept them, it storesthe messages in queues, one per client. Here you can manage overflows in those queues.Maximum per-client message queue lengthSet a limit for the maximum number of outstanding messages that are queued perclient.Overflow handling strategyThere are two options: Drop newest message keeps the older messages, and removes the newer messages from the queue. Drop oldest queued message continually updates the queue with the newest data,removing the oldest m
DataHub V9 introduces an MQTT client feature that allows the DataHub to connect to standard MQTT brokers as well as Azure IoT Hub, Google IoT Hub, and Amazon IoT Core. The DataHub implements bi-directional data transfer between the MQTT broker and stan-dard industrial protocols. It provides some configurability of the MQTT message format,