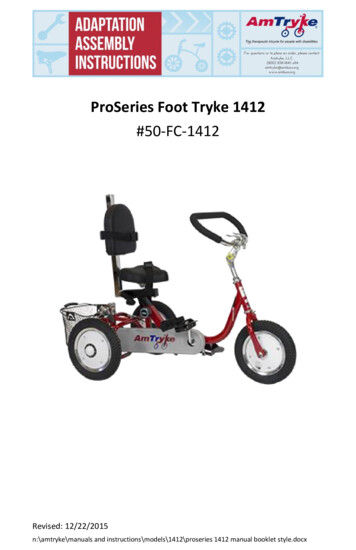
Transcription
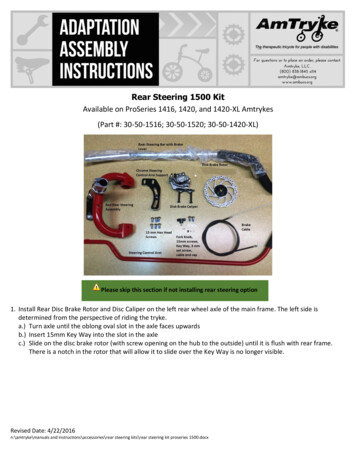
Rear Steering 1500 KitAvailable on ProSeries 1416, 1420, and 1420-XL Amtrykes(Part #: 30-50-1516; 30-50-1520; 30-50-1420-XL)Please skip this section if not installing rear steering option1. Install Rear Disc Brake Rotor and Disc Caliper on the left rear wheel axle of the main frame. The left side isdetermined from the perspective of riding the tryke.a.) Turn axle until the oblong oval slot in the axle faces upwardsb.) Insert 15mm Key Way into the slot in the axlec.) Slide on the disc brake rotor (with screw opening on the hub to the outside) until it is flush with rear frame.There is a notch in the rotor that will allow it to slide over the Key Way is no longer visible.Revised Date: 4/22/2016n:\amtryke\manuals and instructions\accessories\rear steering kits\rear steering kit proseries 1500.docx
2. Install the 3mm set screw through rotor using a 3mm Allen wrench, tighten securely.3. Install rear wheels (do not use the 22mm silver spacer tube on the left side axle if you are installing the rearsteering kit).4. Install front wheel (see assembly manual).5. Install Disc Brake Caliper.a.) Flip the bike upside down. It is easier to install the disc brake caliper and steering control arm support platefrom the bottom.b.) Insure brake pads slide smoothly over brake rotor or disk.Revised Date: 4/22/2016n:\amtryke\manuals and instructions\accessories\rear steering kits\rear steering kit proseries 1500.docx
c.) Put in black bolts with 5mm Allen wrench. Hint: tighten the rear bolt first as it will touch the bracket. Thentighten the front bolt until the brake is secure. Be sure both sides of the brake bracket contacts the red rearaxle tube evenly.d.) Test the rear axle rotation. It should spin easily without binding.6. Install Disc Brake Caliper.a.) Use two (2) of the 15mm hex screws provided in the parts bag to install the chrome support plate in thecenter of the rear tryke frame. The groove in the plate should be on the left side of the tryke when upright.b.) While you have the tryke upside down. Loosen the two (2) screws holding the black basket plate on the mainframe. Do not remove—just loosen!7. Install Disc Brake Caliper.a.) Be sure to loosen the two (2) screws holding the basket plate to the bottom rear of the main frame first. Justloosen, do not remove.b.) It is important that all the screws and bolts be loosely installed at first. This will allow you to line up all the holesand get the screws started easily. The final step is to tighten all bolts and screws.c.) Flip tryke right side up.d.) Remove silver basket bracket, screws and washers from the black basket plate and save them for later.Revised Date: 4/22/2016n:\amtryke\manuals and instructions\accessories\rear steering kits\rear steering kit proseries 1500.docx
e.) Flip tryke upside down again.f.) Slide on red rear steering bracket until the holes line up. The silver push bar brackets should be below and theblack steering linkage should be on top (when tryke is upside down) for easy installation. The bottom side (withtryke upside down) of the red bracket must rest between tryke frame and black basket plate.g.) Install two (2) of the 15mm hex head screws but do not tighten yet.h.) Flip tryke over so it is now right side upi.) Now you can install the basket and top of the red rear steering assembly. The red bracket goes on top of therear frame holes and underneath the black basket plate.j.) Position the basket and loosely install the Phillips head screw in the rear center hole. Do not tighten yet.k.) Place two (2) washers over the bracket holes.l.) Lay the silver basket bracket over the basket and center over the two sets of washers. Re-install the 25mm hexhead screws and one washer through the silver bars. Get all bolts and screws started by hand first. Once all arecorrectly installed; and started, you can tighten the whole assembly.8. Install Steering Control Arma.) For Model 1420-XL—Connect the two red steering control arm sections by using the two small Allen boltsfollowed by locknuts as seen in first picture (1420-XL Version Only!). Please skip to step B if you are working ona 1416 or 1420 tryke.Revised Date: 4/22/2016n:\amtryke\manuals and instructions\accessories\rear steering kits\rear steering kit proseries 1500.docx
b.) Screw red steering control arm into black steering linkage at rear of tryke and tighten all the way. Then,unscrew it one rotation to allow adjustments.c.) Note: This is the straight end. The curved end of the red linkage bar goes at the front and attaches to the frontfork.d.) Important Step: Attach the red steering control arm to the silver steering control arm support plate. The Allenscrew is already installed on the steering control arm support plate inside a plastic bushing. Use the 5mm Allenwrench to fully tighten into the steering control arm.Revised Date: 4/22/2016n:\amtryke\manuals and instructions\accessories\rear steering kits\rear steering kit proseries 1500.docx
e.) Flip tryke right side up.f.) Remove black plastic cap from tab/stud/shaft on the left upper fork and discard.g.) Slide steering rod bushing over tad/stud/shaft at the front of the tryke.h.) Install and tighten black plastic T-knob to secure.9. Install Rear Steering Bara.) Note: Very important—the steering bar must be inserted fully into the cinch collar—the minimum insertionlines must be down inside the collar. If not installed correctly you risk breaking the steering bar.Once the steering bar is fully inserted—align with front wheel for straight ahead position—then tighten the two 5mmAllen screws on the cinch collar.Questions or Concerns Regarding your Build? No problem! Please Contact Derek Shaw, AmTryke Technical andCustomer Support Coordinator @ 1-800-838-1845 x114 or dereks@ambucs.orgRevised Date: 4/22/2016n:\amtryke\manuals and instructions\accessories\rear steering kits\rear steering kit proseries 1500.docx
n:\amtryke\manuals and instructions\accessories\rear steering kits\rear steering kit proseries 1500.docx e.) Flip tryke upside down again. f.) Slide on red rear steering bracket until the holes line up. The silver push bar brackets should be below and the black steering linkage should be on top (when tryke is upside down) for easy installation.