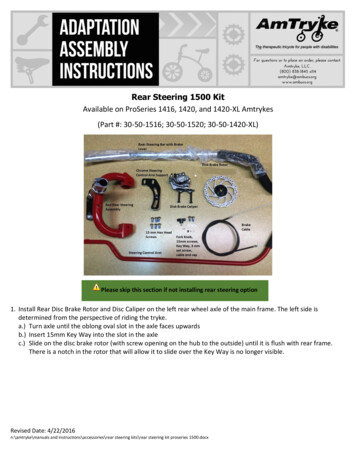
Transcription
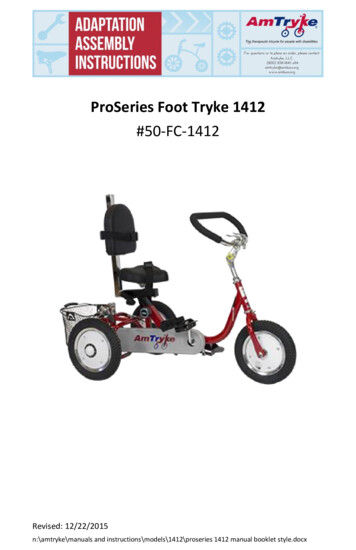
ProSeries Foot Tryke 1412#50-FC-1412Revised: 12/22/2015n:\amtryke\manuals and instructions\models\1412\proseries 1412 manual booklet style.docx
ContentsAbout AmTrykes . 1About This Manual . 1Safety . 2Safe Riding Tips . 2Brakes . 3Shift Gears . 4Assembly Instructions . 5Getting Started . 5Front Fork . 7Handlebar . 8Loading Brake . 9Seat . 10Basket . 11Pedals . 11Steering Pin . 12Additional Assembly Instructions . 13Rear Steering Bar with Hand Brake (Model 1512) . 13Fitting AmTryke for Rider . 16Optional Accessories . 17Troubleshooting . 17Maintenance . 18Wheels and Tires . 18Brakes . 18Chain . 18Maintenance Schedule . 19Warranty . 20Useful Information . 20AmTryke Therapeutic Tricycle Program . 20Donations . 21Returns . 21Refunds . 22AmTryke Sizing Charts . 23Tools . 23Revised: 12/22/2015n:\amtryke\manuals and instructions\models\1412\proseries 1412 manual booklet style.docx
About AmTrykes AmTryke therapeutic tricycles, owned and operated by National AMBUCS Inc., are designed for people with disabilities who are unable to operate atraditional bicycle. AmTryke tricycles or “trykes,” can be operated by feet,hands or both, and include a wide variety of models. The trykes can also beadjusted to fit the needs of different riders, including frame size, type of seat,trunk and leg supports.ProSeries models 1412 and 1512 were developed in response to requests fromtherapists for a traditional tricycle for children with special needs. Some of thefeatures include an adjustable seat (up/down, forward/back), telescopinghandlebars, 12-inch front and rear pneumatic wheels, and pedals that areweighted and self-righting. A loading brake makes transfer of rider safe andeasy. In addition, these trykes have a safety steering pin for parental control.Model 1512 also features a rear steering bar with hand brake for easy parentalcontrol.Both models can be adapted with several accessories. See Optional Accessoriesin this manual for more information. You can also visit our website for most upto date information at www.ambucs.org.About This ManualRead this manual carefully before assembling your tryke or using it for the firsttime. This manual includes important information about safety, assembly andmaintenance. Keep this manual in a safe place for information and for orderingaccessories/parts.AMBUCS/AmTryke reserves the right to make changes to the design andtechnology of AmTrykes. The assembly instructions are accurate as of the dateof this manual’s printing.Revised: 12/22/2015n:\amtryke\manuals and instructions\models\1412\proseries 1412 manual booklet style.docx
SafetySafety is very important to us. AmTryke products are designed in accordancewith the latest safety standards and are constantly monitored for quality. Weuse information from this quality control to develop our products.We urge all riders to seek the opinion of their health-care provider(s) beforeriding their tryke.AmTrykes should be used for their intended purpose only.Safe Riding TipsBefore riding, familiarize yourself how the tryke operates —it’s steering,braking and shift gears (if applicable). Adjust the seat, handlebars and pedals tofit the rider. See Fitting AmTryke for Rider in this manual for more information.Here are some tips about riding safety: AmTrykes should be used with close adult supervision. Riders must wear helmets. All our trykes include a free safety-rated helmet.The helmet must fit appropriately. A properly fitting helmet sits on the headcomfortably a helmet that sits high on the head is too small. Somemovement is acceptable, but a helmet that moves a lot is too large. See theillustration below for reference:Correct Way to Wear HelmetNOTE: Be careful not to pinch theskin when fastening helmet buckle.Wear the helmet flat atop your head,not tilted back at an angle.For more information aboutfinding the correct size helmet,see Helmet Sizing Chart on page24.Make sure the helmet fits snugly anddoesn’t obstruct your vision. The chinstrap should fit securely and the bucklestay fastened.GRAPHIC COURTESY OF BUDDY BIKE LLCRevised: 12/22/2015n:\amtryke\manuals and instructions\models\1412\proseries 1412 manual booklet style.docx
Riders must wear shoes. If shoes have laces, they must be tied properly.WARNING: NEVER ALLOW MORE THAN ONE RIDER ON AMTRYKE. Most trykes are equipped with a steering pin and have three steering optionsavailable:o Full steering: No steering pin. This option allows riders to make sharp turnsand is appropriate for riders who ride at slow speeds or in close quarters.Close adult supervision is required.o Limited steering: This option allows riders to turn 20 degrees in eitherdirection, thus, reducing the risk of over-steering or tipping over.o No steering: This option allows for riding straight only. A supervising adultis required to turn the tryke. To avoid tipping the tryke over, approach wheelchair ramps or thresholds ata 90-degree angle.WARNING: DO NOT RIDE IN OR NEAR TRAFFIC, OR WHERE THERE ISA RISK OF FALLING OFF CURBS, STAIRS, POTHOLES OR OTHER HAZARDS. Use caution on sloped parking lots, driveways and sidewalks. Avoid excessspeed by having an adult restrain the tryke from behind on sloped surfaces.The trykes have many options for control features. Consult AmTryke to findout the best solution for your rider. Many riders do not have the motor skills required to be able to use the handbrake effectively.WARNING: DO NOT RESTRAIN TRYKE BY GRABBING HANDLEBARSOR HAND BRAKE — THIS MAY CAUSE IT TO TURN SHARPLY AND TIPOVER. Depending on trunk stability, behavioral compliance and body awareness,some riders may need supports (e.g., lateral, head), belts (e.g. lap, shoulder),hip abductors or other specialized equipment. A physical therapist/healthprofessional can assist you with any recommendations. Riders should only be allowed to ride trykes that are the appropriate size. Ifyou are uncertain, refer to AmTryke Sizing Charts in this manual or contact aphysical therapist. Before riding, always check that all tires are inflated properly. If parts are broken or missing, the tryke should not be used until repaired.BrakesIf your tryke has brakes (front or coaster brakes) be careful when using thebrakes. Operate the brakes gradually. If your tryke has front brakes (frontRevised: 12/22/2015n:\amtryke\manuals and instructions\models\1412\proseries 1412 manual booklet style.docx
caliper brake or both front caliper brake and rear disk brake) squeeze the brakelever(s) gradually until you feel brake(s) working. The left brake lever operatesthe front caliper brake and the right lever operates the rear brake. To stop yourtryke, use both brakes. It is advisable to start braking by operating the rearbrake slightly before the front brake.WARNING: BE CAREFUL WHEN OPERATING BRAKES. SUDDENBRAKING MAY CAUSE TRYKE TO TIP OVER.Shift GearsIf your tryke has shift gears, use precaution when shifting gears. When shiftinggears keep pedaling but reduce pedaling pressure. Do not try to change gearswhen pedals or wheels are not moving. Also, never change gears while backpedaling and do not force the shift control when changing gears.CAUTION: USE CAUTION WHEN SHIFTING GEARS.Revised: 12/22/2015n:\amtryke\manuals and instructions\models\1412\proseries 1412 manual booklet style.docx
Assembly InstructionsRefer to the following instructions on how to assemble your tryke. Study theinstructions carefully before beginning assembly and follow the sequenceshown in the instructions.NOTE: AmTryke must be assembled by an adult.Be careful when assembling your tryke. Make sure that your working area hasenough light and is free of possible sources of danger, such as tools lyingaround.WARNING: THERE IS ALWAYS A DANGER OF INJURYWHEN WORKING WITH TOOLS OR DOING MANUAL WORK.Always dispose of packaging material properly. Do not let children play withplastic bags.WARNING: THERE IS A RISK OF SUFFOCATION WITHPLASTIC BAGS. KEEP PLASTIC BAGS AWAY FROM CHILDREN.When assembling your tryke, bolt all parts together loosely at first and checkthat they have been put together correctly. Tighten lock nuts by hand untilsnug; then use proper tools to tighten nuts completely.CAUTION: CHECK THAT ALL SCREWS HAVE BEENTIGHTENED SECURELY BEFORE USING YOUR TRYKE.Getting StartedYour AmTryke is shipped in parts. Carefully remove and lay out all parts fromthe carton so that you don’t scratch or lose any parts. Check that you have allthe necessary parts. If any parts are missing, please call us at 1-888-AMTRYKEfor assistance.Remove packaging material and discard. Please recycle! Refer to the followingpicture to identify different parts:Revised: 12/22/2015n:\amtryke\manuals and instructions\models\1412\proseries 1412 manual booklet style.docx
Hand brake(1512)HandlebarRear steering bar(1512)CheststrapsSeat ringcontrol armSteering pinknob (1512)holesSaddleseatLap strapBasketSeat postParkingbrakeFront brake(1512)MainframeChainguardNutcoverBack wheelSeatsecuringknobSeat postbracketPedal crankPedalsSteeringcontrol armFront fork(1512)Frontwheel1412 & 1512 partsYour tryke also includes the following hardware not shown above:Framelever (2)SafetypinScrews (4)for basketRevised: 12/22/2015n:\amtryke\manuals and instructions\models\1412\proseries 1412 manual booklet style.docx
You need the following tools for assembly (for a picture of different tools, seepage 25):TOOLS REQUIRED: 6 mm Allen wrench (incl.)8 and 10 mm wrench/socket13 mm wrench/socket14 and 15 mm wrench (incl.)Quick release wrench (incl.)Front ForkStart assembling your tryke by first mounting the front fork onto the mainframe:1. Slide one of the ball-bearing retainers onto the front-wheel fork tube withball bearings FACING UP and then insert the fork tube into the main frametube.MainframeForkFront fork inserted into main frame’s forktubeStep 12. Slide the second ball-bearing retainer onto the top of the fork tube.BallbearingsideStep 2NOTE: The ball bearings face down and seatinto the chrome ring in the fork tube.Revised: 12/22/2015n:\amtryke\manuals and instructions\models\1412\proseries 1412 manual booklet style.docx
3. Screw the head cup onto the threaded top ofthe fork tube and tighten.HeadcupCAUTION: DO NOT OVER TIGHTEN. FORKASSEMBLY SHOULD BE SNUG WITH NO PLAYBUT EASY TO TURN.4. Place the lock washer onto the top of the forktube.LockwasherStep 2NOTE: Be sure the tab in the washer isinserted into the slot in the fork tube.LocknutStep 35. Finally, install the lock nut onto the fork tubeby threading it. Tighten securely.HandlebarStep 5To install the handlebar, start with the handlebar stem:1. Remove the black plastic cap from the handlebarstem and insert the stem into the fork headtube.HandlebarstemCAUTION: STEM MUST BE INSERTED TOAT LEAST MINIMUM INSERTION LINE (HASHMARKS).2. Remove the gray plastic cover from the stemexpander (Allen head bolt) and secure the stemby tightening it with a 6 mm Allen wrench.HashmarksStep 1Revised: 12/22/2015n:\amtryke\manuals and instructions\models\1412\proseries 1412 manual booklet style.docx
NOTE: Be sure to center thestem with the front wheel.Step 23. Replace the plastic cover.4. Tighten the handlebar clamp by tightening thetwo Allen head screws.Step 3QuickreleaseleversAllenheadscrewsStep 45. Adjust the handle bar position and tightenthe two quick release levers securely.TIP: Use the quick release wrench toeasily tighten quick release levers.Step 5Parking BrakeParking brake is used to help transition rider on/off the tryke safely and easily.To install it:1. Remove the two Allen bolts from the base of theparking brake.2. Place the brake over the right side of the rear axlehousing.3. Align the two holes in the brake bracket with thetwo holes of the bracket attached to the axle.NOTE: The chrome metal piece of the parking brakeshould be over the top of the right back tire.Parking brake (picturedfrom front)Revised: 12/22/2015n:\amtryke\manuals and instructions\models\1412\proseries 1412 manual booklet style.docx
4. Put the two Allen head bolts back (install from the bottom going upward).Tighten securely.CAUTION: ALWAYS ENGAGE PARKINGBRAKE WHEN TRANSFERRING RIDER ON/OFFTRYKE.WARNING: DO NOT USE PARKING BRAKEFOR BRAKING. DOING SO MAY CAUSESERIOUS INJURY.SeatAllenboltsAllenboltsAllenboltsLoading brake (pictured fromback)Start seat assembly by first installing the seat post bracket. Place the bracketonto the frame rail and place the seatFrame railpost plate to the underside of theframe. Secure the bracket one framelever and washer at a time until tight.The seat post bracket can be adjustedforward/backward by loosening theFramelevers.leversNOTE: Frame levers are spring-loaded.Once engaged, pull out the levers torotate them backward withoutloosening the screw. Repeat until youhave seat post bracket fully tightened.To install the seat, slide the seat assembly (seatand seat post) into the seat post bracket. Pull backon the seat securing knob and place the pin intodesired hole for seat height.Seat post bracketSeatsecuringknobTIP: It is not necessary to remove the seatsecuring knob, just loosen and pull to releasethe pin for adjustments.Seat post assemblyRevised: 12/22/2015n:\amtryke\manuals and instructions\models\1412\proseries 1412 manual booklet style.docx
BasketTo install the basket, mount the basket bracket onto the rear bar using two 1¾”bolts with nuts and washers. The bracket ismounted from the bottom. Insert the bolts andwashers from the top and place the washers andnuts on the ends of them, and tighten. (Seepicture on the right).Put the basket onto the bracket (bars on thebasket mount onto it).BasketbarsBasketbracketBasket bracketNOTE: You can use two screws and nuts (black)to attach the basket more securely.BasketPedalsTIP: Pedals and pedal cranks arelabeled “R” (right) and “L” (left).Pedals are mounted onto the pedal cranks. The right pedal tightens clockwiseand the left counterclockwise. Hand thread untilPedalyou are certain that they are threaded properlycrankand then use a 15 mm wrench to tightensecurely.TIP: Pedal threads tightentoward the front of bike.CAUTION: BE CAREFUL WHEN THREADINGPEDALS. DO NOT FORCE. PEDALS THREAD EASILYWHEN INSTALLED PROPERLY.Right pedalRevised: 12/22/2015n:\amtryke\manuals and instructions\models\1412\proseries 1412 manual booklet style.docx
Steering PinIf needed, insert the steering pin into the front fork tube from the side. Installthe adhesive hook strip to the frame to keep thesteering pin secure from loss. Three steeringpositions are available: Top position: Locks steering straight. Lower position: Limits steering to 20 degreesin either direction. No pin: Free steering.Jiggle the front wheel assembly as you push thepin into the hole and through the other side ofthe fork tube. The pin should insert all the wayto the split ring to be correctly seated.Steering pinNOTE: You may find it desirable to limit steering so the ridercan concentrate on learning the pedal motion first.This is the end of basic assembly instructions for both models. SeeAdditional Assembly Instructions if your model is 1512.Revised: 12/22/2015n:\amtryke\manuals and instructions\models\1412\proseries 1412 manual booklet style.docx
Additional Assembly InstructionsModel 1512 also includes a rear steering bar with hand brake for parentalcontrol.Rear Steering Bar with Hand Brake (Model 1512)TOOLS REQUIRED: 8 mm wrench/socket 10 mm wrench/socket 6 mm Allen wrenchTo install the rear steering bar, follow these instructions:1. Loosen the two Allen bolts in therear steering collar with a 6 mmAllen wrench.2. Insert the steering bar into the collarbut do not tighten the bolts, yet.3. Attach the steering control arm tothe rear of the tryke as show in thepicture on the right.4. Attach the steering control arm tothe front and tighten the securingknob.5. Turn the front wheel straight forwardand now tighten the 6 mm Allen boltsfor the steering ltsAllenAllenboltsboltsRear steering bar (pictured from bottom)SecuringknobSteeringcontrol armNOTE: Make sure the steering bar isstraight before tightening.Steering control arm (front of tryke)The hand brake lever is preinstalled to the rear steering bar but you need toattach the hand brake cable to it. Follow these steps:Revised: 12/22/2015n:\amtryke\manuals and instructions\models\1412\proseries 1412 manual booklet style.docx
Locking nutFerruleStep 1: Turn the Ferrule so that theslot in it and the locking nut align.Cable barrelarmStep 2: Pull in on the lever and pull outthe cable barrel arm.CablebarrelStep 3: Insert the cable barrel into thecable barrel arm.Step 4: Slide the cable through the slots ofthe Ferrule and locking nut, and then turnthe locking nut and Ferrule 180 degreesfrom each other.Next, you need to attach the other end of the cable to the caliper brake arm inthe front of the tryke. You also need to adjust the brake pads to align with therim when the brake is applied:1. Use a 10 mm wrench or socket to loosen theacorn nut that secures the brake pad to thecaliper arm.2. Squeeze the brake caliper arms so that thebrake pad touches the front rim. Position thebrake pad until it is aligned with the rim andmakes full contact.3. Retighten the acorn nut.Brake caliperarmsAcorn nutFront brakeRevised: 12/22/2015n:\amtryke\manuals and instructions\models\1412\proseries 1412 manual booklet style.docx
4. Use an 8 mm wrench to loosen the caliperbrake cable clamp.5. Use your hand to loosen the caliper brakecable bezel half way. Tighten the lock nutdown against the caliper brake arm.6. Thread the cable through the caliper brakecable bezel and through the hole in thecaliper brake cable clamp.BezelLocknutCableclampBrake caliper armsHoleHoleCable clamp7. Use one hand to squeeze together the caliper arms so that the brake padsare against the rim and use the other hand to remove any slack in the cable.Retighten the cable clamp with an 8 mm wrench or socket.Pull out slackcableAdjusting cable8. Lift the front tire off the ground and spin the tire to see if the brake is tootight.9. If the front tire does not spin freely, then loosen the caliper brake cablebezel and locking nut by hand.10. Turn the lock nut counterclockwise two to three turns; tighten the caliperbrake cable bezel until the lock nut rests against the caliper brake arm.11. Repeat step 8; if the tire spins freely then proceed to step 12.12. Pull the brake lever in ten times to make sure that the cable does not slip;test the brakes.Revised: 12/22/2015n:\amtryke\manuals and instructions\models\1412\proseries 1412 manual booklet style.docx
Fitting AmTryke for RiderProSeries models 1412 and 1512 have been designed for children with specialneeds. See the information below for quick reference on rider sizerequirements:1412 & 1512Rider’s height: Max. 42 inchesArm length 14-22 inchesLeg length 21-26 inchesMaximum weight: 125lbsFor more information on how to measure rider’s size correctly, refer to Rider’smeasurements graphic on page 24.Follow these instruction to fit your child properly:NOTE: You may need assistance while fitting the tryke.1. Engage the parking brake.2. Adjust the seat height: Start with the seat post in the lowest position andadjust upward if needed. Tighten the seat securing knob securely.3. Adjust the seat back up/down for the best support for your child’s trunk.Tighten the seat back knobs.4. Slide the seat post assembly forward/back to suit your child’s needs. Whenhis/her feet are on the pedals, the knees should be slightly bent. Tighten theseat post bracket levers securely.5. Adjust the handlebar.6. Adjust and secure the lap and chest straps to fit your child.If you need further adjustments, see Optional Accessories on the next page fordifferent options.Revised: 12/22/2015n:\amtryke\manuals and instructions\models\1412\proseries 1412 manual booklet style.docx
Optional AccessoriesMost AmTryke models can be adapted with a variety of seating options andaccessories, so that most riders can feel safe and secure. See the table belowfor accessories available for 1412 and 1512:OPTIONAL ACCESSORIESSnappy seat systemBucket seatH-harnessHand strapsR10 degree seat post1400 seatback1400 lumbar padWrist wrapsWrist brace holding mittsFoot cups1400 full padded backPedal blocks1400 head restExercise pedalsFull padded backPedal leveler pulleyExpanding pedalsKnee adductor positioning strapKnee separatorPull barPush barSafety flagLicense plateFor a complete and updated list of available accessories, please visit ourwebsite at www.ambucs.org.TroubleshootingHere are some common troubleshooting issues with answers.Pedals/handles will not thread into crank arms.Check to make sure that the right pedal is used on the right side and the leftpedal is used on the left side. DO NOT FORCE! Carefully thread in properdirection – then tighten.Rear wheels are making noise.Axle nut(s) is too tight. You need to loosen it slightly by ¼ turn.Brakes squeal or rub against the rim/tire.Brakes are adjusted too tight. Readjust.For any issues not answered here, please call AmTryke at 1-888-AMTRYKE oremail us at amtryke@ambucs.org.Revised: 12/22/2015n:\amtryke\manuals and instructions\models\1412\proseries 1412 manual booklet style.docx
MaintenanceMaintenance is important to help keep your AmTryke in good working orderfor years to come. This section includes some general maintenance tips.Wheels and TiresWobbly wheels cut braking power, so keep all wheels running true. Wheels canlose alignment over time when spokes stretch. Wheel alignment takes specialtools and know-how, so have this done by a professional/bike shop.Proper tire pressure is also very important. If tire pressure is too low, it cancause a flat and rolling resistance, and if tire pressure is too high, it can cause atube to blow out. Keep tires inflated to the pressure marked on the tire.Correct pressure assures longest tire life. Repair tube punctures with a selfadhesive patch, follow instructions that come with the repair kit.BrakesBrake shoes wear out so inspect them at least every six months. Make sure thatthey are properly aligned on the wheel rim for maximum braking power. Makeadjustments if necessary.It is best to let a professional to replace brake shoes. If you, however, decide toreplace them yourself, remove the old brake shoes and install new shoes in thebrake arm. Tighten the brake shoe clamp bolt.ChainClean the chain at least every six months, more often if you have been ridingyour tryke over sand and dirt, or through water and mud.You do not have to remove the chain for cleaning. You may clean the chainwith an environmentally safe chain cleaning product and brush. If you use asolvent (such as kerosene) then remove the chain (with a chain rivet tool) andimmerse it in the solvent to avoid spilling/staining, particularly on the tires orbrake shoes.Before riding your tryke, always check that it is in proper workingorder. Check that all quick release levers, nuts and bolts areproperly tightened, and tires are properly inflated.Revised: 12/22/2015n:\amtryke\manuals and instructions\models\1412\proseries 1412 manual booklet style.docx
Maintenance ScheduleFollow this maintenance schedule to keep your AmTryke in safe operatingcondition.MAINTENANCE SCHEDULEPARTTO DO LISTWHENAll handlebar boltsCheck tightnessEvery 4 monthsBrake cablesCheck for slack, frayed cableEvery 6 monthsBrake armsCheck mounting bolt tightnessEvery 6 monthsBrake leversCheck tightness on handlebarsEvery 6 monthsBrake shoesInspect for wear, alignmentEvery 6 monthsChainCheck for wear, clean, relube or tensionEvery 6 monthsPedalsCheck tightnessEvery 9 monthsRear axle nutsCheck tightnessEvery 4 monthsTiresCheck tire pressureWeeklyWheel alignmentCheck wheels for out of truenessEvery 6 monthsSeat postCheck tightness of leversWeeklySeatCheck tightnessMonthlyRevised: 12/22/2015n:\amtryke\manuals and instructions\models\1412\proseries 1412 manual booklet style.docx
WarrantyAll AmTrykes come with a three-year residential warranty and one-yearinstitutional warranty. The warranty begins with the date of purchase by theconsumer. Address all warranty questions to AmTryke LLC, P.O. Box 5127, HighPoint, NC 27262; 1-800-838-1845.THIS LIMITED WARRANTY IS THE ONLY EXPRESS OR LIMITED WARRANTYAPPLICABLE TO AMTRYKE LLC. THE LIMITED WARRANTY SET FORTH HEREINMAY NOT BE EXTENDED, ENLARGED OR OTHERWISE MODIFIED BY ANYAMTRYKE DEALER, AGENT OR EMPLOYEE, AND AMTRYKE DOES NOT ASSUMEANY LIABILITY OR MAKE ANY WARRANTY EXCEPT AS STATED IN THIS LIMITEDWARRANTY.PARTS: AmTryke will repair or replace, at its option, defective parts for thistryke at no charge, for a period of one year after the date of original purchase.Parts subject to normal wear and tear, including tires, tubes, seat, pedals andhandgrips are not covered by this one year period. Parts subject to normalwear and tear, found to be defective by the purchaser within 30 days ofpurchase, including tires, tubes, seat, pedals and grips, will be replaced byAmTryke at no charge. This warranty does not include dealer service chargesfor parts replacement or shipping charges to or from AmTryke.FRAME: All AmTryke frames and forks are guaranteed to be free from defectsin materials and workmanship for a period of three years from the date oforiginal purchase. A frame or fork found defective in materials or workmanshipwill be repaired or replaced at AmTryke’s option.Useful InformationAmTryke LLC, owned and operated by National AMBUCS Inc., a nationalnonprofit service organization, was established in 1994. It is dedicated tocreating mobility and independence for people with disabilities.AMBUCS has provided over 16,000 AmTrykes to riders across the United States.AMBUCS chapters fundraise and provide trykes for people with financial need.Riders must be evaluated by a physical or occupational therapist to be eligible.AmTryke Therapeutic Tricycle ProgramThe AmTryke Therapeutic Tricycle Program is about abilities, not disabilities.The program’s goal is to provide people with disabilities the opportunity to ridebikes. AmTryke has designed a wide range of models suitable for manydiagnoses at low cost.AmTryke builds foot and hand trykes, and combination hand/foot driventrykes. To ensure a proper fit, AmTrykes can be adapted in many ways,including frame size, type of seat, trunk and leg support. As a therapeutictricycle, AmTrykes help children improve motor skills and provide strengthRevised: 12/22/2015n:\amtryke\manuals and instructions\models\1412\proseries 1412 manual booklet style.docx
training. They are fun to ride and offer the opportunity for inclusive play. Foradults, AmTrykes provide a new form of mobility, exercise and freedom toexplore the community.For therapists the trykes provide an age appropriate, safe, dynamic modalityfor improving balance, coordination and strength. The trykes can buildendurance,
Revised: 12/22/2015 n:\amtryke\manuals and instructions\models\1412\proseries 1412 manual booklet style.docx Safety Safety is very important to us. AmTryke products are designed in accordance with the latest safety standards and are constantly monitored for quality. We use information from this quality control to develop our products.