Transcription
MITSUBISHI CNCC70 / C64 Series Remote monitor toolOperating ManualBNP-B2324F (ENG)
12Outline . 3System configuration . 32.1Operation environment .32.2Connection configuration .32.2.12.2.2345678Direct connection to NC . 3Connection via PLC . 3Installation of Remote monitor tool . 5Uninstallation of Remote monitor tool. 7Upgrading of Remote monitor tool . 7Start and termination. 86.1Starting remote monitor tool .86.2Terminating Remote monitor tool .8Screen configuration . 97.1Title bar .97.2Menu bar .107.3Tool bar .107.4NC information part.117.5Status bar.127.6File transfer dialog box .13Operation details . 148.1Connect with Machine tool (NC) .148.1.18.1.28.1.38.1.48.1.5Connection with automatically searched NC . 14Another search for connectable NCs . 16Connection to NC of manually input IP address . 16Connection to NC via PLC . 16Automatic connection to machine tool (NC) at the startup of tool . 168.2Operate NC screen .178.3Send and receive a parameter file.188.3.18.3.28.4Send and receive the program .208.4.18.4.28.5Sending C language module . 24Receiving C language module . 24Deleting C language module . 25Comparing C language module . 25Send and receive the other file.268.7.18.7.28.8Receiving Maintenance file (SRAM.BIN) . 23Receiving Maintenance file (NCSAMP.CSV) . 23Send/Receive/Delete/Compare C language module .248.6.18.6.28.6.38.6.48.7Receiving program file . 20Sending program file. 21Receiving a maintenance file .238.5.18.5.28.6Receiving parameter file . 18Sending parameter file. 19Receiving the other file . 26Sending the other file . 26Display Remote monitor tool's manual.28
8.9Confirm the remote monitor tool version .289 Setting NC Parameters . 2910Restrictions . 3011Appendix . 3111.1Error message and its remedy .3111.2How to cancel Windows fire wall block .3411.3Obtaining the authority to operate the keys .3611.4Hosts files.3711.5Automatic connection setting .3811.6Setting for redundant communication path .3911.7Enabling to send a parameter file and a machining program file .3911.8Setting the timeout period for screen refresh and file send/receive.3911.9Location to store ReC64Monitor.ini file .40MELDAS is a registered trademark of Mitsubishi Electric Corporation.Microsoft and Windows are the registered trademarks of Microsoft Corporation.Other brands and product names throughout this manual are trademarks or registered trademarks oftheir respective holdersThe specifications described in this document are subject to change without notice.Copyright(C) 2001-2015 MITSUBISHI ELECTRIC CORPORATION All Rights Reserved.2
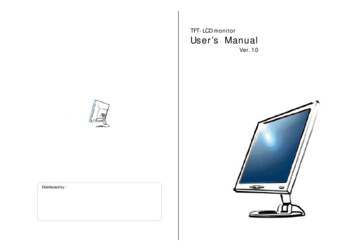
1 OutlineThis manual explains how to set and use Remote monitor tool.Remote monitor tool is the software that enables comprehension of the conditions of remotely placednumerical controllers by using intranet in factories.Remote monitor tool has the following functions.- To remotely monitor NC screens by using intranet- To input and output parameters / machining programs2 System configuration2.1 Operation environmentRemote monitor tool works in the following environment.ItemsOSProcessorRAMHard disk spaceInterfaceMonitorDetailsMicrosoft Windows XP(SP3 or higher) / Vista /7(32bit) / 8(32bit)Conform to the environment recommended for Windows.Conform to the environment recommended for Windows.50MB or more (excluding the capacity required for OS)10/100M Ethernet800x600 or higher resolution, 256 colors or more2.2 Connection configurationRemote monitor tool functions under the following configuration.ItemsDetailsUp to 8 NC screens per NC can be connected and monitoredNumber of simultaneously by Remote monitor tool(including a GOT's CNC monitor screen, C6/C64 dedicatedconnectable monitorsdisplay and WindowsCE display)2.2.1Direct connection to NCRemote monitor tool enables monitoring of Ethernet-connected NC.CNC CPUConnectable NCC6/C64/C64T (Ver. C or newer), C70EthernetGOT1000 SeriesRemotemonitor toolCNCmonitor2.2.2Connection via PLC-Remote monitor tool enables monitoring of NC connected to the same Ethernet bus as PLC.3
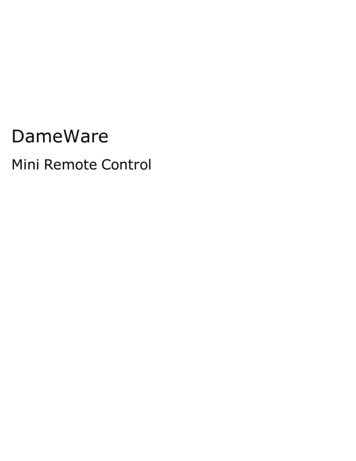
* There are restrictions on the connection via PLC. Refer to " 10 Restrictions" for details.PLC CPUCNC CPUConnectable NCC70EthernetRemotemonitor tool4
3 Installation of Remote monitor toolInstall Remote monitor tool in the following steps (log on as an administrator).1) Start the installer.Choose the language to use during installation and click the [Next] button.2) The screen of "Welcome!" is displayed. Follow the instruction on the screen and click the [Next]button.5
3) Next, the "SOFTWARE LICENSE AGREEMENT" screen is displayed. Thoroughly read the contentsof "SOFTWARE LICENSE AGREEMENT". If you agree, click [Yes]. Or click [No] to stop installation. Ifyou click [RETURN], you will return to the "Welcome!" screen.4) When the [Customer Information] window pops up, enter the user name, company name and serialnumber, and click on [Next].5) Next, the "Choose Destination Location" screen is displayed. On this window, select the directory toinstall Remote monitor tool to. When you wish to install to another directory, click [Browse] and choosethe directory. After selecting, click [Next] to start installing Remote monitor tool.6
* If "Program Compatibility Assistant" pops up in Windows Vista, Windows 7, or Windows 8, click on"This program installed correctly".4 Uninstallation of Remote monitor toolUninstall Remote monitor tool in the following steps (log on as an administrator).1) Terminate Remote monitor tool.2) Choose [Start] - [Setting] - [Control Panel].3) Choose and double-click [Add/Remove Programs] in the Control Panel.4) Choose [Remote monitor tool].5) After making selection, click [Add/Remove].6) Follow the instruction on the screen to proceed with uninstallation.* This is the uninstallation procedure for Windows XP. Some item names in uninstallation may differ fromWindows Vista/7/8.5 Upgrading of Remote monitor toolUpgrade Remote monitor tool in the following steps (log on as an administrator).If the version of Remote monitor tool installed is C1 or before:1) Follow the steps described in Chapter 4 to do uninstallation.2) Follow the steps described in Chapter 3 to do installation.* If you attempt to upgrade it to C2 or newer without uninstallation, the upgrading will be interrupted bythe below error dialog. You can resume upgrading by following the steps below after the error dialoginterrupted the installation.If the version of Remote monitor tool installed is C2 or newer:1) Follow the steps described in Chapter 3 to do installation.7
6 Start and terminationThis chapter explains how to start and terminate Remote monitor tool.6.1 Starting remote monitor toolExecute either of the below mentioned operations.- Double click the program icon of Remote monitor tool- Select the short-cut menu for Remote monitor tool from the [Start] menu.Remote monitor tool enables monitoring of more than one NC at a time by activating more than one toolas shown below.6.2 Terminating Remote monitor toolTo terminate Remote monitor tool, select [Exit] from the [File] menu.Clicking the [X] button on the title bar also terminates the tool.8
7 Screen configurationThe window of Remote monitor tool consists of a "title bar", "menu bar", "tool bar", "NC informationdisplay" and "status bar". When transferring a file, the file transfer dialog box appears.Menu barTitle barTool barNC informationStatus bar7.1 Title barThe following items are displayed on the title bar.(4) Exit(1) Tool name(2) IP address of theconnected NC(3) Iconified tool(1) Tool nameThis shows the name "CNC Remote Monitor".(2) IP address of theconnected NCThis shows the IP address of the connected NC.(3) Iconified toolClick this button to minimize the window of Remote monitor tool tothe size of an icon and to be contained in the task bar.(4) ExitClick this button to exit from Remote monitor tool.9
7.2 Menu barEach function including connection destination designation can be selected from the "menu bar".1) FileVarious functions of this tool can be activated using the [File] menus.ConnectThis opens the dialog box for specifying the connectiondestination. Connection with the NC specified here will bemade.TranslateThis is used to send and receive the parameter, machiningprogram, maintenance data and C language module of theconnected NC. When each of the menu items is selected, thefile transfer tool will start up.OnlineThis switches the communication state with NC betweenonline and offline.ExitThis exits from Remote monitor tool.2) HelpThe manual and version information of this tool can be displayed using the [Help] menus.Show ManualThis shows the manual of Remote monitor tool.About Remote monitor toolThis shows the software version of Remote monitor tool.7.3 Tool barVarious functions can be executed using the toolbar items.For details of the functions possible to be activated from the "tool bar", see the instruction manuals ofeach function.Receive NC sampling dataSend/Receive Program in Text FormatSend/Receive Parameter in Text FormatSTART/STOPCONNECT10
7.4 NC information partThe information of NC that is being monitored is displayed on the "NC information part".Click each button or key to operate the NC. It is also possible to input directly using a personal computerkeyboard.NC informationFunction selectionMenu /Menu 1Menu 2Menu 3Menu 4OperationMenuKeyboard" Relation between the mouse click buttons and keyboard keys"Buttons to be clicked.Menu 1Menu 2Menu 3Menu 4Menu / OperationPosition displayAlarm diagnosisTool offset / Param.ProgramBack, Next,, ,, ,C B / CANAdjustDeleteEOBShiftINPUT0 9!,#, ,(,), ,-, ,[,],*,/,.SpaceKeyboard keysF1F2F3F4F5F6F7F8F9PageUp, PageDown,, , , Shift Tab, TabHome / Shift HomeInsertDelete, Back space;ShiftEnter0 9!,#, ,(,), ,-, ,[,],*,/,.SPACE11
7.5 Status barThe status of Remote monitor tool including communication status is displayed on the "status bar".READYCOMMUNICATIONERROR / DISPLAYINVALIDONLINE/OFFLINE"Items displayed on Status SPLAY INVALID5READYMeaningThis indicates the status that Remote monitor tool iscommunicating with the designated NC. To change the status toonline, click the [CONNECT] buttonon the toolbar or select[Connect] from the menu. Or press the [START/STOP] buttonor select [Online] from the menu.This indicates the status that Remote Monitor Tool is notcommunicating with the designated NC. Select the [START /STOP] buttonon the tool bar or select [Online] from the menuto change the status to the online mode.This indicates that the communication error between Remotemonitor tool and the connected NC has occurred.This indicates the status that "NC information display" is disabledbecause the connected NC's parameter #21034 is set to "1". Todisplay the NC screen, set the connected NC's parameter#21034 to "0".This indicates that the connected NC's operation is ready.12
7.6 File transfer dialog boxSelect [File (F)] - [Translate] - [Parameter] - [Text] etc. from the menu bar to transfer a file. And then,the file transfer dialog box pops up, which enables inputting/outputting of various files between the NCand personal computer.For how to input and output files, refer to the sections from 8.3 to 8.7.Dialog title (varies according to the transfer type)Receive a file (from NC to personal computer)Send a file (from personal computer to NC)Compare files (between NC and personal computer)* For a C language module onlyDelete a file (in NC)* For a C language module only* Even when more than one Remote monitor tool is run, only one file transfer dialog appears.* While the file transfer dialog remains open, monitor operation is disabled.13
8 Operation details8.1 Connect with Machine tool (NC)8.1.1Connection with automatically searched NC1) Select [File] - [Connect] from the menu bar to open the dialog for specifying the connectiondestination.* When [Connect] is selected for Windows Vista, Windows7, or Windows8, the "Windows Security Alert"dialog pops up to ask if you wish to block receiving. In this case, select [Unblock] from this dialog box.If you select [Keep blocking] or ignore this warning, automatic search cannot be properly performed(Note however that it is possible to connect with the NC by manually inputting the IP address). To enableautomatic search, refer to "10.2 How to cancel Windows fire wall block" and cancel the WindowsFirewall block.2) Connectable NCs are automatically searched and are listed in a list box. Select the IP address of theNC to connect from the list, select " NC" for Equipment, and click the [Connect] button.When the connection is properly made, the NC information part is displayed. If any communication erroroccurs, "COMMUNICATION ERROR" is displayed on the status bar.Connection destinationIP addressConnectiondestination deviceConnection destination CPU No.* Set this for connection via PLC.List box14
* Automatic search is available in C70 only but is not available in C6, C64 or C64T. Input the IP addressmanually when the NC is C6, C64 or C64T.For how to input the address manually, refer to "8.1.3 Connection with the NC whose IP address hasbeen manually input".* Up to 512 lines can be displayed in the connection list. If more than 512 NCs are connectable, somewill not be displayed.* When a list of connection destinations is set to the Hosts file, the connection destination NC names, etc.can be displayed in the IP address list.For how to create the Hosts file, refer to "10.4 Hosts files".* When automatic search is frequently repeated, it takes longer to display the list, thus the list ofconnection destinations may be blank. This phenomenon occurs when communication with NCs is busy.In this case, wait for about a minute, and perform search again. Connection displayThis list box shows a list of automatically searched NC information and the connection destinations thathave been registered in the Hosts file.At the top of the list, the information of the NCs that are not registered in the Hosts file is displayed. Theinformation of the NCs that are registered in the Hosts file follows next.The NC information such as "Connection status", "IP address", "Connection destination" and "Name ofthe connected unit" is displayed.The details of each item are described below.Connection statusIP addressAn asterisk mark "*" is added to the NCs found during auto search,meaning that the NC is connectable.* Connection to the NC is enabled only when you select " NC" forEquipment.This displays the IP address of the connected NC.ConnectiondestinationThis displays the connection destination names, etc. that have beenregistered in the Hosts file. This area is left blank when the NC isnot registered in the Hosts file.Name of theconnected unitThis displays the unit name (#1135 unt nm) that has been set tothe automatically searched NC. This display is right aligned. If theunit name is not set to the NC, a four-character space is displayed. Format * [IP Address] Connection destination name (Name of the connected unit)Display example*[192.168.1.1]( AB)*[192.168.1.4]( XYZ)[192.168.1.3]abcdefg(: An automatically searched NC, which is not registeredin the Hosts file.)*[192.168.1.2]ABCDEFG(ABCD): An NC that is registered in the Hosts file but is notconnectable.: An NC that is registered in the Host file and isconnectable.* If the same IP address is described more than once in the Hosts file, the same IP address is displayedon the connection list by the same number. However, the asterisk mark "*" is displayed only at the firstaddress.15
8.1.2Another search for connectable NCs1) Press the [Search] button while the connection designation dialog is displayed.The connectable NCs are searched again and a list in the list box is updated.8.1.3Connection to NC of manually input IP address1) Select [File] - [Connect] from the menu bar to open the dialog for specifying the connectiondestination.2) Click on the IP address field, enter the IP address of the connected NC, and select "NC" forEquipment.3) Press the [Connect] button.8.1.4Connection to NC via PLC1) Select [File] - [Connect] from the menu bar to open the dialog for specifying the connectiondestination.2) Click on the IP address field, enter the IP address of the connected PLC, and select "MELSEC" forEquipment.3) Select the CPU No. of the connected NC.* Connectable NCs are those connected to the same bus as the connected PLC. If no NC is installed inthe designated CPU slot, a communication error occurs.4) Press the [Connect] button.8.1.5Automatic connection to machine tool (NC) at the startup of tool1) Edit the "ReC64Monitor.ini" file to select automatic connection setting.* For the setting method, refer to "11.5 Automatic connection setting". If you edit the "ReC64Monitor.ini"file to revise the previously connected IP address, etc., you can change the automatic connectiondestination at the startup of tool.* If there is no previous connection, the tool connects to "0.0.0.0".2) Activate Remote monitor tool.16
8.2 Operate NC screenVarious operations can be performed on the NC screen, such as monitoring position information, etc.,operation search, tool compensation setting, program editing, alarm diagnosis and NC parameter setting.For details of the NC screen operations, refer to the "CNC monitor screen" section in each NC'sinstruction manual.17
8.3 Send and receive a parameter file8.3.1Receiving parameter file1) Select [File] - [Translate] - [Parameter] - [Text] from the "menu bar".Or select [Binary] and make the "Parameter-Text" dialog box or the "Parameter-Binary" dialog boxdisplay.2) Select "ALL.PRM" (in text format) from the list or select "PARAMET.BIN" (in binary format).3) Press the [Receive] button.Specify the parameter file to receive4) When the "Save As" dialog pops up, specify the directory to save the file to and the file name, andthen press the [Save] button.Specify the folderSpecify the file name5) When transmitting has succeeded, the "Succeeded." dialog box appears.18
8.3.2Sending parameter fileTo send parameter file, change the setting of "ReC64Monitor.ini" to enable sending. For how to set"ReC64Monitor.ini", refer to "11.7 Enabling to send a parameter file and a machining program file".1) Select [File] - [Translate] - [Parameter] - [Text] from the "menu bar".Or, select [Binary] and make the "Parameter-Text" dialog box or the "Parameter-Binary" dialog boxdisplay.2) Press the [Send] button.3) When the "Open" dialog pops up, select the parameter file to send to the NC and press the [Open]button.Specify the parameter file to send4) When transmitting has succeeded, the "Succeeded." dialog box appears.19
8.4 Send and receive the program8.4.1Receiving program file1) Select [File] - [Translate] - [Program] - [Text] from the "menu bar".Or, select [Binary] and make the "Program-Text" dialog box or the "Program-Binary" dialog box display.* The program files in "Binary" format can be handled in C6, C64 and C64T only.2) Select "*.PRG" (Text) or "FILESYS.BIN" (Binary) from the list.* If machining program files are in text format, it is possible to select more than one file arbitrarily.Specify the parameter file to receive3) Press the [Receive] button.4) When the "Save As" dialog box pops up, specify the folder to save the file to and the file name, andthen press the [Save] button.5) When transmitting has succeeded, the "Succeeded." dialog box appears. When receiving programs after selecting more than one programWhen more than one program is selected and received, all the selected programs are combined into the"ALL.PRG" file and received.The selected programs are stored in "ALL.PRG" in the order of the program number. This file can bestored again in the NC by transmitting.* In the case of machine tool builder macro programs, the file name will be "MACROALL.PRG".20
Type of receivable programWhen receiving a program in a text format, it is possible to change the type of program to receive bychanging the directory selection shown at the top of the file send/receive dialog box.Directory\PRG\USER\\PRG\MDI\Program fileUser programMDI program\PRG\MMACRO\Machine tool buildermacro programRemarksWhen the machine tool builder macro function isavailable and the parameter "fixpro" is set to 2,programs can be received.8.4.2Sending program fileTo send program files, change the setting of "ReC64Monitor.ini" to enable sending. For how to set"ReC64Monitor.ini", refer to "11.7 Enabling to send a parameter file and a machining program file".1) Select [File] - [Translate] - [Program] - [Text] from the "menu bar".Or, select [Binary] and make the "Program-Text" dialog box or the "Program-Binary" dialog box display.* The program files in "Binary" format can be handled in C6, C64 and C64T only.2) Press the [Send] button.3) When the "Open" dialog pops up, select the program file to send to the NC and press the [Open]button.4) When transmitting has succeeded, the "Succeeded." dialog box appears.21
Type of transferable programWhen sending a program in a text format, it is possible to change the type of program to send bychanging the directory selection shown at the top of the file send/receive dialog box.Directory\PRG\USER\\PRG\MDI\Program fileUser programMDI programRemarksWhen an MDI program is sent, the MDI status changesto "MDI setting completed".\PRG\MMACRO\Machine tool buildermacro programWhen the machine tool builder macro function isavailable and the parameter "fixpro" is set to 2,programs can be sent. Data protectionIf the "Data protection is ON" error appears in sending a program, check the following signals andparameters ( : related -: not related)Program sent1 to 7999.PRG,10000 to 99999999.PRG8000 to 8999.PRG9000 to 9999.PRGMDI.PRGMMACRO\10000 to 99999999.PRGY31A(Data protect key 3)#8105EDIT LOCK B#1121edlk c#1144mdlkof#1166fixpro-------------22-
8.5 Receiving a maintenance fileMaintenance data is used to investigate failures that occur at customers.Maintenance data has types, "SRAM.BIN" that includes all the data such as parameters and machiningprograms, and "NCSAMP.CSV" that is obtained using NC sampling function.8.5.1Receiving Maintenance file (SRAM.BIN)1) Select [File] - [Translate] - [Maintenance] from the menu bar, and make "Maintenance" dialog boxdisplay.2) Select "SRAM.BIN" from the list.3) Press the [Receive] button.4) When the "Save As" dialog box pops up, specify the directory to save the file to and the file name, andthen press the [Save] button.5) When transmitting has succeeded, the "Succeeded." dialog box appears.8.5.2Receiving Maintenance file (NCSAMP.CSV)1) Select [File] - [Translate] - [Maintenance] from the menu bar, and make "Maintenance" dialog boxdisplay.* Maintenance file (NCSAMP.CSV) is available with C70 only.2) Select "M01:\LOG\" from the box at the top of the "Maintenance" dialog.3) Select "NCSAMP.CSV" from the list.4) When the "Save As" dialog box pops up, specify the directory to save the file to and the file name, andthen press the [Save] button.5) When transmitting has succeeded, the "Succeeded." dialog box appears.23
8.6 Send/Receive/Delete/Compare C language module* Before sending, receiving, deleting or comparing the C language module, the APLC release functionhas to be available.* Functions regarding the C language module (send/receive/delete/compare) are available with C70 only.8.6.1Sending C language moduleTo send C language module, change the setting of "ReC64Monitor.ini" to enable sending. For how to set"ReC64Monitor.ini", refer to "11.7 Enabling to send a parameter file and a machining program file".* Only one C language module can be saved in an NC. Thus, if the module is sent again while the Clanguage module already exists, the existing C language module is overwritten.1) Select [File] - [Translate] - [C language module] from the menu bar to open the"Send/Receive/Delete/Compare" dialog box.2) Press the [Send] button.3) When the "Open" dialog pops up, select the C language module to send to the NC and press the[Open] button.4) When transmitting has succeeded, the "Succeeded. Will be active after reboot." dialog appears.5) Restart the NC.8.6.2Receiving C language module1) Select [File] - [Translate] - [C language module] from the menu bar to open the "Send/Receive"dialog box.2) Select "APLC.O" from the list.3) Press the [Receive] button.4) When the "Save As" dialog appears, specify the folder to save the file to and the file name, and thenpress the [Save] button.5) When transmitting has succeeded, the "Succeeded." dialog box appears.24
8.6.3Deleting C language module1) Select [File] - [Translate] - [C language module] from t
This manual explains how to set and use Remote monitor tool. Remote monitor tool is the software that enables comprehension of the conditions of remotely placed numerical controllers by using intranet in factories. Remote monitor tool has the fol lowing functions. - To remotely monitor NC screens by using intranet