Transcription
TFT- LCD monitorUser’s ManualVer. 1.0
Thank you for your selection of new TFT LCDMonitor.Please take a few minutes to read this User’s manual for thebest performance of this monitor.Information in this manual is subject to change without priornotice for improving design, function and etc.IBM, DOS, PC and VGA are trademarks of InternationalBusiness Machines Corporation.CONTENTSPackage Contents4Monitor Parts5Connecting to PC6Recommended Use7Features8OSD Menu functions9Advanced g163
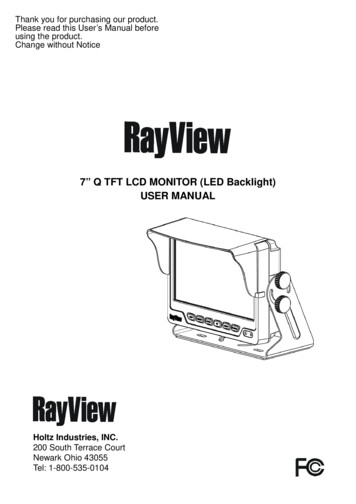
Package ContentsMonitor PartsFRONTYour TFT-LCD monitor box should contain the following :REARSTANDARD PARTS TFT-LCD monitor4 DC Power adapter- Connects to DC IN port on the base of monitor3 Power cord- Connects wall outlet to DC Power adapterA D-SUB 15pin VGA cable1- Connects PC to LCD monitor User's manualOPTIONAL PARTS2A-1USBTypeA-2SerialType Stereo audio cable- Connects PC sound card to audio input port on themonitor562. Power button & LED indicator- Touch installation driver3. Speaker holes (Speakers are optional) Touch interface cable4. VESA standard hole (75mm x 75mm)- Connects PC to LCD monitor81. OSD control button Touch software- USB cable or serial cable75. Power input connector6. D-SUB 15 pin VGA input connector7. Audio IN port8. Touch interface connector (USB interface or serial interface)* 7. 8. parts are optional45
Connecting to PCTo attach your TFT-LCD monitor to your system, followthe instructions hereunder1. Connect 15-pin D-SUB cable to the connector or displaycard of your computer system. Tighten all the screws2. Connect 15-pin D-SUB cable to the appropriateconnectors on the back of the monitor head3. Connect AC adapter cable to the power input connectorson the back of the monitor head4. Connect one end of the power cord to the AC adapterand the other end to the power outlet5. Turn on the monitor6. To complete the setupA. set up your computer system to :1024 x 768 resolution @ 60Hz.B. Use the following OSD controls- Auto adjust control- Coarse or Clock Phase control? Adjustment of the H/V Position and Image Adjust H.Size controls may be required to complete setup ofyour TFT- LCD monitor. For a full description of theseOSD controls, refer to OSD menu functions6Recommended UseFOR OPTIMUM PERFORMANCE,PLEASE NOTE THE FOLLOWING WHEN SETTING UPAND USING THE TFT-LCD MONITOR. DO NOT OPEN THE MONITOR.MONITORopening or removing covers may expose you to dangerousshock hazards or other risks.Once you open it the warranty voids. Do not put anything on top of the monitor. Do not spill any liquids into the cabinet or use your monitor nearwater. Do not place this product on a sloping or unstable cart, stand ortable, as the monitor may fall, causing serious damage to themonitor. If you connect or disconnect the VGA cable while both of PC’sand LCD monitor’s power is turned on, the monitor might showsome garbage on the screen or could be damaged. Please turnoff the TFT-LCD monitor’s power before connect or disconnectVGA cable. Handle with care when transporting. Save packaging fortransporting. Do not touch or press the surface of the LCD panel, it will causea permanent damage. Use only soft cloth with non-ammoniaglass cleaner to clean the panel.7
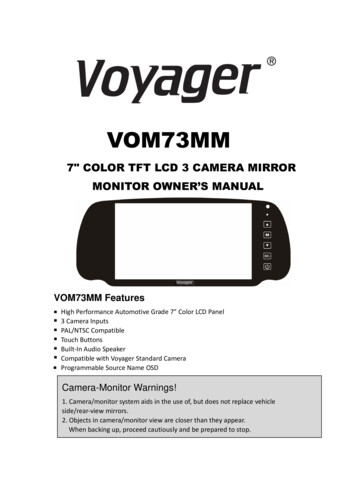
FeaturesOSD menu functionsTFT-LCD (Thin film transistor - liquid crystal display)The XGA panel and hard coating(3H), anti-glare treatment ofthe front polarizer enables low reflection, anti-static, highresolution and high-contrast characteristics.OSD (On-Screen-Display) control functions as follows :To access OSD Menu, press MENU buttonPlug-and-Play CompatibleThis TFT-LCD monitor conforms to the VESA (VideoElectronics Standards Association) standard andDDC1/DDC2B.A picture adjustment function makes it possible to adjust theimage quality to match the input signal.MENUEXIT MENU : Menu on/move button- Show OSD menu on the screen. Moves the highlighted arearight to select one of the functionsEXIT : Menu off button- Exit from OSD menu. Exit to main menu from sub menu.DOWN : Adjust buttonAn automatic size adjustment function is providedAuto-setup control on OSD screen adjust image position,horizontal size or fine settings.Environmentally FriendlyThe power consumption can be reduced by using this TFTLCD monitor in combination of a computer that conforms tothe VESA DPMS(Display Power Management Signaling)standard.Desk space can be used effectively due to the 20cm depth.- Moves the bar left to decrease the adjustment.- Enter the submenu.UP : Adjust button- Moves the bar right to increase the adjustment.- Enter the submenu.[ MAIN MENU DISPLAY ]VESA standard wall mountingThis TFT-LCD monitor has the VESA (Video ElectronicsStandards Association) standard wall mounting holes.Monitor head can be mounted on the wall using a VESAcompliant wall mount.89
AUTO ADJUST COARSE ( Coarse Tuning)Automatically adjust Image Position, HorizontalSize or Fine setting Press UP or DOWN buttonto adjust the settings automatically BRIGHTNESSImproves focus, clarity and image stability bychanging the horizontal image sizeUse or - button to increase or decrease thesetting CLOCK PHASE (Fine Tuning)Controls the brightness of the LCDUse UP or DOWN button to increase or decreasethe setting CONTRASTControls the contrast of the LCDUse UP or DOWN button to increase or decreasethe settingImproves focus, clarity and image stabilityUse UP or DOWN button to increase or decreasethe setting COLORPress the UP or DOWN button to enter into thefollowing submenu H- POSITIONControls the horizontal image position within thedisplay of the LCD Use the UP or DOWN buttonto move the image right or left V- POSITIONControls the vertical image position within thedisplay of the LCDUse the UP or DOWN button to move the imageup or downPress the MENU button to select the item you wish to changeColor temperatureProvides two preset color adjustment : 6500K and 9300KSelect the preset by using MENU button and press EXIT button1011
Advanced FeaturesRGB AdjustmentIncreases or decreases Red, Green or blue color selectedUse UP or DOWN button to increase or decrease the settingTo exits to the OSD main menu, press the EXIT button LANGUAGEProvides Five languages for OSD menu.Select language by using UP or DOWN buttonDISPLAY PIVOTING180 degree display pivotThe display can be turned upside down by usingPivot software.This is suitable for those who interact with aperson across the desk such as banking, financeand POS systems. INFORMATIONShow the horizontal and vertical frequencyVESA MOUNTABLEWall or arm mountableThe monitor can be mounted to VESA arm byusing standard VESA mounting hole(75mm x75mm).Wall-mounting is also possible1213
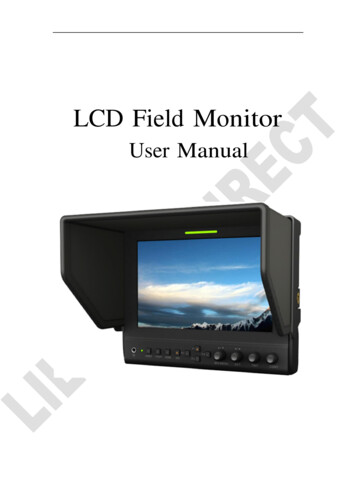
DimensionSpecificationSIZETypePANELActive areaPixel formatPixel pitchColor depthContrast ratioBrightnessDisplay sizeViewing angleBacklightInterfaceRESOLUTIONSUPPORTAmorphous active matrixTFT-LCD14.1” diagonal1024(H) x 768(V)0.279mm x 0.279mm6 bit, 16M colors by dithering250 : 1(Typ.)180cd/ 285.696 X 214.272U/D: 35 / 60 , R/L: 60 / 60 1CCFTLVDSOn workingOff 30 watt 3 wattOSD CONTROLFunctionBrightness, Contrast, Tuning,Color, Image position(H.V),Language select, Auto adjust,InformationPlug & PlayDDC1/DDC2BPOWER SAVINGVESA DPMSPOWER mmXGA 1024 X 768(max)POWERCONSUMPTIONOPTION19mm14.1”InputAC 100V 240V, 50 60HzOutput12VDC61.2mm41.6mmMax.307.2mm15-PIN VGA cable, AC adapter,Power cord, User's guideTouch screenSpeakersResistive touch screen1W x 2 speakers166.3mmNote : Features and specifications are subject to change without notice1415
TroubleshootingNo image on the screen The signal cable should be completely connected to thedisplay card/computer. The display card should be completely seated in its slot. Power button and computer power button should be ON. Check to make sure that a supported mode has been selectedon the display card or system being used.(Please consult display card or system manual to changegraphics mode) Check to make sure that the refresh rate is 60Hz. Check the monitor and display card with respect to compatibilityand recommended settings. Check the signal cable connector for bent or pushed-in pins.Power button does not respond Press the power button continuously. Unplug the power cord of the monitor from the AC outlet, wait 10to 20 minutes, then plug the power cord into the AC outlet. Thiswill reset the monitor and power supply.Image is unstable, unfocused or swimming is apparent Signal cable should be completely attached to the computer Use OSD Image Adjust controls to focus and adjust display byincreasing or decreasing the Coarse or Clock Phase control(Auto Adjust control is recommended). When display mode ischanged, the OSD Image Adjust settings may need to be readjusted. Check the monitor and display card with respect to compatibilityand recommended signal timings. If your text is garbled, changethe video mode to non-interlaced and use 60Hz refresh rate.Display is not sized properly Use Coarse control on OSD menu to increase or decrease the H.Size. Check to make sure that a supported mode and signal timing hasbeen selected on the display card and system being used.(Please consult display card or system manual to change graphicsmode or refresh rate.)LED on monitor is AMBER (with no image on the screen) The signal cable should be completely connected to the displaycard /computer. Make sure the computer is not in a power-saving mode (touchthe keyboard or mouse)1617
FCC STATEMENTThis equipment has been tested and found to comply with the limits fora Class B digital device, pursuant to Part 15 of the FCC Rules. Theselimits are designed to provide reasonable protection against harmfulinterference in a residential installation.This equipment generates, uses and can radiate radio frequency energyand, if not installed and used in accordance with the instructions, maycause harmful interference to radio communication. However, there isno guarantee that interference will not occur in a particular installation.If this equipment does cause harmful interference to radio or televisionreception which can be determined by turning the equipment off and on,the user is encouraged to try to correct the interference by one or moreor the following measures.- Reorient or relocate the receiving antenna.- Increase the separation between the equipment and receiver.- Connect the equipment into an outlet on a circuit different from that towhich the receiver is connected.- Consult the dealer or an experienced radio, TV technical for help.- Only shielded interface cable should be used.Finally, any changes or modification to the equipment by the user notexpressly approved by the grantee or manufacturer could void the usersauthority to operate such equipment.1819
Your TFT-LCD monitor box should contain the following : Monitor Parts STANDARD PARTS TFT-LCD monitor DC Power adapter - Connects to DC IN port on the base of monitor Power cord - Connects wall outlet to DC Power adapter D-SUB 15pin VGA cable - Connects PC to LCD monitor User's manual 1. OSD control button 2. Power button & LED .