Transcription
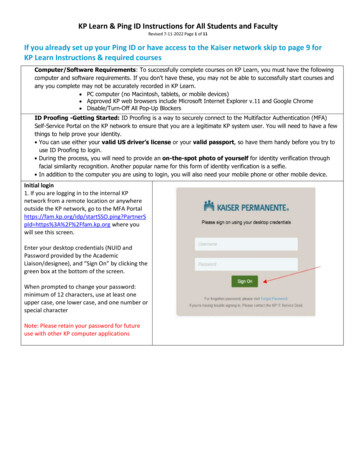
KP Learn & Ping ID Instructions for All Students and FacultyRevised 7-11-2022 Page 1 of 11If you already set up your Ping ID or have access to the Kaiser network skip to page 9 forKP Learn Instructions & required coursesComputer/Software Requirements: To successfully complete courses on KP Learn, you must have the followingcomputer and software requirements. If you don't have these, you may not be able to successfully start courses andany you complete may not be accurately recorded in KP Learn. PC computer (no Macintosh, tablets, or mobile devices) Approved KP web browsers include Microsoft Internet Explorer v.11 and Google Chrome Disable/Turn-Off All Pop-Up BlockersID Proofing -Getting Started: ID Proofing is a way to securely connect to the Multifactor Authentication (MFA)Self-Service Portal on the KP network to ensure that you are a legitimate KP system user. You will need to have a fewthings to help prove your identity. You can use either your valid US driver’s license or your valid passport, so have them handy before you try touse ID Proofing to login. During the process, you will need to provide an on-the-spot photo of yourself for identity verification throughfacial similarity recognition. Another popular name for this form of identity verification is a selfie. In addition to the computer you are using to login, you will also need your mobile phone or other mobile device.Initial login1. If you are logging in to the internal KPnetwork from a remote location or anywhereoutside the KP network, go to the MFA SpId https%3A%2F%2Ffam.kp.org where youwill see this screen.Enter your desktop credentials (NUID andPassword provided by the AcademicLiaison/designee), and “Sign On” by clicking thegreen box at the bottom of the screen.When prompted to change your password:minimum of 12 characters, use at least oneupper case, one lower case, and one number orspecial characterNote: Please retain your password for futureuse with other KP computer applications
KP Learn & Ping ID Instructions for All Students and FacultyRevised 7-11-2022 Page 2 of 112. Once you enter the correct information andhave successful validation of your Usernameand password, you will see the followingscreen.3. Click on the box by the user consentstatement as well as the “I’m not a robot” boxto proceed. You must check both boxes tomove to the next step.4. You will see an image with several boxes anda question such as the sample below. Followthe instructions on the screen to continue thelogin process. In the example below, you wouldclick on all the sections of the photo thatcontain street signs.If none of the images meet the criteria, “Skip”to the next step using the blue box at thebottom right of your screen.Providing documentation of your identity5. You will be prompted to provide youridentification card. Select one of the twooptions – either your valid US driver’s license orpassport – shown in the drop-down menu toproceed. This example shows the process witha driver’s license, and the process is the samewith a passport.After selecting either your driver’s license orpassport for identification, select “Confirminformation” in the green box at the bottom ofyour screen.6. In the next screen, your full name, emailaddress, and date of birth from KP data storeswill populate the appropriate fields. You cannotchange them.Your mobile phone number is not shown forprivacy purposes. You will need to enter yourmobile phone number to proceed.
KP Learn & Ping ID Instructions for All Students and FacultyRevised 7-11-2022 Page 3 of 117. Click on “Continue on Mobile” in the greenbox to continue validation using your selectedform of identification (driver’s license orpassport). You will see the followinginformation on your computer screeninstructing you that the next several steps ofthe process will be using your mobile phone.8. A message will be sent to the mobile numberyou provided to initiate the next part of thevalidation process, providing images to validateyour identity. Follow the instructions on yourmobile device screen and click on the URLprovided to continue.9. Now it’s time to capture the documents youwill need to prove your identity and get accessto the MFA Self-Service portal. You will see thefollowing screen on your mobile phone:10. Follow the prompts in the message on yourphone to capture the front and back sides ofyour identification card (driver’s license orpassport).
KP Learn & Ping ID Instructions for All Students and FacultyRevised 7-11-2022 Page 4 of 11Confirming the quality of your images12. For ID Proofing to work, you will need tomake sure your images are clear. By followingthe “Quality Check” instructions that appear onyour phone screen, you will be able to providethe image quality needed.Be sure to turn your browser into landscapemode and hold your phone horizontally beforeyou click the “Take Photo” option.Landscape Orientation of Phone for Image of IDIf you are not taking your pictures of your IDusing a landscape screen -- turn your phone onits side to take a wider picture and turn onlandscape mode in your browser -- you willreceive the following error message on yourphone and need to capture your documentsagain with your phone and browser in thelandscape or horizontal mode.
KP Learn & Ping ID Instructions for All Students and FacultyRevised 7-11-2022 Page 5 of 1113. When you see the following screen with thegreen emoji and success message, you willknow you’ve successfully captured your imagein landscape mode.14. If you aren’t satisfied with your image, youcan select the “Discard” in the blue box at thebottom left of your screen and repeat theimage capture process steps above until youhave the image you want to use.If you are satisfied with your image and want toproceed, select “Save and Next” in the blue boxat the lower right of your screen.You will need to pass all three image qualitychecks (Portrait Orientation, Face Detectionand Blur Detection) to proceed. When you seethe following screen on your phone, you willknow that your images are the necessaryquality to proceed.
KP Learn & Ping ID Instructions for All Students and FacultyRevised 7-11-2022 Page 6 of 1115. Now that you have an image of youridentification, it’s time to take a picture ofyourself (a “selfie”). For this image, please useyour phone in the standard, portraitorientation -- hold it upright and return yourbrowser to the standard, portrait mode. Thescreens on your phone will step you throughthis process.As with your ID image, your selfie must meetthe “Quality Check” instructions that appear onyour phone (Portrait Orientation, FaceDetection and Blur Detection) to proceed.Make sure you have good contrast betweenyou and the background of your photo. Itemslike hats and headphones can obscure part ofyour face, so be sure to remove them beforetaking your photo.The following screen on your phone willindicate that your images are the necessaryquality to proceed16. If you aren’t satisfied with your image, youcan select the “Discard” in the blue box at thebottom left of your screen and repeat theimage capture process steps above until youhave the image you want to use.
KP Learn & Ping ID Instructions for All Students and FacultyRevised 7-11-2022 Page 7 of 11Uploading your images for validationIf you are satisfied with your image and want toproceed, select “Save and Next” in the blue boxat the lower right of your screen. This willinitiate the process of uploading your imagesfor validation.17. The following screen on your phoneindicates that your images are being uploaded.18. The following message on your phonescreen lets you know that you have successfullyuploaded the necessary documents. You canclose the window on your phone screen andmove back to your computer. The rest of theprocess will take place on your computerscreen.19. You will see the message, “Validation inprogress” on your computer screen to let youknow what is happening. Once you see thegreen check marks by the statuses of yourdocuments, your ID Proofing process iscomplete.
KP Learn & Ping ID Instructions for All Students and FacultyRevised 7-11-2022 Page 8 of 11Reaching the MFA Self-Service Portal20. Success! The following screen shows thatyou have reached the MFA Self-Service Portalwhere you can continue as you normally would.For more information or helpIf you have questions or need more information, pleasecontact the KP Service Desk, at 888-457-4872
KP Learn & Ping ID Instructions for All Students and FacultyRevised 7-11-2022 Page 9 of 11Instructions to access KP Learn.Required courses are listed within the Nursing Pathways websitehttps://kpnursing.org/ lIf needed: access the KP Learn Support Center o Access KP Learn:1. Launch the browser.2. Type kplearn.kp.org in the addressbar and click enter.3. Click Log into KP Learn.4. Sign in using your NUID & Password(desktop credentials) provided by yourAcademic Liaison/DesigneeIf prompted to change your password:minimum of 12 characters, use at leastone upper case, one lower case, andone number or special characterNote: Please retain your password forfuture use with other KP computerapplicationsFor log in assistance contact the ITService Desk 1-888-457-48725. Click Browse the CatalogNote: Some KP Learn courses may bepre-added. Look for those under the “Discover”section “My Learning”.Always complete the required courses listed foryour Medical Center as not all may be preadded.
KP Learn & Ping ID Instructions for All Students and FacultyRevised 7-11-2022 Page 10 of 116. Enter the Keyword, Class ID orDescription in the Search fieldRequired courses are listed at the endof this document.7. Click the Search icon8. Verify course name provided by theAcademic Liaison/Designeeand click on the titleType the entire title as listed as there maybe similar courses available then crossreference with the class ID provided.Note: Class ID numbers subject to change.Note: If you don’t finish the course in onesitting, go back to My Enrollments to relaunch the course.9. Verify correct course then clickLAUNCH10. Once you’re finished with the requiredcourses, click My profileClick Completed Learning11. Click on the Printer icon(in the upper right corner) and printMy Completed Learning summarypage of your completed learningcoursesDO NOT click Print Certificate foreach courseClick the Printer IconFirst NameLast NameFirst NameLast Name
KP Learn & Ping ID Instructions for All Students and FacultyRevised 7-11-2022 Page 11 of 1112. Submit the M y Com pleted Learningsummary page with your SinglePDF Prerequisite Packet to yourAcademic Liaison/Designee (individualcourse certificates are not required)13. Sign outType the entire title as listed as there may be similar courses available then cross reference with the class IDprovided.Note: Class ID numbers subject to change.
KP Learn & Ping ID Instructions for All Students and Faculty Revised 7-11-2022 Page 1 of 11. If you already set up your Ping ID or have access to the Kaiser network skip to page 9 for KP Learn Instructions & required courses . Computer/Software Requirements: To successfully complete courses on KP Learn, you must have the following