Transcription
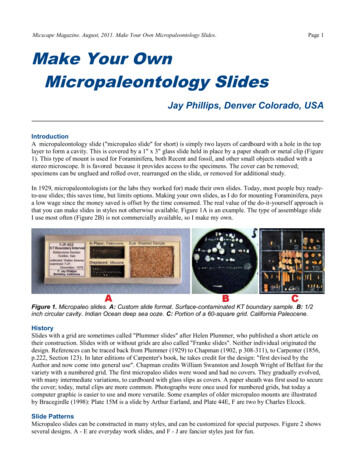
Micscape Magazine. August, 2011. Make Your Own Micropaleontology Slides.Page 1Make Your OwnMicropaleontology SlidesJay Phillips, Denver Colorado, USAIntroductionA micropaleontology slide ("micropaleo slide" for short) is simply two layers of cardboard with a hole in the toplayer to form a cavity. This is covered by a 1" x 3" glass slide held in place by a paper sheath or metal clip (Figure1). This type of mount is used for Foraminifera, both Recent and fossil, and other small objects studied with astereo microscope. It is favored because it provides access to the specimens. The cover can be removed;specimens can be unglued and rolled over, rearranged on the slide, or removed for additional study.In 1929, micropaleontologists (or the labs they worked for) made their own slides. Today, most people buy readyto-use slides; this saves time, but limits options. Making your own slides, as I do for mounting Foraminifera, paysa low wage since the money saved is offset by the time consumed. The real value of the do-it-yourself approach isthat you can make slides in styles not otherwise available. Figure 1A is an example. The type of assemblage slideI use most often (Figure 2B) is not commercially available, so I make my own.Figure 1. Micropaleo slides. A: Custom slide format. Surface-contaminated KT boundary sample. B: 1/2inch circular cavity. Indian Ocean deep sea ooze. C: Portion of a 60-square grid. California Paleocene.HistorySlides with a grid are sometimes called "Plummer slides" after Helen Plummer, who published a short article ontheir construction. Slides with or without grids are also called "Franke slides". Neither individual originated thedesign. References can be traced back from Plummer (1929) to Chapman (1902, p 308-311), to Carpenter (1856,p.222, Section 123). In later editions of Carpenter's book, he takes credit for the design: "first devised by theAuthor and now come into general use". Chapman credits William Swanston and Joseph Wright of Belfast for thevariety with a numbered grid. The first micropaleo slides were wood and had no covers. They gradually evolved,with many intermediate variations, to cardboard with glass slips as covers. A paper sheath was first used to securethe cover; today, metal clips are more common. Photographs were once used for numbered grids, but today acomputer graphic is easier to use and more versatile. Some examples of older micropaleo mounts are illustratedby Bracegirdle (1998): Plate 15M is a slide by Arthur Earland, and Plate 44E, F are two by Charles Elcock.Slide PatternsMicropaleo slides can be constructed in many styles, and can be customized for special purposes. Figure 2 showsseveral designs. A - E are everyday work slides, and F - J are fancier styles just for fun.
Micscape Magazine. August, 2011. Make Your Own Micropaleontology Slides.Page 2Figure 2. Micropaleo slides. A is the widely used 60-square grid. B is my own design which I prefer over A;it is for random sample splits of 300 specimens, with a second cavity for rare species. C is for placingseveral samples on one slide to save space in the slide cabinet. D is a single-hole slide for one specimen orone assemblage. E is for isolating reference specimens; it replaces 10 type D slides, saving space in theslide cabinet. F through J are are just for fun; they are single-hole slides in the style of Victorian paperedslides, but with larger labels. F is the pattern of the Bourgogne family; G is inspired by the mounter "S.B."; His based on C.M. Topping's pattern; I is a generic plaid; and J is the Egyptian carpet on my living room floor.A companion file is provided for downloading the patterns in Figure 2; the link is at the end of this article. Usethese patterns as starting points in designing your own custom slides. Patterns can be edited with a graphicsprogram such as Paint (bundled with Windows). At a minimum, you need to edit place-holder text. If you preferthe English orientation with labels running down instead of across, it is easy to rotate text. Note that the nominal"1/2 inch" circles on the patterns are drafted 10% undersize so the drill bit will remove construction lines. Importyour slide image to a word processing document, scale it to 21%, as specified on each pattern, and place as manycopies on the page as will fit. I print in small batches, and change label information for the project at hand. TheVictorian patterns are also good for papering glass slides.Reference ListsSlides like Figure 2E need records to identify specimens and link them to their source samples. Over the years,these records can be separated from the slide, destroying its value. Even if not lost, looking up data on cards orcomputer files slows use of the slide. My solution is to attach the reference list to the slide (Figure 3). The list
Micscape Magazine. August, 2011. Make Your Own Micropaleontology Slides.Page 3Figure 3. Reference list attaches to slide and folds underfor storage.is taped to the slide clip and folds underneath to fit in astandard slide tray. Slide and list have a unique ID, toprevent mix-up when parts are temporarily separated.Specimen AdhesiveGum tragacanth is the traditional specimen glue formicropaleo slides. It is water soluble, dries clear, is strong,doesn't crack specimens when it dries, and doesn't becomebrittle. Plummer (1929, footnote 10) has a recipe for mixing"foram glue" - basically, stir the powder in boiling wateruntil dissolved, then dilute to the consistency you prefer.Bacteria and mold love gum tragacanth, so it is customaryto add formaldehyde to prevent growth, and a few drops ofclove oil or peppermint oil to cover the formaldehyde odor.Phenol is another suitable fungicide. Cover the entirebottom of the slide cavity with a viscous mixture of gumtragacanth and allow it to dry before adding specimens.Moisture on the picking brush softens the glue and causesspecimens to adhere. If gum tragacanth is hard to find, youcan use paper packaging tape. Wet the tape; scrape off thesoftened glue and place it in a vial; dilute to the consistency you prefer, and add a fungicide.ToolsYou need a few tools to do a neat job; Figure 4 has the details. The discontinued Stanley Power Bore bit shown inFigure 4E and 4F is the best option I have found for clean holes in cardboard. The secret is the high nicking blade;it will be all the way through the cardboard before the chipping blade touches. A reproduction named "QuickBore" is available at it12.aspx. It is rougher than theoriginal, but works after some sharpening and polishing. Other ways to make circular cavities include a circlecutting compass from a craft store, ora metal hole punch. The drill bit iseasiest to center and fastest to use.Sharp tools are the key to cleancavities; when holes become ragged,you need to use a sharpening stone.Figure 4. Tools for makingcardboard micropaleo slides. A:paper cutter to cut 1" x 3" cardslips, and to trim aluminum for slideclips. B: large scissors foraluminum cans. C: small scissorsfor paper. D: paper punch to makesmall cavities. E: Stanley PowerBore bit to cut clean 1/2" cavities. F:closeup of bit. G, H, I: wood chiselsto cut rectangular cavities.
Micscape Magazine. August, 2011. Make Your Own Micropaleontology Slides.Page 4Figure 5. Components of amicropaleo slide. A:computer-printed wrap withbackground, constructionlines, and label. B: top cardlayer which, along with thewrap, is perforated to formcavities. C: computerprinted grid layer. D: bottomcard layer. E: glass slide ascover. F: aluminum blank tomake clip. G: Glue stick.Assembling A Cardboard SlideThe components of a cardboard micropaleo slide are shown in Figure 5. Pieces (A) and (C) are computer prints; aheavier weight, smooth paper is better than everyday paper. Don't use photo "paper"; it is usually plastic, andspecimen glue doesn't stick. Piece (C) is omitted if the slide doesn't use a grid. Pieces (B) and (D) are 1"x3" piecesof poster board or mat board of 1.25-1.5 mm thickness. If a grid is used, these pieces are not visible in thefinished product, so the color doesn't matter. If the grid is omitted, the lower card (D) is visible, forming thebottom of the cell. In that case, use a smooth, flat black board, or a white board for dark specimens. Cover glass(E) is a 1" x 3" glass microscope slide, 1 mm thick. Aluminum strip (F) is folded to form the clip that holds theglass to the slide. A glue stick (G) fastens paper components; permanent acid-free adhesive is best.Steps in assembling the slide, with reference to Figure 5: Trim all pieces to size. Glue the top card layer (B) to the underside of the slide wrap (A); allow to dry. Cut cavities using punch, drill, or chisel, depending upon size and shape of hole. If a grid is part of the design, glue it in place. Place glue on the underside of layer (B) and remove excess byrunning a toothpick around the edge of the cavity before placing the grid layer. Observe the grid from the topand move it to center it and square it up with the slide. Keep glue off the exposed part of the grid layer,because the glue stick is not the adhesive you will use with specimens. Glue bottom card layer (D) to the slide. If no grid, keep glue off the portion that forms the cell bottom. Apply glue to the underside of the 4 projecting flaps of slide wrap (A), wrap the flaps over the edges, andsmooth them in place on the bottom of the slide. Allow to dry, and you have a finished slide.Paper Sheath Or Aluminum Clip?The glass cover is held in place by either a paper sheath or an aluminum clip. The significant difference is thatpaper sheaths have a permanently attached cover glass, while aluminum clips have detachable glass. Clips aresuperior in most respects; one advantage of paper sheaths is that they more easily fit in slide trays with individual1"x3" compartments. Cardboard slides emit vapor, and over time the underside of the glass becomes foggy. Papersheaths must be rebuilt when the glass fogs; glass in an aluminum clip is easily cleaned. Home-made clips savemoney, but have no design advantage over commercial clips. If time is important, purchase commercial clips.
Micscape Magazine. August, 2011. Make Your Own Micropaleontology Slides.Page 5Aluminum ClipsThis section describes the construction of clips from recycled aluminum beverage cans. The aluminum is 0.1 mmthick, and cuts easily with large scissors and a paper cutter.Figure 6. Turning a beverage can into 4 micropaleo slide clips. A: Remove top and bottom with largescissors. B: With a paper cutter, trim the long edges straight, parallel, and 3" (76 mm) apart. C: With a papercutter, cut the long strip into 43 mm wide pieces. Each beverage can yields 4 blanks for forming stage clips.D: End view of a finished clip with slide and cover glass in place.Figure 7. Three-piece wooden jig for bending clips. Dimensions not marked are flexible. The T-shapedpiece represents the thickness and width of (slide cover glass). The trough is slightly wider so the clip andT-shaped piece fit. The 8 mm depth of the saw kerf is (side height flange width). Aluminum blanks are cut(27 8 8 ) mm 43 mm wide. The plain block is a burnisher for creasing folds.If you use card stock thicker than 1.5 mm, you might need to adjust the dimensions of the jig shown in Figure 7.For thicker mat board: 1) increase the 4.5 mm thickness of the T-shaped piece; 2) add 3.5 mm to the new value toget the new saw kerf depth; 3) the new width of the aluminum blank is (27 2*kerf depth).
Micscape Magazine. August, 2011. Make Your Own Micropaleontology Slides.Page 6Figure 8. Forming an aluminum slide clip. A: Place the blank in the kerf; be certain it is fully bottomed. B:Make the first bend in the direction that will put the printed side inside the clip. Use the burnishing block tocrease the bend. C: Repeat for the other edge. D: Place the T-shaped piece into the partially completed clipand place both into the trough of the jig. The enlarged view shows the edge of the unfinished clip extendingabove the surface of the jig. E: Use the burnishing block to fold and crease the two flanges. F. Slide out theT-shaped piece to expose the completedclip.Paper SheathsThe components of a paper sheath areshown in Figure 9. Brown paper packagingtape with water soluble adhesive covers thebottom and sides of the slide, and overlapsthe glass cover to hold it in place. A paperliner prevents the slide from sticking to thepaper tape. A pattern for the liner isincluded with the downloadable images. Acardboard slide is used as a spacer and thesheath is built around it. A glass microscopeslide forms the cover.Figure 9. Paper sheath for micropaleoslide. A: Gummed tape 76 mm x 45 mm.B: Paper liner 76 mm x 32 mm. C:Cardboard slide. D: 76 mm x 26 mmglass slide as cover. E: Completed unitwith slide partly withdrawn.
Micscape Magazine. August, 2011. Make Your Own Micropaleontology Slides.Page 7Steps in assembling a paper sheath, with reference to Figure 9: Cut the two paper pieces to final size. Moisten the glue of paper tape (A); center the liner (B) and glue it to the tape. Allow to dry. (Optional). Cut a semi-circle from each end to make slide removal easier. Fold the sides of the liner so the cardboard slide fits in the bottom and the liner extends up the sides as far asthe top of the cardboard slide. Place slide and cover glass on the sheath; wet the exposed paper tape; press onto the glass. (Optional). Before the tape dries, use a straight edge and razor blade to trim the edges of the tape straight andparallel to the slide for a neater appearance.Archival ConsiderationsSlides made from everyday materials last a long time; I have seen 100 year old slides made with non-archivalmaterials that show no deterioration. But if you want your slides to last the longest possible time, you need toconsider the stability of components. Use archival acid-free mat board intended for framing photographs. Use archival acid-free 100% rag paper (eg: Crane's Thesis Paper) for computer prints of slide wrap and grid. Dye-based color ink fades after long exposure to light. Important computer-printed text should be in blackink, which is more stable. Storing slides in the dark, under their glass covers helps. For true archival labels,use pigment-based ink, which is available for some high-end printers. You might be able to have this done ata fine-art printshop, rather than buying the expensive printer yourself. Hand written text on slide labels should be in permanent pigment-based ink. The Pigma Micron pen is widelyused by museums; it is available in craft stores and art supply stores. Use a glue stick with permanent, acid-free adhesive intended for photographs. Gum tragacanth has a track record of 150 years. It is stable if a fungicide is added. Paper sheaths might not last. Use aluminum clips if you are concerned about slide longevity.Commercial SourcesIRGO, The International Research Group On Ostracoda, maintains a list of commercial suppliers of micropaleoslides and clips. This list can be found athttp://userpage.fu-berlin.de/ palaeont/irgo/microslides.htmlSuppliers with an outdated link might still be in business with a different web address.ReferencesBracegirdle, Brian. 1998. Microscopical Mounts And Mounters. VI 225 pp., 60 plates. Quekett MicroscopicalClub.Carpenter, William B. 1856. The Microscope and Its Revelations. American first ed. XXIV 724 pp. Blanchardand Lea (Philadelphia). Digital copy free online.Chapman, Federick. 1902. The Foraminifera. XV 354 pp. Longmans, Green and Co. (London, New York,Bombay). Digital copy free online.Plummer, Helen J. 1929. Photographic Slide Mount for Micro-Fossils. Journal of Paleontology, Vol. 3, No. 2, pp.189-195. Digital copy available online with a JSTOR license.Slide PatternsA companion file to this article contains full size graphic patterns for the slides mentioned. Download it ipFor comments or questions, the author can be contacted at JPCHECKLST AT AOL DOT COM.Published in the August 2011 issue of Micscape Magazine at www.microscopy-uk.org.ukArticle copyright 2011 by F. Jay Phillips.Slide patterns are placed in the public domain and may be freely copied and modified.
specimens can be unglued and rolled over, rearranged on the slide, or removed for additional study. In 1929, micropaleontologists (or the labs they worked for) made their own slides. Today, most people buy ready-to-use slides; this saves time, but limits options. Making your own slides, as I do for mounting Foraminifera, pays