Transcription
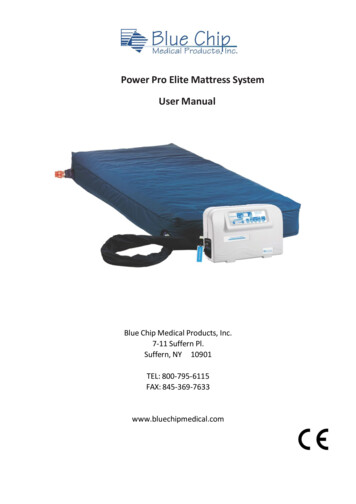
Power Pro Elite Mattress SystemUser ManualBlue Chip Medical Products, Inc.7-11 Suffern Pl.Suffern, NY 10901TEL: 800-795-6115FAX: 845-369-7633www.bluechipmedical.com
IMPORTANT SAFEGUARDSREAD ALL INSTRUCTIONS BEFORE OPERATING THIS DEVICENOTE, CAUTION AND WARNING STATEMENTS:NOTE – Indicate some tips.CAUTION – Indicate correct operating or maintenance procedures in order toprevent damage to or destruction of the equipment or other property.WARNING – Call attention to a potential danger that requires correct procedures orpractices in order to prevent personal injury.2.3.4.5.WARNING– To reduce the risk of electrocution:1. Patients are not allowed to operate the product. Always unplug thisproduct immediately while it’s not in use.Do not disassemble the Pump to avoid electrocution.Do not place or store product where it can fall or be pulled into a tub or sink.Do not place in or drop into water or other liquid. Do not use while bathing.Do not reach for a product that has fallen into water. Unplug immediately.WARNING–To reduce the risk of burns, electrocution, fire or injury toperson:1. The system must be operated with the mattress connected to the Pump.Please do not power-off or unplug the Pump while in use.2. Always use the same voltage as stated on the label. Do not use other powercords on the Pump. Avoid children and pets acquire the plastic packing toprevent suffocation hazards.3. Equipment is not suitable to use in the presence of a flammable anestheticmixture with air or with oxygen or nitrous oxide.4. Keep away from sharp objects.5. Close supervision is necessary when this product is used by, on, or nearchildren or people with disabilities.6. Use this product only for its intended use as described in this manual. Do notuse attachments not recommended by the manufacturer.7. Never operate this product if the Pump has a damaged power cord or plug, ifthe Pump is not working properly, if the Pump has been dropped or damaged,or the Pump has been dropped into water. Return the product to a servicecenter or to the distributor for examination and repair.8. Keep the power cord away from heated surfaces.9. Never block the air openings of this product or place the product on a softsurface, such as a bed or couch, where the openings may be blocked. Keep theair opening free of lint, hair, and other similar particles.10. Never drop or insert any object into any air opening or hose tube.11.Avoid dropping or putting any heavy object on the Pump.
12. Place the power cord and hose tube at patient’s foot area to avoid strangling ofpatient’s neck.13. Avoid electromagnetic interference by not have strong electro-magnetic or RFgenerated equipment nearby patient’s environment.14. The Pump will have minor heat generated in operation, please do not directcontact the surface continuously for more than 1 minute.15. When the mains supply is lost or had temporarily failed, the Pump will stop andthe power failure alarm will alarm up to 20 minutes. This is normal and theproduct will return to normal operation once the mains supply is resumed.16. Connect this product to a properly grounded outlet only. See GroundingInstruction.17. Avoid the risk of electrocution by grounding the ground pin with groundingpower outlet.2
SYMBOLSProduct Symbol DescriptionDESCRIPTIONIPOWER ONOPOWER OFFATTENTION“BF” SYMBOL, INDICATE THIS PRODUCT IS ACCORDING TO THEDEGREE OF PROTECTION AGAINST ELECTRIC SHOCK FOR TYPE BFEQUIPMENT, APPLIED PART:MATTRESSCAUTION, READ THE INSTRUTION BEFORE USEAWAY FROM THE FLAMEIP21WATER AND DUST PROTECTION CLASSIFICAITONFUSE SPECIFICATIONDISPOSAL OF ELECTRICAL & ELECTRONIC EQUIPMENT (WEEE): THISPRODUCT SHOULD BE HANDED OVER TO AN APPLICABLECOLLECTION POINT FOR THE RECYCLING OF ELECTRICAL ANDELECTRONIC EQUIPMENT.UL CERTIFICATION LOGO (COMPLIACE WITH IEC60601-1)WITH RESPECT TO ELECTRICAL SHOCK, FIRE AND MECHANICALHAZARDS ONLY IN ACCORDANCE WITH IEC60601-1.CB CERTIFICATION LOGOCE CERTIFICATION LOGO3
Contents1.2.INTRODUCTION. 5INTENDED USE . 53.4.5.6.7.PRODUCT DESCRIPTION . 5PRODUCT INSTALLATION GUIDE . 6PANEL DISPLAY AND OPERATION GUIDE . 7CLEANING. 12STORAGE . 138.10.11.MAINTENANCE . 13TROUBLESHOOTING. 14TECHNICAL DATA. 154
1.INTRODUCTIONThis manual provides the information required for the initial set up and for thenormal operation of the Power Pro Elite Mattress System. Before operating thePower Pro Elite Mattress System, be sure the operator had read and understood indetail the content of this manual.2.INTENDED USEThe Power Pro Elite Mattress System is intended to help and reduce the incidenceof pressure ulcers while optimizing patient’s comfort. The Power Pro Elite MattressSystem may be used in a variety of settings including, but not limited to individualhome care setting and long-term care of whom suffering from pressure ulcer, or painmanagement as prescribed by physician.NOTE: Equipment is not suitable for use in the presence of a flammableanesthetic mixture with air or with oxygen or nitrous oxide.3.PRODUCT DESCRIPTIONThe Power Pro Elite Mattress System is an alternating mattress replacementsystem used in the prevention and relief for patients with, or vulnerable to, pressureulcers. The Power Pro Elite Mattress System offers patients a comfortable andrelaxing support surface by using the established principles of alternating therapy,which can both prevent skin breakdown and enhance healing.The Control Unit of the Power Pro Elite Mattress System is a Pump featuring adigital pressure adjustment function, mode selections, and audiovisual alarms.5
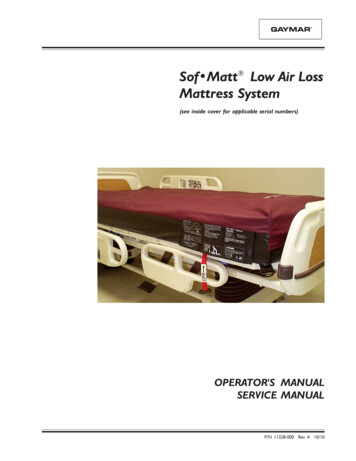
4.PRODUCT INSTALLATION GUIDE1. Position the Pump by its elastichanger brackets over footboard ofthe bed. The elastic hanger bracketswill self-adjust onto the footboardtightly.1Connect 3 hose connector to coloredside panel. Then connect solo hose toupper port.2. Connect the power cord to thePump. The power switch shouldremain off.3. Press the red power cord protectordownward to secure the powercord.4. Plug the power cord into theelectrical outlet.NOTE: Check and ensure the Pumpunit is suitable for the local powervoltage.CAUTION: The Pump can only beapplied to the mattressrecommended by themanufacturer. Do not use thePump for any other purpose.WARNING: Do not place the Pumpunit in area where power cord cancome off easily.4365
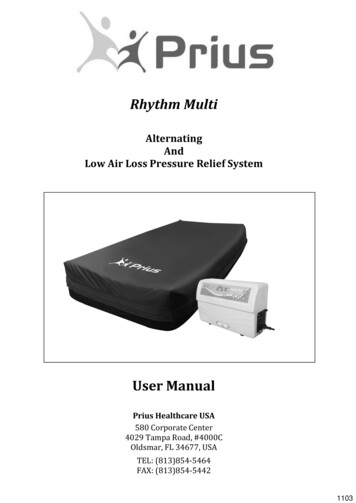
5.PANEL DISPLAY AND OPERATION GUIDE7854315.1 PANEL DISPLAY①Operate or Standby②Auto Firm③Function Mode Selection (Alternate/Static)④Panel Lock-Out⑤Bariatric Switch Button⑥Comfort Control (Soft and Firm)⑦ Alarm Mute and Alarm Indicatorl Low Pressure Alarm Indicatorl Power Failure Alarm Indicatorl Service (Malfunction) Alarm Indicator⑧Alternate Cycle Time or Warning Code Display5.1.1 Operate or StandbyPress this button to start operating or go into standby.5.1.2 Auto-FirmThe Pump will go into the inflation mode (LED lights flashing) every time theoperate mode is triggered. This insures the mattress to be able to reach itsmaximum operating pressure. Once the max pressure level is reached, the pumpwill automatically switch into the previous selected mode and comfort level. Usercan also use this function as full mattress inflation during patient sit-up oringress/egress for better support.7
5.1.3 Function Mode SwitchllAlternate – the air cells of the mattress will be proportionally deflated toreduce the surface pressure. The alternating cycle will continue at theselected cycle time until another mode is selected.Static – the mattress maintains at 70% of the selected pressure in alternatemode.5.1.4 Panel Lock-OutPress the Lock-Out button to lock the panel. Should the panel remain untouchedfor 30 seconds, the Lock-Out feature will lock the panel to prevent accident fromchanging setting without notice. To unlock, hold Lock-Out button down until lightgoes away.5.1.5 BariatricThis feature enhances the output of the Pump for heavier patient support. Referto Table 1 Weight and Comfort Level Reference for weight and comfort levelrecommendation.5.1.6 Comfort LevelComfort level controls the air pressure output level. Press Firm button and theoutput pressure will increase and higher pressure output will support heavierweight patient, for decreasing air pressure, vice versa. Check to see if the suitablepressure is selected by sliding one hand between a deflated air cell and thepatient’s buttocks areas and there should be minimum contact. Always leave atleast 1 inch space between a deflated air cell and patient’s buttocks areas toprevent “bottoming-out”.5.1.7 Alarm MutePress the alarm mute button to suspend temporarily alarms. Should the situationnot resolved and fault conditions continue, the alarm will resume notifying thepatient and caregiver.8
5.2 OPERATION GUIDE5.2.1 General Operation:NOTE:l PressThe power switch is located on the side of the Pump.to turn on the unit, all LED indicators on the control panel will lightup accompanied with a beep for 2 seconds (check for indicator failure if any),and the indicator of Standby on the control panel will light up. If the Pump waspreviously shut off in operate mode then the Pump will enter operate modedirectly.P.S. To test the battery, pressto turn off the power and the powerfailure alarm should be triggered. Refer to 5.2.2 Audiovisual Alarm if thealarm is not triggered.l Press the Operate buttonand the system will begin to inflate and the"Auto-Firm" indicator will be flashing.l The mattress should be fully inflated within 20 minutes, and automaticallyenter the previous operating mode, otherwise the low pressure alarm withwarning code “ ” will be triggered.Note: Do not proceed to other settings before inflation is completed.l After initial inflation is completed. Press Auto-Firm buttonfor movingthe patient onto the mattress. The mattress will turn into a steady condition inaround 5 minutes. Move the patient onto the mattress and press Auto-Firmbuttonagain to cancel Auto-Firm mode and select the appropriate mode.l According to the weight of the patient, adjust the pressure setting to the mostsuitable level without “bottoming-out”. User can determine an appropriatepressure by adjusting the Comfort Level. Please consult with your physician fora proper setting.Warning: the Pump unit should always be operating to prevent bedsoreoccurring.l In operate mode, press operate/standby buttonfor the system to enterstandby mode. The system should be in standby mode before shut down.Switch the power switchto off and the warning code“ ”will appearon the display to shut off the system.Note: For reminding purpose, power failure alarm will be triggered if the9
power is switched off in operating mode (refer to 5.2.2 Audiovisual Alarm). Presspower switchto restart the system, or press Alarm Muteto turn off thesystem (refer 5.2.3 Alarm Mute).Table 1 Weight and Comfort Level Reference5.2.2 Audiovisual Alarml Power Failure – When electrical shortage occurred or power cord is unplugwithout turning off the Pump oris pressed (intentionally orunintentionally), the “Power Failure” indicator will light up along with buzzerand will last 20 minutes.NOTE: When the Pump has not been used for more than 3 months, the Pumpmay need 6 hours or more of operating time for the alarms to function properly.lLow Pressure –When an abnormal low pressure occurred in body section for 5seconds after the pressure is below the abnormal pressure threshold, the"Low Pressure" indicator will flash and beep. Should the situation not resolvedand fault conditions continue, the alarm will resume.lService (Malfunction) –When fault conditions occur, the "Service" indicatorwill light up along with buzzer.Note: Refer to Table 2 for Warning Code Reference Table if error codeappears on the display or refer to 9. TROUBLESHOOTING.5.2.3 Alarm Mutel When alarms are triggered, both LED light and buzzer will turn on to warn thepatient and caregiver. By pressing the button, it will temporarily mute thebuzzer so the caregiver may check for possible causes. Should the situationnot resolved and fault conditions continue, the alarm will resume. Refer to 9.10
lllTROUBLESHOOTING for diagnosis.During “power failure”, pressing “alarm mute” will cease all buzzers andindicators and turn off the system.During “low pressure alarm” if the pressure resumes back to normal then thelow pressure alarm will stop.When more than one alarm is triggered, the alarm will be performedaccording to priority level. Refer to Table 2 Warning Code Reference Table forpriority level.11
9.TROUBLESHOOTINGPROBLEMSOLUTIONllCheck if the plug is connected to the mains supply.Check if the power switch is switched to ON position (presslCheck if there is any blown fuse.Power failure alarm failedlIf the Pump is in operation but failed to trigger the power failurealarm during power off. Charge the Pump for 6 hours or more ofoperating time and if the power failure still not works then pleasecontact the dealer or agent for further investigation.The low pressure light isconstantly flashing and thealarm is soundedlCheck if the connection between air tubes to Pump unit is tightlysecured.Check if all coupling connections along mattress are secured.If the mains supply is normal but there is no sound of the Pump,The Pump is showing noindications of workinglllThe Pump is on but themattress is not alternatedlll).please remove the connector from the Pump to check if there’s aircomes out. If not, please turn off the machine and contact thedealer or agent for further investigation.If all of above steps have been checked. Press “Alarm Mute” forsystem to be verified again.Ensure the mattress inflation is completed.Check the Pump control panel the indicator of “Alternate” shouldbe lighted on, if not, switch it to “Alternate.”Check if “Service” alarm indicator is on with buzzer, if yes, contactthe dealer or agent for further investigation.Service (Malfunction)Alarm is onlPress “alarm mute” for system to be verified again. If the alarm isstill on, please contact dealer or agent.The Pump is operatingnoisilyllMake sure the Pump is resting against a solid surface.If the noise is getting louder, contact the dealer or agent for furtherinvestigation.Patient is bottoming out(without alarm triggered)llPressure setting might be inadequate for the patient, adjustcomfort level to FIRM (refer to Table 1 Weight and Comfort LevelReference Table) and wait for a few minutes for better comfort.Follow the procedures “The low pressure light is constantly flashingand the alarm is sounded” for inspection.If the above information does not solve the problem, please contact your local dealer or agent for further support.14
10. TECHNICAL DATA10.1 Product SpecificationModelDimension (cm)Weight (kg)Alternate Cycle Time (minutes)Auto Firm Time(minutes)Pump output flow range (LPM)Pump UnitSD22340(L)x 17.5(W)x 27.5(H)6.55—30201800Pressure Range (mmHg)20—50 ( 5)PowerAC120V 60HzCurrentFuse RatingClassification4.8 AMAX (@132V )T5A 250VACClass I (MOOP)ClassificationWarrantyType BF(MOPP)1 yearEnvironment ConditionOperation EnvironmentStorage Environment5 —35 15%RH 93%RH(No Condensation)-25 —70 93%RH(No Condensation)Environment Pressure70 kPa—101.3 kPaEnvironment Level 3000m15
Power Pro Elite Mattress System, be sure the operator had read and understood in detail the content of this manual. 2. INTENDED USE The Power Pro Elite Mattress System is intended to help and reduce the incidence of pressure ulcers while optimizing patient's comfort. The Power Pro Elite Mattress System may be used in a variety of .