Transcription
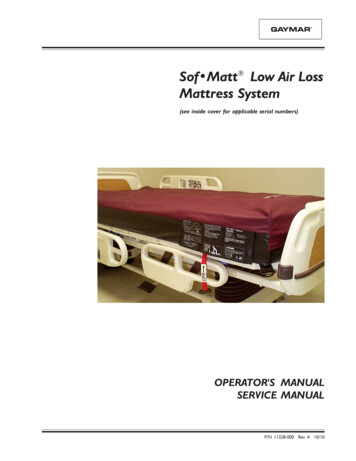
Sof Matt Low Air LossMattress System(see inside cover for applicable serial numbers)OPERATOR'S MANUALSERVICE MANUALP/N 11328-000 Rev A 10/10
Before you begin . . .Sof Matt Low Air Loss Mattress SystemOperator's/Service ManualIMPORTANTPlease read all precautions and instructions beforeusing the Sof Matt Low Air Loss Mattress System.Maximum benefit to the patient at the greatest marginof safety requires a thorough knowledge andunderstanding of the correct operation andapplication of the Sof Matt Low Air Loss MattressSystem.Users must follow the instructions and precautionsincluded with each mattress system prior to use.Operate the equipment with the same care youwould use when operating precision medicalequipment.INCOMING INSPECTION ANDRETURN POLICYCheck the shipping carton for damage immediatelyafter receipt. If damage is discovered, the productshould be unpacked with the carrier’s agent present.Make a claim immediately to the carrier for the damage.Do not return damaged goods without notifying thecarrier. If products damaged during shipment arereturned to Gaymar without notifying the carrier,Gaymar will assume that repairs will be made at thecustomer’s expense. Products returned to Gaymarmust be accompanied by Returned Goods (RG)numbers. Returned Goods authorization and numbersmay be obtained by calling Gaymar Industries'Customer Service Department:Toll free:Direct:WARRANTYSof Matt Low Air Loss Mattress Systems arewarranted against defects in material andworkmanship under normal use and operation fromthe date of shipment for a period of one year.During the warranty period, Gaymar will repair orreplace at its sole option, free of charge, anydefective parts or products returned with priorauthorization prepaid to Gaymar Industries, Inc.See Incoming Inspection and Return Policy.Warranty does not cover products abused, misused,or altered outside factory. There are no obligationson the part of Gaymar for consequential damagesarising out of or in connection with the use orperformance of the product. Gaymar disclaims allimplied warranties including, but not limited to, theimplied warranties of merchantability and of fitnessfor a particular purpose.1 800 828-7341(716) 662-2551When inquiring, please supply model and serial number,purchase order number, whether merchandise wasbought on contract, and reason for return.In general, deleted and outdated merchandise will notbe accepted for credit. A restocking charge of 15% willbe assessed on returns of current merchandise.Ship returns prepaid to Gaymar Industries, Inc.,10 Centre Drive, Orchard Park, NY 14127-2295.Sof Matt Low Air Loss Mattress Systems purchased byindividuals for home use must be returned to thedealer from which they were purchased for repair.SYMBOLS USEDAttention: consult accompanying documentsDangerous voltageAPPLICABLE SERIAL NUMBERSDouble insulated. When servicing, use onlyidentical replacement parts.This service manual applies only to models RSM176S(no configuration) and RSM180S configuration ‘A’Sof Matt Mattress Systems. The 8th characterof the serial number identifies the configuration.Type BF applied equipmentFor example, S/N RSM180S A B10042identifies a configuration ‘A’ system.Gaymar and Sof Matt are registered in the U. S. Patent and Trademark Office. 2001. Gaymar Industries, Inc. All rights reserved. www.gaymar.comPull red strap to rapidly deflatemattress for performing CPR
Sof Matt Low Air Loss Mattress SystemOperator's/Service ions/Indications/Precautions . 2Introduction . 3Operating Instructions . 4Cleaning and Care . 7Specifications . 8Functional Check . 9Troubleshooting . 12Checking Cells for Leaks . 15Maximum Pressure Test . 17Mattress Replacement Parts . 20Control Panel Calibration [advanced] . 28Replacing the Controllers . 2021222324DescriptionPageSof Matt Mattress System . 3Support Boards . 3Firmness Control . 4Securing Linens with 'D' Rings . 4Visual Firmness Check . 5CPR Plug . 6Test Pin . 10Functional Check/Inspection Form . 11Troubleshooting Matrix . 12Mattress Air Flow/Pressure Diagram . 17Mattress Replacement Parts . 20RSM Sof Matt Mattress . 21Upper Cell . 21Control Panel-to-Cell Connections . 22Folding Lower Replacement Cells . 23Panel Assembly . 25CPR Dump Pin Assembly, Parts . 27Upper Cell Controller Parts . 27Calibration Test Bladder Setup . 28Adjustment Points for Calibration . 29Pinch Points . 30Adjustment Points, Upper Cell Calibration . 31Control Panel Parts . 35Functional Test Kit . 361
PRECAUTIONSSof Matt Low Air Loss Mattress SystemOperator's/Service ManualCONTRAINDICATIONSAir support therapy is not recommended when spinal stability is a concern.INDICATIONSThis device is intended to help treat and prevent decubitus ulcers (bed sores).SOF MATT MATTRESSPRECAUTIONSWARNINGElectric shock hazard. Do not remove pump cover. Referservicing to qualified service personnel.Double insulated. When servicing, use only identicalreplacement parts. There are no operator serviceable parts within the equipment. Referservicing, maintenance and FUNCTIONAL CHECK AND SAFETYINSPECTION to qualified technical personel familiar with goodpractice for medical device repair. Always perform the FUNCTIONAL CHECK after making repairs andbefore returning the Sof Matt Mattress System to patient use.Otherwise, personal injury, damage to the Sof Matt MattressSystem or improper therapy may result.PATIENTPRECAUTIONSCAUTION Some medical conditions may not respond to this type of therapy.Patient's skin condition should be inspected regularly.If any redness or breaks in skin occur, consult a physician. Disinfect the mattress between patient installations, utilizing standardhospital protocol and FDA approved disinfectants (such as a 10%chlorinated bleach solution).Failure to disinfect may risk cross-contamination andinfection. Keep bedding dry. Use incontinence pads if necessary.Failure to keep the patient's skin clean and dry may lead tomaceration.2
Sof Matt Low Air Loss Mattress SystemOperator's/Service ManualINTRODUCTIONINTRODUCTIONFigure 1—Sof Matt Mattress SystemGaymar Sof Matt Low Air Loss Mattress Systems are designed to aid in theprevention and treatment of pressure ulcers. The Sof Matt Low Air Loss MattressSystem (fig. 1) has an internal air pump which maintains adequate pressure in itsupper and lower cells.Please read and understand the precautions and instructions within this manualbefore attempting to use the mattress system. Carefully follow the instructionsincluded with each mattress. In addition, we recommend that you requestin-service training from your Gaymar representative.PREPARING THE BEDThe mattress is designed for use on bed frames which provide firm, solidsupport. Use otherwise may cause the mattress to be ineffective.NOTE: When the mattress is used on a link-spring bed frame, it maycause the RSM mattress to sag. Additional support can beprovided by using three appropriately sized support boards. TheRSM mattress contains straps inside the bottom of its cover toaccommodate these boards and hold them in place. See figure 2. Support boards (Gaymar P/N 10623-000) are available fromyour dealer. Boards may also be made as follows: Use 1/2" thickinterior grade plywood board, good both sides. Cut each boardto 33-1/2 inches (85 cm) long by 9 inches (23 cm) wide. Radiusall corners. Sand all surfaces and edges smooth. Make sure alledges are rounded and smoothed to prevent wood slivers fromcausing punctures, which are not covered by warranty.Figure 2—Support Boards3
OPERATING INSTRUCTIONSOPERATINGINSTRUCTIONSSof Matt Low Air Loss Mattress SystemOperator's/Service ManualNOTE: This product is not known to be susceptible to interference fromoutside sources in its normal environment, non does it produce radiatedor line conducted emission that will interfere with other equipment in itsvicinity.1.Place the Sof Matt Mattress on the bed frame with the FOOT END markingsat the proper end of the bed, facing up (fig. 1, p. 3).2.Plug the power cord into a polarized electrical outlet. The mattress willimmediately begin to inflate. The power cord is the only means todisconnect this product from the supply (MAINS).3.Position the Firmness Control (located behind the control panel flap) initiallyas shown in figure 3.Figure 3—Firmness Control4.The patient may be placed on the mattress after 45 minutes. The heelsection will completely inflate within 90 minutes. For rapid inflation, inserta portable inflator (e.g., Gaymar model SC505) into the CPR valve andinflate for one minute. Replace the CPR plug quickly to prevent air fromescaping.5.Apply linens, leaving the red CPR strap exposed.SECURING LINENS (OPTIONAL)To secure linens to the Sof Matt Mattress, thread the four cornersthrough the D rings attached to the mattress (fig. 4). To ensure propertherapy, do not pull linens taut. The linens should remain loose and wrinklyon surface of mattress.Figure 4—Securing Linens with D Rings4
Sof Matt Low Air Loss Mattress SystemOperator's/Service Manual6.OPERATING INSTRUCTIONSPlace the patient on the mattress. If necessary, the Firmness Control settingmay now be adjusted for patient comfort.NOTE: When elevating the head of the bed above 30 ,the Firmness Control setting may need to be increased.MAINTAININGPATIENT COMFORTAND PROTECTION1.If the patient appears to be bottomed when the head of the bed has beenraised to a sitting position (30 or more above horizontal), adjust thefirmness as described in step 6, page 4. When the bed is returned to a flatsleeping position (0 ), adjust as necessary for patient comfort.Too SoftToo FirmFigure 5—Visual Firmness Check2.To determine if the Sof Matt Mattress is functioning properly, visuallycheck twice each day that the mattress is correctly inflated (fig. 5).Turn the pressure control knob clockwise to increase firmness.If the inflation is still incorrect at the maximum setting, remove fromservice and contact your dealer.3.To provide greater comfort, follow the procedure in step 6, page 4.Check patient after changing setting to confirm that the mattress surfaceis correctly inflated.CAUTIONSome medical conditions may not respond to therapy of this type.Check patient's skin frequently. Consult physician if anyredness or skin break occurs.Serious injury could result if the patient's skin condition isleft unchecked.5
OPERATING INSTRUCTIONSPOWER OUTAGE/PATIENT TRANSPORTFEATURESof Matt Low Air Loss Mattress SystemOperator's/Service ManualWhen power is removed from the mattress, therapy will be continued;however, the height of the mattress will gradually begin to decrease.To maintain therapy, power should be restored within 4 hours.When transporting, unplug the power cord and bundle it on top of themattress to keep it from underfoot.The lower cell will maintain internal cell pressure for approximately four hours.The upper cell will partially deflate and the foot end will completely deflate.DEFLATING THEMATTRESSThe Sof Matt Mattress can be deflatedfor storage by pulling firmly on the redCPR strap.REINFLATING THEMATTRESSTo reinflate, make certain to reinstall the CPR pin below the flap and toresecure the retaining snap. Plug the system into a polarized electrical outlet.The mattress will automatically inflate in approximately 90 minutes.For rapid inflation, a portable inflator can be used by inserting it into the CPRvalve.Figure 6—CPR Plug (pull strap to deflate)6
Sof Matt Low Air Loss Mattress SystemOperator's/Service ManualCLEANING AND CARECLEANING AND CARE1.Unplug the power cord from the electrical outlet.2.To clean, use soap and water and a clean cloth to wipe down the powercord and mattress. Do not use abrasive cleaners. Wipe dry with a cleancloth. Do not autoclave.NOTE: Blood and other body fluids must be thoroughly cleanedfrom all surfaces before applying the disinfectant.3.Apply an FDA approved disinfectant or 10% chlorinated bleach solution(chlorinated bleach with 5.25% sodium hypochlorite) to the externalsurfaces of the mattress.Allow to completely dry. The solution contact time is what makesdisinfection effective.4.Wipe down the mattress with a clean, dry cloth to remove any excessdisinfectant.NOTE: Mattress cover must be dry prior to storage orapplication of linens. Failing to remove excess disinfectant couldeventually degrade the polyurethane coating of themattress cover.STORAGE AND CARE,SOF MATT MATTRESSAND COVERIndividual states have established rules and regulations pertaining tothe cleaning and sterilization of mattresses that are intended to beresold, rented, or otherwise transferred from one user to another.Some states prohibit reselling mattresses and require them to bedisposed of properly. Gaymar recommends contacting your statebedding department to obtain information on your state's rules andregulations if reusing, renting, or transferring mattresses.Clean in accordance with the Cleaning and Care instructions above.Plastic material should not be exposed to high temperature. Do not allow heatlamps or heating pads to come close to the mattress cover. Do not autoclave.Do not place sharp objects in contact with the mattress. Holes in the mattresswill degrade system performance.7
Sof Matt Low Air Loss Mattress SystemOperator's/Service ManualSPECIFICATIONSSPECIFICATIONSPHYSIC ALDimensions89 cm x 193 cm x 20 cm(35" x 76" x 8")or89 cm x 203 cm x 20 cm(35" x 80" x 8")Weight12.2 kg(27 lb)Operating AmbientTemperature Range15.6 C to 32.2 C(60 F to 90 F)Storage and TransportTemperature Range-6.7 C to 48.9 C(20 F to 120 F)ELECTRIC AL8ClassificationType BF with no applied patient parts,Class II, double insulated, transportableequipment suitable for continuousoperation. Not classified for protectionagainst harmful ingress of liquid. Notclassified for use in the presence offlammable anesthetics.Input 120 V, 60 Hz, 9 VAPower Cord4.6 m (15 ft), 18 AWG cordwith polarized plugFuses (located insidepump, not accessibleto the operator)Subminiature, 250 V, ver y fast acting,1/4 ampereCurrent Leakage100 microamperes max.CODE APPROVALSUL2601-1CAN/CSA 22.2 No. 601.1
Sof Matt Low Air Loss Mattress SystemOperator's/Service ManualFUNCTIONAL CHECKFUNCTIONAL CHECKCAUTION The FUNCTIONAL CHECK must be performed by qualified technicalpersonnel familiar with good practice for medical device repair.Otherwise, damage to the Sof Matt System andimproper therapy may result. Testing will verify proper operation of the Sof Matt System.Always perform the FUNCTIONAL CHECK after making repairs.Record each maintenance check on the INSPECTION FORM(fig. 8, p. 11).Operation of the Sof Matt System at other than specifiedoperating pressures can result in poor or reduced patientsupport. Improper repair can result in patient injury.TOOLS REQUIRED Functional Test Kit (P/N 78281-000—see fig. 24, p. 35) Manometer, 0-50 mm Hg ( 1 mm Hg accuracy)1. OPERATINGPRESSURE TESTOperate the Sof Matt Mattress for at least two hours at nominal120VAC line voltage prior to performing the Operating Pressure Test.NOTE: Perform steps 1-3 prior to the two-hour warm-up.1.See figure 7 (p. 10). Use the Functional Test Kit (fig. 24, p. 35). Replace theCPR plug with the test pin. Connect the female CPC connector and hoseto the manometer.2. To measure lower cell pressure—Connect the shortest tube (L) fromthe test pin to the connector on the manometer. To measure foot cell pressure—Connect the medium length tube (F)from the test pin to the connector on the manometer. To measure upper cell pressure—Connect the longest tube (U) fromthe test pin to the connector on the manometer.3.Turn the Firmness Control knob to the lowest position (Softer), atapproximately 8 o'clock. After a two-hour warm-up, the cell pressuresshould be: lower cell pressure: 25.0 2.0 mm Hg; foot cell pressure:5.5 2.0 mm Hg; upper cell pressure: 12.0 2.0 mm Hg.9
Sof Matt Low Air Loss Mattress SystemOperator's/Service ManualFUNCTIONAL CHECK1. OPERATINGPRESSURE TEST(continued)Figure 7—Test pin4.Turn the Firmness Control knob to the highest position (Firmer), atapproximately 5 o'clock. After the system stabilizes, the cell pressuresshould be: lower cell pressure: 25.0 2.0 mm Hg; foot cell pressure:5.5 2.0 mm Hg; upper cell pressure: 32.0 3.0 mm Hg.5.If the pressure(s) in steps 3 or 4 are not met, see Troubleshooting, page 12.NOTE: When testing has been completed, remove the manometerand test pin. Replace the original CPR dump plug.2. CURRENTLEAKAGE3. GROUNDRESISTANCE10The internal pump contained within the mattress system has doubleinsulated construction. It is not necessary to measure current leakage.However, if you choose to do so, refer to UL 2601-1, Clause 19.Measuring ground resistance is not applicable to the internal pump.Double insulated appliances are permitted to have two-conductorcords (refer to NFPA 99--Standard for Health Care Facilities, paragraph9-2.1.2.2).
Sof Matt Low Air Loss Mattress SystemOperator's/Service ManualFUNCTIONAL CHECK ANDSAFETY INSPECTION FORMSof Matt Low Air Loss MattressFunctional Check and Safety Inspection FormInitials Date Serial NumberItem(s)ActionObser vationWarmupOperate for two hoursprior to performing steps1-3.Was pump operatedfor two hours?YESNO1. 3.*Connect the manometerto the CPR valve usingtest pin. Use shortesttube to measure lowercell, medium length forfoot cell, and longest forupper cell. Set pressurecontrol knob to theSOFTER (lowest) position.Is lower cell pressure25.0 2.0 mm Hg?YESNO*Is foot cell pressure5.5 2.0 mm Hg?YESNO*Is upper cell pressure12.0 2.0 mm Hg?YESNO*Is lower cell pressure25.0 2.0 mm Hg?YESNO*Is foot cell pressure5.5 2.0 mm Hg?YESNO*Is upper cell pressure32.0 3.0 mm Hg?YESNO*1. ct manometer as in1. 3. above, but set thepressure control knob tothe FIRMER (highest)position.Results (circle selection)* NOTE: If the pressure measured in 1. 3. or 1. 4. exceeds the allowable range ("NO") ,record the value for use with the Troubleshooting Matrix (figure 9).Figure 8—Functional Check and Safety Inspection Form11
Sof Matt Low Air Loss Mattress SystemOperator's/Service ManualTROUBLESHOOTINGTROUBLESHOOTINGUse Obser vations from 1.3, Operating Pressure TestIFOK within specificationGO TOLOW less than spec.Lower CellFoot CellUpper LOWLOWLOW6OKOKHIGH7HIGH greater than spec.Field calibration ofthe panel assembly isnot normally feasible.See Ordering Parts,page 20.Figure 9—Troubleshooting Matrix1.Lower CellFoot CellUpper CellOKLOWOKPossible Causes:1.2.3.Leak in connection to foot cell or to outlet of foot check valve.Leak in foot cell (see p. 16)Foot check valve malfunctioning.Remedies:1.2.3.2.Use O ring lubricant on elbow to foot cell if the leak is here—usewire tie or cut tube shorter by 1/4" to foot check valve.Replace upper cell.Replace panel assembly.Lower CellFoot CellUpper CellLOWLOWOKPossible Causes:1.2.3.4.5.12Lower cell controller out of calibrationCPR plug not inserted all the way.Larger O ring or middle O ring leaks—may be cracked or dried out.Loose or disconnected tubing.Leak in lower cell and/or foot cell.
Sof Matt Low Air Loss Mattress SystemOperator's/Service edies:1.2.3.4.5.3.Replace panel assembly.Reinsert plug and snap.Replace O ring if cracked—lubricate with O ring lubricant if dry.Reconnect, wire tie, or cut 1/4" off loose tube and reconnect.Replace leaking cell(s).Lower CellFoot CellUpper CellHIGHLOWOKPossible Causes:1.2.3.Lower cell controller out of calibration.Ball is stuck in foot check valve.Orifice in the power outage check valve is plugged or valve isstuck closed.Remedies:1.2.3.4.Replace panel assembly.Replace panel assembly.Replace panel assembly.Lower CellFoot CellUpper CellHIGHHIGHOKPossible Causes:1.2.3.4.Lower cell controller and/or check valve are/is out of calibration.Low air loss line from the lower cell controller is restricted.Orifice in the power outage check valve is plugged or valve isstuck closed.Restriction in the 0.013" dia. orifice machined in the check valve.Remedies:1.2.Replace panel assembly.Remove the restriction from the low air loss line connected tothe lower cell controller (brass).3, 4. Remove restriction from orifice.NOTE: Never insert a drill into the orifice.13
Sof Matt Low Air Loss Mattress SystemOperator's/Service ower CellFoot CellUpper CellOKOKLOWPossible Causes:1.2.3.4.5.Larger or middle size O ring on CPR dump pin assembly is leaking.Leak in a tube connection between the upper cell controller andentrance to the upper cell.Leak in upper cell.Damper bag has a leak.Upper cell controller out of calibration.Remedies:1.2.3.4.5.6.Replace O rings. Lubricate with O ring lube (silicone grease).Repair leak at connection. Use wire tie or cut tube shorter by 1/4".Replace upper cell.Replace damper bag.Replace panel.Lower CellFoot CellUpper CellLOWLOWLOWPossible Causes:1.2.3.Pump is not running or runs intermittently—damaged cord or plug.CPR plug almost or actually disengaged.Leaks in upper cell and/or damper bag and lower cell (repeatedpunctures with hypodermic needle).Remedies:1.2.3.14Plug in pump. If the power cord is damaged, replace panel assembly.Insert CPR plug and snap the fastener. Lubricate O rings withO ring lubricant if they are dry.Check for leaks (see pp. 15-16) and replace cells.
Sof Matt Low Air Loss Mattress SystemOperator's/Service ManualTROUBLESHOOTING(continued)7.CHECKING CELLSFOR LEAKSLower CellFoot CellUpper CellOKOKHIGHPossible Causes:1.2.3.Patient pressure setting knob is set too high.Upper cell controller out of calibration.Low air loss line to upper cell controller is restricted.Remedies:1.2.3.Lower the patient pressure setting.Replace the panel.Remove restriction in the low air loss line connected to the uppercell controller.EXCESSIVE NOISEThe Sof Matt Mattress System is designed to produce noise levels less than40 dB(A) per ASTM E1574-95 except at a distance of 36", when the patientweight setting controller is set to the maximum setting position. If the internalpump produces excessive noise, replace the panel assembly.CHECKING LOWERCELL FOR LEAKSTo check the lower cell for leaks:1.Prepare the test setup described in Operating Pressure Test, step 2, page 9.See also figure 7, page 10.2.Connect the manometer assembly to the lower cell (shortest tube ontest pin). The pressure should be 25.0 2.0 mm Hg. Then, connectthe manometer assembly to the foot cell (medium length tube). Thepressure should be 5.5 2.0 mm Hg. If both pressures are met, thelower and foot cells are OK. If not, proceed to step 3.3.Pinch the tubing between the outlet port from the foot checkvalve and the in-line tee (pinch point #3, fig. 10, p.17).4.Connect the manometer assembly to the lower cell. It shouldread 25.0 2.0 mm Hg. If it meets pressure, the lower cell andthe circuitry to it are OK. If it doesn't reach at least 23.0 mm Hg,proceed to step 5.5.Take one finger and press against the valve body outlet of theCPR body to stop the flow into the lower cell. This will have to bedone by pressing on the upper layer of the cell. Use care not todamage the urethane. With flow to the lower cell being stoppedand the tubing still being pinched at pinch point #3, take anotherreading at the test pin (fig. 7). If the pressure now reads at least23.0 mm Hg, the lower cell or the connection to it has a leak. Ifthe leak is not at the connection, replace the cell. Use soap tocheck connections. If the pressure is less than 23 mm Hg, replacethe panel. Release pinch point #3.At this point, we have a non-leaking lower cell.15
Sof Matt Low Air Loss Mattress SystemOperator's/Service ManualCHECKING CELLSFOR LEAKSCHECKING FOOTCELL FOR LEAKSCHECKINGUPPER CELL ANDDAMPER BAGFOR LEAKS16To check the foot cell for leaks:1.Connect the manometer assembly to the foot cell (medium lengthtube on test pin) as described in Operating Pressure Test, step 2,page 9. The manometer will display the pressure of the foot cell.2.Pinch the tubing at pinch point #4 (fig. 10).3.Read the manometer pressure. If the pressure at this point isapproximately 5.5 mm Hg with pinch point #4 closed, but lesswhen the pinch point is released, the foot cell has a leak. Theentire upper cell will have to be replaced since the foot cell is partof the entire upper cell.4.Having already established that the lower cell is within spec,we should see a pressure of 5.5 2.0 mm Hg just ahead of thefoot cell when pinch point #4 is pinched. If this pressure is notwithin spec, the foot check valve is defective. Replace the panel.To check the upper cell and damper bag for leaks:1.Connect the manometer assembly to the upper cell (longest tubeon the test pin) as described in Operating Pressure Test, step 2, page 9.The manometer will display the pressure of the upper cell.2.Set the patient pressure setting valve to the lowest setting(full counterclockwise) position.3.Read the manometer pressure. It should read 12.0 2.0 mm Hg.If it does, turn the patient pressure setting valve to the highest setting(full clockwise) position. It should read 32.0 3.0 mm Hg.4.Return the patient pressure setting valve to the lowest setting,full counterclockwise position.5.Pinch the tubing at pinch point #2 (fig. 10) and the manometer shouldindicate above the spec. If the pressure in the upper cell is within spec,the connection to the cell or the cell itself is leaking. If a soap test ofthe connection to the cell does not show a leak, replace the uppercell. If the pressure does not fall within spec when pinch point #1 isclosed, proceed to step 6.6.Pinch the tube at pinch point #2. If the pressure in the upper cell fallswithin spec, but it didn't when pinch point #1 was closed, there is aleak between these two points. Leak test all joints (with soap solution)between the two pinch points. Also, leak test around the plug of theCPR dump valve. There may be a leak by the larger O ring. If this isthe case, replace or lubricate the O ring. If the pressure in the damperbag is less than 10 mm Hg and remains the same whether pinch point#1 or pinch point #2 is pinched, there is either a leak in the damperbag or the upper cell controller is out of calibration. See Calibrating theUpper Cell, page 31.
Sof Matt Low Air Loss Mattress SystemOperator's/Service ManualMAXIMUMPRESSURE TESTTo test the lower cellpressure controllerMAXIMUMPRESSURE TESTOperate the Sof Matt pump for at least two hours at nominal120VAC line voltage prior to performing the Maximum Pressure Test.To test the lower cell pressure controller for maximum pressure during a faultcondition:1.Connect the manometer assembly to the lower cell (shortest tube on thetest pin) as described in Operating Pressure Test, step 2, page 9. See figure 7,page 10.2.Clamp the low air loss line at point #4 (fig. 10).3.Take one finger and press against the CPR valve hose outlet to stop the airflow into the lower cell. This will have to be done by pressing on the upperlayer of the cell (near point C, figure 14, page 22). Use care not to damagethe urethane.Figure 10—Mattress Air Flow/Pressure Diagram17
Sof Matt Low Air Loss Mattress SystemOperator's/Service ManualMAXIMUM PRESSURETESTMAXIMUMPRESSURE TEST(continued)4.Allow the pressure reading to stabilize.5.If the pressure is less than or equal
The mattress is designed for use on bed frames which provide firm, solid support. Use otherwise may cause the mattress to be ineffective. NOTE: When the mattress is used on a link-spring bed frame, it may cause the RSM mattress to sag. Additional support can be provided by using three appropriately sized support boards. The