Transcription
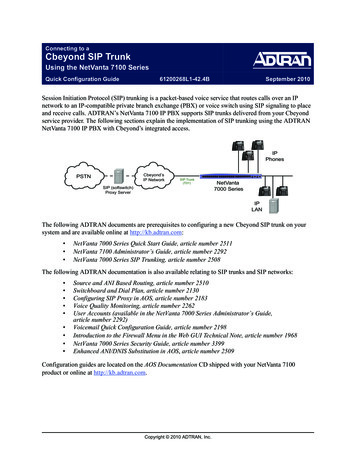
Connecting to aCbeyond SIP TrunkUsing the NetVanta 7100 SeriesQuick Configuration Guide61200268L1-42.4BSeptember 2010Session Initiation Protocol (SIP) trunking is a packet-based voice service that routes calls over an IPnetwork to an IP-compatible private branch exchange (PBX) or voice switch using SIP signaling to placeand receive calls. ADTRAN’s NetVanta 7100 IP PBX supports SIP trunks delivered from your Cbeyondservice provider. The following sections explain the implementation of SIP trunking using the ADTRANNetVanta 7100 IP PBX with Cbeyond’s integrated access. 0#*6 MENUMENUCbeyond’sIP NetworkPSTNSIP Trunk(T01)SIP (softswitch)Proxy 00 Series 59789#*0#6IPLANThe following ADTRAN documents are prerequisites to configuring a new Cbeyond SIP trunk on yoursystem and are available online at http://kb.adtran.com: NetVanta 7000 Series Quick Start Guide, article number 2511NetVanta 7100 Administrator’s Guide, article number 2292NetVanta 7000 Series SIP Trunking, article number 2508The following ADTRAN documentation is also available relating to SIP trunks and SIP networks: Source and ANI Based Routing, article number 2510Switchboard and Dial Plan, article number 2130Configuring SIP Proxy in AOS, article number 2183Voice Quality Monitoring, article number 2262User Accounts (available in the NetVanta 7000 Series Administrator’s Guide,article number 2292)Voicemail Quick Configuration Guide, article number 2198Introduction to the Firewall Menu in the Web GUI Technical Note, article number 1968NetVanta 7000 Series Security Guide, article number 3399Enhanced ANI/DNIS Substitution in AOS, article number 2509Configuration guides are located on the AOS Documentation CD shipped with your NetVanta 7100product or online at http://kb.adtran.com.Copyright 2010 ADTRAN, Inc.
Hardware and Software Requirements and LimitationsThe ADTRAN Operating System (AOS) firmware version A2.05.00 or later is required on your NetVanta7100 product in order to support Cbeyond’s SIP trunking. You should confirm that you are using hardwarepart number 1200796E1 for this configuration. Hardware part number 1200796L1 does not supporttranscoding between G.729 and G.711 RTP streams, which is needed to access voicemail and AA overCbeyond’s SIP trunk service. The hardware part number can be seen on the label at the bottom of the unitand also through the CLI with the show version command; check the DSP number (7119 for E1 and 7116for L1).The NetVanta 7100 product provides native SIP trunking capabilities and does not require an external SIPapplication level gateway (ALG). However, when using the NetVanta 7060 for SIP trunking, an externalSIP-aware router or firewall is required in front of the NetVanta 7060 for network address translation(NAT) to function properly. If a SIP-aware router or firewall is not used in conjunction with the NetVanta7060, then the SIP trunking service may not function correctly. Because of this constraint, the NetVanta7060 is not approved for use with SIP trunking applications on the Cbeyond network.Configuration MethodsThere are two methods for configuring NetVanta 7100 products: the Web-based graphical user interface(GUI) or the command line interface (CLI). Both methods are covered in this guide. Not all the featurescan be enabled through both methods and will be noted when this limitation occurs.Follow the steps below to configure the incoming Cbeyond SIP trunk: Create a SIP trunk account.– Set the SIP server address.– Set the SIP proxy address.Create trunk group(s).Create a SIP Trunk Account Using the GUI1. Open a new page in your Web browser.2. Type your unit’s IP address in the browser’s address field in the following form:http:// ip address /adminThe IP address may also be entered in https:// if your unit has ip http secure-serverenabled.2Copyright 2010 ADTRAN, Inc.61200268L1-42.4B
3. At the prompt, enter your user name and password and select OK. By default, the user name is adminand the password is password.4. From the initial GUI menu, navigate to the Voice System Setup System Parameters menu.Verify that the Transfer Mode and Forward Mode are set to the default setting, Local (decisions aremade internally by the NetVanta unit).Verify Transfer Mode andForward Mode are set tothe default setting, Local.61200268L1-42.4BCopyright 2010 ADTRAN, Inc.3
5. Navigate to the Voice Trunks Trunk Accounts menu. Enter the desired name for the SIP trunk inthe Trunk Name field and select SIP as the trunk Type. Select Add to create the new trunk account andgo to the Edit SIP Trunk menu.Enter a name for theCbeyond SIP trunk.Select SIP as the trunkType.6. Continue the SIP trunk configuration on the SIP Settings tab.Enter the SIP Server Address using either the specific host name with the fully qualified domainname (FQDN) or the IP address on which the trunks will terminate. The SIP Server Address isdefined as the SIPconnect Domain on the Cbeyond Install Profile (provided by Cbeyond athttp://CbeyondOnline.net).Enter the SIP Proxy Address using the specific IP address or FQDN on which the trunks willterminate. The SIP Proxy Address is defined as the Outbound Proxy on the Cbeyond Install Profile(provided by Cbeyond at http://CbeyondOnline.net).The following illustration displays the SIPconnect Domain and Outbound Proxy addresses listed onthe Cbeyond Install Profile (in the Phone Vendor Info menu).In the following example, sipconnect.atl0.cbeyond.net is used for the SIP server address, andsip-proxy.atl0.cbeyond.net is used for the SIP proxy address.Configure the SIP ServerAddress and SIP ProxyAddress to the Cbeyondprovided host name.4Copyright 2010 ADTRAN, Inc.61200268L1-42.4B
7. Enable the FROM Header Host Type and TO Header Host Type using the check boxes.Select Domain from both drop-down menus.Select the checkboxes to enablethe FROM HeaderHost Type and TOHeader HostType.Select Domain fromthe drop-downmenus.8. Enter the SIP Registrar Address using either the specific host name with the FQDN or IP address.The SIP Registrar Address is defined as the Outbound Proxy address provided in the CbeyondInstall Profile (provided by Cbeyond at http://CbeyondOnline.net). By default, the SIP Registrar Portis set to 5060.In the following example, sip-proxy.lax0.cbeyond.net is used for the SIP Registrar Address.Configure the SIPRegistrar Address to theCbeyond-provided hostname.9. Enable Diversion Support using the check box.Select the check boxto enable DiversionSupport.61200268L1-42.4BCopyright 2010 ADTRAN, Inc.5
10. Change the Registrar Threshold setting to 30 seconds.Change the RegistrarThreshold to 30seconds.11. Add a User and Password to Default Authentication. The User is the Billing Telephone Numberlisted in the Cbeyond Install Profile. In addition, under Registration Settings in the NetVanta unit,specify that the Domain Address used by the NetVanta 7100 is set to Use this domain, and enter theSIPconnect Domain from the Cbeyond Install Profile (provided by Cbeyond athttp://CbeyondOnline.net).The following illustration displays the Billing Telephone Number listed on the Cbeyond Install Profile(in the Trunk Group Information menu). The SIPconnect Domain address is located in the PhoneVendor Info menu of the Install Profile.The Install Profile is available online athttp://CbeyondOnline.net.In the following example, the User is specified as the Cbeyond Billing Telephone Number(8585554444), the password is specified, Default Authentication is enabled, and the Domain Addressis specified as the Cbeyond SIPconnect Domain address (sipconnect.lax0.cbeyond.net).Add a User andPassword to DefaultAuthentication. TheUser is the BillingTelephone Numberfrom the CbeyondInstall Profile.6Enter theSIPconnectDomain as theDomain Address.Copyright 2010 ADTRAN, Inc.61200268L1-42.4B
12. Select the ANI Substitution tab (still on the Edit SIP Trunk menu) to configure outgoing caller ID tomatch the main Cbeyond assigned number on the SIP trunk. Set the Match Template to (matchesany number). Set the Substitution to the Cbeyond-assigned SIP trunk number registered with thesoftswitch. Other Cbeyond numbers can be added here as well. For more information, refer to theconfiguration guide Enhanced ANI/DNIS Substitution in AOS (article number 2509) available online athttp://kb.adtran.com. Select Apply to accept the SIP trunk settings.\Set the Match Template to (matches any number).Set the Substitution to theCbeyond-assigned SIPtrunk number registeredwith the softswitch.Select Apply toaccept the settings.For more information on securing the NetVanta 7100 IP PBX, refer to the NetVanta7000 Series Security Guide (article number 3399) available online athttp://kb.adtran.com.13. Configure the necessary firewall settings by navigating to the Data Firewall Security Zones menu.61200268L1-42.4BCopyright 2010 ADTRAN, Inc.7
In the Edit Security Zones menu, select the Public security zone from the list.Select Public fromthe Edit SecurityZones menu.Select Add Policy to Zone ‘Public’.Select Add Policy toZone ‘Public’.Select Allow from the Policy Type drop-down menu and select Continue.Select Allow from thePolicy Type dropdown menu and selectContinue.14. Configure the custom policy entry for the Public security zone.Select udp from the Protocol drop-down menu.Under Allowed Ports, select Specified. Select Equal To from the drop-down menu and enter 5060 asthe destination port.For security purposes, ADTRAN recommends restricting the firewall connection to allowpublic SIP traffic only from Cbeyond’s network. In the previous example, the allowed portis the default SIP port. For added security, only allow the SIP server defined in Step 6 onpage 4. For specific configuration instructions, refer to Restricting Your Firewall Accesson page 11.Select Apply to accept the settings.8Copyright 2010 ADTRAN, Inc.61200268L1-42.4B
Select udpfrom theProtocoldrop-downmenu.SelectSpecified,then selectEqual Tofrom the dropdown menu.Enter 5060 asthedestinationport.Select Apply toaccept thesettings.15. If you need further assistance configuring the firewall or virtual local area network (VLAN) settings,refer to the technical note Introduction to the Firewall Menu in the Web GUI (article number 1968), theNetVanta 7060/7000 Configuration Checklist (article number 2284), or the technical note Changingthe Default VLAN Subnets (article number 2281). These guides are located online athttp://kb.adtran.com.Create a SIP Trunk Account Using the CLI1. Boot up the unit.2. Telnet to the unit (telnet ip address ). For example:telnet 208.61.209.1If during the unit’s setup process you have changed the default IP address (10.10.10.1),use the configured IP address.3. Enter your user name and password at the prompt.61200268L1-42.4BCopyright 2010 ADTRAN, Inc.9
The AOS default user name is admin and the default password is password. If yourproduct no longer has the default user name and password, contact your systemadministrator for the appropriate user name and password.4. Enter the Enable mode by entering enable at the prompt as follows: enable5. Enter your Enable mode password at the prompt.6. Set the Transfer Mode and Forward Mode to the default setting, Local (decisions are made internallyby the NetVanta unit).#configure terminal(config)#voice transfer-mode local(config)#voice forward-mode local7. Create the new trunk account, provide a name, and set SIP as the trunk type using the voice trunkcommand:(config)#voice trunk t01 type sipIf other trunks are installed (such as analog trunks), you may need to use a different trunknumber. For example, t03.8. Set the SIP server and SIP proxy addresses to the specific host name provided by Cbeyond. In thisexample, sipconnect.atl0.cbeyond.net is used for the SIP server address andsip-proxy.atl0.cbeyond.net is used for the SIP proxy address.(config-t01)#sip-server primary roxy primary sip-proxy.atl0.cbeyond.netThe SIP server and SIP proxy addresses are provided by Cbeyond in the Install Profileavailable online at http://CbeyondOnline.net. The SIP server address corresponds toCbeyond’s SIPconnect Domain address, and the SIP proxy address corresponds toCbeyond’s Outbound Proxy address.9. Enable the FROM Header Host Type and TO Header Host Type.(config-t01)#grammar from host domain(config-t01)#grammar to host domain10. Set the SIP Registrar Address to the specific host name provided by Cbeyond. In this example,sip-proxy.lax0.cbeyond.net is used for the SIP registrar address.(config-t01)#registrar primary sip-proxy.lax0.cbeyond.netThe SIP registrar address is provided by Cbeyond in the Install Profile available onlineat http://CbeyondOnline.net. The SIP registrar address corresponds to the OutboundProxy address.10Copyright 2010 ADTRAN, Inc.61200268L1-42.4B
11. Set the registrar threshold to 30 seconds.(config-t01)#registrar threshold absolute 3012. Configure the SIP trunk to support diversion headers.(config-t01)#diversion-supported13. Add a Username and Password to Default Authentication. In this example, 8585554444 is used forthe user name and 3a3269b068763b30 is used for the password.(config-t01)#authentication username 8585554444 password 3a3269b068763b3014. Configure ANI substitution by setting the outgoing caller ID to match the main Cbeyond-assignednumber on the SIP trunk.(config-t01)#match ani substitute 858555444415. Add a new access control list (ACL).(config-t01)#ip access-list extended CBeyond16. Configure the custom policy entry.(config-ext-nacl)#permit udp any any eq 506017. Apply the custom policy entry to the Public security zone.(config)#ip policy-class Public(config-policy-class)#allow list CBeyondFor security purposes, ADTRAN recommends restricting the firewall connection to allowpublic SIP traffic only from Cbeyond’s network. For added security, only allow the SIPserver defined in Step 8 on page 10. For specific configuration instructions, refer toRestricting Your Firewall Access on page 11.Restricting Your Firewall AccessFor security purposes, ADTRAN recommends restricting the firewall connection to allow public SIPtraffic only from Cbeyond’s network. In the previous configuration examples, the custom policy entry forthe security zone Public allows all traffic through the default SIP port (udp 5060). For added security, onlyallow the SIP server defined in Step 6 on page 4, or Step 8 on page 10, which is the SIP server with theaddress defined as the SIPconnect Domain on the Cbeyond Install Profile (provided by Cbeyond athttp://CbeyondOnline.net).You can change the firewall connection using either the GUI or the CLI. These changes are made to allowSIP traffic only from the trusted Cbeyond SIP server and to remove any default statements in theconfiguration where traffic is allowed from any source through the default SIP port.61200268L1-42.4BCopyright 2010 ADTRAN, Inc.11
Restricting Your Firewall Access Using the GUITo change the source of allowed SIP traffic from the default to the Cbeyond SIP server, follow these steps:1. From the GUI main menu, navigate to Data Firewall Security Zones.2. From the Edit Security Zones menu, select Public.Select Public fromthe Edit SecurityZones menu.3. Select the default traffic policy that allows traffic from UDP port 5060. In the example below, thedefault policy is Allow.Select the defaulttraffic policy thatallows traffic fromUDP port 5060.Here the defaultpolicy is Allow.If a default allow policy does not exist, create a new advanced policy type and enter theinformation given in the following steps.12Copyright 2010 ADTRAN, Inc.61200268L1-42.4B
4. In the Configuration for Policy ‘Allow’ in Security Zone ‘Public’ menu, change the Policy Type toAdvanced by selecting the option from the drop-down menu.Select Advancedfrom the PolicyType drop-downmenu.5. Optionally, you can change the Policy Description so that you know this policy works with theCbeyond network. For example, change the description to Cbeyond. Once you have changed the PolicyType and Policy Description, select Apply at the bottom of the Configuration for Policy menu.6. Selecting Apply returns you to the Public Security Zone menu. Select the newly updated policy fromthe policy list (returning you to the Configuration for Policy menu). In this example, the updated policyis the Cbeyond policy.Select the newlyupdated policy fromthe list. Here theupdated policy is theCbeyond policy.7. Scroll down to the Add/Modify/Delete Policy Traffic Selectors menu. Select the Permit trafficselector for editing.Select the Permittraffic selector.The Add/Modify/Delete Policy Traffic Selectors menu will not appear if the policy typeis not set to Advanced.61200268L1-42.4BCopyright 2010 ADTRAN, Inc.13
8. After selecting Permit, you can modify the policy from the Modify Custom Policy Entry menu.Specify that the policy is set to Permit, that the protocol is udp, and specify the Source Host/Networkby selecting Hostname and entering the host name of the Cbeyond SIPconnect Domain from theCbeyond Install Profile (provided by Cbeyond at http://CbeyondOnline.net). The host name entered inthis policy should be the host name of the Cbeyond server specified in Step 6 on page 4. For example,the illustration below uses the SIPconnect Domain (the SIP Server Address)sipconnect.at10.cbeyond.net. In this menu, you should also specify the Destination Ports as EqualTo port 5060. Once you have entered these settings, select Apply.Verify that theFilter Type is setto Permit and thatthe Protocol is setto udp.Specify the SourceHost/Network byHostname, and enterthe SIPconnectDomain host namefrom the CbeyondInstall Profile.Specify theDestination Ports asEqual To port 5060and select Apply.9. The updated Permit policy traffic selector appears in the Add/Modify/Delete Policy Traffic Selectorsmenu and confirms that the default policy has been changed.The updatedPermit policy isnow listed in theAdd/Modify/DeletePolicy TrafficSelectors menu.14Copyright 2010 ADTRAN, Inc.61200268L1-42.4B
10. Save this setting by selecting Save from the upper right corner of the GUI. The firewall is now restrictedto only allow SIP traffic from Cbeyond’s network.You should also remove any other default statements in your configuration that allow SIPtraffic (UDP port 5060) from any source since you now have a specific entry for Cbeyond.Restricting Your Firewall Access Using the CLITo change the allowed source of SIP traffic from the default to the Cbeyond SIP server, follow these steps:1. Create an extended ACL with a different description than the default ACL (defined in Step 15 onpage 11). For example:(config-t01)#ip access-list extended cbeyond-sip-connect2. Configure the ACL to only permit traffic from the Cbeyond SIP server and SIP proxy server. The serveraddresses are provided by Cbeyond (refer to Step 8 on page 10). In the example below, x.x.x.x is yourpublic IP or subnet and y.y.y.y is your subnet mask. For example:(config-ext-nacl)#permit ip hostname sipconnect.at10.cbeyond.net x.x.x.x y.y.y.y(config-ext-nacl)#permit ip hostname sip-proxy.at10.cbeyond.net x.x.x.x y.y.y.y3. Apply the new ACL to the Public security zone.(config)#ip policy-class Public(config-policy-class)#allow list cbeyond-sip-connect4. Save the new configuration.You should also remove any other default statements in your configuration that allow SIPtraffic (UDP port 5060) from any source since you now have a specific entry for Cbeyond.Create Trunk GroupsTrunk groups combine one or more trunk accounts and assign outbound call characteristics. The trunkgroup is assigned outbound call capabilities (local calls, long distance calls, etc.). Additionally, a cost isassigned to each attribute in the outbound call template. Use this section to create a trunk group, add thetrunk account members to the group, and define the outbound call templates and costs.61200268L1-42.4BCopyright 2010 ADTRAN, Inc.15
Create Trunk Groups Using the GUI1. Navigate to the Voice Trunks Trunk Groups menu. To add a new trunk group, and go to the EditTrunk Group menu, enter a new Group Name and select Add. To edit an existing trunk, select the linkfor the desired trunk from the list under Modify/Delete Trunk Group.Enter a Group Nameand select Add tocreate a new trunkgroup.Or, select an existinggroup to edit itsconfiguration.2. To add members to the trunk group, select the Add Members button. The Add Members to TrunkGroup menu will appear.Select Add Members toadd trunk accounts tothe trunk group.3. Add members by selecting the check box beside the name you entered for the Cbeyond SIP trunk. SelectAdd Selected Trunks to append the new member selection(s) and return to the Edit Trunk Groupmenu.Select the check boxbeside the trunk accountto add members.Select Add SelectedTrunks to continue.16Copyright 2010 ADTRAN, Inc.61200268L1-42.4B
4. Scroll down in the Edit Trunk Group menu. Select the appropriate check boxes under Outbound CallTemplates to enable specific templates. Outbound call templates are the types of calls to allow fromthis trunk. Select a cost for each template. Select Apply at the bottom of the menu to accept the newsettings and return to the Add/Modify/Delete Trunk Groups menu.Select the check boxes toenable specific outboundcall templates for thistrunk group.Select the cost for eachtemplate.Select Apply toaccept the settings.5. Verify the addition of the new Cbeyond trunk group.Verify the newly addedtrunk group. Look for thename you entered for theCbeyond SIP trunk in thisarea.61200268L1-42.4BCopyright 2010 ADTRAN, Inc.17
Create Trunk Groups Using the CLI1. Create a new trunk group or enter the configuration command set for an existing trunk group using thevoice grouped-trunk command. enable#configure terminal(config)#voice grouped-trunk Cbeyond SIP Trunk2. Add members to the trunk group:(config-SIP Trunk)#trunk T013. Enable specific outbound call templates and specify a cost for each template. Outbound call templatesare the types of calls to allow from this trunk.(config-SIP Trunk)#accept NXX-XXXX cost 018Copyright 2010 ADTRAN, Inc.61200268L1-42.4B
Copyright 2010 ADTRAN, Inc. Connecting to a Cbeyond SIP Trunk Using the NetVanta 7100 Series Quick Configuration Guide 61200268L1-42.4B September 2010


