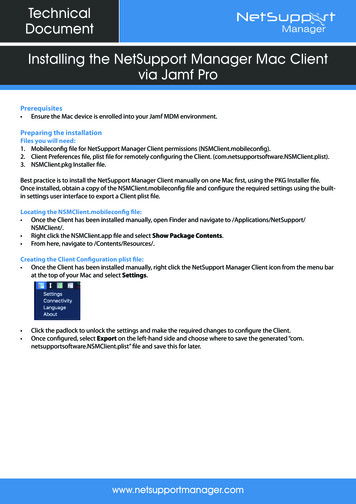
Transcription
NetVanta Unified Communications Technical NoteInstalling NetVanta UC Client Using GPOIn order to successfully install NetVanta Unified Communications (UC) Client software (includingucCompanion click-to-dial) using Microsoft's group policy objects (GPOs), several software prerequisitesmust be installed on the user's computer. These prerequisites are not automatically installed when theNetVanta UC Client software is deployed using GPO and must be either manually installed or deployed(using GPO) on each user's computer before installing the NetVanta UC Client software. This technicalnote gives step-by-step instructions on: How to prepare for GPO deployment of NetVanta UC Client software and its prerequisitesHow to deploy NetVanta UC Client software and its prerequisites using GPOHow to deploy NetVanta UC Client software updates using GPOPreparing NetVanta UC Client and Its Prerequisites for DeploymentThe following sections describe how to extract the NetVanta UC Client software prerequisites so they canbe deployed using GPO via Microsoft Active Directory. After determining which client softwareprerequisites you require for your installation, you must create directories to house each prerequisite anddownload the prerequisites to the appropriate directories. Then a directory must be created to hold theNetVanta UC Client software and the contents of the installation CD copied to that directory. Once thedirectories have been created and the appropriate software extracted to them, then the NetVanta UC Clientsoftware and its prerequisites can be deployed using GPO.Determining Client Software PrerequisitesThe client software requires several prerequisites to function properly. These prerequisites are listed in thetables below. These prerequisites are not automatically installed by the NetVanta UC Client softwareduring a GPO deployment. Instructions have been included for deploying many of these prerequisitesusing GPO.The Microsoft .NET Framework 4.0 and Windows Installer 3.1 Redistributable (v2) prerequisitescannot be deployed using GPO. These must be deployed using other means, such as Windows ServerUpdate Services (WSUS) or manual installation. WSUS can be downloaded athttp://www.microsoft.com/downloads/. For more information, refer to Introduction to DeployingWindows Server Update Services 3.0 and a Step-by-Step Guide to Getting Started withMicrosoft Windows Server Update Services 3.0 available online at http://technet.microsoft.com.
Preparing NetVanta UC Client and PrerequisitesInstalling NetVanta UC Client Using GPOFor the client software deployment, the following prerequisites must be installed:PrerequisiteFile NameMicrosoft .NET Framework 4.0dotnetfx35setup.exeWindows Installer 3.1 Redistributable (v2)WindowsInstaller-KB893803-v2x86.exeVisual C 2005 Service Pack 1 Redistributable (x86 or x64)vcredist x86.exe orvcredist x64.exeVisual C 2008 Service Pack 1 Redistributable (x86 or x64)vcredist x86.exe orvcredist x64.exeFor Office 2003:Microsoft Visual Studio 2005 Tools for Office Second Edition Runtimevstor.exeFor Office 2007 and Microsoft Visual Studio 2008:Visual Studio Tools for the Office System (Version 3.0 Runtime)vstor30.exeFor Office 2007 and Microsoft Visual Studio 2008 Service Pack 1:Visual Studio Tools for the Microsoft Office System (Version 3.0Runtime) Service Pack 1vstor30sp1-KB949258-x86.exeFor Office 2003:Office 2003 Update: Redistributable Primary Interop AssembliesO2003PIA.EXEFor Office 2007 and 2010:2007 Microsoft Office System Primary Interop AssembliesPrimaryInteropAssembly.exeAll of the NetVanta UC Client Software prerequisites (except the Microsoft .NETFramework 4.0) are available on the NetVanta UC Client installation CD. Additionally,all of the NetVanta UC Client software prerequisites are available for download atwww.microsoft.com/downloads.Creating Directories for NetVanta UC Client PrerequisitesIn order to deploy the prerequisites you require for GPO deployment of NetVanta UC Client software, youmust create directories to house each prerequisite and the files that will be extracted. To create the requireddirectories, follow these steps:1. Create a new folder on a local drive of your computer called client gpo.2. In the client gpo folder you created in Step 1, create new folders to house each of the prerequisiteexecutable (.exe) files and the files that will later be extracted from them. Name the folders accordingto the naming conventions outlined in the table below. Refer to Determining Client SoftwarePrerequisites on page 1 to determine which prerequisites you will require for GPO deployment of theclient software.3. In the client gpo folder, create a new folder called MSIs. The path to this new folder should resembleC:\client gpo\MSIs. Using the steps in the proceeding sections, the .exe file of each prerequisite will2Copyright 2011 ADTRAN, Inc.6UCSTN0034-4A
Installing NetVanta UC Client Using GPOPreparing NetVanta UC Client and Prerequisitesbe extracted into its respective folder (created in Step 2 above), and the folder will be copied into theC:\client gpo\MSIs path.PrerequisiteFolder NameVisual C 2005 Service Pack 1 Redistributable (x86)VisualC 2005.x86Visual C 2005 Service Pack 1 Redistributable (x64)VisualC 2005.x64Visual C 2008 Service Pack 1 Redistributable (x86)VisualC 2008.x86Visual C 2008 Service Pack 1 Redistributable (x64)VisualC 2008.x64Microsoft Visual Studio 2005 Tools for Office Second Edition RuntimeVSTOR2005Visual Studio Tools for the Office System (Version 3.0 Runtime)VSTOR30Visual Studio Tools for the Microsoft Office System (Version 3.0 Runtime)Service Pack 1VSTOR30SP1Office 2003 Update: Redistributable Primary Interop AssembliesOffice2003PIA2007 Microsoft Office System Primary Interop AssembliesOffice2007PIADownloading and Extracting the Prerequisites for GPO DeploymentIn order to deploy the NetVanta UC Client prerequisites using GPO, the prerequisite .exe file must bedownloaded and extracted. Extracting each .exe file allows access to the Windows Microsoft Installer(MSI) files needed for deploying files using GPO. To download and extract the software prerequisites totheir appropriate directories, follow these steps:1. Download the prerequisites you need to deploy to their respective folders. Refer to Determining ClientSoftware Prerequisites on page 1 to determine the file names of the prerequisites you require for GPOdeployment of the client software. These files will be in .exe format and must be extracted to access theMSI file that will be used to deploy the software via GPO.2. On the taskbar, navigate to Start Programs Accessories Command Prompt to open a Windowscommand prompt.3. At the prompt, enter the letter of the drive on which you created the client gpo folder in Step 1 followedby a colon. For example, if you created the client gpo folder on the C drive (for example,C:\client gpo), enter:H:\ C:4. Extract the prerequisite executable files using the steps outlined in the following sections.5. Once all the prerequisite software has been extracted to the appropriate folders, proceed to Copying theNetVanta UC Client Software to a Shared Directory on page 8.6UCSTN0034-4ACopyright 2011 ADTRAN, Inc.3
Preparing NetVanta UC Client and PrerequisitesInstalling NetVanta UC Client Using GPOExtracting Visual C 2005 Service Pack 1 Redistributable (x86 and x64)To extract the Visual C 2005 Service Pack 1 Redistributable (x86) to the folder created in Step 3 ofCreating Directories for NetVanta UC Client Prerequisites on page 2, follow these steps:1. Use the change directory (CD) command to change the directory to the folder in which you downloadedthe prerequisite. Type CD followed by the path of the directory and press Enter. For example, if youdownloaded the file to C:\client gpo\VisualC 2005.x86, enter:C:\ CD C:\client gpo\VisualC 2005.x862. To extract the contents of the vcredist x86.exe file, enter the following at the command prompt:C:\client gpo\VisualC 2005.x86 vcredist x86.exe /T:C:\client gpo\VisualC 2005.x86 /C /qThe vcredist x86.exe file will be extracted to the VisualC 2005.x86 folder. The file that is extractedis named VCREDI 3.EXE. This file must also be extracted to recover the MSI file. Do not close thecommand prompt.3. Select the opened command prompt window from Step 2. To extract the VCREDI 3.EXE file, enter thefollowing into the command prompt:C:\client gpo\VisualC 2005.x86 VCREDI 3.EXE /T:C:\client gpo\VisualC 2005.x86 /C4. Copy the VisualC 2005.x86 folder to the C:\client gpo\MSIs folder.To extract the Visual C 2005 Service Pack 1 Redistributable (x64) to the folder created in Step 3 ofCreating Directories for NetVanta UC Client Prerequisites on page 2, follow these steps:1. Use the CD command to change the directory to the folder in which you downloaded the prerequisite.Type CD followed by the path of the directory and press Enter. For example, if you downloaded thefile to C:\client gpo\VisualC 2005.x64, enter:C:\ CD C:\client gpo\VisualC 2005.x642. To extract the contents of the vcredist x64.exe file, enter the following at the command prompt:C:\client gpo\VisualC 2005.x64 vcredist x64.exe /T:C:\client gpo\VisualC 2005.x64 /C /qThe vcredist x64.exe file will be extracted to the VisualC 2005.x64 folder. The file that is extractedis named VCREDI 2.EXE. This file must also be extracted to recover the MSI file. Do not close thecommand prompt.3. Select the opened command prompt window from Step 2. To extract the VCREDI 2.EXE file, enter thefollowing into the command prompt:C:\client gpo\VisualC 2005.x64 VCREDI 2.EXE /T:C:\client gpo\VisualC 2005.x64 /C4. Copy the VisualC 2005.x64 folder to the C:\client gpo\MSIs folder.4Copyright 2011 ADTRAN, Inc.6UCSTN0034-4A
Installing NetVanta UC Client Using GPOPreparing NetVanta UC Client and PrerequisitesExtracting Visual C 2008 Service Pack 1 Redistributable (x86 and x64)To extract the Visual C 2008 Service Pack 1 Redistributable (x86) to the folder created in Step 3 ofCreating Directories for NetVanta UC Client Prerequisites on page 2, follow these steps:1. Use the CD command to change the directory to the folder in which you downloaded the prerequisite.Type CD followed by the path of the directory and press Enter. For example, if you downloaded thefile to C:\client gpo\VisualC 2008.x86, enter:C:\ CD C:\client gpo\VisualC 2008.x862. To extract the contents of the vcredist x86.exe file, enter the following at the command prompt:C:\client gpo\VisualC 2008.x86 vcredist x86.exe /X:C:\client gpo\VisualC 2008.x86 /q3. Copy the VisualC 2008.x86 folder to the C:\client gpo\MSIs folder.To extract the Visual C 2008 Service Pack 1 Redistributable (x64) to the folder created in Step 3 ofCreating Directories for NetVanta UC Client Prerequisites on page 2, follow these steps:1. Use the CD command to change the directory to the folder in which you downloaded the prerequisite.Type CD followed by the path of the directory and press Enter. For example, if you downloaded thefile to C:\client gpo\VisualC 2008.x64, enter:C:\ CD C:\client gpo\VisualC 2008.x642. To extract the contents of the vcredist x64.exe file, enter the following at the command prompt:C:\client gpo\VisualC 2008.x64 vcredist x64.exe /X:C:\client gpo\VisualC 2008.x64 /q3. Copy the VisualC 2008.x64 folder to the C:\client gpo\MSIs folder.Extracting Microsoft Visual Studio 2005 Tools for Office Second Edition RuntimeTo extract the Microsoft Visual Studio 2005 Tools for Office Second Edition Runtime to the folder createdin Step 3 of Creating Directories for NetVanta UC Client Prerequisites on page 2, follow these steps:1. Use the CD command to change the directory to the folder in which you downloaded the prerequisite.Type CD followed by the path of the directory and press Enter. For example, if you downloaded thefile to C:\client gpo\VSTOR2005, enter:C:\ CD C:\client gpo\VSTOR20052. To extract the contents of the vstor.exe file, enter the following at the command prompt:C:\client gpo\VSTOR2005 vstor.exe /X:C:\client gpo\VSTOR2005 /q3. Copy the VSTOR2005 folder to the C:\client gpo\MSIs folder.6UCSTN0034-4ACopyright 2011 ADTRAN, Inc.5
Preparing NetVanta UC Client and PrerequisitesInstalling NetVanta UC Client Using GPOExtracting Visual Studio Tools for the Office System (Version 3.0 Runtime)To extract the Visual Studio Tools for the Office System (Version 3.0 Runtime) to the folder created in Step 3 of Creating Directories for NetVanta UC Client Prerequisites on page 2, follow these steps:1. Use the CD command to change the directory to the folder in which you downloaded the prerequisite.Type CD followed by the path of the directory and press Enter. For example, if you downloaded thefile to C:\client gpo\VSTOR30, enter:C:\ CD C:\client gpo\VSTOR302. To extract the contents of the vstor30.exe file, enter the following at the command prompt:C:\client gpo\VSTOR30 vstor30.exe /X:C:\client gpo\VSTOR30 /q3. Copy the VSTOR30 folder to the C:\client gpo\MSIs folder.Extracting Visual Studio Tools for the Microsoft Office System (Version 3.0 Runtime)Service Pack 1To extract the Visual Studio Tools for the Microsoft Office System Version 3.0 Runtime Service Pack 1 tothe folder created in Step 3 of Creating Directories for NetVanta UC Client Prerequisites on page 2, followthese steps:1. Use the CD command to change the directory to the folder in which you downloaded the prerequisite.Type CD followed by the path of the directory and press Enter. For example, if you downloaded thefile to C:\client gpo\VSTOR30SP1, enter:C:\ CD C:\client gpo\VSTOR30SP12. To extract the contents of the vstor30sp1-KB949258-x86.exe file, enter the following at the commandprompt:C:\client gpo\VSTOR30SP1 vstor30sp1-KB949258-x86.exe /X:C:\client gpo\VSTOR30SP1 /q3. Copy the VSTOR30SP1 folder to the C:\client gpo\MSIs folder.4. A batch file named vstor30sp1.bat is included with the NetVanta UC Client installation media locatedat the following directory: releasefolder \Utility\Scripts\GpoClientDeployment\. The releasefolder variable is the main folder of the installation media (for example,ADTRAN NetVanta UCServer 4.6.2.7310). This batch file is used as a startup script. Open this fileusing Notepad or another text editor.5. Replace \\quebec\client gpo\MSIs\VSTOR30SP1\vstor30sp1-KB949258-x86.msp with the server andpath of the client gpo folder created in Step 1 of Creating Directories for NetVanta UC ClientPrerequisites on page 2. If you have used the exact naming scheme used in this document, you will onlyreplace the server name in the path (quebec) with the name of the server that will host the file. Forexample, if the server’s name hosting the file is called ADTRAN, the replacement path would be:\\ADTRAN\client gpo\MSIs\VSTOR30SP1\vstor30sp1-KB949258-x86.msp.6. Save the revised script and copy it to the domain controller under the\\SYSVOL\sysvol\ domainname \Scripts folder. The domainname parameter is the domain’sfully qualified domain name. For pts6Copyright 2011 ADTRAN, Inc.6UCSTN0034-4A
Installing NetVanta UC Client Using GPOPreparing NetVanta UC Client and PrerequisitesExtracting Office 2003 Update: Redistributable Primary Interop AssembliesTo extract the Office 2003 Primary Interop Assembly to the folder created in Step 3 of Creating Directoriesfor NetVanta UC Client Prerequisites on page 2, follow these steps:1. Use the CD command to change the directory to the folder in which you downloaded the prerequisite.Type CD followed by the path of the directory and press Enter. For example, if you downloaded thefile to C:\client gpo\Office2003PIA, enter:C:\ CD C:\client gpo\Office2003PIA2. To extract the contents of the O2003PIA.exe file, enter the following at the command prompt:C:\client gpo\Office2003PIA O2003PIA.exe /T:C:\client gpo\Office2003PIA /q3. Copy the O2003PIA.msi file to the C:\client gpo\MSIs folder. This file should be located in theC:\client gpo\Office2003PIA folder into which you extracted the O2003PIA.exe file.4. A batch file named o2003pia.bat is included with the NetVanta UC Client installation media located atthe following directory: releasefolder \Utility\Scripts\GpoClientDeployment\. The releasefolder variable is the main folder of the installation media (for ts\GpoClientDeployment). This batch file is used as astartup script. Open this file using Notepad or another text editor.5. Replace \\quebec\client gpo\MSIs\O2003PIA.msi with the server and path of the client gpo foldercreated in Step 1 of Creating Directories for NetVanta UC Client Prerequisites on page 2. If you haveused the exact naming scheme used in this document, you will only replace the server name in the path(quebec) with the name of the server that will host the file. For example, if the server’s name hostingthe file is called ADTRAN, the replacement path would be:\\ADTRAN\client gpo\MSIs\O2003PIA.msi6. Save the revised script and copy it to the domain controller under the\\SYSVOL\sysvol\ domainname \Scripts folder. The domainname parameter is the domain’sfully qualified domain name. For ptsExtracting 2007 Microsoft Office System Primary Interop AssembliesTo extract the 2007 Microsoft Office System Primary Interop Assemblies to the folder created in Step 3 ofCreating Directories for NetVanta UC Client Prerequisites on page 2, follow these steps:1. Use the CD command to change the directory to the folder in which you downloaded the prerequisite.Type CD followed by the path of the directory and press Enter. For example, if you downloaded thefile to C:\client gpo\Office2007PIA, enter:C:\ CD C:\client gpo\Office2007PIA2. To extract the contents of the PrimaryInteropAssembly.exe file, enter the following at the commandprompt:C:\client gpo\Office2007PIA PrimaryInteropAssembly.exe /extract:C:\client gpo\Office2007PIA /q3. Copy the o2007pia.msi file to the C:\client gpo\MSIs folder. This file should be located in theC:\client gpo\Office2007PIA folder into which you extracted the PrimaryInteropAssembly.exe file.6UCSTN0034-4ACopyright 2011 ADTRAN, Inc.7
Deploying NetVanta UC Client and Its PrerequisitesInstalling NetVanta UC Client Using GPOCopying the NetVanta UC Client Software to a Shared DirectoryTo create a directory and download the NetVanta UC Client software, follow these steps:1. Create a directory on your local computer and copy the content of the installation CD to that directory.This folder can be the same folder that you use to deploy the NetVanta UC Client software prerequisites.2. Share the directory you created with the users or groups to whom you want to distribute the clientsoftware. You must have Domain Admin access rights or full rights to the Organizational Unit (OU) forwhich you want to distribute the software.3. Once the NetVanta UC Client software is copied to an appropriate directory and its prerequisites havebeen extracted to their respective directories, you are ready to deploy them using GPO. Proceed toDeploying NetVanta UC Client and Its Prerequisites Using GPO on page 8 for instructions.Deploying NetVanta UC Client and Its Prerequisites Using GPONetVanta UC Client and its prerequisites can be deployed using GPO in Windows Server 2008 and earlierWindows Server environments. The following sections outline how NetVanta UC Client and itsprerequisites are deployed in Windows Server 2008 and Windows Server 2003.The network location for both the scripts (.bat files) and the MSI files must be a sharedfolder containing the packages to be installed. Administrators must have Full Control ofthis software distribution point, and users must have Read permission.Deploying NetVanta UC Client and Its Prerequisites in Windows Server 2008To deploy NetVanta UC Client software and its prerequisites using GPO in Windows Server 2008, followthese steps:1. Select Start on the Microsoft Windows taskbar. From the Start menu, select Run. The Run dialog boxwill open.2. In the Open field, enter mmc, and select OK. Microsoft Management Console will open in a newwindow.3. In the upper-left corner of the window, select File and select Add/Remove Snap-in from the drop-downmenu.8Copyright 2011 ADTRAN, Inc.6UCSTN0034-4A
Installing NetVanta UC Client Using GPODeploying NetVanta UC Client and Its Prerequisites4. In the Available snap-ins list, select Group Policy Management. Select the Add button. The GroupPolicy Management snap-in should now appear in the Selected snap-ins list. Select the OK button.5. In the console tree (the leftmost pane), navigate to Group Policy Management Forest Domains.In Domains, expand the domain in which you want to distribute the client software.6. Right-click the organizational unit (OU) to which you want to distribute the NetVanta UC Clientsoftware (or prerequisite), and select Create a GPO in this domain, and link it here from thedrop-down menu. The New GPO dialog box will appear.For more information on deploying software to OUs using GPOs, refer to Microsoft’sGroup Policy Planning and Deployment Guide, available fromhttp://technet.microsoft.com.7. In the Name field of the New GPO dialog box, enter a name for the new GPO (for example, NetVantaUC Server), and select the OK button.6UCSTN0034-4ACopyright 2011 ADTRAN, Inc.9
Deploying NetVanta UC Client and Its PrerequisitesInstalling NetVanta UC Client Using GPO8. In the console tree, select the OU under which you created the GPO. The GPO you created shouldappear in the details pane (to the right of the console tree). Right-click the GPO, and select Edit fromthe drop-down menu. The Group Policy Management Editor window will appear.9. In the console tree of the Group Policy Management Editor under either Computer Configurationor User Configuration, select Policies. To distribute the NetVanta UC Client (or NetVanta UC Clientprerequisite) to specific users, use User Configuration; to distribute the software to specific computers,use Computer Configuration.Computer Configuration is used to set policies that are applied to the computer,regardless of who logs on to the computer. When you apply the GPO to a specific OU,you will need to ensure that the particular computer is in the intended OU container. User Configuration is used to set policies that are applied to users, regardless of thecomputer the user logs on. When you apply the GPO to a specific OU, you will need toensure that the particular users are in that OU container. Also, the target user (wherethe GPO will be applied) must be in the local administrator's group.10Copyright 2011 ADTRAN, Inc.6UCSTN0034-4A
Installing NetVanta UC Client Using GPODeploying NetVanta UC Client and Its Prerequisites10. Under Policies, expand Windows Settings, then double-click Scripts (Startup/Shutdown) forComputer Configuration or Scripts (Logon/Logoff) for User Configuration.11. In the details pane, double-click Startup (or Logon). The Startup Properties (or Logon Properties)dialog box will appear.12. In the Startup Properties (or Logon Properties) dialog box, select Add. The Add a Script dialog boxwill appear.6UCSTN0034-4ACopyright 2011 ADTRAN, Inc.11
Deploying NetVanta UC Client and Its PrerequisitesInstalling NetVanta UC Client Using GPO13. In the Add a Script dialog box, enter the server path to the .bat files from Extracting Visual Studio Toolsfor the Microsoft Office System (Version 3.0 Runtime) Service Pack 1 on page 6 and Extracting Office2003 Update: Redistributable Primary Interop Assemblies on page 7. The path should resemble thefollowing:C:\Windows\SYSVOL\sysvol\ domainname \Scripts\ filename The following is an example path to the vstor30sp1.bat batch file using adtran.local as the ts\vstor30sp1.batVerify that the path is a network location. If the file is not available from a sharednetwork, clients will not be able to install it.14. Select OK to add the logon script (either vstor30sp1.bat or O2003PIA.bat).15. Repeat Steps 11 through 13 for the remaining batch file.16. Once both scripts have been added, select OK to save the changes and close the Startup Properties (or Logon Properties) dialog box.17. Under the same configuration type (either User Configuration or Computer Configuration) youchose in Step 8, select Policies.18. Under Policies, navigate to Software Settings Software Installation. Right-click on SoftwareInstallation and select New Package from the drop-down menu.12Copyright 2011 ADTRAN, Inc.6UCSTN0034-4A
Installing NetVanta UC Client Using GPODeploying NetVanta UC Client and Its Prerequisites19. Add one of the MSI files that was extracted to the \\server\client gpo\MSIs folder (refer toDownloading and Extracting the Prerequisites for GPO Deployment on page 3), and select Open.Verify that the path is a network location. If the file is not available from a sharednetwork, clients will not be able to install it.20. In the Deploy Software dialog box, select the Advanced button and select OK.6UCSTN0034-4ACopyright 2011 ADTRAN, Inc.13
Deploying NetVanta UC Client and Its PrerequisitesInstalling NetVanta UC Client Using GPO21. In the dialog box that opens, select the Deployment tab and select the Assigned button underDeployment type. Under Deployment options, select the Install this application at logon check boxand select OK.22. Repeat Steps 16 through 20 for each required prerequisite’s MSI file (refer to Determining ClientSoftware Prerequisites on page 1) and for the NetVanta UC Client software that is being deployed.23. After adding all of the required prerequisite MSI files and the NetVanta UC Client software, you shouldsee the software packages listed in the Group Policy Management Editor. Close the Group PolicyManagement Editor to return to the Group Policy Management console.24. In the console tree of the Group Policy Management console, navigate to Group Policy Management Forest Domains domainname OU, where domainname is the domain in which you plan todistribute the NetVanta UC Server software and its prerequisites and OU is the organizational unit towhich you plan to distribute the software and its prerequisites. In the expanded OU, select the GPO youcreated.14Copyright 2011 ADTRAN, Inc.6UCSTN0034-4A
Installing NetVanta UC Client Using GPODeploying NetVanta UC Client and Its Prerequisites25. Once the GPO is selected, the details of the GPO will appear in the details pane to the right of theconsole tree. In the Scope tab in the details pane, right-click on the GPO’s deployment Location in thebox labeled The following sites, domains, and OUs are linked to this GPO and select Enforced. Yeswill appear under both Enforced and Link Enabled columns.Deploying NetVanta UC Client and Its Prerequisites in Windows Server 2003To deploy NetVanta UC Client software and its prerequisites using GPO in Windows Server 2003, followthese steps:1. From the Microsoft Windows taskbar, navigate to Start Programs Administrative Tools ActiveDirectory Users and Computers.2. Make sure that you are connecting to the domain where you want to create the new policy. If you arenot, right-click Active Directory Users and Computers and select Connect to Domain and then enterthe name of the domain in which you want to distribute the client software.3. Right-click the domain and select Properties.4. Select the Group Policy tab.6UCSTN0034-4ACopyright 2011 ADTRAN, Inc.15
Deploying NetVanta UC Client and Its PrerequisitesInstalling NetVanta UC Client Using GPO5. From the domain properties menu, select New. A new window will appear. Enter the name for the newpolicy (for example, NetVanta UC Client Distribution) that you want to create, and select Enter toreturn to the domain properties menu.6. From the domain properties menu, select the name of the policy you created in Step 5, and select Edit.The Group Policy Object Editor window appears.7. In the console tree of the Group Policy Management Editor under either Computer Configurationor User Configuration, select Policies. To distribute the NetVanta UC Client (or NetVanta UC Clientprerequisite) to specific users, use User Configuration; to distribute the software to specific computers,use Computer Configuration.Computer Configuration is used to set policies that are applied to the computer,regardless of who logs on to the computer. When you apply the GPO to a specific OU,you will need to ensure that the particular computer is in the intended OU container. User Configuration is used to set policies that are applied to users, regardless of thecomputer the user logs on. When you apply the GPO to a specific OU, you will need toensure that the particular users are in that OU container. Also, the target user (wherethe GPO will be applied) must be in the local administrator's group.16Copyright 2011 ADTRAN, Inc.6UCSTN0034-4A
Installing NetVanta UC Client Using GPODeploying NetVanta UC Client and Its Prerequisites8. Under Policies, expand Windows Settings, then double-click Scripts (Startup/Shutdown) forComputer Configuration or Scripts (Logon/Logoff) for User Configuration.9. In the details pane, double-click Startup (or Logon). The Startup Properties (or Logon Properties)dialog box will appear.10. In the Startup Properties (or Logon Properties) dialog box, select Add. The Add a Script dialog boxwill appear.11. In the Add a Script dialog box, enter the server path to the .bat files from Extracting Visual Studio Toolsfor the Microsoft Office System (Version 3.0 Runtime) Service Pack 1 on page 6 and Extracting Office2003 Update: Redistributable Primary Interop Assemblies on page 7. The path should resemble thefollowing:6UCSTN0034-4ACopyright 2011 ADTRAN, Inc.17
Deploying NetVanta UC Client and Its PrerequisitesInstalling NetVanta UC Client Using GPOC:\Windows\SYSVOL\sysvol\ domainname \Scripts\ filename The
NetVanta UC Client software is deployed using GPO and must be either manually installed or deployed (using GPO) on each user's computer before installing the NetVanta UC Client software. This technical note gives step-by-step instructions on: How to prepare for GPO deployment of NetVanta UC Client software and its prerequisites