Transcription
TMDIRECTV WirelessCinema Connection Kit
Copyright 2011 DIRECTV. Unpublished work. All rights reserved. All materials are proprietary and confidential. Technology information released after January 2011 may not be included in the material.
NotesDIRECTV Wireless Cinema Connection KitContentsCourse Introduction. 4Course Objectives. 4Agenda. 4Review. 4What is a Wireless Cinema Connection Kit .5Overview. 5A Closer Look - Product Spec Sheet. 6Equipment Details - What’s in the Box. 7Installing a Wireless Cinema Connection Kit .10Prerequisites .10Before You Install.10Connecting the Cinema Connection Kit.10Determining Receiver Connection Type.12Direct Ethernet Connection.13Whole-Home DVR Service without DECA.14DIRECTV Whole-Home DVR Service Compatible with a Receiver DECA.16Completing the Setup .18Manual Wireless Setup .19Hidden Wireless Network Name.21Wireless Security.21Complete Setup.22Troubleshooting .23LEDs.23Common Configuration Issues.27Installation Examples .28Review .30Appendix .31Wall Mount Instructions.31TM3DIRECTV Field Operations Training DIRECTV 2011DIRECTV W-DCCKVersion 1.3.0
NotesDIRECTV Wireless Cinema Connection KitCourse IntroductionWith so many different components to a DIRECTV installation, anyway we can make things easier is always good. Now that some ofour installations require internet connectivity, an added layer ofcomplexity presents itself.So let’s take a minute and welcome the DIRECTV Wireless CinemaConnection Kit, or W-DCCK. This piece of hardware will help tosimplify an installation by allowing the use of a customer’s existingwireless network, thus removing the need to hard-wire the customer’s network connection throughout their home.This training will cover what the W-DCCK is, and how it will simplifythe connections in a customer’s home. You may see the DIRECTVWireless Cinema Connection Kit referred to as the CCK-W in othermaterials; please note that this is the same piece of hardware, butwill be referred to as a W-DCCK in this training.Course ObjectivesUpon completion of this course, you will be able to: Explain what a W-DCCK is Explain what a W-DCCK is used for Install a W-DCCK Troubleshoot W-DCCK issuesAgendaThis module covers the following topics: What is a W-DCCK W-DCCK Installations W-DCCK TroubleshootingReviewWhat questions do you have before we begin?DIRECTV Field Operations Training DIRECTV 2011DIRECTV CCKVersion1.3.04TM
NotesDIRECTV Wireless Cinema Connection KitWhat is a Wireless Cinema Connection KitOverviewThe Wireless DIRECTV CINEMA Connection Kit, or W-DCCK, provides DIRECTV customers with easy access to the DIRECTV CINEMAplus service and other DIRECTV broadband services.This equipment will connect the customer’s wireless router andthe DIRECTV Receiver or DIRECTV Whole-Home DVR service compatible network without any major wiring ran through the home.Prior to the Wireless Cinema Connection Kit, a broadband orreceiver DECA would have to be installed at the customer’s routerand receiver (except on an H/HR24) to bring internet connectivityto the receiver. Some installations would also use powerline equipment, which uses the customer’s electrical lines to transmit data.By using this new hardware, we reduce the amount of wiring andadditional hardware required.Let’s take a closer look at the W-DCCK.TM5DIRECTV Field Operations Training DIRECTV 2011DIRECTV W-DCCKVersion 1.3.0
NotesDIRECTV Wireless Cinema Connection KitWhat is a Wireless Cinema Connection KitA Closer Look - Product Spec SheetSize and WeightWithout Base:Height: 6.38 Inches (162 mm)Width: 7.72 Inches (196 mm)Depth: 1.46 Inches (37 mm)Weight: 12.76 OuncesWith Base:Height: 6.77 Inches (172 mm)Width: 7.72 Inches (196 mm)Depth: 3.3 Inches (37 mm)Weight: 13.74 OuncesSystemRequirementsWireless RouterCompatibilityHD DVR2.4 GHz802.11a/b/g/nWPS Capable (Optional)Ports and InterfacesAP/STA (Future Functionality)EthernetTowards LNB (Coax)SAT Rcvr (Coax w/ Cap)Reset ButtonWPS ButtonLED IndicatorsPowerWLANActivityCoax NetworkAP/STAExternal PowerExternal 18-Watt Power SupplyInput: 120V @ .8A, 60HzOutput: 12V @ 1.5ADimensions: 4.25 x 2.05 x1.34 InchesEnvironmentalRequirementsDepth: 2.6 InchesWidth: 7.99 InchesHeight: 11.89 InchesWeight: 3.3 PoundsOperating Temperature: 32º 122º FahrenheitStorage Temperature: -49º 158º FahrenheitRelative Humidity: 5-85% noncondensingWhat’s in theBoxPart NumberPackagingPower AdapterEthernet CableCoaxial CableBase/Wall Mount KitManualDECAW1MR0-01So what do some of these specs mean to you?On the next few pages, we will take a closer look at what thesethings mean, and how they apply to you.DIRECTV Field Operations Training DIRECTV 2011DIRECTV CCKVersion1.3.06TM
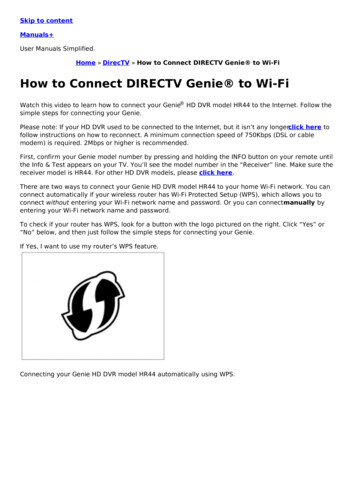
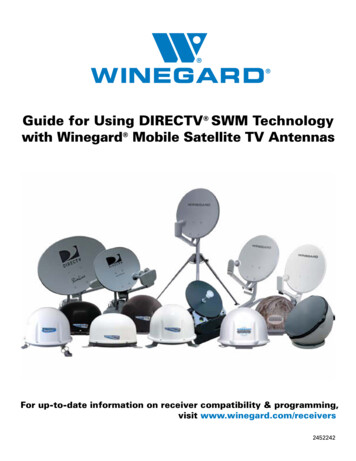
NotesDIRECTV Wireless Cinema Connection KitWhat is a Wireless Cinema Connection KitEquipment Details - What’s in the BoxDECA WirelessWPS Button - Wireless Protected Setup If a customer’s router does not have WPS, this function will allow you to setup WPS via the Cinema Connection Kit. Setting up WPS will be covered later in the module.Reset Button Resets the Cinema Connection Kit.AP/STA No current functionality.Ethernet Jack For connection to the customer’s receiver.Towards LNB To be connected to the coax cable from the LNB.SAT Rcvr To be connected to the receiver through a coax cable.Power Power supply connection.TM7DIRECTV Field Operations Training DIRECTV 2011DIRECTV W-DCCKVersion 1.3.0
NotesDIRECTV Wireless Cinema Connection KitWhat is a Wireless Cinema Connection KitEquipment Details - What’s in the BoxCablingThe Cinema Connection Kit comes with a mini coaxial cable andEthernet (CAT5) cable for connection to the receiver.Power SupplyThe W-DCCK uses an external power supply (MT18-E120150-A1).DIRECTV Field Operations Training DIRECTV 2011DIRECTV CCKVersion1.3.08TM
NotesDIRECTV Wireless Cinema Connection KitWhat is a Wireless Cinema Connection KitEquipment Details - What’s in the BoxTabletop/Wall MountTabletop Mount InstallationABTo attach the DECA wireless to the base, insert the base plate intoknob holes A and B.Wall MountWhile the base allows for the DECA wireless to be mounted to awall, DIRECTV technicians are not allowed to install this product toa wall under any exceptions.If a customer inquires about this, you must inform the customerthat they would have to handle this themselves.At the end of this module, the instructions for the customer toinstall a wall mount are included.TM9DIRECTV Field Operations Training DIRECTV 2011DIRECTV W-DCCKVersion 1.3.0
NotesDIRECTV Wireless Cinema Connection KitInstalling a Wireless Cinema Connection KitPrerequisitesIn order to install a W-DCCK, the customer must have the followinghardware: A 2.4 or 5 GHz Wireless Router DIRECTV HD or HD DVRBefore You Install.Prior to the actual setup, there are several questions to ask thecustomer to assist with your installation.1. Where is the wireless router?2. Is the customer’s router WPS capable?3. Router SSID & security?4. Is there any security on it, and if so, what is the Key?Based on the information that you learn, it will help determinewhere you install the W-DCCK device. If the customer has a largehome, you may want to install it closer at a receiver which is closerto the router.Remember: the customer may not know all of this information,so it’s important to remain patient and help the customer locatesome of this information.Connecting the Cinema Connection Kit1. Verify that the DIRECTV Receiver and theTV are powered on.2. Verify a valid Internet connection via thewireless router and computer.3. Connect the power adapter to the Powerport of the W-DCCK device4. Plug the other end of the power adapterinto a surge protector or an electrical outlet (recommended).5. Determine if the Wi-Fi routerfeatures Wireless Protected Setup(WPS). This is indicated with theseicons, or with the letters WPS:If the customer’s router does nothave WPS, that is OK; the W-DCCK device has this feature available.DIRECTV Field Operations Training DIRECTV 2011DIRECTV CCKVersion1.3.010TM
NotesDIRECTV Wireless Cinema Connection KitInstalling a Wireless Cinema Connection KitConnecting the Wireless Cinema Connection KitThe next steps we take will depend on if the customer’s router isWPS-capable or not. If the router is not WPS capable, skip the nextthree steps.If the router is WPS capable, perform the following steps. (The WDCCK device must be powered on, but do not connect the device tothe DIRECTV Receiver.)1. On the router, press the WPS button.2. Within two minutes of activating WPS on the router, press andhold the WPS button on the W-DCCK device until the WLAN LEDon the W-DCCK device flashes green.WPS Button3. The WLAN LED displays solid green when the connection is complete.If the WLAN LED on the W-DCCK device does not light up, repeat thesteps above. If the WLAN LED still does not light up, go to the nextsection.TM11DIRECTV Field Operations Training DIRECTV 2011DIRECTV W-DCCKVersion 1.3.0
NotesDIRECTV Wireless Cinema Connection KitInstalling a Wireless Cinema Connection KitDetermining Receiver Connection TypeThere are three different options to connect the W-DCCK device tothe receiver, depending on the DIRECTV installation. To properlyinstall the W-DCCK device, follow the steps in this section.1. Power on the HD DVR Receiver to be connected.2. Press the DASH key (lower left key) on the DIRECTV RemoteControl.3. Note the information displayed on the TVDash Key DisplaysOn TVDIRECTV Field Operations Training DIRECTV 2011DIRECTV CCKVersion1.3.012Check Back of ReceiverConnectionNo check neededGo to Direct EthernetConnection.DECA Attached toReceiverGo to Whole-Home DVRService With DECA .DECA not Attached toReceiverReceiver Models H24,HR24 or H25 only: goto the section below,Whole-Home DVR Service Without DECA .All Other Receiver Models: go to the sectionbelow, Direct EthernetConnection.TM
NotesDIRECTV Wireless Cinema Connection KitInstalling a Wireless Cinema Connection KitDirect Ethernet Connection1. Using the supplied Ethernet cable, connect one end of the Ethernet cable to the Ethernet port of the W-DCCK device.2. Connect the other end of the Ethernet cable to the Ethernetport on the back of the DIRECTV Receiver. If the DIRECTV Receiver has two Ethernet ports, connect the cable to the upperport labeled “ETHERNET 1”.3. The POWER and Activity LEDs on the W-DCCK light up. Wait forthe POWER LED to stop flashing. If the LEDs do not light up, go the Troubleshooting section.4. Perform one of the following steps: WPS Connection to Router Established: go to the sectionbelow, Complete Wireless Protected Setup. WPS Connection to Router Not Supported or Established:go to the section below, Manual Wireless Setup.Note: For each receiver that requires an internet connection, a WDCCK is required.TM13DIRECTV Field Operations Training DIRECTV 2011DIRECTV W-DCCKVersion 1.3.0
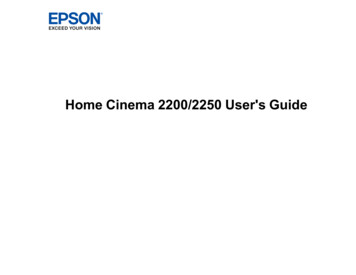
NotesDIRECTV Wireless Cinema Connection KitInstalling a Wireless Cinema Connection KitWhole-Home DVR Service without DECAThis section describes how to connect your W-DCCK device if youhave a DIRECTV Whole-Home DVR service compatible installation.In this installation, you will be using the enclosed coaxial cable.The Ethernet cable included with your W-DCCK will not be used.1. Disconnect the coaxial cable from the back of your Receiver,which should be connected to the port labeled “SATELLITE IN1” or “SAT IN 1.” and connect it to the coaxial connector on yourW-DCCK device labeled “Towards LNB”.2. Unscrew the cap from the coaxial connector labeled “SAT Rcvr”on your W-DCCK device.3. Using the enclosed coaxial cable, connect one end to the coaxial connector on your W-DCCK device labeled “SAT Rcvr”.DIRECTV Field Operations Training DIRECTV 2011DIRECTV CCKVersion1.3.014TM
NotesDIRECTV Wireless Cinema Connection KitInstalling a Wireless Cinema Connection KitWhole-Home DVR Service without DECA4. Connect the other end of the coaxial cable to the coaxial connector labeled “SATELLITE IN 1” or “SAT IN 1” on your Receiver.5. The POWER, Activity and Coax Network LEDs on the W-DCCKdevice should light up. Wait for the POWER LED to stop flashing.If you used WPS to automatically set up your wireless connection,go to the “Completing the Setup” section.If you cannot use WPS or are unsure if you have WPS, go to the“Manual Wireless Setup” section to manually establish your wireless connection.TM15DIRECTV Field Operations Training DIRECTV 2011DIRECTV W-DCCKVersion 1.3.0
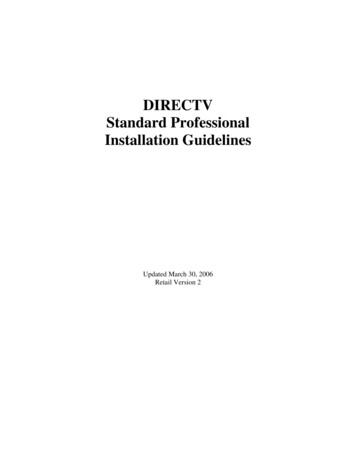
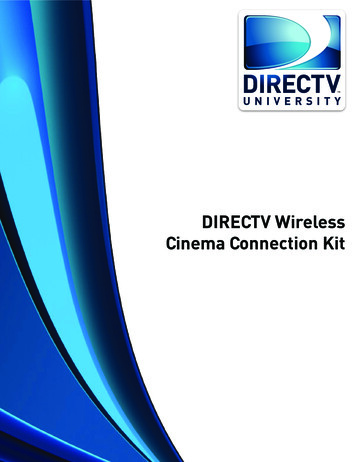
NotesDIRECTV Wireless Cinema Connection KitInstalling a Wireless Cinema Connection KitDIRECTV Whole-Home DVR Service Compatible witha Receiver DECAThis section describes how to connect your W-DCCK device if yourinstallation uses one or more DECA units.In this installation, you will use the enclosed coaxial cable, alongwith an Ethernet cable. The Ethernet cable between the IRD andthe DECA must always be connected.1. Locate the coaxial cable connected on the “Towards LNB” endof the Connected Home Adapter (see image below). Disconnect the coaxial cable from the Connected Home Adapter andreconnect it to the coaxial connector on your W-DCCK devicelabeled “Towards LNB”.2. Unscrew the cap from the coaxial connector labeled “SAT Rcvr”on your W-DCCK device.DIRECTV Field Operations Training DIRECTV 2011DIRECTV CCKVersion1.3.016TM
NotesDIRECTV Wireless Cinema Connection KitInstalling a Wireless Cinema Connection KitDIRECTV Whole-Home DVR Service Compatible withConnected Home Adapter Connection3. Using the enclosed coaxial cable, connect one end to the coaxial connector on your W-DCCK device labeled “SAT Rcvr”.4. Connect the other end of the coaxial cable to the coaxial connector on your Connected Home Adapter labeled “TowardsLNB”.5. The POWER, Activity and Coax Network LEDs on the W-DCCKdevice should light up. Wait for the POWER LED to stop flashing.If you used WPS to automatically set up your wireless connection,go to the Completing the Setup section.If you cannot use WPS or are unsure if you have WPS, go to the“Manual Wireless Setup” section to manually establish your wireless connection.TM17DIRECTV Field Operations Training DIRECTV 2011DIRECTV W-DCCKVersion 1.3.0
NotesDIRECTV Wireless Cinema Connection KitCompleting the Setup1. Wait 30 seconds to let the DIRECTV Receiver establish a connection with the W-DCCK device.2. To verify connection to the Internet, press the “MENU” buttonon your DIRECTV Remote Control. Select “Parental, Fav’s &Setup”, then “System Setup”, then “Network Setup”. Then select“Connect Now” or “Repeat Network Setup”.3. To proceed, select “Continue”. When the DIRECTV Receiver isconnected to the Internet, the Internet connected screen appears.If you do not see the Internet connected screen, follow theinstructions in the “Manual Wireless Setup” section.DIRECTV Field Operations Training DIRECTV 2011DIRECTV CCKVersion1.3.018TM
NotesDIRECTV Wireless Cinema Connection KitManual Wireless SetupAfter you connect your W-DCCK device to your DIRECTV Receiver,instructions will automatically be displayed on your TV screen.Follow the steps below to complete your wireless setup. Use the“SELECT” button on your remote to make your choices.1. Within 60 seconds, the TV should present a screen thatprompts you to configure your wireless device. Select “Set upNow” to continue.a. If you still do not see the Wireless Adapter Found screen,then press the “MENU” button on your DIRECTV RemoteControl. Select “Parental, Fav’s & Setup”, then “SystemSetup”, then “Network Setup”. Then select “Repeat NetworkSetup” or “Connect Now”. Follow the on-screen instructionsand choose “Wireless” for the method you will use to connect.2. The TV displays a list of wireless networks. Use the UP andDOWN ARROW keys on your DIRECTV Remote Control tohighlight your wireless network and press “SELECT” to display ablue dot next to your network. Then select “Continue”a. Note: If you have configured your router to hide the network name, it will not appear in the list. Select “Enter Name”and proceed with the instructions in “Hidden Wireless Network Name (SSID) Users.”TM19DIRECTV Field Operations Training DIRECTV 2011DIRECTV W-DCCKVersion 1.3.0
NotesDIRECTV Wireless Cinema Connection KitManual Wireless SetupIf your wireless network is not displayed, try placing the W-DCCKdevice in an elevated or alternate location and remove any obstacles that would block the wireless signal. To refresh the WirelessNetworks list, press the “MENU” button on your DIRECTV RemoteControl. Select “Parental, Fav’s & Setup”, then “System Setup”, then“Network Setup”.Then select “Repeat Network Setup” or “Connect Now”. Follow theon-screen instructions and choose “Wireless” for the method youwill use to connect.TM20DIRECTV Field Operations Training DIRECTV 2011DIRECTV W-DCCKVersion 1.3.0
NotesDIRECTV Wireless Cinema Connection KitManual Wireless SetupHidden Wireless Network NameIf you are using a hidden wireless network name (SSID), then select“Enter Name,” enter your hidden network name (SSID) and thenselect “OK”.Use the number keypad on your DIRECTV Remote Control to enter your hidden network name (SSID). For each character, pressthe appropriate number button repeatedlyuntil you see the desired character (pressthe LEFT ARROW key to delete characters).When you are finished, press the DOWN ARROW and then select“Continue”.Wireless SecurityIf your network uses wirelesssecurity, use the number keypad on your DIRECTV RemoteControl to enter the securitykey. Then select “Continue”.Wait until the security key isverified.The security key was created when you or the customer set up thewireless router. Refer to the router’s documentation for more information, or work with the customer to get this information.DIRECTV Field Operations Training DIRECTV 2011DIRECTV CCKVersion1.3.021TM
NotesDIRECTV Wireless Cinema Connection KitManual Wireless SetupComplete SetupTo connect the receiver to theinternet, select “Connect Now”.The DIRECTV Receiver is nowconnected to the Internet. Toproceed, select “Continue”.If you receive an error on thisscreen, press the LEFT ARROWkey on the DIRECTV RemoteControl then select “ConnectNow” (as done previously). Ifan error is shown again, wait afew minutes and then press theLEFT ARROW key again on theDIRECTV Remote Control andselect “Connect Now”.Please have the customer read the information on this screen.Then select “Done”.Inform the customer to allow up to 48 hours for all of the DIRECTVCINEMAplus content to be downloaded onto their DIRECTV Receiver. To begin your DIRECTV CINEMAplus experience, refer thecustomer to Channel 1000.TM22DIRECTV Field Operations Training DIRECTV 2011DIRECTV W-DCCKVersion 1.3.0
NotesDIRECTV Wireless Cinema Connection KitTroubleshootingThe Wireless Cinema Connection Kit status lights can help youidentify problems with the device.LEDsThe LEDs on the W-DCCK can help to tell you what problems youmay be having.LED LabelPOWERWLANACTIVITYCoax NetworkAP/STAEthernet CableConfigSolid GreenSolid GreenFlashing GreenOffOffCoax Cable ConfigSolid GreenSolid GreenFlashing GreenSolid GreenOffPowerThis LED flashes green when the device is booting up for approximately 30 seconds. Once powered up, this LED remains solidgreen. The LED is off when proper power is not supplied or thedevice is faulty.WLANThis LED is green when there is a good established wireless LANconnection. A solid yellow indicates a wireless LAN connectionhas been established, but the quality of the connection is poor –troubleshooting is warranted to assure a stable quality connection.A steady green flash indicates the wireless system is in “pairing”mode. This indicates the WPS button on the back of the device hasbeen pressed to establish automatic pairing with a wireless router.The LED is off when no wireless connection is established.DIRECTV Field Operations Training DIRECTV 2011DIRECTV CCKVersion1.3.023TM
NotesDIRECTV Wireless Cinema Connection KitTroubleshootingLEDsActivityThis LED is green when the Whole-Home DVR service network isestablished. Both the wireless connection and a wired connection(either Ethernet or Coax) must be established. It flashes when datais being transmitted through the CCK-W. The LED is off when noWhole-Home DVR service coax network is established.Coax NetworkThis LED indicates that the Whole-Home DVR service networkis operational. When the light is steady green, it means a goodMoCA coax network is established with full bandwidth. When thelight is steady yellow, it means the MoCA coax network is established, but with degraded bandwidth. The coaxial distributionshould be checked to ensure all devices in line are DIRECTV-approved; splitters, coax cable, wall-ports, etc. This LED is off when noMoCA coax network is established. LED off is expected when usingan Ethernet connection.AP/STAAP is for possible future implementation testing only.LED oubleshooting TipsSolidGreenPower is on,device isbootedSolid green is normal.FlashingGreenOffDIRECTV Field Operations Training DIRECTV 2011DIRECTV CCKVersion1.3.024Wait for 30 seconds. If LED isnot solid, unplugDevice isthe power from the W-DCCKbooting updevice, wait 10 seconds,then plug in the power to theW-DCCK device.Check to ensure the powerDevice isadapter is plugged intonot powthe W-DCCK device and intoeredan electrical outlet.TM
NotesDIRECTV Wireless Cinema Connection KitTroubleshootingLEDsLED DefinitionsLED psWireless link isSolid green isSolid Greengoodnormal.Move the W-DCCKdevice closer toSolidWireless link isyour router and/Yellowpooror remove obstructions.Wait for two minWPS is conutes. If the LED isFlashing Greennecting tonot solid green,your routerrepeat the installation procedureRepeat theNo wirelessOffinstallationlinkprocedureSolid green isnormal.Note: If networktraffic is expected,e.g. you have aNetwork isDIRECTVSolid GreenestablishedCINEMAplus download inprogress, ensurethe home network is connectedto the Internet.IndicatesFlashing green isFlashing Green active networknormal.trafficRepeat theNo tionDIRECTV Field Operations Training DIRECTV 2011DIRECTV W-DCCKVersion 1.3.0
NotesDIRECTV Wireless Cinema Connection KitTroubleshootingLEDsLED TipsSolid GreenCoaxial networking isgoodSolid green isnormal.LED LabelSolid YellowCoaxial networking ismarginalOffNo coaxialnetworkOffIn stationmode (this isthe defaultpreferredmode)Coax NetworkAP/STADIRECTV Field Operations Training DIRECTV 2011DIRECTV CCKVersion1.3.026Check the coaxialcable connectionsat the W-DCCKand Receiver andtighten cables ifnecessary.Off is normal ifyou set up yourW-DCCK deviceusingthe Direct Ethernet Connectionmethod. Otherwise,check the coaxialcable connectionsat the W-DCCKand Receiver andtighten cables ifnecessary.LED is alwaysOff (reserved forfuture functionality).TM
NotesDIRECTV Wireless Cinema Connection KitTroubleshootingCommon Configuration IssuesIf you encounter either of the following issues after installing theW-DCCK, you may have a configuration issue. Go through theDetermining Receiver Connection Type process again to verify youare using the correct type of connection.DIRECTV Whole-Home DVR service is lost. You can no longer seethe playlist. Expected Cause: Installed with Ethernet when Coax connectionshould have been used Resolution: Go through Determining Receiver Connection Typeto verify proper connection type was usedPixilation or poor video quality at other receivers within the home. Expected Cause: Installed with Coax when Ethernet connectionshould have been used Resolution: Go through Determining Receiver Connection Typeto verify proper connection type was usedTM27DIRECTV Field Operations Training DIRECTV 2011DIRECTV W-DCCKVersion 1.3.0
NotesDIRECTV Wireless Cinema Connection KitInstallation ExamplesDIRECTV Field Operations Training DIRECTV 2011DIRECTV CCKVersion1.3.028TM
NotesDIRECTV Wireless Cinema Connection KitInstallation ExamplesTM29DIRECTV Field Operations Training DIRECTV 2011DIRECTV W-DCCKVersion 1.3.0
NotesDIRECTV Wireless Cinema Connection KitReviewNow that we’ve completed the training on the Wireless CinemaConnection Kit, you should be able to: Explain what a Wireless Cinema Connection Kit is Explain what a Wireless Cinema Connection Kit is used for Install a Wireless Cinema Connection Kit Troubleshoot Wireless Cinema Connection Kit issuesHow do you think this kit will make a customer’s installationeasier?What additional questions do you have before we finish for today?Thanks for everything you do, and stay safe!TMTMDIRECTV Field Operations Training DIRECTV 2011DIRECTV CCKVersion1.3.030TM
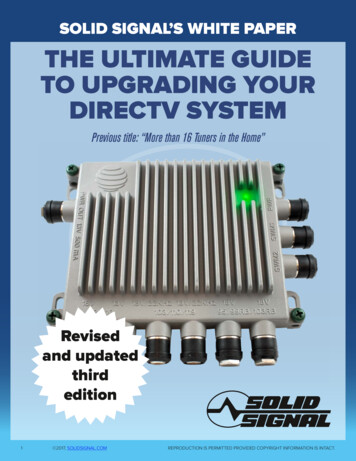
Tabletop InstallationThe DIRECTV CINEMA Connection Kit (DCCK) unit should be placed on the baseplate (Figure 1) by inserting the baseplateknobs into knob holes A & B (Figure 2). Shift the baseplate to the left to tighten onto the unit as shown in Figure 3.NotesDIRECTV Wireless Cinema Connection KitAppendix POWER LAN Coax Status Coax NTWK POWER LAN WLAN Coax Status AP STA Coax NTWK WLAN AP STAWall Mount InstructionsFigure 3Wall Mount InstallationWall mount installation options:1. Wall mount the unit with the baseplate.2. Wall mount the unit directly on the screws.Two M4 x 20mm pan head screws (thread type: tapping) and expansion anchors (Figure 4) are included for wall mounting.You can call DIRECTV for detailed information.* Horizontal orientation using points C & D (Figure 5‐1) or vertical orientation using points C & D (Figure 5‐2).* Suitable masonry screw expansion anchors may be required if attaching to stone/brick wall.ScrewC7mmD3.75 4.25mm120mm3Figure 5-113Expansion AnchorC8mmDC2D225mmFigure 5-22.9mmFigure 4Figure 5Figure 6Figure 7y To mount the unit on a wall, follow these instructions:1. Ensure that the mounting location is free from hazards (electricity cables/pipes etc).2. Decide orientation: horizontal or vertical.3. Drill two pilot holes 26mm (about 1.0 inches) deep using a 3.6mm (about 0.14
Notes DIRECTV Wireless Cinema Connection Kit TM DIRECTV Field Operations Training DIRECTV 2011 DIRECTV CCK Version1.3.0 4 Course Introduction With so many different components to a DIRECTV installation, any way we can make things easier is always good. Now that some of our installations require internet connectivity, an added layer of