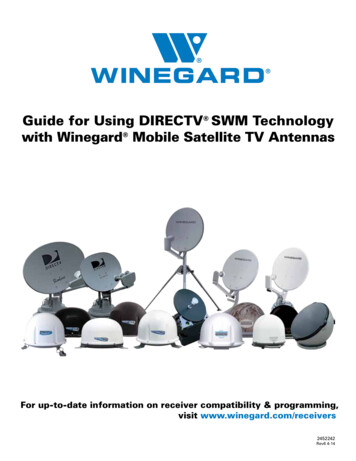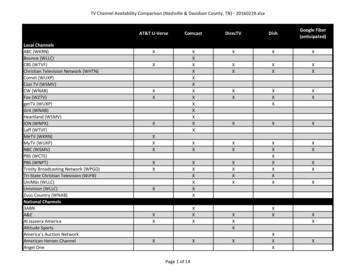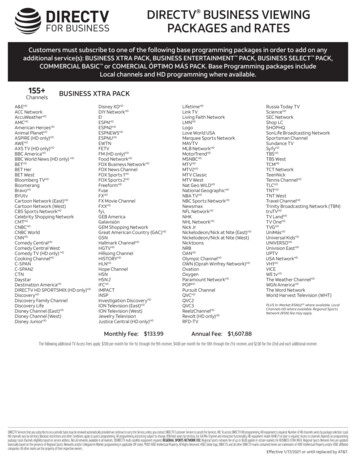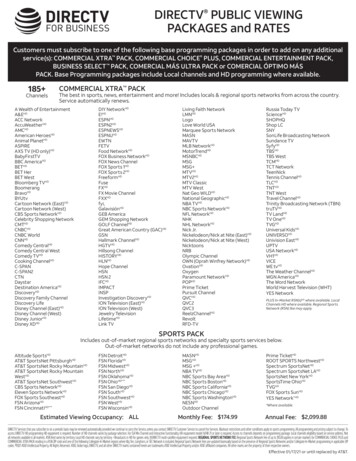
Transcription
DIRECTVStandard ProfessionalInstallation GuidelinesUpdated March 30, 2006Retail Version 2
The basic DIRECTV residential installation includes the following:1. Confirmation of installation appointment. DIRECTV recommends that at aminimum, each customer should receive two (2) pre-calls from the retailer’sinstallation company prior to any work being performed and one (1) post-callafter work has been performed. Contact the customer: Two (2) to three (3) days in advance of their scheduled installation to confirmboth the appointment window and work to be performed. Installer or dispatcher should phone the customer on the day of the scheduledappointment to confirm when they will arrive to begin the job. In the eventthat the agreed upon timeframe is in jeopardy, the customer should becontacted and notified of any changes. Contact the customer within two (2) weeks post installation to confirmcustomer satisfaction.2. Arrival at customer's residence within the designated window of time preferablywearing proper ID and uniform.3. Completion of a site survey and planning the installation with the customer (Cablerouting, antenna location, connection of devices). Refer to the DIRECTVInstallation Manual.4. Verification of services ordered and work to be performed with customer. Anynon-standard/custom work with incremental costs associated must becommunicated and agreed to in writing prior to commencement of installation.5. Routing and properly attaching approved RG-6 cable through external andinternal walls as needed. Routing of cable through attics and/or crawlspaces isconsidered standard. Refer to the DIRECTV Installation Manual.6. Use of DIRECTV approved drop materials is required.7. Grounding to meet Local / NEC requirements. Refer to the DIRECTVInstallation Manual.8. Properly mounting to customer’s home, aligning and peaking satellite antenna formaximum signal strength. Standard mounting includes, but is not limited to theroof, eave, outside wall, balcony, deck and chimney. Refer to the DIRECTVInstallation Manual.9. A Pole Mount is considered standard on KAKU ODU’sCopyright 2006 DIRECTV. Unpublished work. All rights reserved.Revised 3/30/06Page iiiVersion 1
10. A Monopole support mount must be installed on all wall and roof mountedKAKU ODU’s.11. In any market where local channels are delivered from the 101 110 or 119 orbitalslots or on HD installs or upgrades, a TripleSat ODU is required on allinstallations.12. A KAKU ODU is required in any market where High Definition local channelsare delivered from the 99 or 103 orbital slots or on HD installs or upgrades.13. Dual or Quad cable run is recommended from the ODU to the ground block orMultiswitch on single sat or triple sat installs.14. Quad cable run is recommended from the ODU to the ground block orMultiswitch on all KAKU High Definition installs.15. A “B band” converter must be installed to the “SAT IN” on all H20 IRD’s16. Dual cable must be run to all DIRECTV DVRs.17. Installation of one or more DIRECTV System IRDs as indicated on thecustomer’s work order.18. All IRDs must be connected to a land based telephone line. Refer to theDIRECTV Installation Manual.19. Connection of existing off-air antenna or active cable drop (enabling TV tofunction as it had prior to DIRECTV installation).20. Connection of existing co-located devices (VCR, functioning surround sound,DVD, video games, etc.) and programming the DIRECTV Universal RemoteControl to operate all applicable devices.21. Completion of a system test verifying signal strength, access card match andtelephone connectivity. Refer to the DIRECTV Installation manual22. Activation of DIRECTV service with the customer on the phone.23. Cleaning up any mess made during installation and removing debris from thecustomer's residence. This includes removal of empty equipment boxes atcustomer’s request.24. Customer education (min. 20 min) on system operation including soft and hardresets. and features (min. 20 minutes). Refer to the DIRECTV Installation ManualCopyright 2006 DIRECTV. Unpublished work. All rights reserved.Revised 3/30/06Page ivVersion 1
25. Completion of all applicable forms (eg. Work order, Customer InstallationChecklist, Certificate Program documents, etc) and obtaining customer's signaturecertifying the job was completed to their satisfaction.26. Leaving installation company name and toll free telephone number if applicablewith the customer enabling them to contact the Installation Company directly ifthere are any problems with the installation.27. If, after arriving at a job the installation cannot be completed and is cancelled, theinstaller must explain to the customer in detail why they were not able tocomplete the job.DIRECTV RECOMMENDED RATES FOR REQUESTED SERVICES BEYONDWHAT IS PROVIDED IN A STANDARD PROFESSIONAL INSTALLATIONThe following list contains DIRECTV’s recommended rates for additional services,applicable nation-wide. These rates were established after reviewing rates from multiplesources for similar services. We believe these rates are reasonably competitive. Ofcourse, these rates are merely recommended rates and retailers are free to chargereasonable fees based upon the actual work to be rendered by them.ADDITIONAL CHARGES TO BE PAID TO THE RETAILER OR INSTALLATIONCOMPANY UPON COMPLETION OF INSTALLATION:WALL FISHPOLE MOUNT REMOVAL DIGPOLE MOUNT REMOVAL CUTPOLE MOUNT/ PER CUSTOMERS REQUESTSIDEWALK BOREMIRROR OUTLETADDITIONAL OUTLETS WITHOUT RECEIVERSADDITIONAL OUTLETS WITH RECEIVERSSEPARATE TRIP ADDITIONAL OUTLETSNON -PENETRATING/ SLED MOUNTBALCONY MOUNT/BRACKETSFLAT CABLE JUMPERBURY CABLE/ OUTLETLINE AMPSDIPLEXERS (2)WIRELESS PHONE JACKRELOCATE DISH (CUSTOMER REQUEST)Copyright 2006 DIRECTV. Unpublished work. All rights reserved.Revised 3/30/06Not to Exceed 60.00 per 65.00 20.00 75.00 35.00 45.00 45.00 45.00 85.00 65.00 30.00 5.00 30.00 15.00 15.00 75.00 97.50Page vVersion 1
DIRECTV INSTALLATION MANUAL – TABLE OF CONTENTS1. Introduction . . . . . . . . . . . . . . . . . . . . . . . . . . . . . . . . . . . . . . . . . . . . . . . . . . . . . . . . 11.1 Pre-Call1.2 Identification1.3 Verification1.4 Pre-Installation Process2. Site Survey . . . . . . . . . . . . . . . . . . . . . . . . . . . . . . . . . . . . . . . . . . . . . . . . . . . . . . . . . 22.1 Preliminary Evaluation2.2 Unobstructed Line of Sight2.3 Ground Source2.4 Access to Phone2.5 Distribution Location2.6 TV Set Location2.7 Customer Concerns2.8 Customer Walk Through2.9 Installation Overview – Standard Installation2.10 Non-Standard Installation2.11 Safety Considerations2.12 Working on Roof or Wall Mounts2.13 Ground Mounts2.14 Know Your Limitations!3. Dish Antenna Installation . . . . . . . . . . . . . . . . . . . . . . . . . . . . . . . . . . . . . . . . . . . . . 93.1 Antenna Assembly3.2 Wall Mounting – Wood3.3 Brick Mount3.4 Roof Mount Assembly3.5 Positioning3.6 Pole Mount – Hole Size and Location3.7 Concrete3.8 Trench/Drop Bury3.9 Cable Run3.10 Dish Antenna Assembly4. Grounding and Bounding . . . . . . . . . . . . . . . . . . . . . . . . . . . . . . . . . . . . . . . . . . . . . . 124.1 Ground Block4.2 Suitable Ground Sources4.3 #4 or #6 Ground Wire to Electrode4.4 Electrical Ground Rod4.5 Panel Box Lug or Meter Base4.6 Metallic Service Raceway4.7 Grounded Metal Structure (Mobile Home)4.8 Sprinkler System – Commercial Buildings4.9 Metal Underground Water PipeCopyright 2006 DIRECTV. Unpublished work. All rights reserved.Revised 3/30/06Page viVersion 1
4.10 Supplemental Electrode Bonding Ground Rod4.11 Summary of Grounding5. Cable Routing . . . . . . . . . . . . . . . . . . . . . . . . . . . . . . . . . . . . . . . . . . . . . . . . . . . . . . 175.1 Conventional Foundation5.2 Slab Foundation5.3 Cable Considerations6. Telephone Line Installation and Troubleshooting . . . . . . . . . . . . . . . . . . . . . . . . . . . 196.1 Installation6.2 Troubleshooting Phone Lines6.3 Valid Reasons for Non-Impulse DIRECTV Receivers7. Access Cards . . . . . . . . . . . . . . . . . . . . . . . . . . . . . . . . . . . . . . . . . . . . . . . . . . . . . . . 228. Integration With The Customer’s Equipment . . . . . . . . . . . . . . . . . . . . . . . . . . . . . . 228.1 Tuning VCRs8.2 Stereo/Surround Sound8.3 Picture-in-Picture (PIP)8.4 High Definition TV (HDTV)9. Dish Antenna Alignment and Peaking . . . . . . . . . . . . . . . . . . . . . . . . . . . . . . . . . . . . 259.1 General9.2 Signal Strength Meter – Alignment9.3 DIRECTV Receiver Signal Meter – Alignment9.4 Peaking a Multi-Satellite Dish Antenna9.5 Peaking a Multi-Satellite Dish Antenna with DIRECTV Receiver SignalMeter10. Customer Education . . . . . . . . . . . . . . . . . . . . . . . . . . . . . . . . . . . . . . . . . . . . . . . . . 2910.1 Remote Control10.2 Operating the VCR with DIRECTV10.3 Explain How to Record DIRECTV Programming10.4 Explain How to Record Off Air and Cable Programming10.5 Stereo Connection10.6 Menus10.7 Additional Customer Information11. Multiswitches . . . . . . . . . . . . . . . . . . . . . . . . . . . . . . . . . . . . . . . . . . . . . . . . . . . . . . 3111.1 Purpose11.2 Types of Multiswitches11.3 Multiswitch Functions12. Independent Contractors . . . . . . . . . . . . . . . . . . . . . . . . . . . . . . . . . . . . . . . . . . . . . 3212.1 Installation ContractorsCopyright 2006 DIRECTV. Unpublished work. All rights reserved.Revised 3/30/06Page viiVersion 1
13. Installation Tips/Common Installation Problems . . . . . . . . . . . . . . . . . . . . . . . . . . 3313.1 Premature Rain Fade13.2 Useful Equipment for Troubleshooting13.3 Locate DIRECTV Receiver’s Main Menu and Perform “Systems Test”13.4 Signal Strength13.5 Additional Troubleshooting Tips14. Troubleshooting Steps . . . . . . . . . . . . . . . . . . . . . . . . . . . . . . . . . . . . . . . . . . . . . . . 3415. Risk Management . . . . . . . . . . . . . . . . . . . . . . . . . . . . . . . . . . . . . . . . . . . . . . . . . . 3415.1 Property Damage15.2 Irate Customers15.3 Customer Not Home15.4 Late for Appointment15.5 Technician Responsibility15.6 Clean Up After Installation16. WorldDirect Installation and Upgrade . . . . . . . . . . . . . . . . . . . . . . . . . . . . . . . . . 3716.1 WorldDirect Installation Overview16.2 Satellite Dish Pointing Coordinates16.3 Multiswitches17. 72.5 WL Installation and Upgrade . . . . . . . . . . . . . . . . . . . . . . . . . . . . . . . . . . . . . 4017.1 Installation Overview17.2 Satellite Dish Pointing Coordinates17.3 Multiswitches18. KaKu (5 LNB Multi Satellite Dish, MPEG4 & KaKu Compatible) Installation andUpgrade . . . . . . . . . . . . . . . . . . . . . . . . . . . . . . . . . . . . . . . . . . . . . . . . . . . . . . . . . . . . . 4318.1 KaKu Installation Overview18.2 KaKu Pointing Coordinates18.3 MultiswitchCopyright 2006 DIRECTV. Unpublished work. All rights reserved.Revised 3/30/06Page viiiVersion 1
1INTRODUCTIONAll employees, contractors or agents, working for a DIRECTV dealer/retailer/sales agent,are required to follow the practices, procedures and standards found in this manual. Anyvariation from these standards requires prior written approval from DIRECTV technicaloperations.It is imperative each person representing DIRECTV provide the best products, promptresponses to problems and courtesy to all DIRECTV customers. The installationtechnician is often the only person associated with DIRECTV to have direct and personalcontact with our customer.The installer’s efficiency, appearance and demeanor determine the customer's firstimpression of DIRECTV. It is therefore essential that the installer make a positive firstimpression that reflects well on him, his company and DIRECTV. It is the goal ofDIRECTV for each customer contact to be exciting and friendly for the customer.This manual will: Provide the information to ensure every installation is performed in an acceptableand professional manner. Ensure the installation standards are followed and maintained in accordance withDIRECTV requirements.1.1 1.2 Pre-CallAt a minimum, each customer should receive two (2) pre-calls from the retailer orInstallation Company prior to any work being performed.Contact the customer two (2) to three (3) days in advance of their scheduledinstallation to confirm both the appointment window and work to be performed.Installer or dispatcher should phone the customer on the day of the scheduledappointment to confirm when they will arrive to begin the job. In the event thatthe agreed upon timeframe is in jeopardy, the customer should be contacted andnotified of any changes.Contact the customer within two (2) weeks post installation to confirm customersatisfaction.IdentificationThe credibility of the installer and DIRECTV hinge on the first impression madewith the customer.The installer must look and be professional in his or her actions, appearance andthe appearance of his or her vehicle.All vehicles should be appropriate for installation work, undamaged and haveproper identifiable signage.Upon arrival the installer should knock or ring the bell and step away from thedoor so he can be identified.While greeting the customer the installer should smile and introduce himself.The installer should show the customer proper identification.Copyright 2006 DIRECTV. Unpublished work. All rights reserved.Revised 03/30/06Page 1Version 1
The installer must remain polite and courteous at all times.A picture ID card identifying the installer as a representative of the retailer shouldbe plain view or, at a minimum, carried and displayed at the initial introductionand upon request.1.3VerificationThe installer will: Verify services ordered and work to be performed with customer. Any nonstandard / custom work with incremental costs associated must be communicatedand agreed to in writing prior to commencement of installation. Ask if there are any known restrictions on satellite antennas in the area or ifpermission is required from a homeowner's association or landlord.
30.03.2006 · 17. Installation of one or more DIRECTV System IRDs as indicated on the customer’s work order. 18. All IRDs must be connected to a land based telephone line. Refer to the DIRECTV Installation Manual. 19. Connection of existing off-air antenna or active cable drop (enabling TV to function as it had prior to DIRECTV installation). 20 .