Transcription
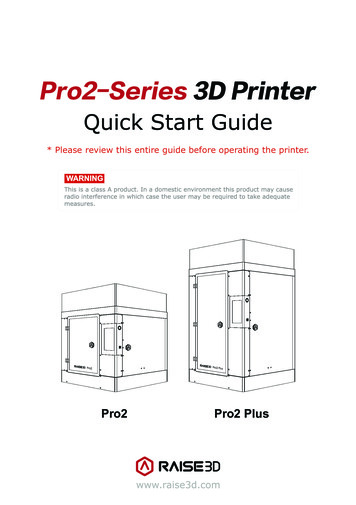
Pro2-Series 3D PrinterQuick Start Guide* Please review this entire guide before operating the printer.Pro2Pro2 Plus
The contents of this Quick Start Guide may be updated over time. For the latestversion, scan the QR code or visit the link de
Pro2-Series 3D Printer / Quick Start GuideA. List of PartsPro2FilamentRun-out SensorFilament FeederFansCameraFilamentGuide TubeHot EndsTouch ScreenHEPA FilterZ Ball ScrewsPrint BedUSB Storage SlotsPower InletEthernet InterfaceZ-StagePower SwitchPro2 PlusFilamentRun-out SensorFilament FeederFansCameraFilamentGuide TubeHot EndsHEPA FilterTouch ScreenZ Ball ScrewsPrint BedUSB Storage SlotsZ-StagePower InletEthernet InterfaceWheelsPower Switch01
Pro2-Series 3D Printer / Quick Start GuideB. Hardware Installation12Remove!Remove!( 24)Locate the four shipping zip ties, andremove them.It's recommend to unclip these as opposedto cutting. They can be reused if you needto transport your machine in the future.3Peel the yellow sticker and remove the 24security spacers.These clips are designed to hold theextruder assembly in place during shippingand should be saved for future transport.Do not operate printer with clips installed.4Remove!( 2)Hex Wrench(3 mm)Select the largest of the included hex headwrench (3mm), and remove all four hexhead security bolts from Z-axis clamps (2bolts each).These are located on the left and rightsides on the printer on the ball screwthread.02Plug the machine into a wall outlet usingthe power adapter for your designatedcountry. (5 included)Flip the switch to power the unit on.
Pro2-Series 3D Printer / Quick Start GuideB. Hardware Installation (continued)Once the unit has been powered, theprinter will go through a start-up sequence.Your Raise3D printer will take approximately 60 seconds to boot up. When the touchscreen displays the "Home" screen, theprinter is ready.5Open the "Utilities" tab, and press the ZHoming button.OK the request, and the print bed willbegin to “home” or move to the originposition.This will also allow you to access youraccessory packages.67Open the front door, and remove thestarter box and filament box from the baseof the printer.Open these packages, and compare withthe following contents list.03
Pro2-Series 3D Printer / Quick Start GuideB. Hardware Installation (continued)List of Contents3mm2.5mm2mm1.5mmPower CableHex Wrenches( 5)USB StorageHeat Resistant GlovesFilamentBuild Plate( 2)(with Build Surfaceinside Protective Cover)Filament HolderSpatula( 2)15A10ANozzleCleaning Kit04TweezersFuseThumb ScrewsOther Accessories(Spare)(Spare)
Pro2-Series 3D Printer / Quick Start GuideB. Hardware Installation (continued)89Lower the Z platform by 50mm.To do this, set the interval at "10mm" byselecting it in the "Move Steps" bar. Thiswill move the bed 10mm per arrow click.Click this downward arrow 5 times to moveZ platform downward to 50mm.10Protective FoamCoverLoose the two thumb screws on the Zplatform by rotating the two thumbscrewscounter-clockwise.11Build PlateRemove!Remove the aluminum build plate from thefoam packaging.Using the included spatula, remove theleveling calibration model from your buildplate.05
Pro2-Series 3D Printer / Quick Start GuideB. Hardware Installation (continued)Slide the build plate onto the Z platformwith the logos facing upwards, and thehandle edge facing the front of themachine.12Re-install the thumb screws, rotatingclockwise, to lock the build plate intoposition.1314ABMount PointsC06DOpen the side door of the printer, andinstall the filament holders into themounting points. Open one of the includedspools of filament, and place it on theholder.NOTE: The direction of filament spool should beplaced to rotate in clockwise if at points B and D,and should be oriented to rotate counterclockwise at mount points A and C.
Pro2-Series 3D Printer / Quick Start GuideB. Hardware Installation (continued)15Locate the open end of the filament, andfeed it through the guide tube.16Press the “Utilities” tab on the screen andset the temperature of the left nozzle forthe filament that you're using.Press the “Load” button and the printer willbegin to heat. When the target temperature is reached, press "Load". Completethe feeding operation according to theinstructions on the screen.NOTE: This document's instructions are based onthe properties of Raise3D PLA filament. This isthe standard filament included with your productand it is advised to use the Raise3D PLA fortesting and initial setup.07
Pro2-Series 3D Printer / Quick Start GuideC. ideaMaker InstallationThe ideaMaker slicing software isavailable on the USB storage driveincluded with your printer.Additional downloads and versionsare available online wnload ideaMakerWINDOWS108Open the installer and choose your preferred language. Select the installation locationfor ideaMaker, and click "Next".
Pro2-Series 3D Printer / Quick Start GuideC. ideaMaker Installation (continued)2Follow the instructions provided by the console, and click "Install". After the installationis finished, click "Next" to go to the next step.3Click "Finish" and ideaMaker is installed.09
Pro2-Series 3D Printer / Quick Start GuideC. ideaMaker Installation (continued)MAC OS XOpen the Disk Image for the ideaMaker installer. This is located in the USB storage driveincluded with your printer, or download the latest version fromwww.raise3d.com/pages/download#down-im.Drag the ideaMaker icon(left) into the Application folder on the right side.10
Pro2-Series 3D Printer / Quick Start GuideD. ideaMaker Initial Settings1When launching ideaMaker for the first time you, you will need to select your printermodel from the drop-down list, then press "Next".2Select the diameter of your filament. Press "Finish" to finalize the initial settings.NOTE: ALL Pro2-Series printers use 1.75mm filaments.11
Pro2-Series 3D Printer / Quick Start GuideE. Using ideaMaker1Click the " " button to import “Giveaway Spinner” included in the USB storage.2Click the "Start" or “3Confirm your printer type and material are correct, then select the standard slicingtemplate.Click “Edit” to select the type of Platform Addition and the type of Support.12” button to begin slicing the model.
Pro2-Series 3D Printer / Quick Start GuideE. Using ideaMaker (continued)4Select your type of Platform Addition and Support in the "Edit" window. Click "Saveand Close" to return to the previous menu. Click "Slice" to generate your file.5Save the sliced files (.gcode and .data) by exporting to the USB storage drive.NOTE: File names that do not conform to the Western Latin character set may notdisplay properly.6Confirm that the files are saved and eject the USB storage.13
Pro2-Series 3D Printer / Quick Start GuideF. Start First PrintThe Pro2/Pro2 Plus units are preleveled in thefactory, but we recommend verifying that theleveling has not changed during shipping.1First, home the X/Y Axis by selecting the"home" button, then Z axis "home" button.If the homing procedures complete withoutissues, reposition the print head.Select "10mm" for "Move Steps" and move X to50mm, Y to 10mm.Please use the feeler gauge to check thedistance between nozzle and printing platform.The optimal distance between is 0.2mm.20.2mmFeeler GageThe distance between the nozzle and theprinting platform can be adjusted by turning thethumb screw on the left-front corner of theZ-plate, the higher the screw stands out, thefurther the distance between the nozzle to theprinting platform gets.3Closer14The best condition of this is that you can feel alittle friction when you slide the feeler gaugeinto the gap.Further
Pro2-Series 3D Printer / Quick Start GuideF. Start First Print (continued)Insert the USB storage that contains your slicedmodel (.gcode and .data files).4Insert this USB drive into the USB slot on theside of touchscreen.USB Storage56Select the “Print” tab, and choose “USB Storage”.Select the file and check the printing parametersand settings. Press “Print” to start printing thetest file.During printing, you can check the status of yourprint including printing time remaining and otherparameters from the touchscreen in the “Home”interface.NOTE: The touch screen will display an image of yourmodel on-screen during printing. This image will only beshown when the file is sliced by ideaMaker and the.data file is saved in USB storage or uploaded to screen.15
Pro2-Series 3D Printer / Quick Start GuideG. User Interface· Status bar· Menu title, Settings Button· Extruder and HeatBed temperature· Current model name,total print time, currentprinting status and height· Printingparameters andadjustment· Visual display of currentmodel· Pause/Resume button· Stop button· TaskbarHomeTune· Moving step distancesetting· Disable motor button· Choose where toload the print jobfrom· X/Y/Z axes move/returnto original position· Check uploadinglist, recovery tasklist, printingstatistics· Load and unloadfunction for the L&Rextruders.Utilities16Print
Pro2-Series 3D Printer / Quick Start GuideH. Dual-Extruder Print - Slicing1Open ideaMaker, Click the " " button to import your two models (.stl/.obj/.3mf file). Youcan download a file or use the test model included in the USB storage drive.2Choose one of the models and set its designated Extruder as Left Extruder from theleft side 'Model Info' window.17
Pro2-Series 3D Printer / Quick Start GuideH. Dual-Extruder Print - Slicing (continued)183Choose the other model and set Extruder as the Right Extruder using the 'Model Info'window.4Click the "Start" or “i” button to begin the slicing of the model.5Confirm your printer type and materials for both extruders, then select the standardslicing template.Click “Edit” to select the type of Platform Addition and the type of Support.
Pro2-Series 3D Printer / Quick Start GuideH. Dual-Extruder Print - Slicing (continued)6Select your type of Platform and Support in the "Edit" window. Click "Save and Close"to return to the previous menu. Click "Slice" to generate your file.7Save the sliced files (.gcode and .data) to your USB storage drive.NOTE: File names that do not conform to the Western Latin character set may notdisplay properly.8Confirm that the files are saved and eject the USB storage.19
Pro2-Series 3D Printer / Quick Start GuideH. Dual-Extruder Print - Hardware InstallationThe following steps show how to feed the right nozzle. For the other hardware installationssteps please see with Part B. Hardware Installation in this guide.1ABMount PointsC220DInstall the filament holder in the mountpoint on the side of the printer and place aspool of filament on the holder.NOTE: The direction of filament spool should beplaced to rotate in clockwise at mount points Band D and counterclockwise at mount points Aand C.Feed the filament through the guide tube.
Pro2-Series 3D Printer / Quick Start GuideH. Dual-Extruder Print - Hardware Installation (continued)3Open the “Utilities” tab on the screen andset the temperature of the right nozzle forthe filament you're using, then press the“Load” button.Finish the feeding operation step by stepaccording to the instructions on thescreen.NOTE: This document is set based on theRaise3D PLA filament, delivered with the printer.We advise that using the Raise3D PLA for thisinitial setup and testing.21
Pro2-Series 3D Printer / Quick Start GuideH. Dual-Extruder Print - Start First Print1The Pro2/Pro2 Plus units are preleveled inthe factory, but we recommend verifyingthat the leveling has not changed duringshipping.First, home the X/Y Axis by selecting the"home" button, then Z axis "home" button.If the homing procedures complete withoutissues, reposition the print head.Select "10mm" for "Move Steps" and move Xto 50mm, Y to 10mm.2322Press the nozzles button in Ultilities page andset the temperature to be 180 degrees. Waituntil nozzles heat up to the set temperature.Press the left nozzle button and the downwardarrow.
Pro2-Series 3D Printer / Quick Start GuideH. Dual-Extruder Print - Start First Print (continued)Once the left nozzle moves down, the rightnozzle will go up.4Please use the feeler gauge to check thedistance between nozzle and printing platform.The optimal distance between is 0.2mm.50.2mmFeeler GageThe best condition of this is that you can feel alittle friction when you slide the feeler gaugeinto the gap.The distance between the nozzle and theprinting platform can be adjusted by turning thethumb screw on the left-front corner of theZ-plate, the higher the screw stands, the furtherthe distance between the nozzle will be from theprinting platform.6Home the Z axis after each adjustment.CloserFurther23
Pro2-Series 3D Printer / Quick Start GuideH. Dual-Extruder Print - Start First Print (continued)7Press the right nozzle button and the downwardarrow.8Once the right nozzle moves down, the leftnozzle will go up.Please use the feeler gauge to check thedistance between nozzle and printing platform.The optimal distance between is 0.2mm.90.2mmFeeler Gage24The best condition of this is that you can feel alittle friction when you slide the feeler gaugeinto the gap.
Pro2-Series 3D Printer / Quick Start GuideH. Dual-Extruder Print - Start First Print (continued)The distance between the nozzle and theprinting platform can be adjusted by turning thethumb screw on the left-front corner of theZ-plate, the higher the screw stands, the furtherthe distance between the nozzle will be from theprinting platform.10Home the Z axis after each adjustment.CloserFurtherInsert the USB storage that contains your slicedmodel (.gcode and .data files).11Insert this USB drive into the USB slot on theside of touchscreen.USB Storage12Open the “Print” tab, and choose “USB Storage”to open the file storage path. Select your dualextrusion file to check the printing parametersand settings. Press “Print” to start printing testfile.25
Pro2-Series 3D Printer / Quick Start GuideH. Dual-Extruder Print - Start First Print (continued)13During printing, you can check the status of yourmodel including the remaining printing time andother parameters from the “Home” interface onthe touchscreen.NOTE: The touch screen will display an image of yourmodel on-screen during printing. This image will only beshown when the file is sliced by ideaMaker and the.data file is saved in USB storage or uploaded to screen.26
Technical SpecificationsITEMPro2 PlusPro2Build Volume (W D H)CONSTRUCTIONSingle PrintDual Print12 12 11.8 inch305 305 300 mm11 12 11.8 inch280 305 300 mm*Single PrintDual Print12 12 23.8 inch305 305 605 mm11 12 23.8 inch280 305 605 mmMachine Size (W D H)24.4 23.2 43.5 inch620 590 1105 mm24.4 23.2 29.9 inch620 590 760 mmELECTRICALPower Supply InputPower Supply OutputPRINTERPrint TechnologyPrint HeadFilament DiameterXYZ Step SizePrint Head Travel SpeedBuild PlateMax Build Plate TemperatureHeated Bed MaterialBuild Plate LevelingSupported MaterialsNozzle DiameterMax Nozzle TemperatureConnectivityNoise emission (acoustic)Operating Ambient TemperatureStorage TemperatureSOFTWARESlicing SoftwareSupported File TypesSupported OSMachine Code TypeUser InterfaceNetworkPRINTER CONTROLLERResume Print after Power OutageScreen ResolutionMotion ControllerLogic ControllerMemoryOnboard FlashOSPorts*100-240 V AC, 50/60 Hz 230 V @ 3.3 A24 V DC, 600 WFFFDual-head with electronic lifting system1.75 mm0.78125, 0.78125, 0.078125 micron30 - 150 mm/sHeated aluminum build plate with magnetic holding110 ºCSiliconePre-calibrated levelingPLA/ ABS/ HIPS/ PC/ TPU/ TPE/ NYLON/ PETG/ PVA/ ASA/ PP/Glass Fiber Filled/ Carbon Fiber Enforced/ Metal Particles Filled/ Wood Filled0.2/ 0.4/ 0.6/ 0.8/ 1.0 mm300 ºCWi-Fi, LAN, USB port, Live camera 50 dB(A) when building15 - 30 C, 10 - 90% RH non-condensing-25 C to 55 C, 10 - 90% RH non-condensingideaMakerSTL, OBJ, 3MFWINDOWS/ IOS/ LINUXGCODE7 inch Touch ScreenEthernet: Ethernet 802.11b/g/nWLAN: IEEE802.11b/g:2412MHz to 2472 MHzIEEE802.11n HT20:2412MHz to 2472 MHzIEEE802.11a:5150 - 5250MHz, 5725 -5850 MHzIEEE802.11an HT20:5150 - 5250MHz, 5725 -5850 MHzIEEE802.11an HT :5150 - 5250MHz, 5725 -5850 MHzSecond Generation1024*600ATM Cortex M7.400MHZ FPU32 bit freescale imx6, Quad core 1Ghz ARM processor1GB8GBEmbedded LinuxUsb2.0*2, Ethernet*1: When you are printing with dual material.
Experiencing Difficulties?If you run into any issues during the guided setup, please contact our expert technicians by opening a ticket online at: http://help.raise3d.com.
4th Floor, Building B5, 1600 North Guoquan Rd, Shanghai, China 200438 86 21 6533785543 Tesla, Irvine, CA 92618, USA 1 888 963 9028www.raise3d.com
Pro2-Series / Quick Start Guide3D Printer B. Hardware Installation (continued) Open the front door, and remove the starter box and filament box from the base of the printer. Open these packages, and compare with the following contents list. 7 Once the unit has been powered, the printer will go through a start-up sequence.