Transcription
TrademarksMatchWare, MatchWare Mediator, MatchWare OpenMind and MatchWare ScreenCorder are trademarksor registered trademarks of MatchWare A/S.Microsoft, Microsoft Windows, Microsoft Word, Windows Media Player, Windows Explorer and InternetExplorer are trademarks or registered trademarks of Microsoft Corporation.Macintosh, Mac and QuickTime are registered trademarks of Apple Computer Inc.Flash is a trademark of Adobe Systems Inc. (formerly Macromedia, Inc.).Other brand or product names are trademarks or registered trademarks of their respective holders.1
MatchWare License AgreementThis program is copyrighted 1993-2007 by MatchWare A/S. All rights reserved.MatchWare and MatchWare ScreenCorder are trademarks or registered trademarks of MatchWare A/S.Other brand or product names are trademarks or registered trademarks of their respective holders.Information given in this documentation can be changed and represents no obligation on MatchWare, itsPublishers or Agents. This documentation is copyrighted 1993-2007 by MatchWare A/S. All rightsreserved. This documentation is not to be copied, photocopied, reproduced, translated or transferred to anelectronic media or machine sensible form without a written authorization from MatchWare or itsPublishers.IMPORTANT You should read the following MatchWare License Agreement (EULA) carefully. If youinstall, copy, download, or use this software product you agree to be bound by the terms of thisagreement. If you do not agree with the conditions, you are not entitled to install and use the software,and should immediately return the software package and all other material in this package along withproof of payment, to the authorized dealer from whom you obtained it for a full refund of the price youpaid. Do not make any illegal copies.MatchWare License AgreementUSEThis is a legal agreement between you, the end user, and MatchWare A/S ("MatchWare"). The enclosedsoftware program ("Software") is licensed, not sold, to you by MatchWare for use under the term of thislicense.You (an entity or a person) may use one (1) copy of the Software. This Software may be freely movedfrom one computer or location to another, so long as there is no possibility of it being used by more thanone person at a time. You may make one (1) backup copy of the Software.A Terminal Server, such as (but not limited to) a Microsoft Terminal Server or a Citrix Server, is acomputer that allows Client computers to run applications on the Terminal Server. If the Software isinstalled on a Terminal Server you need a license for each Client computer that can run the Software.You may add users by paying for a separate license for each user you wish to add. When installing theSoftware on a server which allows multiple, concurrent users to access and run the Software, you mustlicense (purchase) additional licenses for each computer.2
When using Remote Desktop technologies you may access and use the Software provided that only theprimary user of the device hosting the remote desktop session accesses and uses the Software with aremote access device. You are not permitted to use the Software on both the device hosting the remotedesktop session and the access device at the same time.You may not rent, lease, loan or license this Software or any copy.You may not reverse-engineer, disassemble, decompile, modify or create derivative work of thisSoftware.EDUCATIONAL LICENSESCommercial use of Educational Licenses of this Software is prohibited.You agree to not use an Educational License to engage in commercial activities including, withoutlimitation, the following activities: offering for sale any products or services; soliciting for advertisers or sponsors; conducting raffles or contests that require any type of entry fee; displaying a sponsorship banner of any kind, including those that are generated by banner or linkexchange services; and displaying banners for services that provide cash or cash-equivalent prizes to users in exchange forhyperlinks to their web sites.Some educational multi-user licenses offer home use rights for teachers (and students). Any additionalCDs purchased to facilitate such home use may not be installed or used on the respective educationalinstitution premises, buildings or campus.TRANSFER OF THE SOFTWAREYou may transfer all of your rights to use the Software to another person, provided that you transfer tothat person the entire software package, CD-ROM's, documentation, and this statement, and transfer ordestroy all copies in any form. Once you transfer the Software you no longer have any rights to use it.Only the person to whom the Software is transferred may use it in accordance with the copyright law,international treaty and this statement.If you have purchased an upgrade version of the Software, it constitutes a single product with theMatchWare Software that you upgraded. For instance, the upgrade and the Software that you upgradedcannot both be available for use by two different persons at the same time and cannot be transferredseparately.3
COPYRIGHTAll intellectual property rights in the Software and user documentation are owned by MatchWare A/S orits suppliers and are protected by United Kingdom copyright laws, other applicable copyright laws andinternational treaty provisions. MatchWare A/S retains all rights not expressly granted.CLIPARTThis Software may contain clipart ("Clipart") such as images, sounds, video clips etc. All intellectualcopyright for the Clipart is owned by MatchWare A/S or licensed by MatchWare A/S.MatchWare grants you a non-exclusive, non-sublicensable right to use the Clipart in presentations or websites created with this Software, including in runtime versions of the Software. There is no royalty due forsuch use to MatchWare. The Clipart may not be sublicensed or made available to any person or entity thatdoes not have a legal license of this Software.RUNTIME VERSIONSIn some MatchWare products (including this Software) you have the opportunity to make runtimeversions or web sites of your applications. Your runtime versions or web sites and the distribution of themare subject to all of the following conditions: You may not remove or alter any MatchWare copyright, trademark, or any other proprietary rights. You may not use MatchWare's or any of its suppliers' names, logos, or trademarks to market yourruntime version. You may state that your runtime version was made using this MatchWare product. You will remain solely responsible to anyone receiving your runtime versions or web site for support,service, upgrades, or technical assistance. The recipients will have no right to contact MatchWare forsuch services or assistance. You will indemnify and hold MatchWare, its related companies and its suppliers harmless from andagainst any claims or liabilities arising out of the distribution of your runtime versions. As part of the license to use MP3, we are required to inform you of the following: Supply of thisproduct does not convey a license nor imply any right to distribute content created with this productin revenue-generating broadcast systems (terrestrial, satellite, cable and/or other distributionchannels), streaming applications (via Internet, intranets and/or other networks), other contentdistribution systems (pay-audio or audio-on-demand applications and the like) or on physical media(compact discs, digital versatile discs, semiconductor chips, hard drives, memory cards and the like).An independent license for such use is required. For details, please visit http://mp3licensing.com.4
LIMITED WARRANTYMatchWare warrants the physical media and physical documentation provided by MatchWare to be freeof defects in materials and workmanship for a period of ninety (90) days from the original purchase date.MatchWare will replace defective media or user documentation at no charge, provided you return theitem within the warranty period. If MatchWare is unable to replace defective media or userdocumentation, MatchWare will refund the amount you paid for the Software. These are your soleremedies for any breach of warranty.LIMITATION OF LIABILITYThe entire and exclusive liability and remedy for breach of this limited warranty shall be limited toreplacement of defective media or documentation and shall not include or extend to any claim for or rightto recover any other damages, including but not limited to, loss of profit, data, or use of the Software orspecial, incidental or consequential damages, or other similar claims, even if MatchWare has beenadvised of the possibility of such damages. MatchWare makes no representation or warranty that thesoftware or documentation are "error free" or meet any of the user's particular standards, requirements, orneeds. In no event shall MatchWare's liability exceed the amount paid by you for the Software. To theextent that applicable law does not allow the exclusion or limitation of implied warranties or limitation ofliability for incidental or consequential damages the above limitation or exclusion may not apply to you.U.S. GOVERNMENT RESTRICTED RIGHTSThis Software and documentation are provided with RESTRICTED RIGHTS. The Software anddocumentation are developed at private expense and no part of them is in the public domain. Use,duplication, or disclosure by the Government is subject to restrictions as set forth in subparagraph c(1)and (2) of the Commercial Computer Software Restricted Rights clause at FAR 52.277-19 orsubparagraph c(1) (ii) of the Rights in Technical Data and Computer Software clause at DFARS 252.227- 7013. Manufacturer is MatchWare A/S, Vestergade 48F, 8000 Århus C, Denmark.GENERALThis agreement is governed by English law and any dispute connected with this agreement and/or theSoftware is subject to the exclusive jurisdiction of the English courts. The export of this product isgoverned by U.S and UK export regulations.5
Table of ContentsTrademarks. 1MatchWare License Agreement . 2Welcome. 8What's new in ScreenCorder 5 . 9Installation .11Stand-alone installation . 12Administrative installation (system administrators only). 12Troubleshooting . 13Quick Start .15Tutorial. 16Optimizing Tips . 21User Guide .23Setting up a recording . 24Setting up the environment . 24Defining the recording area. 25Defining the video settings . 29Defining the audio and mouse settings. 30Creating a recording . 34Starting a recording. 34Viewing a recording. 35Editing a recording . 38Saving the project . 41Enhancing a recording. 43Adding multimedia objects . 43Inserting still images. 48Adding webcam objects . 51Using markers . 57Adding interactivity . 60Adding quizzes. 61Creating a video. 68Creating a video - Step 1: Setup. 68Creating a video - Step 2: Format. 70Creating a video - Step 3: Compression Settings. 74Creating a video - Step 4: Destination . 81Creating a website . 83Web Builder. 83FTP Upload Manager. 93Exporting snapshots . 976
Customizing ScreenCorder . 100Support.104Questions and answers . 105Getting help . 109Reporting a problem . 110Shortcuts.111Index .1137
WelcomeMatchWare ScreenCorder is a desktop recording tool for capturing on-screen activity. Everything thattakes place on the screen, including keyboard actions, speech, mouse clicks and movement, is recorded.ScreenCorder lets you create tutorials, on-line training videos, software demos, CBT material and more,recording directly from your own desktop.Here is a list of ScreenCorder's main features: You can record a sound track at the same time as you create the video desktop recording or add thesound track later to comment your recording or give step-by-step audio instructions. You can add a variety of objects to your screen recording, including animated objects, still images,webcam recordings, speech bubbles and magnifiers, which you can customize according to yourneeds. Once you have created your initial screen recording, you can edit it in many different ways. You canfor instance remove sections at the beginning or at the end, cut out a section in the middle, insert newaudio and/or video material or freeze particular frames. You can make your recordings interactive by inserting markers at particular points and by placingactions (pause, go to a specific marker, send an email and so on) on its objects. You can export your recording in different video formats: WMV, AVI, Flash (SWF) and FLV(Flash Video). You can assess your viewers' understanding of your material by inserting quizzes at various points ofthe recording, which you can then export to a SCORM 1.2 compliant Learning Management System(LMS). Finally you can save your desktop recordings as projects. This enables you to re-open them at a laterdate to expand them, edit them and recreate videos from them, either in the same video format as theoriginal recording or in a different format.MatchWare ScreenCorder also comes with a Web Builder. This is a separate program for use withScreenCorder which allows you to create a web presentation environment for one or more of your videos,complete with navigation, design (using the predefined templates included), title, description and so on.8
What's new in ScreenCorder 5ScreenCorder 5 has many new features, which are fully described in the appropriate sections of thisdocumentation. Here is a brief description of the most important enhancements.User Interface: The ScreenCorder 5 interface has been improved with a new visual display and newnavigation controls. See "Viewing a recording" for a full description of ScreenCorder controls andnavigation facilities.Multimedia Catalog: ScreenCorder 5 includes a new Multimedia Catalog with an enhanced interface. Itcontains a variety of text bubbles, arrows, animated objects and magnifiers which you can customize asyou wish by resizing or rotating them, changing their border color, fill color, level of transparency and soon. For more information on these objects, see "Adding multimedia objects" and "Inserting still images".Webcam objects: ScreenCorder 5 lets you create one or more webcam recordings for insertion into yourvideo. You can save these webcam recordings for use in different ScreenCorder projects, and even importother AVI videos into your recordings. To find out how to create and insert a webcam object into yourscreen recording, see "Adding webcam objects".Markers: ScreenCorder 5 allows you to set markers in your recording to identify particular frames,during the actual recording or during the editing phase. You can use these markers to single out frames onwhich you want to do further work, isolate a section of the recording which you need to delete, or addinteractivity to your recording. For a full description of this new feature, see "Using markers".Interactivity: With ScreenCorder 5, you can add interactivity to the objects placed on your recordingduring the editing phase. This enables you to create navigation menus for your viewers and let themperform specific actions by clicking particular objects. For more information, see "Adding interactivity".Note that this feature is only supported by the Flash (SWF) video format.Quizzes: ScreenCorder lets you assess your viewers' understanding of your video material by insertingquizzes at key points of the recording. Quizzes can also be used to provide feedback on the informationgiven in the video. You can choose whether the scores should be presented at the end of each quiz or on acumulative score card displayed at the end of the last quiz. You can also choose to receive the scores bye-mail or to store them on a SCORM-compliant Learning Management System (LMS). For a fulldescription of this feature, see "Adding quizzes". As this feature relies on interactivity, it is onlysupported by the Flash (SWF) video format.Snapshots: You can now capture still snapshots of your screen recording during the editing phase. Youcan then export all the snapshots selected, either as image files in the folder of your choice, or embeddedin a pre-formatted Microsoft Word document. For more information, see "Exporting snapshots".9
Notes: The 8 bit color resolution, which most computers do not offer any more, is not supported byScreenCorder 5. The Animated GIF and AVI 8 bit export formats, which were only available fordesktop recordings made in 8 bit color resolution, have therefore been removed from the formatsavailable. In order to support all the new features mentioned above, the file format of ScreenCorder projects hasbeen changed. This means that projects created in ScreenCorder 4 or earlier versions can no longer beopened in ScreenCorder 5.10
Installation11
ScreenCorder InstallationStand-alone installation¾ Insert the CD-ROM in the CD-ROM drive.¾ Follow the instructions on the screen when the ScreenCorder Install program starts.If the ScreenCorder Install program does not start automatically:¾ Choose Start - Run.¾ Type the following:X:\start.exewhere X represents the CD-ROM drive letter.Administrative installation (system administrators only)The Windows Installer can perform an administrative installation of an application or product to anetwork for use by a workgroup. An administrative installation installs a source image of the applicationonto the network that is similar to a source image on a CD-ROM. The administrative installation packagecan then be pushed by system administrators to client computers in a domain via Group Policies. This isonly possible from Windows 2000 Server onwards.To find out more about Windows Installer and administrative installations, please refer to the Microsoftweb site.Creating an administrative installationAdministrators can create an administrative installation from the command line by using the /a commandline option.¾ Choose Start - Run.¾ Type the following:msiexec.exe /a X:\install\setup.msiwhere X represents the CD-ROM drive letter.(please check the location of the setup.msi on the CD-ROM)12
¾ Specify the following in the dialog that appears: Where you want to unpack the .msi file The user name and company name to use as default The serial number¾ (optional) Check 'Force activation when ScreenCorder is run' if you want ScreenCorder to beautomatically activated the first time the program runs.¾ (optional) Check 'Automatically activate during installation' if you want to activate ScreenCorderduring installation.These two activation options are "silent" (i.e. they do not display any messages).The above options are stored in a file called "admin.ini" in the destination folder. You can edit this file using atext editor like Notepad if you want to change the options without making a new administrative installation.Applying a patch package to an administrative installation¾ Choose Start - Run.¾ Type:msiexec.exe /p path to .msp file /a path to administrative .msifile Members of the workgroup using ScreenCorder must then reinstall the application from the newadministrative source image to receive the update.To completely reinstall the application and cache the updated .msi file on their computer, users may entereither of the following commands: msiexec.exe /fvomus //server/ administrative .msi file msiexec.exe /I //server// administrative .msi file REINSTALL ALLREINSTALLMODE vomusTroubleshootingChanging the location of the activation fileBy default, the activation data is stored in:C:\Documents and Settings\All Users\Application Data\mwas\ScreenCorder5.0.mwas13
In some rare situations, client computers may be setup with restricted access to the above folder, and thiswill cause the activation file not to be saved. If you have a client server system setup in this way, you canmove the activation file to another location by adding an entry to the admin.ini file as follows:[Activation]mwas c:\different folder with write access\ScreenCorder5.0.mwasStoring several activation files on the serverYou can store several activation files in the same folder of the server by adding an entry to the admin.inifile as follows:[Activation]mwas \\server\activations\ScreenCorder5.0 %COMPUTERNAME%.mwasWhere:server the name of the serveractivations the share name on the server%COMPUTERNAME% will be replaced with the client computer nameProblem applying a patchQ. Nothing happens when I double-click the patch file (ex. patch.msp).A. The .msp file extension may be allocated to an application other than the Windows installer.In this case, you can apply the patch as follows:¾ Chose Start - Run.¾ Type the following command:msiexec.exe /p c:\temp\patch.msp(assuming that you have copied the .msp file to c:\temp)14
Quick Start15
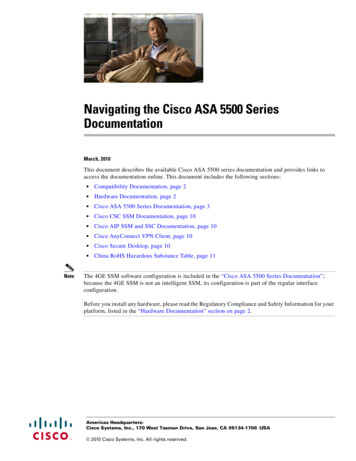
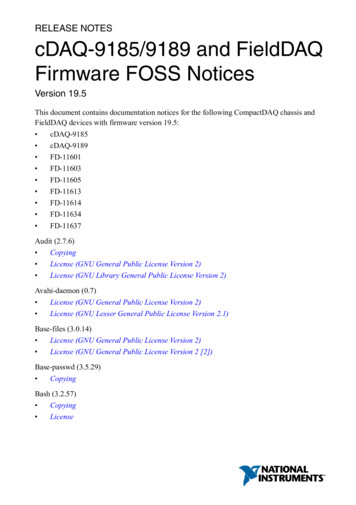
TutorialThis tutorial will guide you quickly through your first desktop recording. The features and optionsmentioned here are all described in detail in this documentation.When you open ScreenCorder the first window that appears is the Welcome window.¾ Click the New Project button to begin a new recording.The ScreenCorder Recording Settings dialog appears.Step 1 - Defining the recording areaThe Video tab is selected by default.¾ Click the Select Window button to select your recording area.ScreenCorder disappears and you can now select a window or frame with the mouse pointer.¾ Move the mouse pointer around until the window or frame you want to record from is highlighted,then click to select it.16
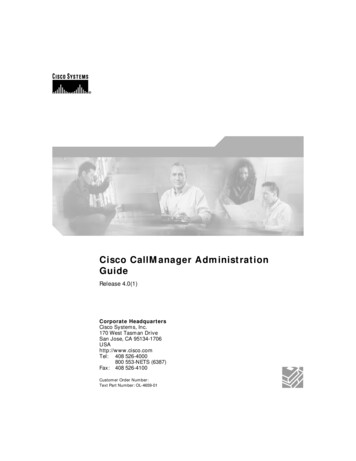
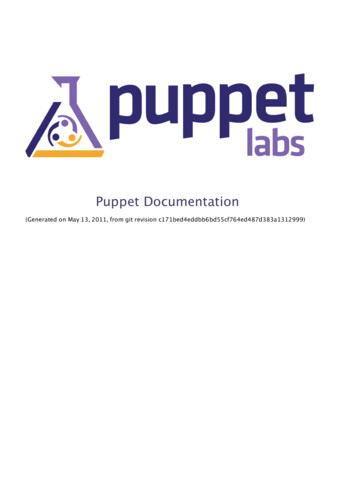
If necessary, you can now define the recording area more precisely with the X, Y, Width and Heightfields.Instead of using Select Window you could also use Select Area to define your own recording area.Step 2 (optional) - Defining the audio and mouse settings¾ Click the Audio / Mouse tab at the top of the Recording Settings dialog.¾ If you do not want to record sound, uncheck 'Record audio'.¾ Click OK at the bottom of the Recording Settings dialog to save the settings and exit the dialog.The Capture Tip dialog may appear. Just click the Don't Adjust button to continue.Step 3 - Creating the recordingYou are now in the main window.17
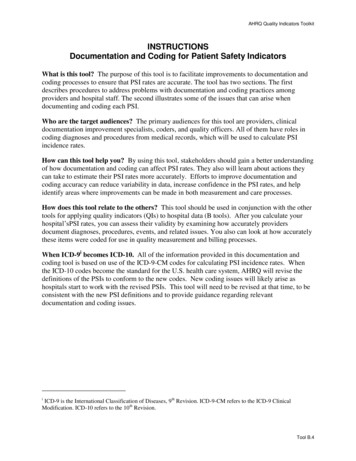
¾ Click the Record buttonto start recording (capturing).An information screen may appear. After reading it, click Begin Recording Now.ScreenCorder hides itself. A red flashing frame appears around the recording region you defined in theRecording Settings dialog to indicate that recording is in progress.If you are recording full screen, the red flashing frame does not display, as it would otherwise bevisible in the recording itself.You can move the pointer around, left and right-click with the mouse, use the keyboard, open menus andso on. Any action taking place within the recording region you defined in the Recording Settings dialog isnow recorded.A common mistake when recording mouse movement is to move the mouse too quickly. When you are recordingmouse movements, make sure that you move the mouse slowly. This will make it easier for the viewers of your videoto follow your speech and on-screen actions.¾ Press the Esc key when you have finished recording.¾ Click the Play buttonto check the recording.18
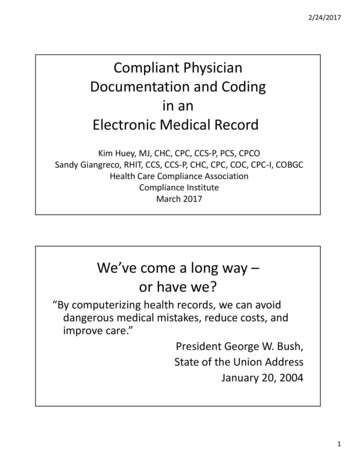
If you are satisfied with the recording proceed to Step 4. If not, you can restart from the beginning andremake your entire recording, or just re-record the part you are unhappy with. To do this, move the sliderto the point from which you want to start re-recording and click the Record button.Step 4 - Saving the project / Exporting the recordingBefore you create a video from your desktop recording, it is a good idea to save it as a project.Saving your recordings as projects allows you to re-open them a later date, continue working on them andre-export them as videos, in the same format as the original video or in a different format.¾ Choose File Save Project on the main menu, choose a path and name for your project in the SaveAs dialog that opens and click Save.You are now ready to export your recording as a video.¾ Choose File Export Video on the main menu.The Setup dialog of the Export Wizard appears.¾ Make sure Export current recording is checked and click Next.The Format dialog appears to let you select your preferred video format.¾ Click Next.The Compression Settings tab appears with the standard compression settings.¾ Click Next.19
The Destination dialog appears.¾ Enter a path and name for your video or browse for a specific folder.¾ Click Export to start creating the video.¾ Once the export is complete, click Play Video to view the video in the built-in ScreenCorder Player.You must close the Player before you can continue working in ScreenCorder.20
Optimizing TipsYou can start recording as soon as ScreenCorder is installed. To help you get the best possible results, wehave listed here the main points to pay attention to when recording. Following the tips given in the topicsmentioned below should ensure a perfect outcome.1. Computer settingsSee "Setting up the environment" in the chapter "Setting up a recording".2. Size of recording areaSee "Defining the recording area" in the chapter "Setting up a recording".3. Recording settingsVideoSee "Defining the video settings" in the chapter "Setting up a recording".AudioSee "Defining the audio and mouse settings" in the chapter "Setting up a recording".4. Exporting the videoScreenCorder supports four different export options: WMV, Flash (SWF), FLV (Flash Video) andAVI.See "Creating a video - Step 2: Format" for a description of the advantages and disadvantages of eachformat.Tips for WMV exportSee the paragraph "WMV format" in "Creating a video - Step 3: Compression Settings".Tips for Flash (SWF) exportSee the paragraph "Flash (SWF) format" in "Creating a video - Step 3: Compression Settings".Tips for FLV (Flash Video) exportSee the paragraph "FLV (Flash Video) format" in "Creating a video - Step 3: Compression Settings".21
Tips for AVI exportSee the paragraph "AVI format" in "Creating a video - Step 3: Compression Settings".5. Resizing the recordingSee the paragraph "Resizing the recording" in "Creating a video - Step 2: Format".22
User Guide23 p
recording directly from your own desktop. Here is a list of ScreenCorder's main features: You can record a sound track at the same time as you create the video desktop recording or add the sound track later to comment your recording or give step-by-step audio instructions.