Transcription
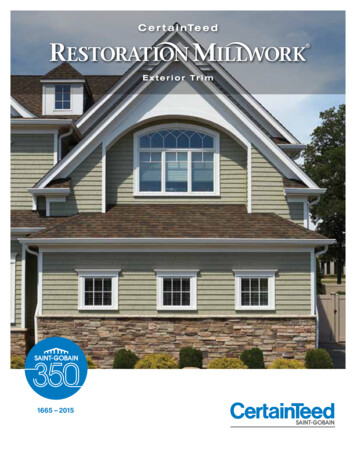
Restoration Millwork Exterior TrimInstallationGuidelines
Installation GuidelinesRestoration Millwork cellular PVC trim is anexterior decorative trim for use only in nonload-bearing applications. It must never be usedas a siding/cladding material. These InstallationGuidelines are a general resource in standardinstallation techniques and procedures forworking with Restoration Millwork. They aremeant to be as thorough as possible. For moreresources and information, please access ourwebsite at www.certainteed.com/trimRestoration Millwork cellular PVC trim looks and feels liketop-grade lumber. It installs like lumber and can be cut, shaped,routed, or milled with ordinary wood-working tools. All ourtrimboards, sheets, and specialty millwork have a naturalwhite surface that does not need painting. RestorationMillwork meets all ICC and CCMC code requirements.SafetyRestoration Millwork exterior trim is a cellular PVC productand cutting it will create PVC dust and particles. Cut cellular PVC trim in an open, well-ventilated area. Always wear safety glasses or goggles and a face maskwhen cutting Restoration Millwork. If you cut trim with a power saw,wear a dust mask.Table of ContentsSafety1Storage and Handling1Pallet Handling2Cutting, Drilling, Routing and Finishing2Expansion and Contraction2Fastening3, 4Bonding, Adhesives and Joinery5Rakes, Fascias and Bandboards5Soffit and Porch Ceilings5CornersSkirtboardWindow and Door TrimInvisiPro Hidden Fastening System7, 89, 101111, 12Storage and HandlingRestoration Millwork is more flexible than wood, so it mayconform to uneven surfaces, particularly in warm weather. Store Restoration Millwork up off the ground on a flat,level surface. If the product is stored in a cantilever rack,use the CertainTeed shipping pallet to provide support. Restoration Millwork should not be stored or placeddirectly on surfaces that can develop excessive heat, suchas blacktop. Trimboards are packaged in protective wrap forprotection from scuffs and dirt. Once the protective wrapis removed, protect the trim from dirt and debris. If itdoes get dirty, clean the trim with a soft bristle brush andmild soap and water before you install it. The protectivewrap is not meant to be a weather barrier; use the palletshroud or a tarp when storing the product outside. Products with removable film should be kept dry prior toinstallation. Do not expose to direct sunlight for extendedperiods of time. Protective film can be removed prior,during or immediately after installation.Column Wraps13 When moving and installing Restoration Millwork, handleit the same way you would handle soft pine lumber.Beadboard14 Take care in the handling of column wraps to preventtearing the tape or cracking at miter lock corner joints.Concealing Joints15Painting, Bending and Cleaning15, 16Glossary17, 18Restoration Millwork Product Line Back CoverNote: When the terms "recommend" and "should" areused in this manual, the step is optional for installingRestoration Millwork. However, it is included because thestep represents best practice. When the terms "required"and "must" are used, the step is a necessary part of theinstallation process and must be adhered to.1
Pallet HandlingIt is important to take certain steps when handlingRestoration Millwork. The below recommendations mayhelp to keep the product in a factory-like condition prior toinstallation and at the job site. A typical Restoration Millwork pallet weighs 3,200 pounds. Restoration Millwork pallets should not be picked up two(2) at one time using standard four (4) foot wide forks. To pick up two (2) skids of material, a ten (10) foot forkspreader is recommended. A typical spreader can costapproximately 3000 and can be mounted to the front ofa lift truck. Use adjustable nylon straps around the skid and cornersto protect the product where pallet bands come intocontact with boards. Use an empty Restoration Millwork skid to fill pieceorders and stack product neatly. The use of edgeprotectors and plastic banding will help secure the skidand avoid damage. Avoid the use of the metal banding as these may cut intothe boards if pulled too tight. When moving a pallet of Restoration Millwork, keep theload as close to the ground as possible.Cutting, Drilling, Routing,and FinishingCuttingYou can cut Restoration Millwork with aconventional carbide-tipped blade that isdesigned for working with wood. Do notuse fine-tooth metal-cutting blades. Do not use plywood ormetal blades because the kerf of the blade is too thin andcan cause heat buildup in the material. For best results, usea 32-tooth (or higher) blade designed for woodworking. Tomaintain a smooth edge, support the trim across its entirelength when you cut it.ProTip : When it is cut properly, Restoration Millwork will havea smooth edge. If you get a rough edge from cutting, checkfor excessive friction, a worn saw blade, or badly aligned tools.Rasp and sand the trim to restore a smooth edge.DrillingYou can drill Restoration Millwork with standardwood-working drill bits. Do not use bits made for rigid PVC.Avoid heat buildup from excessive friction, and remove theshavings from the drill hole frequently. To avoid binding, takeprecautions when using a hole saw.RoutingFor crisp, clean edges, use a sharp carbide-tipped bit on arouter.For smooth milling, it is important to adjust the speedof the router and control the “push” rate. Hand-held routersare difficult to control, so we recommend that you mountthe router (150 to 1,300 rpm) on a table. Make sure the router guide bearing is running along asmooth cut. Go over the cut a second time to smooth out therouter edge.FinishingRestoration Millwork trim features our FinishedEdge technology, which prevents dirt from collecting on thesurface of the edges. Use machine edging, sanding,grinding, or filing to finish field-cut edges. To scuff sandRestoration Millwork trim, use 100–120 grit sandpaperor a Norton Abrasive Sponge. The finished edges willhave the texture of the interior cell structure, which is acosmetically smooth surface. Do not allow excessive heat to build up. For a smoother edge, spackle, sand, or paint thefinished edge. Static Guard spray can be used on yourself and routerto keep dust down and off of your equipment.Expansion and ContractionVinyl building products expand and contract as thetemperature changes. You must allow for this movementwhen you fasten Restoration Millwork. You can minimizethe movement of PVC trim by observing proper fasteningtechniques along the entire length of the trim board orsheet; using screws rather than trim nails will also help (seeProTip below). Allow 1/4 in. per 18 ft. of product for expansion andcontraction (1/8 in. at each end). 30 to 45 scarf joints work well to minimize seamsand allow expansion and contraction. Glue scarf joints together to help control separationcaused by expansion and contraction (see “Bonding,Adhesives and Joinery” section on page 5 for more onproper bonding techniques). Be sure to fasten both sidesof the joint. Gluing the joints moves the expansion and contraction outto the ends, where movement is covered by RestorationMillwork one-piece corners. However, in some situationsglued scarf joints can result in larger gaps at the end ofboards when vinyl contracts in cold weather. Expansionjoints are an alternative to scarf joints in such situations. Expansion joints can also be used to address the effectsof expansion and contraction in longer runs where two ormore pieces of trim are placed end to end (see page 6 forexpansion joint details). To cover the gap between boards created by expansionjoints, decorative elements like T-bars, keystones andchevrons can be created out of spare pieces of trimboard.See “Ceilings” section on page 6 and “ConcealingExpansion Joints” section on page 15 for details.ProTip : Use screws to better control expansion/contraction.Screws have heavier shanks than trim nails and are less likelyto move.Moulding Standard wood working machinery is acceptable withspeeds of 8,000 RPM or greater. Higher RPMs will produce a smoother surface. Sharp tooling made of carbide or high speed steel usedwith hold down clamps and dust collection systems willproduct the most desirable finish.2
FasteningDo not use brads, staples, wire nails, ring-shank nails,or fine-threaded wood screws.Unless you are using largefasteners or installingRestoration Millwork inunusually low temperatures(less than 40 F), you will notneed to pre-drill holes beforefastening.Choose the correctly sized fastener: 1-1/2 in. of thefastener must penetrate a framing member and/orstructural sheathing. If you use 1/2 in. OSB (a type ofstructural sheathing), the fastener needs to penetrate theframing member only 1 in.If you are covering 1/2 in. foam (non-structural sheathing),you must penetrate the framing member 1-1/2 in. In otherwords, in the second example, the fastener needs to belonger to meet the fastening requirements.Fastening ScheduleUse stainless steel or hot-dipped galvanized fastenersdesigned for wood trim and cladding. For best results,use fasteners with thin shanks, blunt points, and full roundheads. We recommend using the CertainTeed Cortex Concealed Fastening System.Width ofTrimboardFasteners perFraming Member, 16 in, O.C.Less than 6 in.26 in. to 12 in.3Greater than 12 in.4Sheets16 in. on center horizontally, 6 in.on center vertically, and 4 in.around the perimeter of the panelSheet Fastening DiagramNote: for sheets - vertical wall fastenings, perimeterfasteners spaced 4 in. apart can be secured into OSB.Fasteners on 16 in. centers must also be secured intoframing members. Standard pneumatic nailerswork well, generally at apressure between 70 psi and100 psi, depending upon thetype of gun, the type of nail,the air temperature, and thedensity of the substrate. In-line pressure gauges willhelp maintain even pressureto the nail gun. Apply trimboards over framing no greater than 16 in.O.C. If framing members are greater than 16 in. O.C.,provide additional bracing for fastening. Fastener heads shouldbe flush with the surfaceof the trim or slightlyindented and no closerthan 3/4 in. from theend of the board toavoid blowout throughthe side of the board. Fasteners shouldpenetrate a minimum of1-1/2 in. through a flat,solid wood substrateinto a framing member.Note: When fastening a pocket accessory, make sureto measure 3/4 in. from the edge of the pocket. Donot fasten through the pocket. For example, to installRestoration Millwork with a 3/4 in. pocket, measure back1-1/2 in.: 3/4 in. for the pocket 3/4 in. for clearance.NOTE: Fasteners should be no closer than 3/4" fromthe edge of the board to avoid blowouts3
Recommended Fastener Sizes for Restoration Millwork Exterior Trim11ProductThickness (actual)Restoration Millwork ProductsAvailable in this ThicknessFinish NailMinimum Length#8 Trim ScrewMinimum Length3/8 in.Sheets6D (2 in.)1-7/8 in.1/2 in.Beadboard, Beadboard Panel, Sheets6D (2 in.)2 in.5/8 in.Trimboards, Sheets8D (2-1/2 in.)2-1/8 in.3/4 in.Trimboards, Sheets8D (2-1/2 in.)2-1/4 in.1 in.Trimboards, Sheets, One-piece Corners8D (2-1/2 in.)2-1/2 in.1-1/4 in.Inside Corner, One-piece Corners, CustomCraft 10D (3 in.)2-3/4 in.The recommended lengths and sizes assume that Restoration Millwork is applied over a nailable, rated structural sheathing (substrate) with athickness of 1/2 in. applied directly to a framing member. If non-structural sheathing is used over framing members, the fastener must penetratethrough the non-structural sheathing into the framing member a minimum of 1-1/2 in.Cortex Concealed Fastening SystemFastening Smaller, Lighter Profiles The Cortex Concealed Fastening System is designed foruse with Restoration Millwork trimboards with actualthicknesses of 5 8 in. to 5 4 in.Many of the Restoration Millwork profiles are narrowerand lighter than trimboards, making it difficult to followthe recommended fastening schedule. When applyingsmaller profile pieces like Base Cap, Quarter Round, DripCap, Shingle Mould, Bed Mould, Lattice, or #356 Casing,you can use a shorter and/or thinner gauge fastener, suchas a 4d finish nail, to apply the profiles. You may have topre-drill the profiles, and CertainTeed recommends usingadhesives or glues to provide additional holding power. Using the Cortex setting tool, set the Cortex fastenersperpendicular to the trimboard, spaced a maximumof 16 in. O.C. Using a standard 18V cordless impact drill, drive thefastener to the pre-set level below the trim surface. Place the PVC trim plug into the hole with thetrim-surface-side up, and gently tap until it is flush withthe trimboard. To ensure a strong bond, make sure thecored hole is free of dirt or rain water.General Fastening Guidelines for Cortex For horizontal trimboards more than 12 in. wide, use4 Cortex fasteners at every framing member, rafter tail,or wall stud. If the board is 6 in.–12 in. wide, use 3 Cortex fasteners.Touching Up Fastener HolesFasteners driven beyond the surface of RestorationMillwork boards can leave unsightly holes in the finishedproduct. To touch up small holes in Restoration Millwork,we highly recommend using Extreme PVC Trim Welder Nail Eraser. For best results be sure to follow instructionson package. You can also use caulking or glue productsdesigned for use with cellular PVC millwork to touch upholes, but they may create less than desirable results,weather poorly, or collect dirt over time. If the board is less than 6 in. wide, use 2 Cortexfasteners. Fasten within 2 in. of the end of each board. If youmust fasten within 3/4 in. of the end of the board, usea 3/16 in. drill bit to pre-drill pilot holes. For more information on the Cortex ConcealedFastening System and installation with RestorationMillwork, visit www.certainteed.com/trim and search for"Cortex".4
Bonding, Adhesives and JoineryRakes, Fascias and BandboardsGluing Restoration Millwork to RestorationMillwork or Other PVCUse an adhesive designed for use with cellular PVC trimto bond all scarf and miter joints. To bond joints suchas corners, window surrounds, and long fascia runs,we recommend Extreme PVC TrimWelder or Partite 7315and 7333.For best results, create a scarf joint by cutting a taperon the end of the trim pieces. Gluing the joints betweenthe trim pieces will help eliminate separation caused byexpansion and contraction. Place fasteners on both sidesof the scarf joint. This will help minimize expansion andcontraction. Allow 1/4 in. per 18 ft. of product for expansion andcontraction. Allow 1/8 in. at each end of a long run. When you apply trim that is less than 6 in. wide, usetwo fasteners. For trim 6 in. to 12 in. wide, use threefasteners. Trim wider than 12 in. requires four fasteners.Miter Joint (Front View)Scarf Joint(Top View)Fastener3/4 in.Fastener Fasteners must penetrate the substrate a minimumof 1-1/2 in.Fascia with Return Leg3/4 in.Apply adhesive hereNote: Two Fasteners each sideYou can also miter pieces using a Kreg Jig(www.kregtool.com). A Kreg Jig allows you to join twopieces of Restoration Millwork trim by drilling a hole at anangle into one piece of trim and connecting it to anotherwith a self-tapping screw. Before you attempt to glue Restoration Millwork surfaces,make sure the surfaces are clean, dry, and in completecontact. Scarf joints work well when gluing long runs. PVC cement and other solvent-based adhesives havedifferent working times, which vary from productto product. To allow sufficient time for a full cure,mechanically fasten the joint on each side staying 3/4 in.away from the edge of the joint. To ensure complete curing, make sure the gluedpieces are kept clean and adequately ventilated. Thisis particularly important when bonding large panelsface-to-face as inadequate ventilation of solvents caninterfere with proper bonding.ProTip : Always apply adhesives to Restoration Millworkfollowing the adhesive manufacturer's recommendedapplication instructions. Press together to get superior bond.Bonding to Other SurfacesRestoration Millwork can also be bonded to a variety ofsubstrates. We recommend OSI TRIMTeQ TeQ Mount Mounting Adhesive or Loctite PL Premium PolyurethaneConstruction Adhesive. Specific substrate combinationsrequire specific adhesives: contact cement, epoxy, rubberbased adhesives, or urethane-based adhesives.Use the proper cement for each substrate. Always followthe adhesive manufacturer’s instructions, and check thebond on a test piece before proceeding with theinstallation. Also, be aware of the temperature and humidity,as they can affect the performance of the adhesive.Note: Never use adhesives alone to fastenRestoration Millwork to a substrate.5The CertainTeed Restoration Millwork Fascia trimboard withbuilt in return leg is designed to workwith a wide range of soffit materials. Itsone-piece design eliminates installing aJ-Channel and gives a cleaner look byhiding end fasteners and cut edges.When using Restoration Millwork Fasciawith Return Leg, soffit is installed normally.1. Install soffit material according to manufacturer’s requirements.Return Leg2. Loosely butt Restoration Millwork frieze board up tosoffit material.3. Measure and cut height of fascia board to size allowing forenough overhang for the return leg to accommodate thethickness of the soffit material.4. Install fascia board to subfascia board (minimum 2 Xthickness) apply 3 fasteners 16 in. on center across thelength of the board. Fasteners should be either 8D finishnails with a minimum 2-1/2 in. length or #8 trim screwswith a minimum 2-1/2 in. length. Return leg does not needto be fastened to subfascia board.For a clean finished look use CertainTeed’s Cortex HiddenFastening System (includes screws, plugs and settingtools) that conceal fastener heads, offering a fast andsimple alternative to face-nailing.Soffit and Porch CeilingsRestoration Millwork must not be used in load-bearingapplications, but it may be used in spanned applicationssuch as soffit and ceilings.Before you install Restoration Millwork as a soffit, reviewand comply with all local building codes and regulationsregarding wall construction, including the proper use ofsheathings, framing, weather resistant barriers, flashings,ventilation requirements and other building materials andsystems. Irregularities in framing may be visible in thefinished application. To minimize the effect of unevenwalls, shim the wall as necessary.
Apply a high quality construction grade polyurethaneadhesive (OSI TRIMTeQ TeQ Mount MountingAdhesive or Loctite PL Premium PolyurethaneConstruction Adhesive) on all joists and/or structuralsheathing prior to application of Restoration Millwork.FasciaNails If you are going to use H-channels at the miteredcorners, nail the H-channel to the 2x blocking and slidethe cut soffit into it. Cut the soffit 1/8 in. shorter than theH-channel to allow for expansion and contraction.Soffit Proper attic ventilation is important for any home.The 2009 International Building Code (IBC)Section 1203 Ventilation furnishes a basic guide fordetermining proper ventilation forany home. When using RestorationMillwork in a soffit or ceilingapplication the space above mustbe properly ventilated. Determinethe amount of ventilation requiredWP4 /for your project and installNickelgapadequate soffit vents accordingly.Spanning Schedule for Soffits and Porch CeilingsProductMaximum Span(Porch Ceiling/Soffit)BeadBoard Tongue & Groove,2TL & 3TL12 in.BeadBoard Panel16 in.Sheets(Minimum 1 in. nominal,3/4 in. actual thickness)24 in.WP4/NickelgapTongue & Groove16 in. Fasten the soffit no closer than 3/4 in. from the sideedge, from the butt end, and from the corner. Space thefasteners every 12 in. along both the front and back edge. The butt ends should be in contact, fastened atcorresponding ends, and supported by framing.Expansion Joints for Soffit andPorch Ceiling ApplicationsWhen Restoration Millwork sheets, Beadboard, Beadboard2TL or 3TL, or Beadboard panels must be butted togetherto cover larger soffit or porch ceiling areas, leave spacebetween the pieces to allow for expansion and contraction.The gaps that result from these expansion joints can becovered with a T-bar — fashioned from Trimboards —for a cleaner look that will also hide the small amountof expansion and contraction that may occur. The T-baris attached to framing with trim nails (no glue) so that thesheets or panels can move freely above it. (See “ConcealingExpansion Joints” on page 15 for more details.)Ceiling joistCeiling panelT-barCeiling panelCeiling and soffit applications must not exceed themaximum span without installing blocking or providingadditional support by using a minimum 1/2 in. structuralsheathing such as plywood or OSB. When applied as soffit, Restoration Millwork sheetsshould be applied to structural framing members spacedno more than 24 in. O.C. with the longest dimensionperpendicular to the framing. If the temperature is 40 F or below at the time ofinstallation, do not span Restoration Millwork beyond12 in. In any case, do not span Restoration Millwork morethan 24 in. Nail a 2 in. x 2 in. (minimum) nailer board along the wall,with the bottom edge of the nailer board level with thebottom edge of the fascia. At every butt joint of the soffit, back up the joint with2x framing going from the fascia back to the wall. If thesoffit corners are going to be mitered, nail 2x blockingfrom the corner of the fascia to the corner of the wall.6
Corners Use a flat solid surface thatsupports the corner.One-piece Outside CornersRestoration Millwork one-piece corners come in bothsmooth and TrueTexture woodgrain finish; in two widthoptions, 4 in. (3-1/2 in. actual) and 6 in. (5-1/2 in. actual);and with or without a built-in J-pocket. All styles are 5/4in. (1 in. actual) thick, natural white and available in 10 ft.and 20 ft. lengths.1. Flash the corners of the structureby bending a 20 in. piece of trimcoil 90 so you have two 10 in.legs. Cover the entire height ofthe corner, lapping the upperpieces of the flashing over thelower piece.3/4 in.3/4 in.2. Position the corner with thetop spaced at least 1/8 in. fromthe underside of the eave. Thedistance from the top of thecorner to the underside of theeave depends upon the lengthof the corner. Allow 1/4 in. forexpansion for every 18 ft. ofcorner. Leave the bottom of thecorner 3/4 in. below the starterstrip if you will be installing vinylsiding, and trim to length.3. Make sure the corner is straightand true before nailing. If the flange slides freely in the grooves, insert a screwthrough the back side of the flange and into the cornerpiece near the top, making sure the screw doesn’tprotrude through theexposed face. One screw perflange should be sufficient.To install one-piece cornerswith attached nail hem flanges:1-1/2 in.1-1/2 in.Nail Hem Flange for One-Piece CornerThe grooved design incorporated into Restoration Millworkone-piece outside corners accommodates traditional facenailing methods. However, for a cleaner installation option,use Restoration Millwork PVC nail hem flange inserts,which feature molded protrusions that fit directly into thegrooves of the corner piece. The flanges provide hiddenattachment points for securing the corner piece tightly tothe wall. With no nail holes to fill, corners can be finishedmore quickly and neatly.7 To fully seat the flangein the groove, place apiece of scrap RestorationMillwork or wood atop theflange and gently hammerit, working down the lengthof the flange and ensuringit is fully seated into thegrooves. The scrap pieceshould be taller than theadjacent edge of thecorner piece to preventdamaging it. Do NOT hammer directlyon the flange.4. On J-pocket corners andtrimboards, the pocket comesback 3/4 in. from the edge of theboard. Do not nail through the J-pocket opening. Holdthe fastener back 3/4 in. from the inside of the J-pocketopening. This means you will be fastening the corner/trimboard 1-1/2 in. from the edge of the board (3/4 in.for pocket 3/4 in. for holdback 1-1/2 in.).Nail hem flanges are 9 ft. 11-3/4in., so two are needed for eachside of a 20 ft. one-piece corner.Space flanges 1/2 in. apart to allowfor expansion and contraction. Toassemble corner and flanges: Insert flange into groovestarting from one end. DO NOT NAIL. Fasteners must benoncorrosive, self-tapping,pan head or washer headscrews, or oval head withcountersunk washer screwsat least 1-1/8 in. long, with atleast 5/16 in. diameter headand 1/8 in. diameter shaft.Figure A DO NOT SCREW TIGHT.Leave 1/16 in. between thescrew head and nail flangeto allow for expansion andcontraction. Position the uppermostscrew at the top of the nailslot (Figure A). All remaining screws must bepositioned in the middle of thenail slots (Figure B).Figure B Install screws every 12 in. to 16 inProTip : If the cornerpost is to be installed on top of a flushsurface such as masonry, skirtboard or any other ledge,leave a -1/4 in. - 1/2 in. gap at the top and bottom to allowfor expansion.
Packing out Trimboards to Create a J-pocketCedarBoards If you are using a siding product likeInsulated siding, which requires a 1-1/4 in. pocketheight, you may have to pack out Restoration Millworktrimboards to achieve the desired pocket size. CertainTeedrecommends using a low-maintenance, durable packingmaterial like Restoration Millwork to avoid potential futuredecomposition.b. M AXIMUM PACKING MATERIAL WIDTH:The maximum width of the packing material can beno more than the width of the covering trimboardminus the desired pocket depth (e.g. when usinga 4 in. trimboard requiring a 1 in. pocket depth thepacking material must be no more than 3 in. wide).5. A pply packing material, then install covering trimboardsover packing material. Use appropriate length fastenersfor both packing material and covering trimboards thatallows the fastener to penetrate through the substrateand into a framing member a minimum of 1-1/2 in.Two-piece Outside CornersTo fabricate your own corner, miter or butt the trimboardstogether and seal the joint with a PVC adhesive likeExtreme PVC TrimWelder or Partite 7315 and 7333. PVCadhesives have a very short open time, so when gluingPVC trim, do not apply the adhesive until you are ready tobring the two pieces together.TrimboardOutside CornerTo properly pack out Restoration Millwork trimboardsplease follow the instructions below:1. D etermine the required pocket depth for expansion andcontraction (e.g. CertainTeed 12 ft. 6 in. vinyl siding is 1 in.).2. Determine the required pocket height necessaryto accommodate the butt edge of the siding beinginstalled (e.g. Monogram is 3/4 in.). (NOTE: Often timesthe easiest way to make this determination is to refer tothe manufacturer’s product guide showing the depthsand widths of J-Channel pockets.)3. T o determine the thickness of the packing materialrequired behind your trimboard to achieve desiredpocket height, use the required pocket heightmeasurement from step 2 above (e.g. if sidingchoice requires a 1-1/4 in. pocket height the packingmaterial could be made from the Restoration MillworkCustomCraft trimboard). If you plan to use theJ-pocket of a pre-routed trimboard or corner, deductthe height of the existing J-pocket from your desiredpocket height measurement to determine the requiredpacking material height (e.g. if siding requires a 1-1/4 in.pocket height and you are planning to use a5/4 in. corner with J-pocket, you would also require a1/4 in. thick piece of packing material).4. P acking material has a minimum and maximum widthbased on the size of the covering trimboard beingapplied over it and the desired pocket depth necessaryto accommodate the siding product. For butted joints, apply adhesive to the end of the trim,and fasten the corner pieces together. Use a fastenerthrough the butt every 16 in. Let the corner cure, andinstall as described for one-piece corners. For mitered corners, assemble the corner beforeinstalling it. Cut the miter angles, apply adhesive tothe length of the miter, and fasten the corner piecestogether. Let the corner cure and install as described forone-piece corners.ProTip : If building a butted corner, the piece that buttsagainst should be installed on the less visible wall to hidethe joint line.Butteda. M INIMUM PACKING MATERIAL WIDTH:The minimum width of the packing material can be noless than 50% of the width of the covering trimboard(e.g. when using a 4 in. trimboard the packingmaterial must be no less than 2 in. wide).Mitered8
SkirtboardRestoration Millwork skirtboard is used as a startingcourse for fiber cement siding; when transitioning fromlap siding to shingle siding; and at transition points suchas horizontal wall-to-roof intersections (frieze board),masonry-to-siding intersections, and where fiber cementsiding meets decks and patios. Restoration Millworkskirtboard’s DualStart reversible feature providesdesign flexibility — CertainTeed’s exclusive TrueTexture woodgrain finish on one side, a smooth finish on the other,with top and bottom edges identically beveled.CuttingCut Restoration Millwork skirtboard with a conventionalcarbide-tipped wood-working blade. Do not use fine-toothmetal-cutting blades.Expansion and Contraction Allow 1/4 in. per 18 ft. of product for expansion andcontraction (1/8 in. at each end). Use 30º to 45º scarf joints to minimize seams and allowexpansion and contraction. Glue scarf joints between the pieces to help controlseparation caused by expansion and contraction.Gluing the joints moves the expansion and contractionout to the ends. Be sure to fasten both sides of the joint.Fastening Use stainless steel or hot-dipped galvanized fastenersdesigned for wood trim and cladding. For best results,use fasteners with thin shanks, blunt points, and fullround heads. Standard pneumatic nailers work well, generally at apressure between 70 psi and 100 psi, depending uponthe type of gun, the type of nail, the a
4 Cortex Concealed Fastening System Many of the Restoration Millwork profiles are narrower The Cortex Concealed Fastening System is designed for use with Restoration Millwork trimboards with actual thicknesses of 5 8 in. to 5 4 in. Using the Cortex setting tool, set the Cortex fasteners perpendicular to the trimboard, spaced a maximum