Transcription
RMSify User GuideRMSify: User GuidePage 1 of 117Version 6.0.0
RMSify User GuideVersion 13/01/201725/07/2018NotesFirst EditionRelease EditionVersion 2 Functionality, Windows 8Version 3 FunctionalityVersion 4 Functionality, JSONConversionSEO Meta tags, Image Alt TagsVersion 5 new features, Responsivecheckout supportRebrandedWeb Order processing updateInventory ChangesWritten ByMWMWMWMWMWApproved ByCB, KCKCMWMWMWSSSSPrerequisites A Shopify web store has already been registered and is configured with a payment gateway.For further information please see the Shopify – Getting Started guide.Microsoft Dynamics RMS Version 2 is installed and configured with a valid SQL databaseRMSify has been installed to Shopify, downloaded to the RMS system, and installed andconfigured with the RMS database. For more information see the RMSify – InstallationGuideIt is assumed the reader has some knowledge of RMS and how it works. This is not designedto be an RMS user manual.It is assumed some basic knowledge of Shopify has been learned. For further help seehttp://www.shopify.comSupport for RMSify is provided only for installation, configuration and synchronisation ofRMSify by email only: support@k3retail.com. If you would like K3 Retail to provide supportfor RMS and/or Shopify, please contact 44 1675 463032 or emailcoleshill.support@k3retail.comSupport does not ever cover themes, search engine optimisation, or web marketing tipsSystem Requirements .NET Framework 4.61gb RAM (2gb Recommended)User must have windows administrator privilegesWindows 7 Pro or Windows 8 Pro, Windows 10Microsoft Dynamics Retail Management System 2.0Page 2 of 117Version 6.0.0
RMSify User GuideContentsVersion Control . 2Prerequisites . 2System Requirements . 21. Introduction . 61.1. Login . 82. Overview . 92.1. Menus . 102.2. Status . 112.3. Log . 122.4. Sync Section . 132.5. To Shopify . 142.6. From Shopify . 152.7. Sync Buttons . 162.8. Go To Webstore . 172.9. Choose Web Store . 182.10. Web Orders . 192.11. Get Web Orders . 212.11.1 Apply Date Range . 212.12. Print Pick List . 232.13. Complete Order . 242.14. RMSify Quick Process . 243. Configuration . 253.1. HQ . 273.1.1. Sync Data. 273.1.2. Web Store . 283.1.3. Resend Settings . 283.2. Shopify API . 293.2.1 Shop Location. 293.3. Shopify Settings. 303.4. Tender Settings . 313.5. Product Field Mappings . 323.5.1. SKU . 333.5.2. Product Title . 33Page 3 of 117Version 6.0.0
RMSify User Guide3.5.3. Description . 333.5.4. Product Type . 343.5.5. Product Vendor . 343.5.6. Selling Price . 353.5.7. Weight . 353.5.8. Compare At Price . 353.5.9. Variant 1, 2 and 3 . 373.5.10. Tags . 383.5.11. Picture . 383.5.12. Picture Alt Text. 393.5.13. Collection . 393.5.14. Barcode . 403.6. Customer Field Mappings . 413.7. Rules . 423.7.1. Track Inventory . 423.7.2. Out of Stock. 433.7.3. Use Inventory Levels . 433.7.4. Charge Taxes . 433.7.5. Require Shipping Address . 443.7.5. Automatic RMS Sale Pricing . 443.7.6. Split Matrix by Dimension 1 . 453.7.7. Use Variant Images . 473.7.8. Bypass Shopify Fulfilment . 473.7.9. Bypass Tracking Number . 483.7.10. Create Out Of Stock Variants . 483.7.11. Rule Overrides. 483.7.12. Bypass RMS Basket Validation . 493.7.13 Shipping. 503.9. Web Order Receipt . 513.9. Custom Fields . 543.9.1. RMS Fields . 553.9.2. Shopify Meta Fields . 564. Synchronisation. 594.1. Status Bar . 60Page 4 of 117Version 6.0.0
RMSify User Guide4.2. Log . 614.3. To Shopify . 634.4. From Shopify . 654.5. Images . 674.6. Product Visibility . 704.7. Stock Update . 714.8. Scheduled Stock Update . 724.9. Multiple Web Stores . 734.9.1. Add a Web Store . 744.9.2. Editing a Web Store . 754.9.3. Delete a Web Store . 754.9.4. Synchronising Product Data . 754.9.5. Stock Update . 754.9.6. Scheduled Stock Update . 754.9.7. Processing Web Orders . 764.9.8. Go To Webstore . 764.10. Web Item Filter . 774.11.1. Web Stores . 784.11.2. Filter Tabs . 784.11.3. Filter Script . 794.11.4. Buttons . 794.11. Tools . 804.11.1. Scheduled Stock Update . 804.11.2. Multiple Web Stores . 804.11.3. Web Item Filter . 804.11.4. Custom Fields . 804.11.5. Quick Editor. 804.11.6. Print Logs. 804.11.7. Delete All Custom Collections . 804.11.8. Delete All Images . 805. Web Orders . 825.1. Get Web Orders . 855.2. Customers . 875.3. Print Picking List . 89Page 5 of 117Version 6.0.0
RMSify User Guide5.4. Complete Orders . 905.4.1 Order Discounts . 915.4.2. Sales Tax . 925.4.3. Shipping. 935.4.4. Process Order . 945.4.5. Tracking Number. 955.4.6. Customer Notifications . 955.5. Quick Process . 966. Quick Editor. 966.1. Filter . 986.2. Data Grid . 996.3. Columns to Display. 1006.4. Data Editing . 1016.4.1. Enter Data Manually . 1016.4.2. Apply To A Range . 1036.4.3. Apply to Matrix/Dimension1/Column . 1046.4.4. Apply Formula . 1056.4.5. Text Functions . 1076.5. Save . 1127. Automated Product Sync . 112Appendix A: Link Directory . 115Appendix B: Payment Gateways . 1161. IntroductionRMSify is an add-in developed and supported by Retail Technology Ltd, and is designed to provide afull integration between Microsoft Dynamics RMS, and the popular eCommerce platform, Shopify.The add-in must be installed through the Shopify App Store, and you must have a valid Shopifyaccount in order to install it. It’s easily found by searching for “RMSify” at http://apps.shopify.comThe software itself is a single installer which can be used anywhere in the RMS estate. There are nodifferent installers for Headquarters, Store or POS as there are with other integrated solutions. It’sone simple package which can be installed wherever you need to run it. The package consists of 2components. RMSify Sync – This is the application which synchronises your product data between RMSand Shopify, and is also where all settings are configured. RMSify Sync can eitherPage 6 of 117Version 6.0.0
RMSify User Guidesynchronise data from RMS to Shopify, or the other way round – from Shopify into RMS. Thiscan be run on a Store Operations database or a Headquarters database and it willautomatically detect which it is and behave accordingly. This is usually operated from a“Back office” computer. RMSify Web Orders – This is the application which runs on the till and allows the process ofShopify Web Orders through the RMS POS interface. It retrieves outstanding orders fromShopify to allow a “Picking List” to be printed to your receipt printer. Once picked, it importsthe order as a standard POS transaction and allows you to tender the transaction as perRMS. It then notifies Shopify that the order has been shipped. It can only be launchedthrough a Custom POS Button and therefore can only be run on an RMS Point of Sale.As already discussed, RMSify can be used in Store Operations and Headquarters, or a combination ofboth. Here are the supported topologies which you can deploy RMSify to. Standard Headquarters – This scenario is when product data is synchronising from theHeadquarters database. All web orders must be processed through an RMS POS, and youmust choose which store is going to be used to process your web orders. You can optionallychoose which “on hand” figures you want to use in Shopify – Either the quantities from thestore you selected as your web store or the total of “on hand” quantities from all of yourstores. In this scenario, it is not possible to run Sync and Web Orders on the same physicalcomputer. Store Only Headquarters – This scenario is when your store is part of an RMS Headquarterschain, but product data and web orders are all processed through a single store as part ofthat chain. This is not recommended, as any product data amended at store level is liable tobe overwritten by an RMS Headquarters Worksheet. In this scenario, only local storeinventory data is used for your Shopify inventory levels. Single Store – This scenario is when you have only one RMS store. Both RMSify Sync andRMSify Web Orders run from the single store database.Page 7 of 117Version 6.0.0
RMSify User Guide1.1. LoginUpon launching RMSify, you will be presented with a Login screen as shown below.The RMSify Login makes use of the usernames and passwords you already use in RMS.If it is installed to a Headquarters database, you would log in using the credentials used forHeadquarters Manager. The Headquarters user must have “Administrator Rights” to be able to usethe application on a Headquarters database.If it is installed to a Store Operations database, you can use the credentials you enter to access StoreOperations Manager or Point of Sale. The user must have “Manager Rights” in order to run theapplication for a Store Operations databaseIf you do not want to be prompted to log in each time you run the application, check the Do not askme to log in again box.Page 8 of 117Version 6.0.0
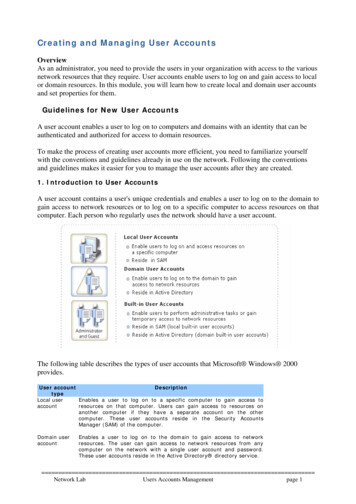
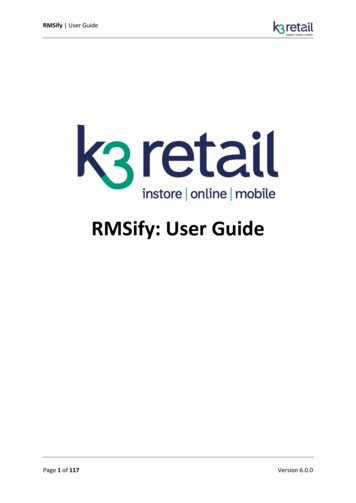
RMSify User Guide2. OverviewRMSify can be launched from the Start Menu through Start All Programs Retail Technology Ltd RMSify, or if you are using the standard RMS addins path, it will be accessible through Utilities Addins RMSify in Store Operations or Headquarters Manager.These will always launch the main RMSify application, which is known as RMSify Sync and is shownbelow.123498567Additionally, there is an application called RMSify Web Orders, and can only be opened through a“Custom POS Button” on the POS. This button is automatically created upon the launch of RMSifySync. This is shown below.1011Page 9 of 1171213Version 6.0.0
RMSify User Guide2.1. MenusThe menus allow you to access various tools and functions within the application.File Database SettingsFile ExitOptions SettingsOptions Backup DatabaseOptions Require LoginUpdates Check For UpdatesTools Scheduled Stock Up Tools Multiple Web StoresTools Web Item FilterTools Custom FieldsTools Quick EditorTools Print LogsTools Delete All Custom Tools Delete All ImagesHelp AboutHelp Read ManualHelp Send LogsHelp Support ForumPage 10 of 117This will let you switch between RMS databasesThis will exit the applicationThis will take you to the settings screen to configure the softwareThis will backup the database the application is usingThis will toggle if you are required to log in to the app or notThis will update the software to the latest versionThis will allow you to schedule an automatic stock quantity updateThis is where you configure RMSify to update multiple web storesThis is where you can filter what items get published to the webThis is where you define custom fields to extend your databaseThis is where you make quick wholesale changes to your databaseThis will print the log from the user interface to help troubleshootThis will delete all custom collections from your Shopify storeThis will delete all images from your Shopify storeThis will tell you the software’s current version numberThis will open this user guide (PDF Reader required)This is used by K3 support if we need to troubleshoot the softwareThis is a link to our support forum to get free help with the softwareVersion 6.0.0
RMSify User Guide2.2. StatusThe status bar shows you the current sync status of the application.When Idle (As above) or complete, you can Sync data.Whilst data syncing is in progress, you will see a progress bar for each section of the sync that it hasto perform. Each of these are detailed later in the user guide.Page 11 of 117Version 6.0.0
RMSify User Guide2.3. LogThe log section of the screen shows you useful information about the sync process, allowing you tosee exactly what is happening during data synchronisation.If you double click an error in the log, it will show you the full details of the error, which can often bemuch more helpful when deducing the cause of the issue or warning.If you need to send these log files to K3 for analysis, then use the Help Send Logs menu.Page 12 of 117Version 6.0.0
RMSify User Guide2.4. Sync SectionThis area lists the different Shopify fields which RMS can sync with. These make use of the fieldmappings which are defined in the configuration. At any time you can see what field is mapped to itby hovering the pointer over the field name.Page 13 of 117Version 6.0.0
RMSify User Guide2.5. To ShopifyThis column allows you to pick which fields you want to update in Shopify when you press the Syncbutton. It will only update fields in Shopify which have a check in the box.Cells which are shaded out are “required” fields that you can not toggle, so will always synchronisewith Shopify.Page 14 of 117Version 6.0.0
RMSify User Guide2.6. From ShopifyThis column allows you to synchronise data back from Shopify into RMS when you press the syncbutton. It is designed so that you can make the most of Shopify’s WYSIWYG editor and apply richformatting to your product description and product pages.Cells which are shaded out are “required” fields that you can not toggle, so will always synchronisewith Shopify.Page 15 of 117Version 6.0.0
RMSify User Guide2.7. Sync ButtonsWhen one of the relevant Sync buttons is pressed, data will be syncronised between RMS andShopify in the direction that you choose. Only fields which have a check in the box will besynchronised.They will only synchronise new or changed data.Page 16 of 117Version 6.0.0
RMSify User Guide2.8. Go To WebstoreThis button takes you directly to the administration area of your Shopify web store. You will stillneed to log in using your registered username and password.If you are using the Multiple Web Stores feature, the button will take you to the administration pageof the webstore selected in the Sync drop down box.Page 17 of 117Version 6.0.0
RMSify User Guide2.9. Choose Web StoreIf you are using the Multiple Web Stores feature, then the Sync screen has a drop down box listingthe web stores you have configured.Pressing the Sync button will sync data for the web store selected in this box only.Page 18 of 117Version 6.0.0
RMSify User Guide2.10. Web OrdersThis section lists all of the web orders which have been downloaded to RMS and are awaiting pickingand processing. With an order selected you can perform a task with the buttons at the bottom of thescreen.Order NameOrder DateRMS Customer NameShopify Billing NameOrder ValueStatusRiskThe Shopify order name downloaded (Usually an order number)The date the order was created on ShopifyThe name of the RMS customer that the order is forThe name of the customer downloaded from ShopifyThe total value of the order (Including shipping)If the order has been picked or notIf the order is at risk of being fraudulent it will show a yellow iconThe RMS Customer and Shopify Billing Name can be different. The Shopify Billing Name isthe name of the customer as entered into the web order. When downloading web orders,it associates the order with the RMS customer which has a matching Account Number orEmail Address.Any cashier which needs to process web orders must have the permission to alter taxstatus in their RMS cashier rights. For more information about this, please contact yourRMS support partner.Page 19 of 117Version 6.0.0
RMSify User GuidePage 20 of 117Version 6.0.0
RMSify User Guide2.11. Get Web OrdersPressing this button will retrieve all “Open” web orders in groups of 20 from your Shopify web store,where a pay
Microsoft Dynamics RMS Version 2 is installed and configured with a valid SQL database RMSify has been installed to Shopify, downloaded to the RMS system, and installed and configured with the RMS database. For more information see the RMSify - Installation Guide It is assumed the reader has some knowledge of RMS and how it works.